https://github.com/nuvious/quicc
A covert channel demonstration using the Connection ID header in the quic protocol.
https://github.com/nuvious/quicc
covert-channel cybersecurity cybersecurity-tool decryption encryption encryption-decryption quic
Last synced: 9 months ago
JSON representation
A covert channel demonstration using the Connection ID header in the quic protocol.
- Host: GitHub
- URL: https://github.com/nuvious/quicc
- Owner: nuvious
- License: bsd-3-clause
- Created: 2024-07-09T03:43:47.000Z (almost 2 years ago)
- Default Branch: main
- Last Pushed: 2025-01-15T21:15:49.000Z (over 1 year ago)
- Last Synced: 2025-01-18T21:39:40.948Z (over 1 year ago)
- Topics: covert-channel, cybersecurity, cybersecurity-tool, decryption, encryption, encryption-decryption, quic
- Language: Jupyter Notebook
- Homepage:
- Size: 27.6 MB
- Stars: 4
- Watchers: 2
- Forks: 1
- Open Issues: 11
-
Metadata Files:
- Readme: README.md
- License: LICENSE
Awesome Lists containing this project
README
# QuiCC Covert Channel Demo
## Overview
Covert channels are means of transmitting information in a clandestine way that
are not observable by a passive warden and are resistant to intercept or
disruption by an active warden.
This covert channel is implemented using the quic protocol defined by
[RFC 9000](https://datatracker.ietf.org/doc/html/rfc9000) and
[RFC 9369](https://datatracker.ietf.org/doc/html/rfc9369/) by exploiting high
entropy header fields. In this implementation the connection id field is
specifically targeted with future work to utilize other high-entropy header
fields.
## Video Demonstration
### ShmooCon 2025 Talk - On Covert Channels using Quic Protocol Headers
[](https://www.youtube.com/watch?v=JnbYzd9nriw)
### Initial Video Demonstration Jul, 2024
[](https://www.youtube.com/watch?v=5oHfefoECCE)
NOTE: In the above demo the RSA bit strength is set to 1024. This was done only
to speed up implementation and debugging execution during development of the
project. The implementation at time of writing [defaults to 4096 bit RSA](https://github.com/nuvious/aioquic/blob/fe7c293e1822babcc7fcafbb7658e145d9cc02dd/src/aioquic/quic/connection.py#L118).
## Running in Docker
First build the container:
```bash
sudo docker build -t quicc .
```
Next create a network:
```bash
sudo docker network create quicc
```
Next run the server:
```bash
sudo docker run --rm -it --name quicc --network quicc quicc \
python3 http3_cc_server.py \
--certificate aioquic/tests/ssl_cert.pem \
--private-key aioquic/tests/ssl_key.pem
```
Finally run the client:
```bash
sudo docker run --rm -it --network quicc quicc \
python3 http3_cc_client.py \
--ca-certs aioquic/tests/pycacert.pem \
wss://quicc:4433/ws
```
### Clone the repository and initialize submodules
```bash
git clone --recurse-submodules https://github.com/nuvious/QuiCC.git
cd QuiCC
```
### Install Requirements
For the HTTP server and client examples provided by the aioquic library, the
requirements are not included in the package dependencies so we have to install
them manually.
```bash
sudo apt install build-essential libssl-dev python3-dev
pip3 install aioquic/ dnslib jinja2 starlette wsproto
```
### Start the server
```bash
python3 http3_cc_server.py \
--certificate aioquic/tests/ssl_cert.pem \
--private-key aioquic/tests/ssl_key.pem
```
### Start the client
```bash
python3 http3_cc_client.py \
--ca-certs aioquic/tests/pycacert.pem \
wss://localhost:4433/ws
```
NOTE: If running the client and server on separate hosts, replace `localhost`
with the DNS entry; in this example `quicc.local`.
### Send commands
On both the client and server you should be presented with this prompt:
```bash
Welcome to the QuiCC console.
Enter 'm:[MESSAGE]' to send a message.
Enter 'c:[COMMAND]' to send a remote command.
Enter 'f:[FILE]' to send a file.
Enter 'k' to send a keepalive message to recieve responses.
Enter 'q' to quit.
Enter your command:
```
### Send a message
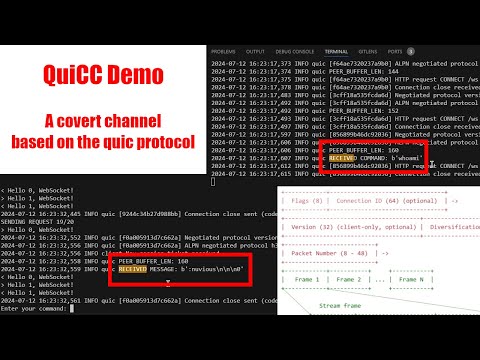
Typing a command `m:hi` should produce the following output on the server
logs:
```bash
2024-07-12 01:06:01,587 INFO quic RECEIVED MESSAGE: b'hi'
```
### Send a file
Typing a command `f:test_file.txt` should result in the following output on the
server logs:
```bash
RECEIVED FILE SAVED TO: ::ffff:127.0.0.1-message-1.bin
```
The `::ffff:127.0.0.1-message-1.bin` should hold the contents of test_file.txt
### Send a remote command
Typing a command `c:whoami` should result in the following output on the
server logs:
```bash
2024-07-12 01:11:09,287 INFO quic RECEIVED COMMAND: b'whoami'
```
At this point stdout and stderr will be queued to be sent back but we need
to send requests to get CIDs sto decrypt the output. To do this simply use
the command `k` and a keep-alive message will be sent and the result of
the command should appear in the client logs:
```bash
2024-07-12 01:12:44,387 INFO quic RECEIVED MESSAGE: b':nuvious\n\n\n0'
```
## Running on separate hosts
If you're running the server on a separate machine, you'll need to change out
the example key and cert used by the server to ones that match your server
host domain. You'll need to add a entry to the dns record for the ip used; in this
case I used `quicc.local`.
On the server run the below in the root of the project:
```bash
openssl genrsa -out ca-key.pem 4096
openssl req -new -x509 -days 365 -key ca-key.pem -out aioquic/tests/pycacert.pem -subj '/CN=QuiCCA'
openssl genrsa -out aioquic/tests/ssl_key.pem 4096
openssl req -new -key aioquic/tests/ssl_key.pem -out csr.pem -subj '/CN=quicc.local' -nodes
openssl x509 -req -in csr.pem -out aioquic/tests/ssl_cert.pem \
-CA aioquic/tests/pycacert.pem -CAkey ca-key.pem -CAcreateserial -days 3650 \
-extfile <(printf "subjectAltName=DNS:quicc.local\nkeyUsage=digitalSignature,keyEncipherment\nextendedKeyUsage=serverAuth,clientAuth\nbasicConstraints=CA:FALSE\nsubjectKeyIdentifier=hash\nauthorityKeyIdentifier=keyid,issuer\nauthorityInfoAccess=caIssuers;URI:http://testca.pythontest.net/testca/pycacert.cer,OCSP;URI:http://testca.pythontest.net/testca/ocsp/\ncrlDistributionPoints=URI:http://testca.pythontest.net/testca/revocation.crl")
```
You'll then need to copy over the `pycacert.pem` and replace the
`aioquic/tests/pycacert.pem` file with it on the client machine.
## Known Issues
Known issues for this implementation of the covert channel are documented in
the Github Issues section of this repository. If you find a vulnerability in
this project related to intercept, disruption or denial of service that may
be mitigated, feel free to open up an issue and/or contribute to the project.