https://github.com/ollionorg/packer-gcp-custom-image
https://github.com/ollionorg/packer-gcp-custom-image
Last synced: 25 days ago
JSON representation
- Host: GitHub
- URL: https://github.com/ollionorg/packer-gcp-custom-image
- Owner: ollionorg
- Created: 2021-12-09T20:21:52.000Z (almost 4 years ago)
- Default Branch: master
- Last Pushed: 2021-12-09T20:22:37.000Z (almost 4 years ago)
- Last Synced: 2025-04-12T23:47:01.835Z (6 months ago)
- Language: PowerShell
- Size: 73.2 KB
- Stars: 0
- Watchers: 22
- Forks: 0
- Open Issues: 0
-
Metadata Files:
- Readme: README.md
Awesome Lists containing this project
README
# packer-gcp-custom-image
[Originally](https://github.com/GoogleCloudPlatform/community/tree/master/tutorials/create-cloud-build-image-factory-using-packer) crafted by Injae Kwak
Updated by David Cunliffe | Senior Cloud Consultant | 2nd Watch
Contributed by Google employees and modified by 2nd Watch for clarity.
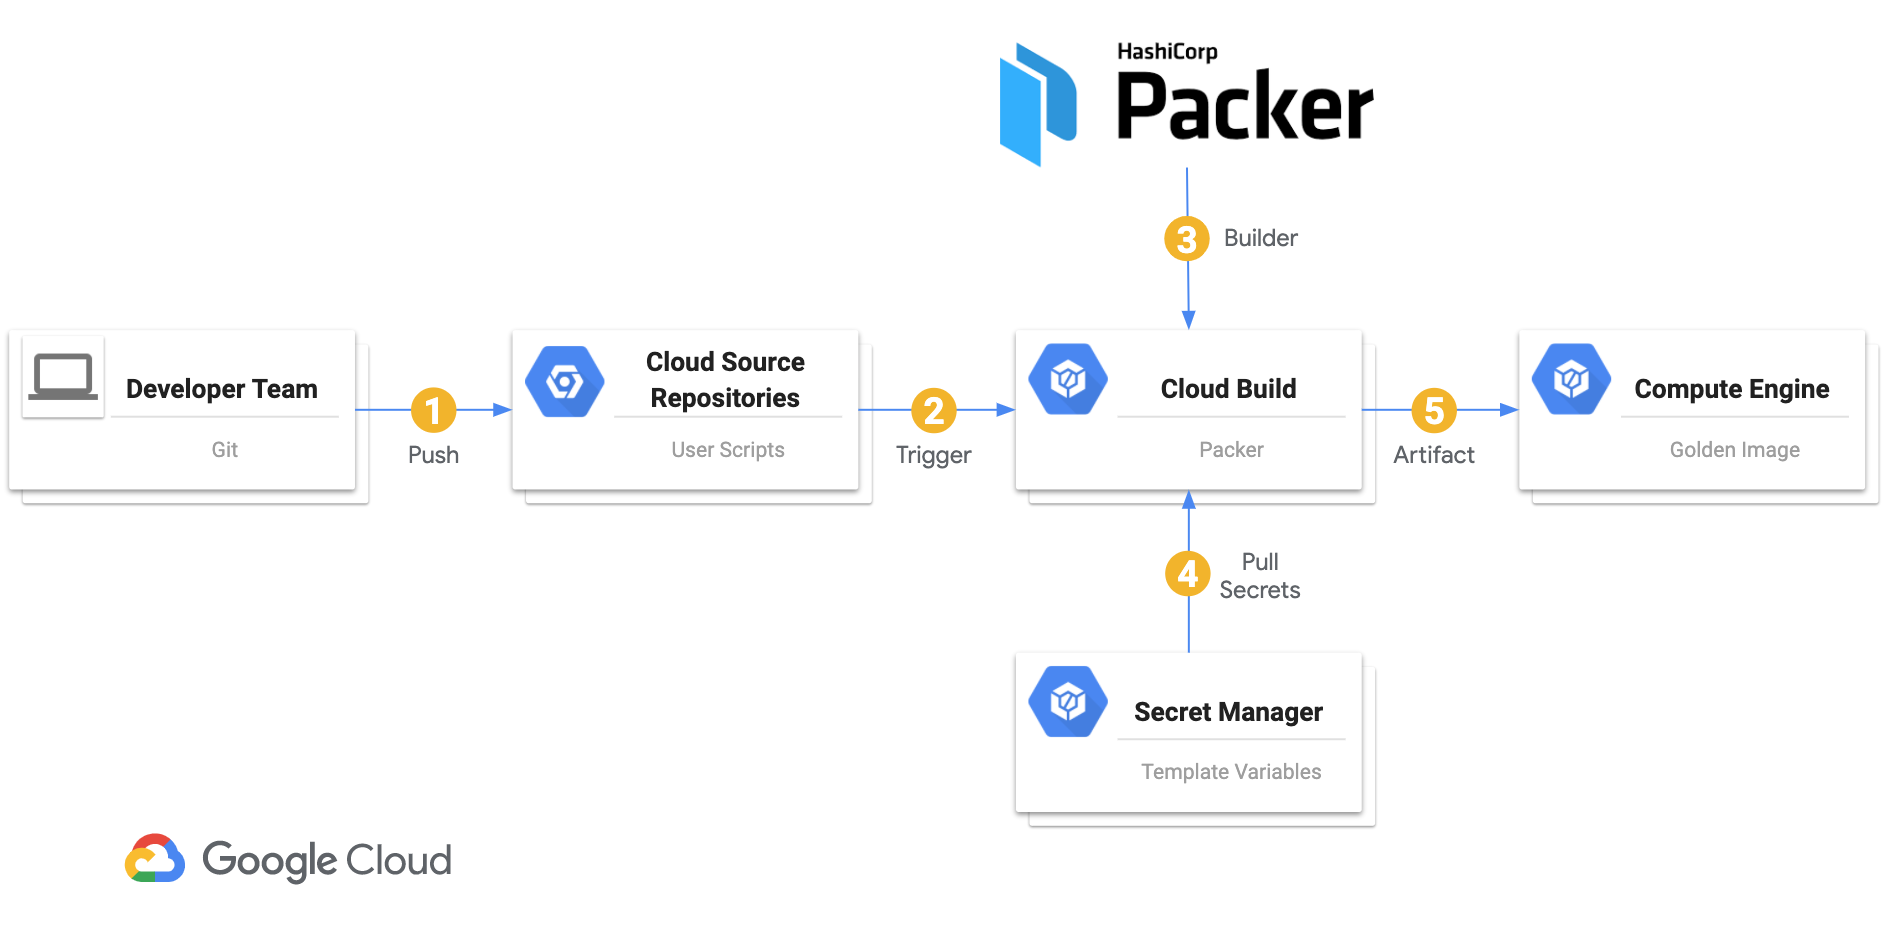
This tutorial shows you how to create an image factory using Cloud Build and
[Packer by HashiCorp](https://packer.io). The image factory automatically
creates new images from Cloud Source Repositories each time a new tag is pushed
to the repository, as shown in the following diagram.
This tutorial includes instructions for creating Packer images for Linux and Windows.
- For building a Linux image, this tutorial uses Packer to create a new image from a CentOS 7 VM with Nginx.
- For building a Windows image, this tutorial uses Packer to create a new image from a Windows Server 2019 VM with Python 3, Git, and 7-Zip,
using Chocolatey as a package manager.
Secret Manager is only used for the Windows option.
## Prerequisites
- A Google Cloud account
- One of the following:
- Project editor access to an existing project
- Organization permissions to create a new project in an existing organization
You can run commands in this tutorial using [Cloud Shell](https://cloud.google.com/shell) in the Cloud Console, or you can use `gcloud` on your local computer if
you have installed the Cloud SDK.
## (Optional) Create a project with a billing account attached
This section helps you to set up a new Google Cloud project in which to run your Packer
build factory. If you use an existing project for this tutorial, you can skip this section and go to the "Set the project variable" section.
### Linux Commands
PROJECT=[NEW PROJECT NAME]
ORG=[YOUR ORGANIZATION NAME]
BILLING_ACCOUNT=[YOUR_BILLING_ACCOUNT_NAME]
ZONE=[COMPUTE ZONE YOU WANT TO USE]
ACCOUNT=[GOOGLE ACCOUNT YOU WANT TO USE] or $(gcloud config get-value account)
gcloud projects create "$PROJECT" --organization=$(gcloud organizations list --format="value(name)" --filter="(displayName='$ORG')")
gcloud beta billing projects link $PROJECT --billing-account=$(gcloud alpha billing accounts list --format='value(name)' --filter="(displayName='$BILLING_ACCOUNT')")
gcloud config configurations create --activate $PROJECT
gcloud config set project $PROJECT
gcloud config set compute/zone $ZONE
gcloud config set account $ACCOUNT
### Windows Commands
$env:PROJECT="NEW PROJECT ID"
$env:ORG="YOUR ORGANIZATION NAME"
$env:BILLING_ACCOUNT="YOUR_BILLING_ACCOUNT_NAME"
$env:ZONE="COMPUTE ZONE YOU WANT TO USE"
$env:ACCOUNT="GOOGLE ACCOUNT YOU WANT TO USE" or $(gcloud config get-value account)
gcloud projects create "$env:PROJECT" --organization=$(gcloud organizations list --format="value(name)" --filter="(displayName='$env:ORG')")
gcloud beta billing projects link $env:PROJECT --billing-account=$(gcloud alpha billing accounts list --format='value(name)' --filter="(displayName='$env:BILLING_ACCOUNT')")
gcloud config configurations create --activate $env:PROJECT
gcloud config set project $env:PROJECT
gcloud config set compute/zone $env:ZONE
gcloud config set account $env:ACCOUNT
## (Optional) Set the project variable
### Skip this section if you created a new project.
If you are using an existing project, set the project variable to indicate which project to use for `gcloud` commands.
For more information on configurations see [configurations](https://cloud.google.com/sdk/gcloud/reference/config/configurations/).
Replace `[CONFIGURATION NAME]` with the name of the configuration you want to use.
### Linux Commands
gcloud config configurations activate [CONFIGURATION NAME] #The configuration for the project you want to use
PROJECT=$(gcloud config get-value project)
REGION=$(gcloud config get-value compute/region)
ZONE=$(gcloud config get-value compute/zone)
### Windows Commands
gcloud config configurations activate [CONFIGURATION NAME] #The configuration for the project you want to use
$env:PROJECT=$(gcloud config get-value project)
$env:REGION=$(gcloud config get-value compute/region)
$env:ZONE=$(gcloud config get-value compute/zone)
## Enable the required services
In this section, you enable the Google Cloud APIs necessary for the tutorial. The required services are the same for Windows and Linux images.
gcloud services enable sourcerepo.googleapis.com \
cloudapis.googleapis.com compute.googleapis.com \
servicemanagement.googleapis.com storage-api.googleapis.com \
cloudbuild.googleapis.com secretmanager.googleapis.com
## (Windows image only) Managing secrets for parameters using Secret Manager
In this section, you use [Secret Manager](https://cloud.google.com/secret-manager) to store your input values for Packer in a secure and modular way. Although
it's easier to simply hard-code parameters into the Packer template file, using a central source of truth like a secret manager increases manageability and
reuseability among teams.
Create your secrets using the following commands:
## Linux Commands
echo -n "windows-2019" | gcloud secrets create image_factory-image_family --replication-policy="automatic" --data-file=-
echo -n "golden-windows" | gcloud secrets create image_factory-image_name --replication-policy="automatic" --data-file=-
echo -n "n1-standard-1" | gcloud secrets create image_factory-machine_type --replication-policy="automatic" --data-file=-
echo -n $REGION | gcloud secrets create image_factory-region --replication-policy="automatic" --data-file=-
echo -n $ZONE | gcloud secrets create image_factory-zone --replication-policy="automatic" --data-file=-
echo -n "default" | gcloud secrets create image_factory-network --replication-policy="automatic" --data-file=-
echo -n "allow-winrm-ingress-to-packer" | gcloud secrets create image_factory-tags --replication-policy="automatic" --data-file=-
## Windows Commands
echo -n "windows-2019" | gcloud secrets create image_factory-image_family --replication-policy="automatic" --data-file=-
echo -n "golden-windows" | gcloud secrets create image_factory-image_name --replication-policy="automatic" --data-file=-
echo -n "n1-standard-1" | gcloud secrets create image_factory-machine_type --replication-policy="automatic" --data-file=-
echo -n $env:$REGION | gcloud secrets create image_factory-region --replication-policy="automatic" --data-file=-
echo -n $env:$ZONE | gcloud secrets create image_factory-zone --replication-policy="automatic" --data-file=-
echo -n "default" | gcloud secrets create image_factory-network --replication-policy="automatic" --data-file=-
echo -n "allow-winrm-ingress-to-packer" | gcloud secrets create image_factory-tags --replication-policy="automatic" --data-file=-
Optionally, you can customize the values using the [documentation](https://cloud.google.com/secret-manager/docs/creating-and-accessing-secrets).
## (Windows image only) Create a new VPC firewall to allow WinRM for Packer
Before you can provision using the WinRM (Windows Remote Management) communicator, you need to allow traffic through Google's firewall on the WinRM port
(`tcp:5986`). This creates a new firewall called `allow-winrm-ingress-to-packer` that is stored with Secret Manager and used by Cloud Build in the
`cloudbuild.yaml` configuration file.
gcloud compute firewall-rules create allow-winrm-ingress-to-packer \
--allow tcp:5986 --target-tags allow-winrm-ingress-to-packer
## Give the Cloud Build service account permissions through an IAM role
Find the Cloud Build service account and add the editor role to it (in practice, use least privilege roles). For the Windows image, you also grant the
`secretmanager.secretAccessor` role for [Secret Manager](https://cloud.google.com/secret-manager/docs/access-control).
### Linux Commands
CLOUD_BUILD_ACCOUNT=$(gcloud projects get-iam-policy $PROJECT --filter="(bindings.role:roles/cloudbuild.builds.builder)" --flatten="bindings[].members" --format="value(bindings.members[])")
gcloud projects add-iam-policy-binding $PROJECT \
--member $CLOUD_BUILD_ACCOUNT \
--role roles/editor
### Windows Commands
$env:CLOUD_BUILD_ACCOUNT=$(gcloud projects get-iam-policy $env:PROJECT --filter="(bindings.role:roles/cloudbuild.builds.builder)" --flatten="bindings[].members" --format="value(bindings.members[])")
gcloud projects add-iam-policy-binding $env:PROJECT \
--member $env:CLOUD_BUILD_ACCOUNT \
--role roles/editor
gcloud projects add-iam-policy-binding $env:PROJECT \
--member $env:CLOUD_BUILD_ACCOUNT \
--role roles/secretsmanager.secretAccessor
## Create the repositories in Cloud Source Repositories for your image creator
In this section, you commit your Cloud Build configuration file, Packer template, and bootstrap scripts to a repository in Google Cloud to start the Packer
build.
### Linux Packer Image Repository
gcloud source repos create centos-7-nginx-image-factory
### Windows Packer Image Repository
gcloud source repos create windows-image-factory
## Create the build trigger for the image creator source repository
By configuring a build trigger to the source repository you created in the previous step, you can define a webhook to tell Cloud Build to pull down your
committed files and start the build process automatically.
To see a list of image families, but will be using centos 7 and 2019 windows images for our base builds:
gcloud compute images list | awk '{print $3}' | awk '!a[$0]++'
### Linux Packer Image
The linux packer image will use variables set within the trigger.
Create a trigger on the [build triggers page](https://console.cloud.google.com/cloud-build/triggers) in Cloud Console:
1. Click **Create Trigger**.
1. In the **Name** field, enter `centos-7-hello-world-image-factory`.
1. Under **Event**, select **Push to a tag**.
1. Under **Source**, select `centos-7-nginx-image-factory` as your
**Repository** and the tag to match or `.*` (any tag) as your tag.
1. Under **Configuration**, select **Cloud Build configuration file (yaml or json)**.
1. In the **Cloud Build configuration file location**, validate it shows `cloudbuild.yaml`.
2. Under **Substitution variables** in **Advanced**, click **+ Add variable**.
3. In the **Variable** field enter `_IMAGE_FAMILY` and in **Value** enter `centos-7`.
4. In the **Variable** field enter `_IMAGE_ZONE` and in **Value** enter `us-east1-b` or the zone you set as your default.
5. Click **Create** to save your build trigger.
### Windows Packer Image
The Windows Packer Image will use the variables set within GCP Secrets Manager.
Create a trigger on the [build triggers page](https://console.cloud.google.com/cloud-build/triggers) in Cloud Console:
1. Click **Create Trigger**.
1. In the **Name** field, enter `windows-image-factory`.
1. Under **Event**, select **Push new tag**.
1. Under **Source**, select `windows-image-factory` as your
**Repository** and the tag to match or `.*` (any tag) as your tag.
1. Under **Build Configuration**, select **Cloud Build configuration file (yaml or json)**.
1. In the **Cloud Build configuration file location**, validate it shows `cloudbuild.yaml`.
1. Click **Create** to save your build trigger.
## Add the Packer Cloud Build image to your project
Get the builder from the community repository and submit it to your project. This allows Cloud Build to use a Docker container that contains the Packer binaries.
### Linux Commands
project_dir=$(pwd)
cd /tmp
git clone https://github.com/GoogleCloudPlatform/cloud-builders-community.git
cd cloud-builders-community/packer
gcloud builds submit --config cloudbuild.yaml
rm -rf /tmp/cloud-builders-community
cd $project_dir
### Windows Commands
$env:PROJECT_DIR=$(Get-Location)
New-Item -Path "C:\" -Name "temp" -ItemType Directory
Set-Location -Path "C:\temp"
git clone https://github.com/GoogleCloudPlatform/cloud-builders-community.git
Set-Location -Path "./cloud-builders-community/packer"
gcloud builds submit --config cloudbuild.yaml
Remove-Item -Path "C:\temp\cloud-builders-community" -Recurse -Force
Set-Location -Path $env:PROJECT_DIR
## Add your repository as a remote repository and push
In this section, you configure the local Git instance to use the repository that you created.
***You will need to remove the original git folder in the root of this project prior to these following steps.***
### Linux Packer Image
There are two directories in your project. We are going to move into the linux directory and complete the following commands.
.
├── README.md
├── linux
└── windows
1. (If running locally, not in Cloud Shell) Set up your Google credentials for Git:
gcloud init && git config --global credential.https://source.developers.google.com.helper gcloud.sh
1. Ensure you have $PROJECT and ZONE set:
PROJECT=$(gcloud config get-value project)
ZONE=$(gcloud config get-value compute/zone)
1. Initiallize git for the linux packer image repository
cd linux
git init
1. Add the `google` repository as a remote:
git remote add google https://source.developers.google.com/p/$PROJECT/r/centos-7-nginx-image-factory
1. Add your files, tag them with a version number, and push them to your repository:
git add .
git commit -m "first image"
git tag v0.1
git push google master --tags
### Windows Packer Image
There are two directories in your project. We are going to move into the windows directory and complete the following commands.
.
├── README.md
├── linux
└── windows
1. (If running locally, not in Cloud Shell) Set up your Google credentials for Git:
gcloud init && git config --global credential.https://source.developers.google.com.helper gcloud.sh
1. Ensure you have $PROJECT and ZONE set:
PROJECT=$(gcloud config get-value project)
ZONE=$(gcloud config get-value compute/zone)
1. Initiallize git for the linux packer image repository
cd windows
git init
1. Add the `google` repository as a remote:
git remote add google https://source.developers.google.com/p/$PROJECT/r/windows-image-factory
1. Add your files, tag them with a version number, and push them to your repository:
git add .
git commit -m "first image"
git tag v0.1
git push google master --tags
## View build progress
You can view the standard output from both the staging VM and Packer to check on the build progress. After the Packer build completes successfully, it outputs
the newly created image:
Step #1: Build 'googlecompute' finished.
Step #1:
Step #1: ==> Builds finished. The artifacts of successful builds are:
Step #1: --> googlecompute: A disk image was created: golden-windows-2020-05-05-554-54
Open the [**Cloud Build** page](https://console.cloud.google.com/cloud-build), find the build that is in progress, and click the link to view its progress.
## Create a Compute Engine instance for the image in your Google Cloud project
In this section, you test the Compute Engine image that Packer created by creating a new instance.
### Linux Packer Image
1. Create a firewall rule to allow port 80 to test your new instance:
gcloud compute firewall-rules create http --allow=tcp:80 \
--target-tags=http-server --source-ranges=0.0.0.0/0
1. Create an instance using the new Linux image:
gcloud compute instances create helloworld-centos-7-nginx \
--image https://www.googleapis.com/compute/v1/projects/$PROJECT/global/images/helloworld-v01 \
--tags=http-server --zone=$ZONE
### Windows Packer Image
1. Open the [**Compute Engine** page](https://console.cloud.google.com/compute) in Cloud Console and navigate to **Images** to see the new image.
1. Select the image and click **Create instance**.
1. Name the instance `helloworld-windows-2019-packer`
1. Complete the wizard to start the instance, ensuring that **Boot disk** is set to use the new custom image called `golden-windows-`.
## Verifying the results
In this section, you verify that your deployment has worked correctly.
### Linux
1. Wait a few minutes and open the browser to the IP address of the instance to see the special message.
1. Retrieve the instance IP address:
gcloud compute instances list --filter="name:helloworld*" --format="value(networkInterfaces[0].accessConfigs[0].natIP)"
1. Go to the IP address in the browser and make sure that you see the `"Hello from the image factory!"` message.
1. Another option is to curl the instance and verify that the nginx server is serving our content.
curl $(gcloud compute instances list --filter="name:helloworld*" --format="value(networkInterfaces[0].accessConfigs[0].natIP)")
You should recieve a response from the nginx with the following output:
Hello, from the image factory!
### Windows
1. Wait a few minutes until the Windows VM has completed the boot up process.
1. [Connect to your instance using RDP.](https://cloud.google.com/compute/docs/instances/connecting-to-instance)
1. If you need to generate a Windows password, follow
[these instructions](https://cloud.google.com/compute/docs/instances/windows/creating-passwords-for-windows-instances#generating_a_password).
1. Verify that Git, Python, and 7-Zip have been installed successfully, matching the versions defined in the `packages.config` XML manifest.

## Cleaning up
If you don't want to keep the resources after this tutorial, you can delete them.
### Linux Packer Image
1. Delete the instance, and the image:
gcloud compute instances delete --quiet helloworld-centos-7-nginx
gcloud compute images delete --quiet helloworld-v01
2. Delete the Packer Cloud Build image:
gcloud container images delete --quiet gcr.io/$PROJECT/packer --force-delete-tags
3. Delete the repository:
gcloud source repos delete --quiet centos-7-nginx-image-factory
Only do this if you don't want to perform the tutorial in this project again. The repository name won't be usable again for up to 7 days.
### Windows Packer Image
1. Delete the firewall rule, the instance, and the image:
gcloud compute firewall-rules delete --quiet allow-winrm-ingress-to-packer
gcloud compute instances delete --quiet helloworld-windows-2019-packer
gcloud compute images delete --quiet $(gcloud compute images list --filter="name~'golden-windows'" | awk '/golden/{x=NR+2}(NR<=x){print $1}')
2. Delete the Packer Cloud Build image (skip if you completed during linux packer cleanup):
gcloud container images delete --quiet gcr.io/$PROJECT/packer --force-delete-tags
3. Delete the repository:
gcloud source repos delete --quiet windows-image-factory
Only do this if you don't want to perform the tutorial in this project again. The repository name won't be usable again for up to 7 days.
4. Delete your secrets using the following commands:
gcloud secrets delete image_factory-image_family --quiet
gcloud secrets delete image_factory-image_name --quiet
gcloud secrets delete image_factory-machine_type --quiet
gcloud secrets delete image_factory-region --quiet
gcloud secrets delete image_factory-zone --quiet
gcloud secrets delete image_factory-network --quiet
gcloud secrets delete image_factory-tags --quiet
## Reference
### Linux Packer scripts
[**`linux/cloudbuild.yaml`**](./windows/cloudbuild.yaml)
contains the [build configuration](https://cloud.google.com/cloud-build/docs/build-config) for the Cloud Build service, which uses Packer to build a
new image using instructions within the the file.
[**`linux/install-website.sh`**](./windows/install-website.sh)
invokes bash to update and install nginx onto the centos server. The script will also setup a basic page to be served from the server upon startup of the service.
### Windows Packer scripts
[**`windows/cloudbuild.yaml`**](./windows/cloudbuild.yaml)
contains the [build configuration](https://cloud.google.com/cloud-build/docs/build-config) for the Cloud Build service, which uses Packer to build a
new image using instructions within the `packer.json` file.
[**`windows/packer.json`**](./windows/packer.json)
contains the [googlecompute builder template](https://www.packer.io/docs/builders/googlecompute/) for creating a new image for use with Compute Engine.
Because of the way Packer uses WinRM as the communicator to connect and configure Windows, this template achieves the following:
- `"variables"` contains placeholder values such as `_PROJECT_ID` that are dynamically changed by Cloud Build sourced from both built-in variables (project)
and custom user variables (Secret Manager). By using `"source_image_family"`, Packer automatically retrieves the latest version available for
the machine image.
- Configures WinRM to use HTTPS for connecting Packer and the staging Windows VM (creates a temporary, local self-signed certificate).
- Using [Compute Engine metadata](https://cloud.google.com/compute/docs/startupscript#providing_a_startup_script_for_windows_instances)
`"windows-startup-script-cmd"`, temporarily creates a new local account `packer_user` on the Windows VM and adds it to local administrator group to provide
permissions for WinRM and installs the desired packages.
- Within the `"provisioners"` section, create a local copy of `packages.config` and `cleanup-packer.ps1` files in the staging Windows VM, to be used by
[Chocolatey](https://chocolatey.org/) and the `"windows-shutdown-script-ps1"` Compute Engine metadata to clean up when finished.
- Still within the `"provisioners"` section, run the PowerShell scripts for bootstrapping your Windows environment using Chocolatey.
- (Optional) You can replace the Chocolatey PowerShell scripts with your own custom bootstrap script, or pull/push configuration management tools such as
Ansible, Puppet, Chef, or PowerShell DSC.
- `GCESysprep -NoShutdown` is called as a way to seal the image using the optional `-NoShutDown` parameter to prevent the Windows environment from shutting
down and create a false positive, unhealthy signal back to Packer. Lifecycle needs to be managed by Packer to complete the image workflow.
[**`windows/scripts/bootstrap-packer.ps1`**](./windows/scripts/bootstrap-packer.ps1)
configures Packer to use an HTTPS connection for WinRM to secure communication between the staging VM and Packer host. The configuration made during
this script such as a local certificate, listener, and firewall are deleted by `cleanup-packer.ps1`.
[**`windows/scripts/cleanup-packer.ps1`**](./windows/scripts/cleanup-packer.ps1) is invoked as a shutdown script to remove the Chocolatey PowerShell binaries and the local user account for Packer,
undo WinRM configurations, and then remove the shutdown script itself.
[**`windows/scripts/disable-uac.ps1`**](./windows/scripts/disable-uac.ps1) installs the latest version of Chocolatey, a package management binary for PowerShell.
[**`windows/scripts/packages.config`**](./windows/scripts/packages.config) contains a list of packages in an XML manifest for Chocolatey to install. This is where you can define
[any supported packages](https://chocolatey.org/packages) to install, as well as versioning, options, and switches. For details, see the
[Chocolatey documentation](https://chocolatey.org/docs/commandsinstall#packagesconfig).
[**`windows/scripts/run-chocolatey.ps1`**](./windows/scripts/run-chocolatey.ps1) invokes Chocolatey to install the packages defined in the XML manifest, including error handling. Because some Windows
software requires a restart to complete the installation, this script allows it (exit code `3010`) as Packer will shut down and sysprep the image as the final
step.