https://github.com/onkar69483/home-security-system
Smart home security system built using a NodeMCU, an ultrasonic sensor (HC-SR04), an LED, and a buzzer. The system detects motion and alerts by lighting up the LED, sounding the buzzer, and sending notifications to Telegram.
https://github.com/onkar69483/home-security-system
esp8266 esp8266-projects home-security-system iot nodemcu-esp8266 safety security
Last synced: 2 months ago
JSON representation
Smart home security system built using a NodeMCU, an ultrasonic sensor (HC-SR04), an LED, and a buzzer. The system detects motion and alerts by lighting up the LED, sounding the buzzer, and sending notifications to Telegram.
- Host: GitHub
- URL: https://github.com/onkar69483/home-security-system
- Owner: onkar69483
- License: mit
- Created: 2024-02-15T08:32:09.000Z (over 2 years ago)
- Default Branch: main
- Last Pushed: 2024-07-04T16:08:24.000Z (about 2 years ago)
- Last Synced: 2025-03-02T10:22:19.930Z (over 1 year ago)
- Topics: esp8266, esp8266-projects, home-security-system, iot, nodemcu-esp8266, safety, security
- Language: C++
- Homepage: https://youtu.be/_iyvJMkf_yY?si=iY1cPKYc2rqpItVW
- Size: 531 KB
- Stars: 1
- Watchers: 1
- Forks: 0
- Open Issues: 0
-
Metadata Files:
- Readme: README.md
Awesome Lists containing this project
README
# Home Security Bot
This project is a smart home security system built using a NodeMCU, an ultrasonic sensor (HC-SR04), an LED, and a buzzer. The system detects motion and alerts by lighting up the LED, sounding the buzzer, and sending notifications to Telegram.
## Components
- NodeMCU v1.0
- HC-SR04 Ultrasonic Sensor
- LED
- Buzzer
- Breadboard
- Jumper wires
## Circuit Diagram and Demonstration

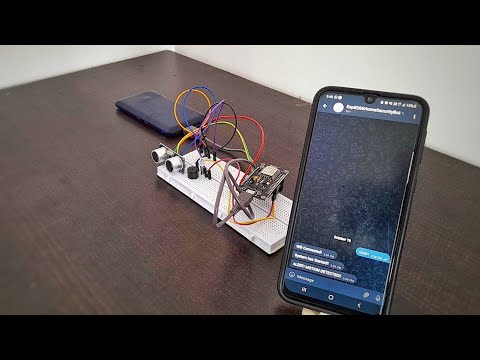
## How It Works
The HC-SR04 ultrasonic sensor measures the distance to an object. If an object comes within a certain distance, the NodeMCU triggers the LED and buzzer to alert the presence of an object or person, and sends a notification to a predefined Telegram channel.
## Setup Instructions
1. **Hardware Setup**
- Connect the components as shown in the circuit diagram.
- Ensure that all connections are secure and correct.
2. **Software Setup**
- Install the Arduino IDE from [here](https://www.arduino.cc/en/Main/Software).
- Install the NodeMCU board in the Arduino IDE. Follow the instructions [here](https://arduino-esp8266.readthedocs.io/en/latest/installing.html).
- Connect the NodeMCU to your computer using a USB cable.
- Open the `homesecuritybot.ino` file in the Arduino IDE.
- Select the correct board and port from the Tools menu.
- Upload the code to the NodeMCU.
## Usage
- Power the NodeMCU with a USB cable or a 5V power source.
- The ultrasonic sensor will continuously measure the distance.
- If an object is detected within the specified range, the LED will light up, the buzzer will sound, and a notification will be sent to Telegram.
## Troubleshooting
- Ensure that the connections are secure and match the circuit diagram.
- Check that the NodeMCU is correctly connected to the computer and that the correct port is selected in the Arduino IDE.
- Make sure the ultrasonic sensor is functioning correctly.
## Contributing
If you'd like to contribute to this project, please fork the repository and use a feature branch. Pull requests are welcome.
## License
This project is licensed under the MIT License - see the [LICENSE](LICENSE) file for details.