https://github.com/open-mmlab/mmgen-facestylor
https://github.com/open-mmlab/mmgen-facestylor
Last synced: about 1 month ago
JSON representation
- Host: GitHub
- URL: https://github.com/open-mmlab/mmgen-facestylor
- Owner: open-mmlab
- License: apache-2.0
- Created: 2021-12-07T08:40:23.000Z (over 3 years ago)
- Default Branch: master
- Last Pushed: 2022-04-22T06:33:29.000Z (about 3 years ago)
- Last Synced: 2025-05-07T15:07:46.028Z (about 1 month ago)
- Language: Python
- Size: 3.83 MB
- Stars: 255
- Watchers: 9
- Forks: 30
- Open Issues: 18
-
Metadata Files:
- Readme: README.md
- License: LICENSE
Awesome Lists containing this project
README
# MMGEN-FaceStylor


English | [简体中文](https://github.com/open-mmlab/MMGEN-FaceStylor/blob/master/README_CN.md)
## Introduction
This repo is an efficient toolkit for Face Stylization based on the paper "AgileGAN: Stylizing Portraits by Inversion-Consistent Transfer Learning". We note that since the training code of AgileGAN is not released yet, this repo merely adopts the pipeline from AgileGAN and combines other helpful practices in this literature.
This project is based on [MMCV](https://github.com/open-mmlab/mmcv) and [MMGEN](https://github.com/open-mmlab/mmgeneration), star and fork is welcomed 🤗!
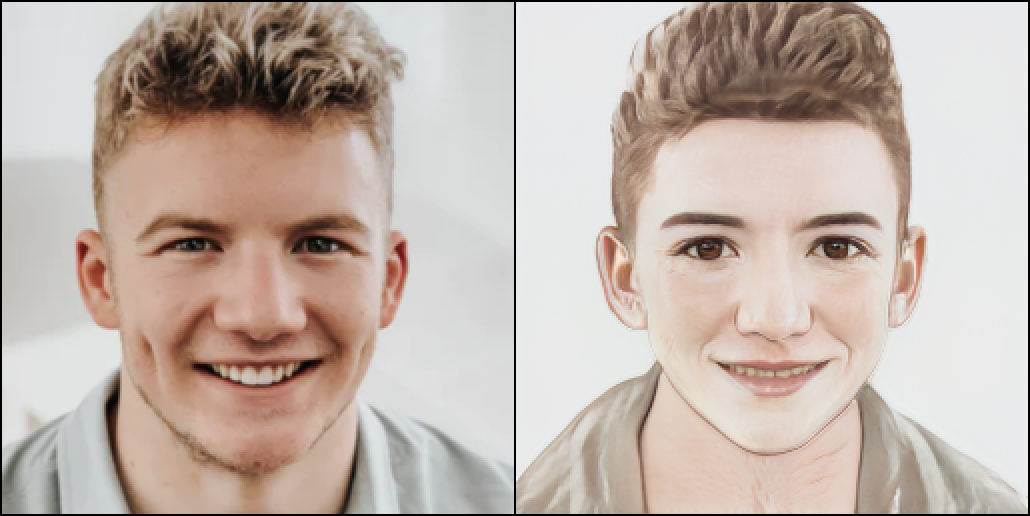
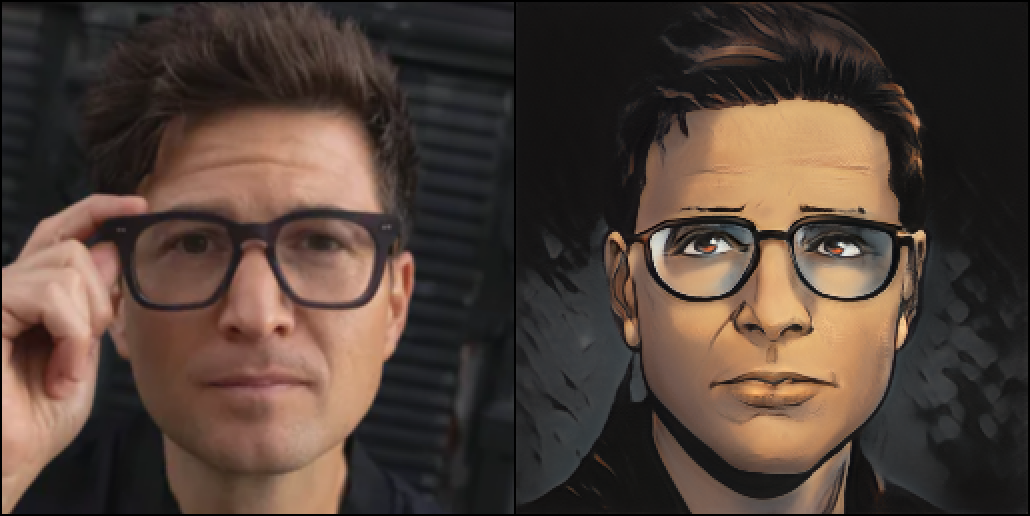
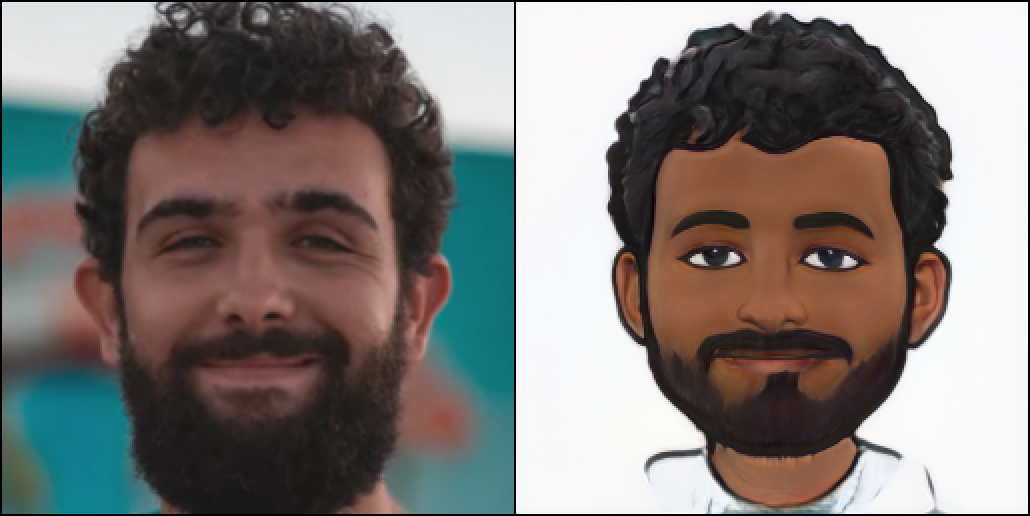
Results from FaceStylor trained by MMGEN

## Requirements
- CUDA 10.0 / CUDA 10.1
- Python 3
- PyTorch >= 1.6.0
- MMCV-Full >= 1.3.15
- MMGeneration >= 0.3.0
## Setup
### Step-1: Create an Environment
First, we should build a conda virtual environment and activate it.
```bash
conda create -n facestylor python=3.7 -y
conda activate facestylor
```
Suppose you have installed CUDA 10.1, you need to install the prebuilt PyTorch with CUDA 10.1.
```bash
conda install pytorch=1.6.0 cudatoolkit=10.1 torchvision -c pytorch
```
### Step-2: Install MMCV and MMGEN
We can run the following command to install MMCV.
```bash
pip install mmcv-full -f https://download.openmmlab.com/mmcv/dist/cu101/torch1.6.0/index.html
```
Of course, you can also refer to the MMCV [Docs](https://mmcv.readthedocs.io/en/latest/get_started/installation.html) to install it.
Next, we should install MMGEN containing the basic generative models that will be used in this project.
```bash
# Clone the MMGeneration repository.
git clone https://github.com/open-mmlab/mmgeneration.git
cd mmgeneration
# Install build requirements and then install MMGeneration.
pip install -r requirements.txt
pip install -v -e . # or "python setup.py develop"
cd ..
```
### Step-3: Clone repo and prepare the data and weights
Now, we need to clone this repo and install dependencies.
```bash
git clone https://github.com/open-mmlab/MMGEN-FaceStylor.git
cd MMGEN-FaceStylor
pip install -r requirements.txt
```
For convenience, we suggest that you make these folders under `MMGEN-FaceStylor`.
```bash
mkdir data
mkdir work_dirs
mkdir work_dirs/experiments
mkdir work_dirs/pre-trained
```
For testing and training, you need to download some necessary [data](https://drive.google.com/drive/folders/1sksjD4awYwSAgibix83hVtx1sm4KOekm) provided by [AgileGAN](https://github.com/flyingbread-elon/AgileGAN) and put them under `data` folder. Or just run this:
```bash
wget --no-check-certificate 'https://docs.google.com/uc?export=download&id=1AavRxpZJYeCrAOghgtthYqVB06y9QJd3' -O data/shape_predictor_68_face_landmarks.dat
```
Then, you can put or create the soft-link for your data under `data` folder, and store your experiments under `work_dirs/experiments`.
or
```bash
wget --no-check-certificate https://github.com/JeffTrain/selfie/raw/master/shape_predictor_68_face_landmarks.dat -O data/shape_predictor_68_face_landmarks.dat
```
We also provide some pre-trained weights.
| Pre-trained Weights |
|---------------------------------------|
| [FFHQ-1024 StyleGAN2](https://download.openmmlab.com/mmgen/stylegan2/stylegan2_c2_ffhq_1024_b4x8_20210407_150045-618c9024.pth) |
| [FFHQ-256 StyleGAN2](https://download.openmmlab.com/mmgen/stylegan2/stylegan2_c2_ffhq_256_b4x8_20210407_160709-7890ae1f.pth) |
|[IR-SE50 Model](https://openmmlab-share.oss-cn-hangzhou.aliyuncs.com/mmgen/agilegan/model_ir_se50.pth)|
| [Encoder for FFHQ-1024 StyleGAN2](https://download.openmmlab.com/mmgen/agilegan/agile_encoder_ffhq1024x1024_lr_1e-4_500kiter_20211201_112111-fb1312dc.pth) |
| [Encoder for FFHQ-256 StyleGAN2](https://download.openmmlab.com/mmgen/agilegan/agile_encoder_celebahq256x256_lr_1e-4_150k_20211104_134520-9cce67da.pth) |
| [MetFace-Oil 1024 StyleGAN2](https://download.openmmlab.com/mmgen/agilegan/agile_transfer_metfaces-oil1024x1024_zplus_lpips0.5_freezeD5_ada_bs4x2_lr_1e-4_1600iter_20211104_134350-2b99cb9b.pth) |
| [MetFace-Sketch 1024 StyleGAN2](https://download.openmmlab.com/mmgen/agilegan/agile_transfer_metfaces-sketch1024x1024_zplus_lpips0.5_freezeD5_ada_bs4x2_lr_1e-4_1600iter_20211104_134426-081af2a2.pth) |
| [Toonify 1024 StyleGAN2](https://download.openmmlab.com/mmgen/agilegan/agile_transfer_toonify1024x1024_zplus_lpips0.5_freezeD5_ada_bs4x2_lr_1e-4_1600iter_20211104_134449-cb6785b6.pth) |
|[Cartoon 256](https://openmmlab-share.oss-cn-hangzhou.aliyuncs.com/mmgen/agilegan/agile_transfer_photo2cartoon256x256_zplus_lpips0.5_freezeD5_ada_bs4x2_lr_1e-4_800_iter_20211201_140719-062c09fa.pth)|
|[Bitmoji 256](https://download.openmmlab.com/mmgen/agilegan/agile_transfer_bitmoji256x256_z_wolpips_freezeD3_ada_bs4x2_lr_1e-4_iter_1600_20211202_195819-9010a9fe.pth)|
|[Comic 256](https://download.openmmlab.com/mmgen/agilegan/agile_transfer_face2comics256x256_z_wolpips_freezeD3_ada_bs4x2_lr_1e-4_30kiter_best_fid_iter_15000_20211201_111145-4905b63a.pth)|
| More Styles on the Way! |
## Play with MMGEN-FaceStylor
If you have followed the aforementioned steps, we can start to investigate FaceStylor!
### Quick Try
To quickly try our project, please run the command below
```bash
python demo/quick_try.py demo/src.png --style toonify
```
Then, you can check the result in `work_dirs/demos/agile_result.png`.
- If you want to play with your own photos, you can replace `demo/src.png` with your photo.
- If you want to switch to another style, change `toonify` with other styles. Now, supported styles include `toonify`, `oil`, `sketch`, `bitmoji`, `cartoon`, `comic`.
### Inversion
The inversion task will adopt a source image as input and return the most similar image that can be generated by the generator model.
For inversion, you can directly use `agilegan_demo` like this
```bash
python demo/agilegan_demo.py SOURCE_PATH CONFIG [--ckpt CKPT] [--device DEVICE] [--save-path SAVE_PATH]
```
Here, you should set `SOURCE_PATH` to your image path, `CONFIG` to the config file path, and `CKPT` to checkpoint path.
Take [Celebahq-Encoder](configs/agilegan/agile_encoder_celebahq_lr_1e-4_150k.py) as an example, you need to download the [weights](https://openmmlab-share.oss-cn-hangzhou.aliyuncs.com/mmgen/agilegan/agile_encoder_celebahq1024x1024_lr_1e-4_150k_20211104_133124-a7e2fd7f.pth?versionId=CAEQHhiBgMDpiaGo5xciIDgzNTQ4YTQ2OWQ1OTQ0NmM4NWZiZjg2MTk0ZGEzMmFi) to `work_dirs/pre-trained/agile_encoder_celebahq1024x1024_lr_1e-4_150k.pth`, put your test image under `data` run
```bash
python demo/agilegan_demo.py demo/src.png configs/agilegan/agile_encoder_celebahq1024x1024_lr_1e-4_150k.py --ckpt work_dirs/pre-trained/agile_encoder_celebahq_lr_1e-4_150k.pth
```
You will find the result `work_dirs/demos/agile_result.png`.
### Stylization
Since the encoder and decoder of stylization can be trained from different configs, you're supposed to set their ckpts' path in config file.
Take [Metface-oil](configs/demo/agile_transfer_metface-oil1024x1024.py) as an example, you can see the first two lines in config file.
```python
encoder_ckpt_path = xxx
stylegan_weights = xxx
```
You should keep your actual weights path in line with your configs. Then run the same command without specifying `CKPT`.
```bash
python demo/agilegan_demo.py SOURCE_PATH CONFIG [--device DEVICE] [--save-path SAVE_PATH]
```
## Train
Here I will tell you how to fine-tune with your own datasets. With only 100-200 images and less than one hour,
you can train your own StyleGAN2. The only thing you need to do is to copy an
`agile_transfer` config, like this [one](configs/agilegan/agile_transfer_metfaces-oil1024x1024_zplus_lpips0.5_freezeD5_ada_bs4x2_lr_2e-3_1600iter.py). Then modify the `imgs_root` with your actual data root, choose one of the two commands below to train your own model.
```bash
# For distributed training
bash tools/dist_train.sh ${CONFIG_FILE} ${GPUS_NUMBER} \
--work-dir ./work_dirs/experiments/experiments_name \
[optional arguments]
# For slurm training
bash tools/slurm_train.sh ${PARTITION} ${JOB_NAME} ${CONFIG} ${WORK_DIR} \
[optional arguments]
```
## Training Details
In this part, I will explain some training details, including ADA setting, layer freeze, and losses.
### ADA Setting
To use [adaptive discriminator augmentation](https://github.com/NVlabs/stylegan2-ada-pytorch) in your discriminator, you can use `ADAStyleGAN2Discriminator` as your discriminator, and adjust `ADAAug` setting as follows:
```python
model = dict(
discriminator=dict(
type='ADAStyleGAN2Discriminator',
data_aug=dict(type='ADAAug',
aug_pipeline=aug_kwargs, # This and below arguments can be set by yourself.
update_interval=4,
augment_initial_p=0.,
ada_target=0.6,
ada_kimg=500,
use_slow_aug=False)))
```
### Layer Freeze Setting
In transfer learning, it's a routine to freeze some layers in models.
In GAN's literature, freezing the shallow layers of pre-trained generator and discriminator may help training convergence.
[FreezeD](https://github.com/sangwoomo/FreezeD) can be used for small data fine-tuning,
[FreezeG](https://github.com/bryandlee/FreezeG) can be used for pseudo translation.
```python
model = dict(
freezeD=5, # set to -1 if not need
freezeG=4 # set to -1 if not need
)
```
### Losses Setting
In [AgileGAN](https://github.com/GuoxianSong/AgileGAN), to preserve the recognizable identity of the generated image, they introduce a similarity loss at the perceptual level. You can adjust the `lpips_lambda` as follows:
```python
model = dict(lpips_lambda=0.8)
```
Generally speaking, the larger `lpips_lambda` is, the better the recognizable identity can be kept.
## Datasets Link
To make it easier for you to train your own models, here are some links to publicly available datasets.
|Dataset Links|
|------|
|[MetFaces](https://github.com/NVlabs/metfaces-dataset)|
|[AFHQ](https://github.com/clovaai/stargan-v2/blob/master/README.md#animal-faces-hq-dataset-afhq)|
|[Toonify](https://mega.nz/file/HslSXS4a#7UBanJTjJqUl_2Z-JmAsreQYiJUKC-8UlZDR0rUsarw)|
|[photo2cartoon](https://www.kaggle.com/arnaud58/photo2cartoon)|
|[selfie2anime](https://www.kaggle.com/arnaud58/selfie2anime)|
|[face2comics v2](https://www.kaggle.com/defileroff/comic-faces-paired-synthetic-v2)|
|[High-Resolution Anime Face](https://www.kaggle.com/subinium/highresolution-anime-face-dataset-512x512)|
|[Bitmoji](https://www.kaggle.com/mostafamozafari/bitmoji-faces)|
## Applications
We also provide `LayerSwap` and `DNI` apps for the trade-off between the structure of the original image and the stylization degree.
To this end, you can adjust some parameters to get your desired result.
### LayerSwap
When [Layer Swapping](https://github.com/justinpinkney/toonify) is applied, the generated images have a higher similarity to the source image than AgileGAN's results.
From Left to Right: Input, Layer-Swap with L = 4, 3, 2, xxx Output

Run this command line to with different `SWAP_LAYER`(1, 2, 3, 4, etc) :
```bash
python demo/quick_try.py demo/src.png --style toonify --swap-layer=SWAP_LAYER
```
and you can discover the result tends to be close to the source image.
We also provide a blending script to create and save the mixed weights.
```bash
python apps/blend_weights.py modelA modelB [--swap-layer SWAP_LAYER] [--show-input SHOW_INPUT] [--device DEVICE] [--save-path SAVE_PATH]
```
Here, `modelA` is the base model, where only the deep layers of its decoder will be replaced with `modelB`'s counterpart.
### DNI
Deep Network Interpolation between L4 and AgileGAN output

For more precise stylization control, you can try [DNI](https://github.com/xinntao/DNI) with following commands:
```bash
python apps/dni.py source_path modelA modelB [--intervals INTERVALS] [--device DEVICE] [--save-folder SAVE_FOLDER]
```
Here, `modelA` and `modelB` are supposed to be `PSPEncoderDecoder`(configs start with `agile_encoder`) with decoders of different stylization degrees. `INTERVALS` is supposed to be the interpolation numbers.
You can also try [applications](https://github.com/open-mmlab/mmgeneration/tree/master/apps) in MMGEN, like interpolation and SeFA.
### Interpolation

Indeed, we have provided an application script to users. You can use apps/interpolate_sample.py with the following commands for unconditional models’ interpolation:
```bash
python apps/interpolate_sample.py \
${CONFIG_FILE} \
${CHECKPOINT} \
[--show-mode ${SHOW_MODE}] \
[--endpoint ${ENDPOINT}] \
[--interval ${INTERVAL}] \
[--space ${SPACE}] \
[--samples-path ${SAMPLES_PATH}] \
[--batch-size ${BATCH_SIZE}] \
```
For more details, you can read related [Docs](https://mmgeneration.readthedocs.io/en/latest/tutorials/applications.html#interpolation).
## Galary
Toonify
***


Oil
***


Cartoon
***


Comic
***


Bitmoji
***


## Notions and TODOs
- For encoder, I experimented with vae-encoder but found no significant improvement for inversion. I follow the "encoding into z plus space" way as the author does. I will release the vae-encoder version later, but I only offer a vanilla encoder this time.
- For generator, I released vanilla stylegan2-generator, and `attribute-aware generator` will be released in next version.
- For training settings, the parameters have slight difference from the paper. And I also tried `ADA`, `freezeD` and other methods not mentioned in paper.
- More styles will be available in the next version.
- More applications will be available in the next version.
- Further code clean jobs.
## Acknowledgments
Codes reference:
- https://github.com/open-mmlab/mmcv
- https://github.com/open-mmlab/mmgeneration
- https://github.com/GuoxianSong/AgileGAN
- https://github.com/flyingbread-elon/AgileGAN
- https://github.com/eladrich/pixel2style2pixel
- https://github.com/happy-jihye/Cartoon-StyleGAN
- https://github.com/NVlabs/stylegan2-ada-pytorch
- https://github.com/sangwoomo/FreezeD
- https://github.com/bryandlee/FreezeG
- https://github.com/justinpinkney/toonify
Display photos from:
https://unsplash.com/t/people
Web demo powered by:
https://gradio.app/
## License
This project is released under the [Apache 2.0 license](https://github.com/open-mmlab/MMGEN-FaceStylor/blob/master/LICENSE). Some implementation in MMGEN-FaceStylor are with other licenses instead of Apache2.0. Please refer to [LICENSES.md](https://github.com/open-mmlab/MMGEN-FaceStylor/blob/master/LICENSE.md) for the careful check, if you are using our code for commercial matters.