https://github.com/openatx/uiautomator2
Android Uiautomator2 Python Wrapper
https://github.com/openatx/uiautomator2
python test uiautomator
Last synced: about 1 year ago
JSON representation
Android Uiautomator2 Python Wrapper
- Host: GitHub
- URL: https://github.com/openatx/uiautomator2
- Owner: openatx
- License: mit
- Created: 2017-09-17T12:20:42.000Z (almost 9 years ago)
- Default Branch: master
- Last Pushed: 2025-05-09T23:05:16.000Z (about 1 year ago)
- Last Synced: 2025-05-12T02:45:42.158Z (about 1 year ago)
- Topics: python, test, uiautomator
- Language: Python
- Size: 1.59 MB
- Stars: 7,107
- Watchers: 189
- Forks: 1,461
- Open Issues: 175
-
Metadata Files:
- Readme: README.md
- Changelog: CHANGELOG
- License: LICENSE
Awesome Lists containing this project
- awesome-tester - uiautomator2 - 基于 Python 的 UI 自动化测试框架,可支持 Android/iOS (自动化工具)
- awesome-testing - Uiautomator2
- awesome-starts - openatx/uiautomator2 - Android Uiautomator2 Python Wrapper (Python)
- awesome - openatx/uiautomator2 - Android Uiautomator2 Python Wrapper (Python)
README
# uiautomator2
[📖 阅读中文版](README_CN.md)
[](https://pypi.python.org/pypi/uiautomator2)

[](https://codecov.io/gh/openatx/uiautomator2)
QQ group: **815453846**
Discord:
> I haven't maintained this project for a while (maybe two years), but recently I needed to research Android native automation again for work. Of course, I also investigated Appium. Comparing the two, I found that the uiautomator2 project runs really fast, from detecting elements to clicking, all in milliseconds, and the code is relatively easy to understand. I never expected to have written such a magical project before. How can such a good project be left to gather dust? It needs to be properly maintained, and some garbage code needs to be cleaned up. So the project version has been upgraded from 2.x.x to 3.x.x.
Users still using version 2.x.x can first check [2to3](docs/2to3.md) to decide whether to upgrade to 3.x.x (I personally highly recommend upgrading).
Since this is a major version upgrade from 2 to 3, many functions have been removed. First, the atx-agent has been removed, followed by a bunch of atx-agent related functions. Deprecated features like init have also been removed.
Various dependency library version numbers
- [](https://pypi.python.org/pypi/uiautomator2)
- [](https://github.com/openatx/adbutils)
- [](https://github.com/openatx/android-uiautomator-server)
- ~~[](https://github.com/openatx/atx-agent)~~
[UiAutomator](https://developer.android.com/training/testing/ui-automator.html) is a Java library provided by Google for Android automation testing, based on the Accessibility service. It is very powerful and can test third-party apps, obtain any control properties of any app on the screen, and perform any operation on them. However, it has two drawbacks: 1. Test scripts can only be written in Java. 2. Test scripts need to be packaged into jar or apk files and uploaded to the device to run.
We hope that the test logic can be written in Python and can control the phone while running on the computer. Here, we must thank Xiaocong He ([@xiaocong][]), who realized this idea (see [xiaocong/uiautomator](https://github.com/xiaocong/uiautomator)). The principle is to run an HTTP RPC service on the phone, open up the functions in uiautomator, and then encapsulate these HTTP interfaces into a Python library.
Since the `xiaocong/uiautomator` library has not been updated for a long time, we directly forked a version. To make it easier to distinguish, we added a 2 at the end [openatx/uiautomator2](https://github.com/openatx/uiautomator2). I also forked a corresponding Android package source code [openatx/android-uiautomator-server](https://github.com/openatx/android-uiautomator-server).
In addition to fixing bugs in the original library, we have added many new features. The main parts are as follows:
* ~~The device and the development machine can be connected via WiFi without a data cable (based on [atx-agent](https://github.com/openatx/atx-agent))~~
* ~~Integrated [openstf/minicap](https://github.com/openstf/minicap) for real-time screen projection and real-time screenshots~~
* ~~Integrated [openstf/minitouch](https://github.com/openstf/minitouch) for precise real-time device control~~
* Fixed the frequent exit issue of [xiaocong/uiautomator](https://github.com/xiaocong/uiautomator)
* Refactored and streamlined the code for easier maintenance
* Implemented a device management platform (also supports iOS) [atxserver2](https://github.com/openatx/atxserver2) (Note: currently not well maintained)
* Expanded the functionality of toast retrieval and display (requires manual enabling of ATX's floating window permission) Seems to have a bug and is unusable
> Here I need to clarify, because many people often ask, openatx/uiautomator2 does not support iOS testing. For iOS automation testing, you can switch to this library [openatx/facebook-wda](https://github.com/openatx/facebook-wda).
> PS: This library ~~~~ is no longer maintained, please switch as soon as possible.
Here is a quick reference for those who are already familiar with it [QUICK REFERENCE GUIDE](QUICK_REFERENCE.md). Feel free to provide feedback.
## Requirements
- Android version 4.4+
- Python 3.8+
## QUICK START
First, prepare an Android phone (not two) with `Developer Options` enabled, connect it to the computer, and make sure you can see the connected device by running `adb devices`.
Run `pip3 install -U uiautomator2` to install uiautomator2.
Run `python` in the command line to open the Python interactive window. Then enter the following commands into the window.
```python
import uiautomator2 as u2
d = u2.connect() # connect to device
print(d.info)
```
If you see output similar to the following, you can officially start using this library. Since this library has many features, there is still a lot of content to cover later...
```
{'currentPackageName': 'net.oneplus.launcher', 'displayHeight': 1920, 'displayRotation': 0, 'displaySizeDpX': 411, 'displaySizeDpY': 731, 'displayWidth': 1080, 'productName': 'OnePlus5', 'screenOn': True, 'sdkInt': 27, 'naturalOrientation': True}
```
Additionally, to maintain stability, you need to enable the floating window permission for the `yellow car`. Refer to the article [py-uiautomator2 keeps the service available for a long time through the floating window](https://zhuanlan.zhihu.com/p/688009468).
In general, it will succeed, but there may be unexpected situations. You can join the QQ group to report issues (group number at the top), and there are many experts in the group who can help you solve problems.
## Sponsors
Thank you to all our sponsors! ✨🍰✨
### Gold Sponsor
Empty
# Article Recommended
Excellent articles recommended (feel free to @ me in the QQ group for feedback)
- [How to deploy uiautomator2 in termux](https://www.cnblogs.com/ze-yan/p/12242383.html) by `Chengdu - Tester who knows a little`
## Related Projects
- A library for interacting with Android via the adb protocol [adbutils](https://github.com/openatx/adbutils)
- [uiauto.dev](https://uiauto.dev) for viewing UI hierarchy, similar to uiautomatorviewer (used to replace the previously written weditor), for viewing UI hierarchy
- Device management platform, useful when there are many devices [atxserver2](https://github.com/openatx/atxserver2) (looking for project maintainers)
- ~~[atx-agent](https://github.com/openatx/atx-agent) A resident program running on the device, developed in Go, used to keep related services on the device alive~~
- ~~[weditor](https://github.com/openatx/weditor) Similar to uiautomatorviewer, a dedicated editor developed for this project (currently not maintained)~~
**[Installation](#installation)**
**[Connect to a device](#connect-to-a-device)**
**[Command line](#command-line)**
**[Global settings](#global-settings)**
- **[Debug HTTP requests](#debug-http-requests)**
- **[Implicit wait](#implicit-wait)**
**[App management](#app-management)**
- **[Install an app](#install-an-app)**
- **[Launch an app](#launch-an-app)**
- **[Stop an app](#stop-an-app)**
- **[Stop all running apps](#stop-all-running-apps)**
- **[Push and pull files](#push-and-pull-files)**
- **[Other app operations](#other-app-operations)**
**[UI automation](#basic-api-usages)**
- **[Shell commands](#shell-commands)**
- **[Session](#session)**
- **[Retrieve the device info](#retrieve-the-device-info)**
- **[Key Events](#key-events)**
- **[Gesture interaction with the device](#gesture-interaction-with-the-device)**
- **[Screen-related](#screen-related)**
- **[Selector](#selector)**
- **[Watcher](#watcher)**
- **[Global settings](#global-settings)**
- **[Input method](#input-method)**
- **[Toast](#toast)**
- **[XPath](#xpath)**
- **[Screenrecord](#screenrecord)**
- **[Image match](#image-match) Removed**
**[Contributors](#contributors)**
**[LICENSE](#license)**
# Installation
1. Install uiautomator2
```bash
pip install -U uiautomator2
```
Test if the installation is successful `uiautomator2 --help`
2. UI Inspector
```bash
pip install uiautodev
# Start
uiauto.dev
```
Open the browser and go to https://uiauto.dev to view the current device's interface structure.
**uiauto.dev**
[uiauto.dev](https://github.com/codeskyblue/uiauto.dev) is a project independent of uiautomator2, used to view the layer structure. It is a refactored version of the old project [weditor](https://github.com/openatx/weditor). It may be charged in the future (the price will definitely be worth it) to support the continued maintenance of this project. If you are interested, you can join the group for discussion (including making requests) QQ group 536481989
# Connect to a device
Use serial number to connect to the device, e.g., `123456f` (seen from `adb devices`)
```python
import uiautomator2 as u2
d = u2.connect('123456f') # alias for u2.connect_usb('123456f')
print(d.info)
```
Serial can be passed through env-var `ANDROID_SERIAL`
```python
# export ANDROID_SERIAL=123456f
d = u2.connect()
```
# Command line
`$device_ip` represents the device's IP address
To specify a device, pass in `--serial` like `python3 -m uiautomator2 --serial bff1234 `, where SubCommand is a subcommand (screenshot, current, etc.)
> 1.0.3 Added: `python3 -m uiautomator2` equals to `uiautomator2`
- screenshot: Take a screenshot
```bash
$ uiautomator2 screenshot screenshot.jpg
```
- current: Get the current package name and activity
```bash
$ uiautomator2 current
{
"package": "com.android.browser",
"activity": "com.uc.browser.InnerUCMobile",
"pid": 28478
}
```
- uninstall: Uninstall app
```bash
$ uiautomator2 uninstall # Uninstall a package
$ uiautomator2 uninstall # Uninstall multiple packages
$ uiautomator2 uninstall --all # Uninstall all
```
- stop: Stop app
```bash
$ uiautomator2 stop com.example.app # Stop an app
$ uiautomator2 stop --all # Stop all apps
```
- doctor:
```bash
$ uiautomator2 doctor
[I 2024-04-25 19:53:36,288 __main__:101 pid:15596] uiautomator2 is OK
```
# API Documents
### New command timeout (Removed)
When python quits, the UiAutomation service also quits.
### Debug HTTP requests
Print out the HTTP request information behind the code
```python
>>> d.debug = True
>>> d.info
12:32:47.182 $ curl -X POST -d '{"jsonrpc": "2.0", "id": "b80d3a488580be1f3e9cb3e926175310", "method": "deviceInfo", "params": {}}' 'http://127.0.0.1:54179/jsonrpc/0'
12:32:47.225 Response >>>
{"jsonrpc":"2.0","id":"b80d3a488580be1f3e9cb3e926175310","result":{"currentPackageName":"com.android.mms","displayHeight":1920,"displayRotation":0,"displaySizeDpX":360,"displaySizeDpY":640,"displayWidth":1080,"productName":"odin","screenOn":true,"sdkInt":25,"naturalOrientation":true}}
<<< END
```
### Implicit wait
Set the element search wait time (default 20s)
```python
d.implicitly_wait(10.0) # can also be modified by d.settings['wait_timeout'] = 10.0
d(text="Settings").click() # if the Settings button does not appear in 10s, UiObjectNotFoundError will be raised
print("wait timeout", d.implicitly_wait()) # get default implicit wait
```
This function will have an influence on `click`, `long_click`, `drag_to`, `get_text`, `set_text`, `clear_text`, etc.
## App management
This part showcases how to perform app management
### Install an app
We only support installing an APK from a URL
```python
d.app_install('http://some-domain.com/some.apk')
```
### Launch an app
```python
# The default method is to parse the mainActivity of the apk package through atx-agent, and then call am start -n $package/$activity to start
d.app_start("com.example.hello_world")
# Use monkey -p com.example.hello_world -c android.intent.category.LAUNCHER 1 to start
# This method has a side effect, it will automatically turn off the phone's rotation lock
d.app_start("com.example.hello_world", use_monkey=True) # start with package name
# Start the application by specifying the main activity, equivalent to calling am start -n com.example.hello_world/.MainActivity
d.app_start("com.example.hello_world", ".MainActivity")
```
### Stop an app
```python
# equivalent to `am force-stop`, thus you could lose data
d.app_stop("com.example.hello_world")
# equivalent to `pm clear`
d.app_clear('com.example.hello_world')
```
### Stop all running apps
```python
# stop all
d.app_stop_all()
# stop all apps except for com.examples.demo
d.app_stop_all(excludes=['com.examples.demo'])
```
### Get app info
```python
d.app_info("com.examples.demo")
# expect output
#{
# "mainActivity": "com.github.uiautomator.MainActivity",
# "label": "ATX",
# "versionName": "1.1.7",
# "versionCode": 1001007,
# "size":1760809
#}
# save app icon
img = d.app_icon("com.examples.demo")
img.save("icon.png")
```
### List all running apps
```python
d.app_list_running()
# expect output
# ["com.xxxx.xxxx", "com.github.uiautomator", "xxxx"]
```
### Wait until app running
```python
pid = d.app_wait("com.example.android") # wait for the app to run, return pid(int)
if not pid:
print("com.example.android is not running")
else:
print("com.example.android pid is %d" % pid)
d.app_wait("com.example.android", front=True) # wait for the app to run in the foreground
d.app_wait("com.example.android", timeout=20.0) # maximum wait time 20s (default)
```
> Added in version 1.2.0
### Push and pull files
* push a file to the device
```python
# push to a folder
d.push("foo.txt", "/sdcard/")
# push and rename
d.push("foo.txt", "/sdcard/bar.txt")
# push fileobj
with open("foo.txt", 'rb') as f:
d.push(f, "/sdcard/")
# push and change file access mode
d.push("foo.sh", "/data/local/tmp/", mode=0o755)
```
* pull a file from the device
```python
d.pull("/sdcard/tmp.txt", "tmp.txt")
# FileNotFoundError will raise if the file is not found on the device
d.pull("/sdcard/some-file-not-exists.txt", "tmp.txt")
```
### Other app operations
```python
# grant all the permissions
d.app_auto_grant_permissions("io.appium.android.apis")
# open scheme
d.open_url("appname://appnamehost")
# same as
# adb shell am start -a android.intent.action.VIEW -d "appname://appnamehost"
```
## Basic API Usages
This part showcases how to perform common device operations:
### Shell commands
* Run a short-lived shell command with a timeout protection. (Default timeout 60s)
Note: timeout support requires `atx-agent >=0.3.3`
`adb_shell` function is deprecated. Use `shell` instead.
Simple usage
```python
output, exit_code = d.shell("pwd", timeout=60) # timeout 60s (Default)
# output: "/\n", exit_code: 0
# Similar to command: adb shell pwd
# Since `shell` function return type is `namedtuple("ShellResponse", ("output", "exit_code"))`
# so we can do some tricks
output = d.shell("pwd").output
exit_code = d.shell("pwd").exit_code
```
The first argument can be a list. for example
```python
output, exit_code = d.shell(["ls", "-l"])
# output: "/....", exit_code: 0
```
This returns a string for stdout merged with stderr.
If the command is a blocking command, `shell` will also block until the command is completed or the timeout kicks in. No partial output will be received during the execution of the command. This API is not suitable for long-running commands. The shell command given runs in a similar environment of `adb shell`, which has a Linux permission level of `adb` or `shell` (higher than an app permission).
* Run a long-running shell command (Removed)
### Session
Session represents an app lifecycle. Can be used to start the app, detect app crash.
* Launch and close app
```python
sess = d.session("com.netease.cloudmusic") # start NetEase Cloud Music
sess.close() # stop NetEase Cloud Music
sess.restart() # cold start NetEase Cloud Music
```
* Use python `with` to launch and close app
```python
with d.session("com.netease.cloudmusic") as sess:
sess(text="Play").click()
```
* Attach to the running app
```python
# launch app if not running, skip launch if already running
sess = d.session("com.netease.cloudmusic", attach=True)
```
* Detect app crash
```python
# When the app is still running
sess(text="Music").click() # operation goes normal
# If the app crashes or quits
sess(text="Music").click() # raise SessionBrokenError
# other function calls under session will raise SessionBrokenError too
```
```python
# check if the session is ok.
# Warning: function name may change in the future
sess.running() # True or False
```
### Retrieve the device info
Get basic information
```python
d.info
```
Below is a possible output:
```
{'currentPackageName': 'com.android.systemui',
'displayHeight': 1560,
'displayRotation': 0,
'displaySizeDpX': 360,
'displaySizeDpY': 780,
'displayWidth': 720,
'naturalOrientation': True,
'productName': 'ELE-AL00',
'screenOn': True,
'sdkInt': 29}
```
Get window size
```python
print(d.window_size())
# device upright output example: (1080, 1920)
# device horizontal output example: (1920, 1080)
```
Get current app info. For some android devices, the output could be empty (see *Output example 3*)
```python
print(d.app_current())
# Output example 1: {'activity': '.Client', 'package': 'com.netease.example', 'pid': 23710}
# Output example 2: {'activity': '.Client', 'package': 'com.netease.example'}
# Output example 3: {'activity': None, 'package': None}
```
Wait activity
```python
d.wait_activity(".ApiDemos", timeout=10) # default timeout 10.0 seconds
# Output: true or false
```
Get device serial number
```python
print(d.serial)
# output example: 74aAEDR428Z9
```
Get WLAN IP
```python
print(d.wlan_ip)
# output example: 10.0.0.1 or None
```
~~Get detailed device info~~ `d.device_info`
device_info
```python
print(d.device_info)
```
Below is a possible output:
```
{'arch': 'arm64-v8a',
'brand': 'google',
'model': 'sdk_gphone64_arm64',
'sdk': 34,
'serial': 'EMULATOR34X1X19X0',
'version': 14}
```
### Clipboard
Get or set clipboard content
Set clipboard content or get content
* clipboard/set_clipboard
```python
d.clipboard = 'hello-world'
# or
d.set_clipboard('hello-world', 'label')
```
Get clipboard content
> get clipboard requires IME(com.github.uiautomator/.AdbKeyboard) call `d.set_input_ime()` before using it.
```python
# get clipboard content
print(d.clipboard)
```
### Key Events
* Turn on/off screen
```python
d.screen_on() # turn on the screen
d.screen_off() # turn off the screen
```
* Get current screen status
```python
d.info.get('screenOn') # require Android >= 4.4
```
* Press hard/soft key
```python
d.press("home") # press the home key, with key name
d.press("back") # press the back key, with key name
d.press(0x07, 0x02) # press keycode 0x07('0') with META ALT(0x02)
```
* These key names are currently supported:
- home
- back
- left
- right
- up
- down
- center
- menu
- search
- enter
- delete (or del)
- recent (recent apps)
- volume_up
- volume_down
- volume_mute
- camera
- power
You can find all key code definitions at [Android KeyEvent](https://developer.android.com/reference/android/view/KeyEvent.html)
* Unlock screen
```python
d.unlock()
# This is equivalent to
# 1. press("power")
# 2. swipe from left-bottom to right-top
```
### Gesture interaction with the device
* Click on the screen
```python
d.click(x, y)
```
* Double click
```python
d.double_click(x, y)
d.double_click(x, y, 0.1) # default duration between two clicks is 0.1s
```
* Long click on the screen
```python
d.long_click(x, y)
d.long_click(x, y, 0.5) # long click 0.5s (default)
```
* Swipe
```python
d.swipe(sx, sy, ex, ey)
d.swipe(sx, sy, ex, ey, 0.5) # swipe for 0.5s (default)
```
* SwipeExt extended function
```python
d.swipe_ext("right") # swipe right, 4 options "left", "right", "up", "down"
d.swipe_ext("right", scale=0.9) # default 0.9, swipe distance is 90% of the screen width
d.swipe_ext("right", box=(0, 0, 100, 100)) # swipe in the area (0,0) -> (100, 100)
# Practice found that when swiping up or down, starting from the midpoint has a higher success rate
d.swipe_ext("up", scale=0.8) # The code will vkk
# You can also use Direction as a parameter
from uiautomator2 import Direction
d.swipe_ext(Direction.FORWARD) # Page down, equivalent to d.swipe_ext("up"), just easier to understand
d.swipe_ext(Direction.BACKWARD) # Page up
d.swipe_ext(Direction.HORIZ_FORWARD) # Page horizontally right
d.swipe_ext(Direction.HORIZ_BACKWARD) # Page horizontally left
```
* Drag
```python
d.drag(sx, sy, ex, ey)
d.drag(sx, sy, ex, ey, 0.5) # swipe for 0.5s (default)
* Swipe points
```python
# swipe from point(x0, y0) to point(x1, y1) then to point(x2, y2)
# time will speed 0.2s between two points
d.swipe_points([(x0, y0), (x1, y1), (x2, y2)], 0.2))
```
Mostly used for nine-grid unlock, get the relative coordinates of each point in advance (percentage is supported here),
For more detailed usage, refer to this post [Using u2 to achieve nine-grid pattern unlock](https://testerhome.com/topics/11034)
* Touch and drag (Beta)
This interface belongs to a relatively low-level original interface, which feels imperfect, but it can be used. Note: this place does not support percentages
```python
d.touch.down(10, 10) # Simulate press
time.sleep(.01) # Delay between down and move, control it yourself
d.touch.move(15, 15) # Simulate move
d.touch.up(10, 10) # Simulate release
```
Note: click, swipe, drag operations support percentage position values. Example:
`d.long_click(0.5, 0.5)` means long click center of the screen
### Screen-related
* Retrieve/Set device orientation
The possible orientations:
- `natural` or `n`
- `left` or `l`
- `right` or `r`
- `upsidedown` or `u` (cannot be set)
```python
# retrieve orientation. the output could be "natural" or "left" or "right" or "upsidedown"
orientation = d.orientation
# WARNING: not pass testing in my TT-M1
# set orientation and freeze rotation.
# notes: setting "upsidedown" requires Android>=4.3.
d.set_orientation('l') # or "left"
d.set_orientation("l") # or "left"
d.set_orientation("r") # or "right"
d.set_orientation("n") # or "natural"
```
* Freeze/Un-freeze rotation
```python
# freeze rotation
d.freeze_rotation()
# un-freeze rotation
d.freeze_rotation(False)
```
* Take screenshot
```python
# take screenshot and save to a file on the computer, require Android>=4.2.
d.screenshot("home.jpg")
# get PIL.Image formatted images. Naturally, you need pillow installed first
image = d.screenshot() # default format="pillow"
image.save("home.jpg") # or home.png. Currently, only png and jpg are supported
# get opencv formatted images. Naturally, you need numpy and cv2 installed first
import cv2
image = d.screenshot(format='opencv')
cv2.imwrite('home.jpg', image)
# get raw jpeg data
imagebin = d.screenshot(format='raw')
open("some.jpg", "wb").write(imagebin)
```
* Dump UI hierarchy
```python
# get the UI hierarchy dump content
xml = d.dump_hierarchy()
# compressed=True: include not important nodes
# pretty: format xml
# max_depth: limit xml depth, default 50
xml = d.dump_hierarchy(compressed=False, pretty=False, max_depth=50)
```
* Open notification or quick settings
```python
d.open_notification()
d.open_quick_settings()
```
### Selector
Selector is a handy mechanism to identify a specific UI object in the current window.
```python
# Select the object with text 'Clock' and its className is 'android.widget.TextView'
d(text='Clock', className='android.widget.TextView')
```
Selector supports below parameters. Refer to [UiSelector Java doc](http://developer.android.com/tools/help/uiautomator/UiSelector.html) for detailed information.
* `text`, `textContains`, `textMatches`, `textStartsWith`
* `className`, `classNameMatches`
* `description`, `descriptionContains`, `descriptionMatches`, `descriptionStartsWith`
* `checkable`, `checked`, `clickable`, `longClickable`
* `scrollable`, `enabled`,`focusable`, `focused`, `selected`
* `packageName`, `packageNameMatches`
* `resourceId`, `resourceIdMatches`
* `index`, `instance`
#### Children and siblings
* children
```python
# get the children or grandchildren
d(className="android.widget.ListView").child(text="Bluetooth")
```
* siblings
```python
# get siblings
d(text="Google").sibling(className="android.widget.ImageView")
```
* children by text or description or instance
```python
# get the child matching the condition className="android.widget.LinearLayout"
# and also its children or grandchildren with text "Bluetooth"
d(className="android.widget.ListView", resourceId="android:id/list") \
.child_by_text("Bluetooth", className="android.widget.LinearLayout")
# get children by allowing scroll search
d(className="android.widget.ListView", resourceId="android:id/list") \
.child_by_text(
"Bluetooth",
allow_scroll_search=True,
className="android.widget.LinearLayout"
)
```
- `child_by_description` is to find children whose grandchildren have
the specified description, other parameters being similar to `child_by_text`.
- `child_by_instance` is to find children with has a child UI element anywhere
within its sub hierarchy that is at the instance specified. It is performed
on visible views **without scrolling**.
See below links for detailed information:
- [UiScrollable](http://developer.android.com/tools/help/uiautomator/UiScrollable.html), `getChildByDescription`, `getChildByText`, `getChildByInstance`
- [UiCollection](http://developer.android.com/tools/help/uiautomator/UiCollection.html), `getChildByDescription`, `getChildByText`, `getChildByInstance`
Above methods support chained invoking, e.g. for below hierarchy
```xml
...
```
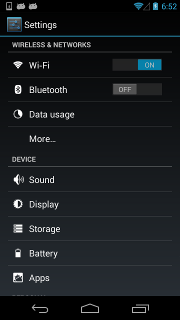
To click the switch widget right to the TextView 'Wi‑Fi', we need to select the switch widgets first. However, according to the UI hierarchy, more than one switch widget exists and has almost the same properties. Selecting by className will not work. Alternatively, the below selecting strategy would help:
```python
d(className="android.widget.ListView", resourceId="android:id/list") \
.child_by_text("Wi‑Fi", className="android.widget.LinearLayout") \
.child(className="android.widget.Switch") \
.click()
```
* relative positioning
Also, we can use the relative positioning methods to get the view: `left`, `right`, `top`, `bottom`.
- `d(A).left(B)`, selects B on the left side of A.
- `d(A).right(B)`, selects B on the right side of A.
- `d(A).up(B)`, selects B above A.
- `d(A).down(B)`, selects B under A.
So for above cases, we can alternatively select it with:
```python
## select "switch" on the right side of "Wi‑Fi"
d(text="Wi‑Fi").right(className="android.widget.Switch").click()
```
* Multiple instances
Sometimes the screen may contain multiple views with the same properties, e.g., text, then you will
have to use the "instance" property in the selector to pick one of the qualifying instances, like below:
```python
d(text="Add new", instance=0) # which means the first instance with text "Add new"
```
In addition, uiautomator2 provides a list-like API (similar to jQuery):
```python
# get the count of views with text "Add new" on the current screen
d(text="Add new").count
# same as count property
len(d(text="Add new"))
# get the instance via index
d(text="Add new")[0]
d(text="Add new")[1]
...
# iterator
for view in d(text="Add new"):
view.info # ...
```
**Notes**: when using selectors in a code block that walks through the result list, you must ensure that the UI elements on the screen
keep unchanged. Otherwise, when Element-Not-Found error could occur when iterating through the list.
#### Get the selected UI object status and its information
* Check if the specific UI object exists
```python
d(text="Settings").exists # True if exists, else False
d.exists(text="Settings") # alias of above property.
# advanced usage
d(text="Settings").exists(timeout=3) # wait for Settings to appear in 3s, same as .wait(3)
```
* Retrieve the info of the specific UI object
```python
d(text="Settings").info
```
Below is a possible output:
```
{ u'contentDescription': u'',
u'checked': False,
u'scrollable': False,
u'text': u'Settings',
u'packageName': u'com.android.launcher',
u'selected': False,
u'enabled': True,
u'bounds': {u'top': 385,
u'right': 360,
u'bottom': 585,
u'left': 200},
u'className': u'android.widget.TextView',
u'focused': False,
u'focusable': True,
u'clickable': True,
u'chileCount': 0,
u'longClickable': True,
u'visibleBounds': {u'top': 385,
u'right': 360,
u'bottom': 585,
u'left': 200},
u'checkable': False
}
```
* Get/Set/Clear text of an editable field (e.g., EditText widgets)
```python
d(text="Settings").get_text() # get widget text
d(text="Settings").set_text("My text...") # set the text
d(text="Settings").clear_text() # clear the text
```
* Get Widget center point
```python
x, y = d(text="Settings").center()
# x, y = d(text="Settings").center(offset=(0, 0)) # left-top x, y
```
* Take screenshot of widget
```python
im = d(text="Settings").screenshot()
im.save("settings.jpg")
```
#### Perform the click action on the selected UI object
* Perform click on the specific object
```python
# click on the center of the specific UI object
d(text="Settings").click()
# wait for the element to appear for at most 10 seconds and then click
d(text="Settings").click(timeout=10)
# click with offset(x_offset, y_offset)
# click_x = x_offset * width + x_left_top
# click_y = y_offset * height + y_left_top
d(text="Settings").click(offset=(0.5, 0.5)) # Default center
d(text="Settings").click(offset=(0, 0)) # click left-top
d(text="Settings").click(offset=(1, 1)) # click right-bottom
# click when exists in 10s, default timeout 0s
clicked = d(text='Skip').click_exists(timeout=10.0)
# click until the element is gone, return bool
is_gone = d(text="Skip").click_gone(maxretry=10, interval=1.0) # maxretry default 10, interval default 1.0
```
* Perform long click on the specific UI object
```python
# long click on the center of the specific UI object
d(text="Settings").long_click()
```
#### Gesture actions for the specific UI object
* Drag the UI object towards another point or another UI object
```python
# notes: drag cannot be used for Android<4.3.
# drag the UI object to a screen point (x, y), in 0.5 seconds
d(text="Settings").drag_to(x, y, duration=0.5)
# drag the UI object to (the center position of) another UI object, in 0.25 seconds
d(text="Settings").drag_to(text="Clock", duration=0.25)
```
* Swipe from the center of the UI object to its edge
Swipe supports 4 directions:
- left
- right
- top
- bottom
```python
d(text="Settings").swipe("right")
d(text="Settings").swipe("left", steps=10)
d(text="Settings").swipe("up", steps=20) # 1 step is about 5ms, so 20 steps is about 0.1s
d(text="Settings").swipe("down", steps=20)
```
* Two-point gesture from one point to another
```python
d(text="Settings").gesture((sx1, sy1), (sx2, sy2), (ex1, ey1), (ex2, ey2))
```
* Two-point gesture on the specific UI object
Supports two gestures:
- `In`, from edge to center
- `Out`, from center to edge
```python
# notes: pinch cannot be set until Android 4.3.
# from edge to center. here is "In" not "in"
d(text="Settings").pinch_in(percent=100, steps=10)
# from center to edge
d(text="Settings").pinch_out()
```
* Wait until the specific UI appears or disappears
```python
# wait until the UI object appears
d(text="Settings").wait(timeout=3.0) # return bool
# wait until the UI object is gone
d(text="Settings").wait_gone(timeout=1.0)
```
The default timeout is 20s. see **global settings** for more details
* Perform fling on the specific UI object (scrollable)
Possible properties:
- `horiz` or `vert`
- `forward` or `backward` or `toBeginning` or `toEnd`
```python
# fling forward (default) vertically (default)
d(scrollable=True).fling()
# fling forward horizontally
d(scrollable=True).fling.horiz.forward()
# fling backward vertically
d(scrollable=True).fling.vert.backward()
# fling to beginning horizontally
d(scrollable=True).fling.horiz.toBeginning(max_swipes=1000)
# fling to end vertically
d(scrollable=True).fling.toEnd()
```
* Perform scroll on the specific UI object (scrollable)
Possible properties:
- `horiz` or `vert`
- `forward` or `backward` or `toBeginning` or `toEnd`, or `to`
```python
# scroll forward (default) vertically (default)
d(scrollable=True).scroll(steps=10)
# scroll forward horizontally
d(scrollable=True).scroll.horiz.forward(steps=100)
# scroll backward vertically
d(scrollable=True).scroll.vert.backward()
# scroll to beginning horizontally
d(scrollable=True).scroll.horiz.toBeginning(steps=100, max_swipes=1000)
# scroll to end vertically
d(scrollable=True).scroll.toEnd()
# scroll forward vertically until specific UI object appears
d(scrollable=True).scroll.to(text="Security")
```
### WatchContext
Currently, this watch_context is started with threading and checks every 2s.
Currently, only the click trigger operation is available.
```python
with d.watch_context() as ctx:
# When both (Download Now or Update Now) and Cancel buttons appear, click Cancel
ctx.when("^Download Now|Update Now").when("Cancel").click()
ctx.when("Agree").click()
ctx.when("OK").click()
# The above three lines of code are executed immediately, without any waiting
ctx.wait_stable() # Start popup monitoring and wait for the interface to stabilize (no popups within two popup check cycles means stable)
# Use the call function to trigger function callbacks
# call supports two parameters, d and el, regardless of parameter position, can be omitted, if passed, the variable name cannot be wrong
# eg: When an element matches Midsummer Night, click the back button
ctx.when("Midsummer Night").call(lambda d: d.press("back"))
ctx.when("OK").call(lambda el: el.click())
# Other operations
# For convenience, you can also use the default popup monitoring logic in the code
# Below is the current built-in default logic, you can @ the group owner in the group to add new logic, or directly submit a PR
# when("Continue to use").click()
# when("Move to control").when("Cancel").click()
# when("^Download Now|Update Now").when("Cancel").click()
# when("Agree").click()
# when("^(OK|Confirm)").click()
with d.watch_context(builtin=True) as ctx:
# Add on top of the existing logic
ctx.when("@tb:id/jview_view").when('//*[@content-desc="Image"]').click()
# Other script logic
```
Another way to write it
```python
ctx = d.watch_context()
ctx.when("Settings").click()
ctx.wait_stable() # Wait for the interface to no longer have popups
ctx.close()
```
### Watcher
**WatchContext is more recommended** The writing is more concise
~~You can register [watchers](http://developer.android.com/tools/help/uiautomator/UiWatcher.html) to perform some actions when a selector does not find a match.~~
Before version 2.0.0, the [Watcher]((http://developer.android.com/tools/help/uiautomator/UiWatcher.html) method provided by the uiautomator-jar library was used, but in practice, it was found that once the uiautomator connection failed and restarted, all watcher configurations were lost, which is definitely unacceptable.
So currently, a method of running a thread in the background (depending on the threading library) is used, and then the hierarchy is dumped every once in a while. When an element is matched, the corresponding operation is performed.
Usage example
Register monitoring
```python
# Common writing, register anonymous monitoring
d.watcher.when("Install").click()
# Register monitoring named ANR, when ANR and Force Close appear, click Force Close
d.watcher("ANR").when(xpath="ANR").when("Force Close").click()
# Other callback examples
d.watcher.when("Grab red envelope").press("back")
d.watcher.when("//*[@text = 'Out of memory']").call(lambda d: d.shell('am force-stop com.im.qq'))
# Callback description
def click_callback(d: u2.Device):
d.xpath("OK").click() # Calling in the callback will not trigger the watcher again
d.xpath("Continue").click() # When using d.xpath to check elements, the watcher will be triggered (currently up to 5 times)
# Start background monitoring
d.watcher.start()
```
Monitoring operations
```python
# Remove ANR monitoring
d.watcher.remove("ANR")
# Remove all monitoring
d.watcher.remove()
# Start background monitoring
d.watcher.start()
d.watcher.start(2.0) # Default monitoring interval 2.0s
# Force run all monitoring
d.watcher.run()
# Stop monitoring
d.watcher.stop()
# Stop and remove all monitoring, commonly used for initialization
d.watcher.reset()
```
In addition, there are still many documents not written, it is recommended to directly look at the source code [watcher.py](uiautomator2/watcher.py)
### Global settings
```python
u2.HTTP_TIMEOUT = 60 # Default value 60s, default HTTP request timeout
```
Other configurations are currently mostly concentrated in `d.settings`, and configurations may be added or removed based on future needs.
```python
print(d.settings)
{'operation_delay': (0, 0),
'operation_delay_methods': ['click', 'swipe'],
'wait_timeout': 20.0}
# Configure delay before click 0.5s, delay after click 1s
d.settings['operation_delay'] = (.5, 1)
# Modify the methods for which the delay takes effect
# Among them, double_click, long_click all correspond to click
d.settings['operation_delay_methods'] = ['click', 'swipe', 'drag', 'press']
d.settings['wait_timeout'] = 20.0 # Default control wait time (native operation, xpath plugin wait time)
d.settings['max_depth'] = 50 # Default 50, limit the element level returned by dump_hierarchy
```
For deprecated configurations with version upgrades, a Deprecated warning will be given, but no exception will be thrown.
```bash
>>> d.settings['click_before_delay'] = 1
[W 200514 14:55:59 settings:72] d.settings[click_before_delay] deprecated: Use operation_delay instead
```
**uiautomator recovery method settings**
Careful you may have noticed that there are actually two APKs installed on the phone, one visible in the foreground (yellow car). One package name is `com.github.uiautomator.test` in the background and invisible. These two apps are signed with the same certificate.
The invisible app is actually a test package that contains all the test code, and the core test service is also started through it.
However, when running, the system needs the yellow car app to keep running (it can also run in the background). Once the yellow car app is killed, the background running test service will also be killed soon. Even if you do nothing, the app will be quickly reclaimed by the system when running in the background. (Here I hope experts can point out how to not rely on the yellow car app, it feels theoretically possible, but I don't know how to do it yet).
~~There are two ways to keep the yellow car running in the background, one is to start the app and put it in the background (default). Another way is to start a background service through `am startservice`.~~
~~You can adjust this behavior through `d.settings["uiautomator_runtest_app_background"] = True`. True means starting the app, False means starting the service.~~
UiAutomator timeout settings (hidden method)
```python
>> d.jsonrpc.getConfigurator()
{'actionAcknowledgmentTimeout': 500,
'keyInjectionDelay': 0,
'scrollAcknowledgmentTimeout': 200,
'waitForIdleTimeout': 0,
'waitForSelectorTimeout': 0}
>> d.jsonrpc.setConfigurator({"waitForIdleTimeout": 100})
{'actionAcknowledgmentTimeout': 500,
'keyInjectionDelay': 0,
'scrollAcknowledgmentTimeout': 200,
'waitForIdleTimeout': 100,
'waitForSelectorTimeout': 0}
```
To prevent the client program from responding timeout, `waitForIdleTimeout` and `waitForSelectorTimeout` are currently set to `0`
Refs: [Google uiautomator Configurator](https://developer.android.com/reference/android/support/test/uiautomator/Configurator)
### Input method
This method is usually used for input when the control is unknown.
```python
# Currently using the method of pasting from the clipboard
d.send_keys("Hello123abcEFG")
d.send_keys("Hello123abcEFG", clear=True)
d.clear_text() # Clear all content in the input box
d.send_action() # Automatically execute commands such as enter, search, etc. according to the needs of the input box, Added in version 3.1
# You can also specify the input method action to send, eg: d.send_action("search") supports go, search, send, next, done, previous
```
```python
print(d.current_ime()) # Get the current input method ID
```
> More reference: [IME_ACTION_CODE](https://developer.android.com/reference/android/view/inputmethod/EditorInfo)
### Toast
```python
print(d.last_toast) # get last toast, if not toast return None
d.clear_toast()
```
> Fixed in version 3.2.0
### XPath
Java uiautomator does not support xpath by default, so this is an extended feature. The speed is not that fast.
For example: The content of one of the nodes
```xml
```
xpath positioning and usage
Some attribute names have been modified, pay attention
```
description -> content-desc
resourceId -> resource-id
```
Common usage
```python
# wait exists 10s
d.xpath("//android.widget.TextView").wait(10.0)
# find and click
d.xpath("//*[@content-desc='Share']").click()
# check exists
if d.xpath("//android.widget.TextView[contains(@text, 'Se')]").exists:
print("exists")
# get all text-view text, attrib and center point
for elem in d.xpath("//android.widget.TextView").all():
print("Text:", elem.text)
# Dictionary eg:
# {'index': '1', 'text': '999+', 'resource-id': 'com.netease.cloudmusic:id/qb', 'package': 'com.netease.cloudmusic', 'content-desc': '', 'checkable': 'false', 'checked': 'false', 'clickable': 'false', 'enabled': 'true', 'focusable': 'false', 'focused': 'false','scrollable': 'false', 'long-clickable': 'false', 'password': 'false', 'selected': 'false', 'visible-to-user': 'true', 'bounds': '[661,1444][718,1478]'}
print("Attrib:", elem.attrib)
# Coordinate eg: (100, 200)
print("Position:", elem.center())
```
Click to view [Other common XPath usage](XPATH.md)
### Screenrecord (Deprecated)
Video recording (deprecated), use [scrcpy](https://github.com/Genymobile/scrcpy) instead
Here, the screenrecord command built into the phone is not used, but the method of obtaining phone images and synthesizing videos is used, so some other dependencies need to be installed, such as imageio, imageio-ffmpeg, numpy, etc.
Because some dependencies are relatively large, it is recommended to install them using a mirror. Just run the following command.
```bash
pip3 install -U "uiautomator2[image]" -i https://pypi.doubanio.com/simple
```
Usage
```
d.screenrecord('output.mp4')
time.sleep(10)
# or do something else
d.screenrecord.stop() # After stopping the recording, the output.mp4 file can be opened
```
When recording, you can also specify fps (currently 20), this value is lower than the speed of minicap outputting images, it feels very good, it is not recommended to modify it.
# Enable uiautomator2 logger
```python
from uiautomator2 import enable_pretty_logging
enable_pretty_logging()
```
Or
```
logger = logging.getLogger("uiautomator2")
# setup logger
```
## Stop UiAutomator
When the Python program exits, UiAutomation also exits.
However, the service can also be stopped through the interface method
```python
d.stop_uiautomator()
```
## Differences between Google UiAutomator 2.0 and 1.x
https://www.cnblogs.com/insist8089/p/6898181.html
- New interfaces: UiObject2, Until, By, BySelector
- Import method: In 2.0, the com.android.uiautomator.core.* import method is deprecated. Changed to android.support.test.uiautomator
- Build system: Maven and/or Ant (1.x); Gradle (2.0)
- The form of the generated test package: from zip/jar (1.x) to apk (2.0)
- The difference in the way to run UiAutomator tests locally with adb commands:
adb shell uiautomator runtest UiTest.jar -c package.name.ClassName (1.x)
adb shell am instrument -e class com.example.app.MyTest
com.example.app.test/android.support.test.runner.AndroidJUnitRunner (2.0)
- Can Android services and interfaces be used? 1.x~No; 2.0~Yes.
- Log output? Use System.out.print output stream to echo to the execution end (1.x); Output to Logcat (2.0)
- Execution? Test cases do not need to inherit any parent class, method names are not limited, use annotations for testing (2.0); Need to inherit UiAutomatorTestCase, test methods need to start with test (1.x)
## Dependent projects
- uiautomator jsonrpc server
- ~~uiautomator daemon ~~
# Contributors
- codeskyblue ([@codeskyblue][])
- Xiaocong He ([@xiaocong][])
- Yuanyuan Zou ([@yuanyuan][])
- Qian Jin ([@QianJin2013][])
- Xu Jingjie ([@xiscoxu][])
- Xia Mingyuan ([@mingyuan-xia][])
- Artem Iglikov, Google Inc. ([@artikz][])
[@codeskyblue]: https://github.com/codeskyblue
[@xiaocong]: https://github.com/xiaocong
[@yuanyuan]: https://github.com/yuanyuanzou
[@QianJin2013]: https://github.com/QianJin2013
[@xiscoxu]: https://github.com/xiscoxu
[@mingyuan-xia]: https://github.com/mingyuan-xia
[@artikz]: https://github.com/artikz
Other [contributors](../../graphs/contributors)
## Other excellent projects
- https://github.com/atinfo/awesome-test-automation A collection of all excellent testing frameworks, all-encompassing
- [google/mobly](https://github.com/google/mobly) Google's internal testing framework, although I don't quite understand it, it feels very useful
- https://github.com/zhangzhao4444/Maxim Based on Uiautomator's monkey
- http://www.sikulix.com/ An automated testing framework based on image recognition, very old
- http://airtest.netease.com/ The predecessor of this project, later taken over and continued to be optimized by the NetEase Guangzhou team. It has a good IDE
The ranking is in order, welcome to add
# LICENSE
[MIT](LICENSE)