https://github.com/ospoon/wechat4node
https://github.com/ospoon/wechat4node
Last synced: about 1 year ago
JSON representation
- Host: GitHub
- URL: https://github.com/ospoon/wechat4node
- Owner: OSpoon
- License: mit
- Created: 2022-07-25T16:38:37.000Z (about 4 years ago)
- Default Branch: master
- Last Pushed: 2022-09-01T06:41:35.000Z (almost 4 years ago)
- Last Synced: 2025-05-19T05:05:45.016Z (about 1 year ago)
- Language: TypeScript
- Size: 3.42 MB
- Stars: 0
- Watchers: 1
- Forks: 0
- Open Issues: 0
-
Metadata Files:
- Readme: README.md
- License: LICENSE
Awesome Lists containing this project
README
# wechat4node
## 写作背景:
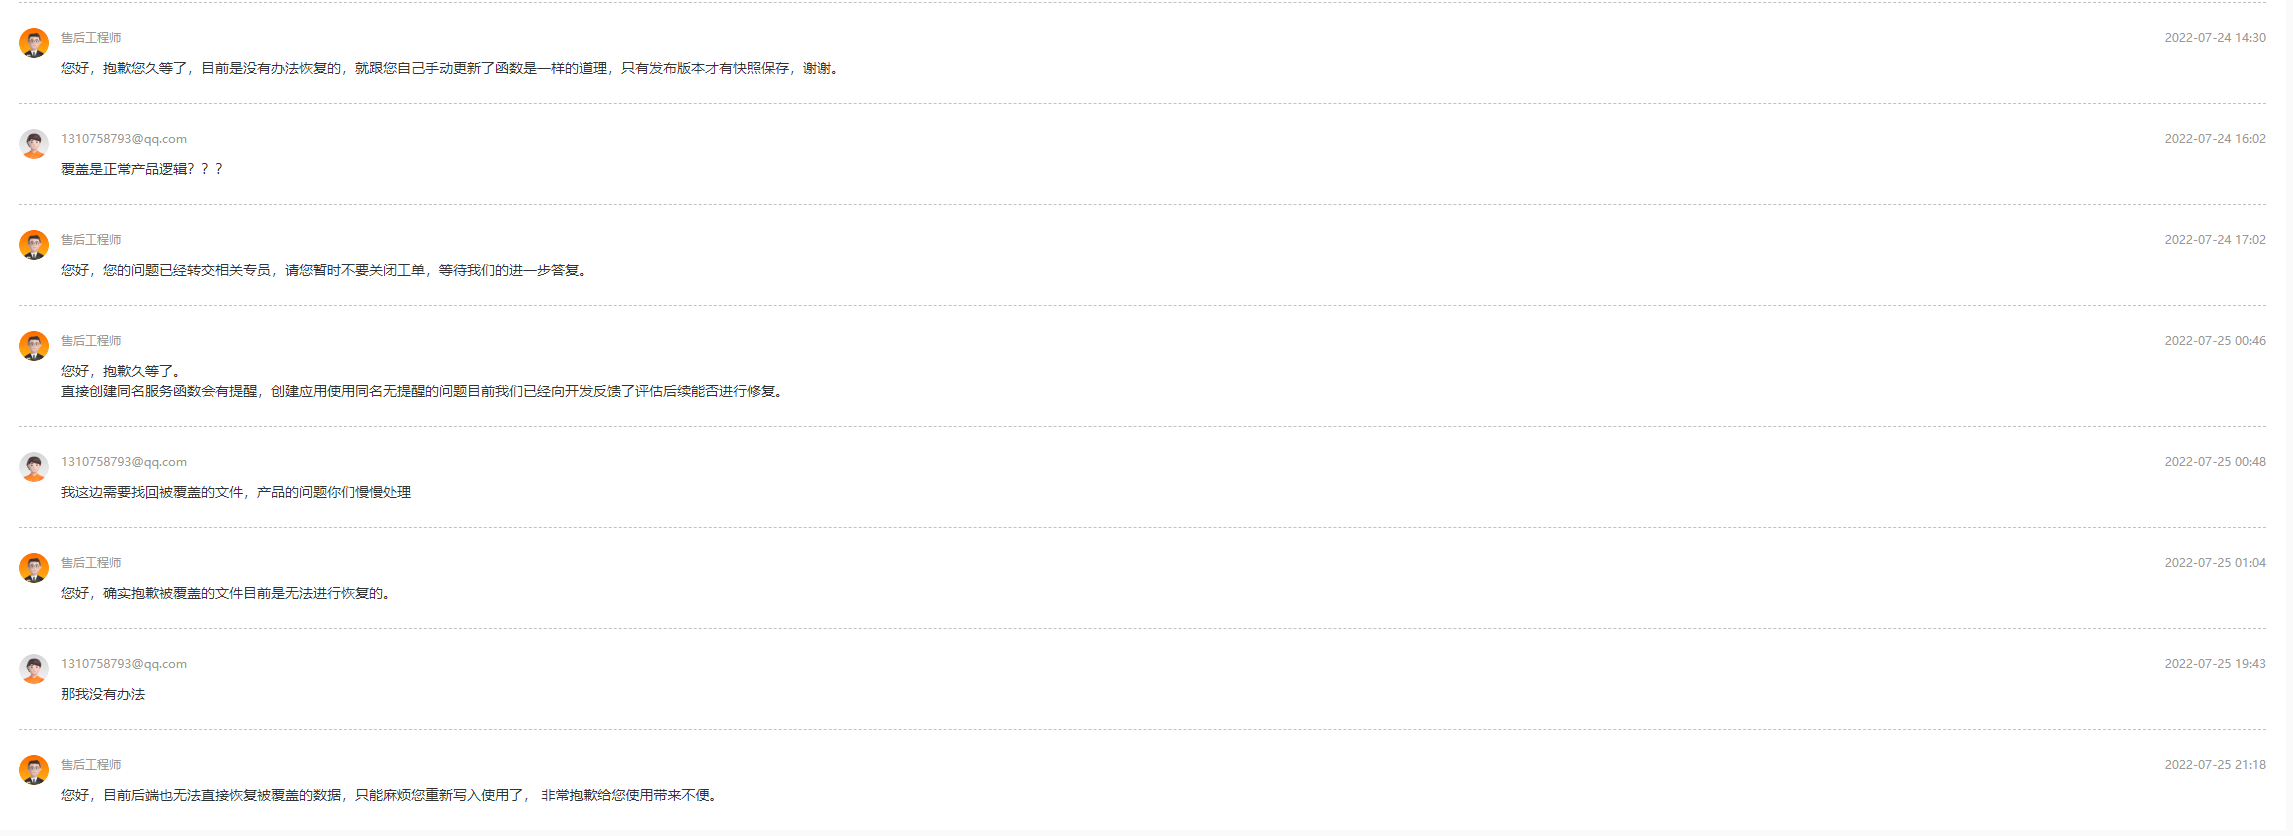
**💢第一坑来自ali云,ali云的函数计算FC产品在使用模板创建项目的过程中,如下图中的服务名和函数名每次创建都是一样的,我们很容易就按默认的创建了,但是多次创建会覆盖前一次的内容,我写好的授权接口就被覆盖了~**
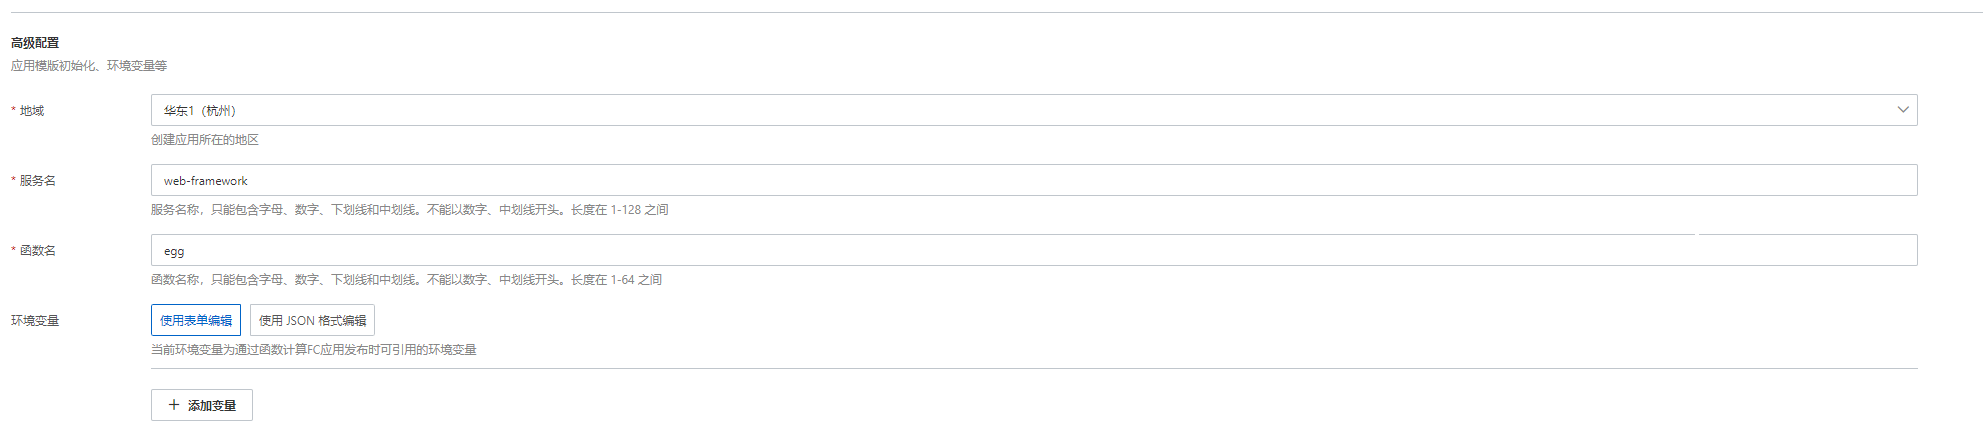
**💘ali的产品原来也有这种低级的错误,不管你是产品设计的缺陷还是系统开发的缺陷,这都是致命的,因为正常运行的服务丢了~**
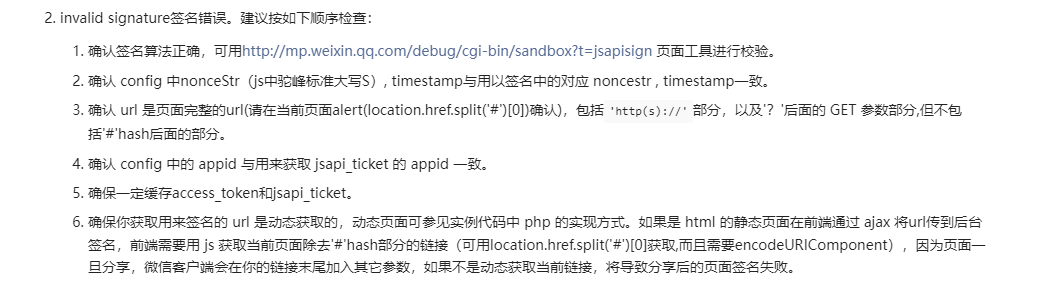
**💥第二坑来自WeChat,在ali云调试好的代码丢就丢了吧,我就打算还在ali云上开始重新来一遍,靠着搜索到的网站还没关掉,就写完了第二遍云上的代码,接口测试可以返回信息,但是【折】在了前端wx.config函数的校验问题上,写过的都知道文档提供了校验失败的排查过程,你要是能按这个解决了,微信开发社区就不会提5k+近似重复的问题而没有结果了~**
💤**写代码就应该【有始有终】我还是在本地搭建全套环境来再搞一遍试试看,请熟悉下面各个地址的快速上手文档来搭建环境~**
1. **服务端:**[**Egg.js**](https://www.eggjs.org/zh-CN/intro/quickstart)
1. **前端:**[**Vue3**](https://staging-cn.vuejs.org/)
1. **微信:**[**公众号测试平台**](https://mp.weixin.qq.com/debug/cgi-bin/sandboxinfo?action=showinfo&t=sandbox/index)
1. **内网穿透:**[Natapp](https://natapp.cn/)
## 代码实操:
### 第一步,启动Natapp:
1. 在natapp平台找到免费提供的隧道进行配置更改:将`7001`端口进行映射,`7001`是eggjs项目默认端口;
1. 在下载好natapp客户端(window)后在客户端同级目录编写`config.ini`配置文件并将平台提供的免费隧道键入到配置文件中,格式同:`authtoken=`;
1. 配置后双击客户端如下图就启动正常了,免费隧道的IP随时可能会变,开发中需要注意~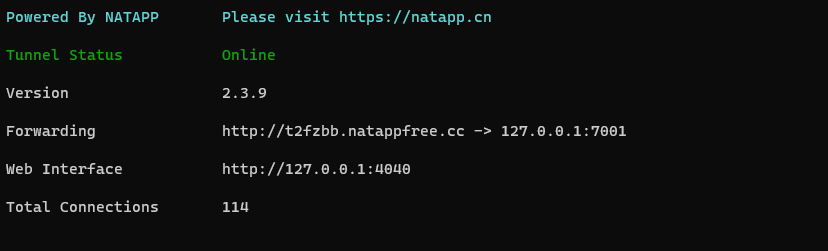
### 第二步,先搞前端部分:
1. 使用`yarn create vite`创建一个前端项目,用着顺手就行,为的就是**快~**
1. 安装`axios`来发送授权信息获取请求;
1. 微信的JS-SDK既然没看到官方提供依赖包那就用配置到index.html,`](http://res2.wx.qq.com/open/js/jweixin-1.6.0.js">)`
1. 在模板中我们编写少量的代码来显示授权的状态:
```html
{{ message }}
点击右上角=>分享给朋友
{{ status }}
```
5. 我们通过`axios`获取`/signature`接口的数据,为了避免**url**参数的传递可能存在编码的问题,那我们稍后在设计`/signature`接口的时候**url**参数通过**body**传递来避免,授权数据拿到后就是`wx.config`执行验证了~
```typescript
import { ref } from "vue";
import axios from "axios";
const message = ref("");
const status = ref("");
axios
.post(`http://t2fzbb.natappfree.cc/signature`, {
url: location.href.split("#")[0],
})
.then((res) => {
const { appId, nonceStr, signature, timestamp } = res.data;
console.log("[ res ] >", appId, nonceStr, signature, timestamp);
wx.config({
debug: true, // 开启调试模式,调用的所有 api 的返回值会在客户端 alert 出来,若要查看传入的参数,可以在 pc 端打开,参数信息会通过 log 打出,仅在 pc 端时才会打印。
appId, // 必填,公众号的唯一标识
timestamp, // 必填,生成签名的时间戳
nonceStr, // 必填,生成签名的随机串
signature, // 必填,签名
jsApiList: ["updateAppMessageShareData"], // 必填,需要使用的 JS 接口列表
});
wx.error((res) => {
message.value = res.errMsg;
});
wx.ready(() => {
wx.checkJsApi({
jsApiList: ["updateAppMessageShareData"], // 需要检测的 JS 接口列表,所有 JS 接口列表见附录2,
success: (res) => {
wx.updateAppMessageShareData({
title: "我的掘金", // 分享标题
desc: "我在掘金输出前端知识~", // 分享描述
link: "https://juejin.cn/user/3966693685871694", // 分享链接,该链接域名或路径必须与当前页面对应的公众号 JS 安全域名一致
imgUrl:
"https://p9-passport.byteacctimg.com/img/user-avatar/71ca4682501063257d8413ff726105a0~300x300.images", // 分享图标
success: function () {
status.value = "设置成功";
},
});
},
});
});
});
```
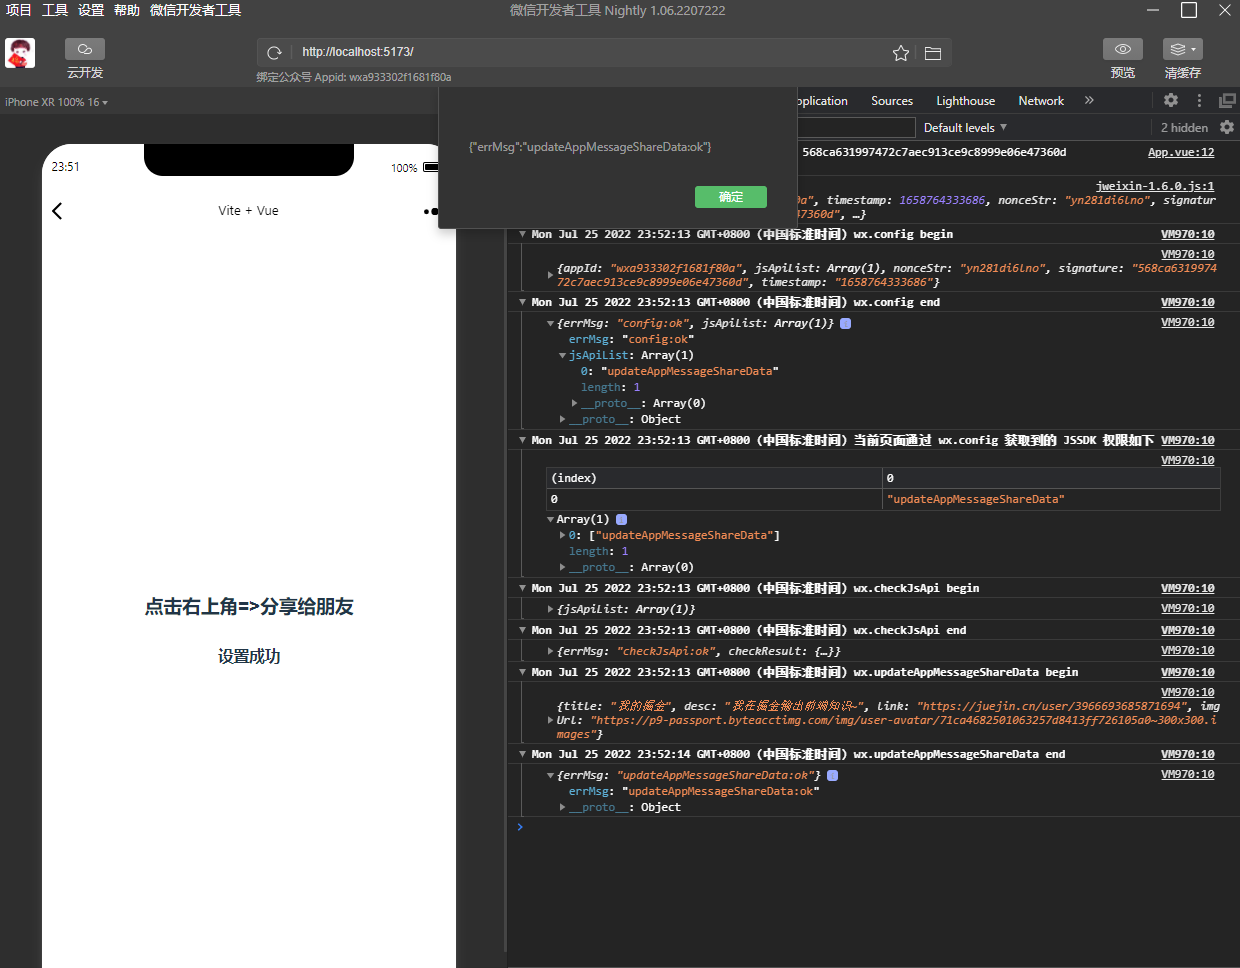
最终我们要在微信开发者工具的公众台看到一堆**ok**就说明可以了~
### 第三步,编写服务端接口:
🤣在开始前有一个问题,微信的各种**票据**都需要我们自己做缓存处理,仅在超时后再刷新,要不会遇到调用次数超限制的麻烦,服务端缓存**票据**我最先想到的是**Redis**,但是多一份配置还是挺麻烦的,后来想到的是**读写文件**,我在【ali云】的两次就是通过读写文件来实现的,毕竟是Demo,效率靠后呗~
😋最后我想到的是服务运行后我可以使用全局对象来缓存数据呀,并不需要借助额外的渠道来实现,我们以前的**单利模式**就是在需要的时候再实例化对象的呀💗
#### 编写个接口的Controller层:
1. checkOrigin:用来在公众号测试平台发起验证服务的请求来验证数据来源;
1. token:用来获取`access_token`,我会在server层做`access_token`的**对象缓存**;
1. ticket:用来获取`ticket`,这个也会在server层做**对象缓存**;
1. signature:用来生成验签,并返回**wx.config**需要配置数据,期间需要一次获取`access_token`和`ticket`,可以看到`url`我们是通过`body`获取的。
```typescript
import { Controller } from 'egg';
export default class HomeController extends Controller {
public async checkOrigin() {
const { ctx } = this;
const { signature, timestamp, nonce, echostr } = ctx.query;
const result = await ctx.service.weChat.checkSignature(
signature,
timestamp,
nonce,
);
ctx.body = result ? echostr : '';
}
public async token() {
const { ctx } = this;
ctx.body = await ctx.service.weChat.getToken();
}
public async ticket() {
const { ctx } = this;
ctx.body = await ctx.service.weChat.getTicket();
}
public async signature() {
const { ctx } = this;
const { url } = ctx.request.body;
console.log('[ url ] >', url);
ctx.body = await ctx.service.weChat.genSignature(url);
}
}
```
#### 编写Service的第一个函数checkSignature:
💕需要接口微信平台发送来的**signature**,**timestamp**,**nonce**,在测试平台我们配置了个自定义的TOKEN,我们需要将【TOKEN, timestamp, nonce】进行**sort**排序后拼接成一个字符串,并使用**SHA1**加密算法(这里使用的crypto-js依赖)来生成我们自己的**验签**,将我们的生成的**验签**和平台发送过来的**signature**对比并将结果返回到Controller,并响应微信测试平台~
```typescript
public async checkSignature(
signature: string,
timestamp: string,
nonce: string,
) {
const own = SHA1([ TOKEN, timestamp, nonce ].sort().join('')).toString();
return own === signature;
}
```
#### 编写Service的第二个函数getToken:
1. 我在服务的最开始定义了一个**cache**对象来缓存**token**;
1. 当**token**中的`access_token`字段不存在时就需要使用上下文对象中的`curl`来发起请求获取一份新的`access_token`数据;
1. 在拿到新数据后通过`Date.now() + expires_in * 1000`得到一个失效的时间并赋值给`last_time`;
1. 当前的`Date.now()`大于存储的`last_time`时需要再次刷新`access_token`。
```typescript
const cache: {
token: {
access_token: string | undefined;
expires_in: number;
last_time: number;
};
} = {
token: {
access_token: undefined,
expires_in: 0,
last_time: 0,
}
};
public async getToken() {
const { ctx } = this;
const request = async () => {
const { data } = await ctx.curl(URL_TOKEN, { dataType: 'json' });
const { access_token, expires_in } = data;
console.log('[ token data ] >', data);
cache.token = {
access_token,
expires_in,
last_time: Date.now() + expires_in * 1000,
};
};
if (!cache.token.access_token) {
console.log('[ token 还没有~ ] ');
await request();
} else {
if (Date.now() > cache.token.last_time) {
console.log('[ token 超时了 ] ');
await request();
}
}
return cache.token;
}
```
#### 编写Service的第三个函数getTicket:
**🤖getTicket**和**getToken**的缓存逻辑一致,区别在于getTicket发起请求时需要携带`access_token`,其它直接看代码~
```typescript
const cache: {
token: {
access_token: string | undefined;
expires_in: number;
last_time: number;
};
ticket: {
ticket: string | undefined;
expires_in: number;
last_time: number;
};
} = {
token: {
access_token: undefined,
expires_in: 0,
last_time: 0,
},
ticket: {
ticket: undefined,
expires_in: 0,
last_time: 0,
},
};
public async getTicket() {
const { ctx } = this;
const request = async () => {
const { access_token } = await this.getToken();
const { data } = await ctx.curl(URL_TICKET, {
dataType: 'json',
method: 'GET',
data: {
access_token,
},
});
const { ticket, expires_in } = data;
console.log('[ ticket data ] >', data);
cache.ticket = {
ticket,
expires_in,
last_time: Date.now() + expires_in * 1000,
};
};
if (!cache.ticket.ticket) {
console.log('[ ticket 还没有~ ] ');
await request();
} else {
if (Date.now() > cache.ticket.last_time) {
console.log('[ ticket 超时了 ] ');
await request();
}
}
return cache.ticket;
}
```
#### 编写Service的最后一个函数genSignature:
1. 调用上一次函数得到`jsapi_ticket`;
1. 生成随机字符串noncestr:`Math.random().toString(36).substr(2, 15)`;
1. 生成时间戳timestamp:`Date.now()`;
1. ~~验签生成在官网描述中需要:~~
1. ~~对所有待签名参数按照字段名的ASCII 码从小到大排序(字典序);~~
1. ~~使用 URL 键值对的格式(即key1=value1&key2=value2…)拼接成字符串string1;~~
1. ~~需要注意的是所有参数名均为小写字符;~~
1. ~~对string1作sha1加密,字段名和字段值都采用原始值,不进行URL 转义;~~
5. 官网的描述太麻烦了,我们直接按ASCII 码从小到大凭借模板字符串,排序、键值对格式、大小写这些注意事项就都省了,我们只需要按第一个函数中做一次`SHA1`加密并`toString()`得到验签字符串就可以le~
5. 组装前端`wx.config`中需要的四个参数并返回~
```typescript
public async genSignature(url: string) {
const { ticket: jsapi_ticket } = await this.getTicket();
const noncestr = Math.random().toString(36).substr(2, 15);
const timestamp = Date.now();
const signature = SHA1(
`jsapi_ticket=${jsapi_ticket}&noncestr=${noncestr}×tamp=${timestamp}&url=${url}`,
).toString();
return {
appId: APPID,
nonceStr: noncestr,
timestamp,
signature,
};
}
```
## 微信测试号平台:
### 接口配置信息:
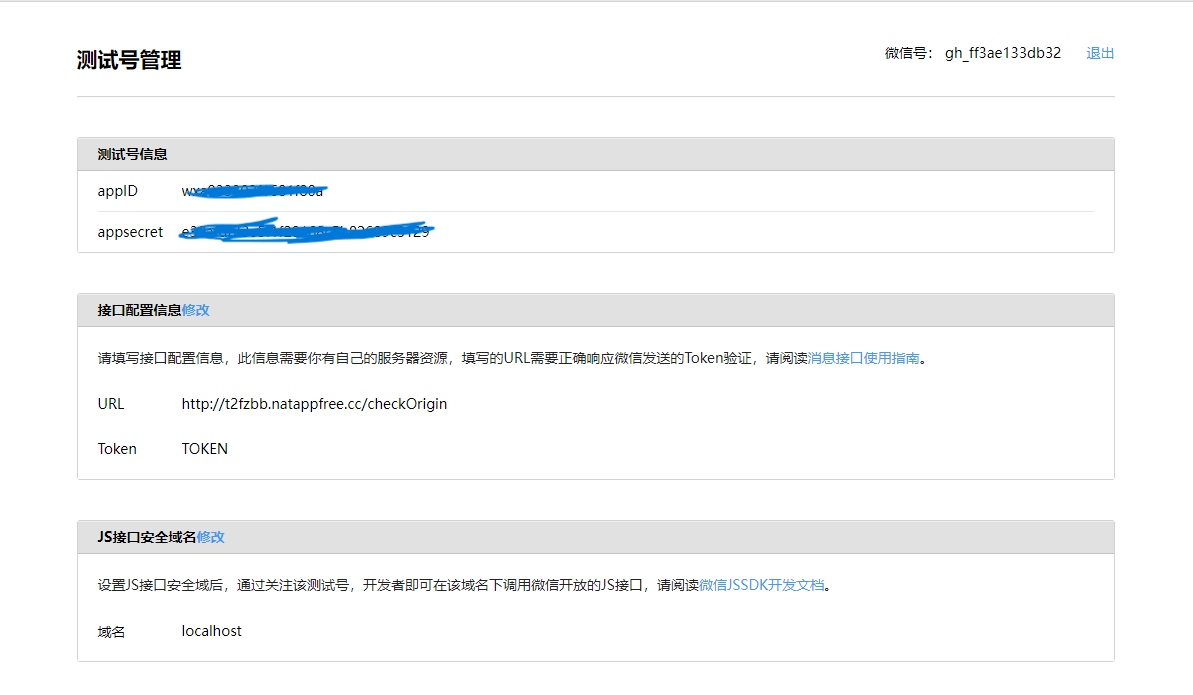
💥需要调用我们的`/checkOrigin`,Token字段为我们自定义的内容,和服务中验证签名时使用的一致就可以了,配置提交后会向我们的服务发起**GET**请求,并通过query携带参数给我们,当我们验证通过后需要将平台传递过来的随机字符返回回去代表我们验证通过~
### JS接口安全域名:
这个因为我们在微信开发者工具中调试前端页面用的`localhost`,所以需要将`localhost`配置在这个地方~
## 总结:
💯代码的编写还是很容易的,就是和这种大平台沟通成本太高,每次编写都有新坑要踩,最后我将代码的配置信息剔除后上传到[GitHub](https://github.com/OSpoon/),需要的jym可以下载跑跑看~