https://github.com/oxylabs/building-scraping-pipeline-apache-airflow
Using Apache Airflow to Build a Pipeline for Scraped Data
https://github.com/oxylabs/building-scraping-pipeline-apache-airflow
airflow-pipelines airflow-python-api apache-airflow apache-airflow-tutorial how-to-use-airflow pipeline-for-scraped-data python sql
Last synced: 10 months ago
JSON representation
Using Apache Airflow to Build a Pipeline for Scraped Data
- Host: GitHub
- URL: https://github.com/oxylabs/building-scraping-pipeline-apache-airflow
- Owner: oxylabs
- Created: 2022-08-18T07:07:03.000Z (almost 4 years ago)
- Default Branch: main
- Last Pushed: 2024-09-30T14:16:02.000Z (almost 2 years ago)
- Last Synced: 2024-11-17T02:10:09.124Z (over 1 year ago)
- Topics: airflow-pipelines, airflow-python-api, apache-airflow, apache-airflow-tutorial, how-to-use-airflow, pipeline-for-scraped-data, python, sql
- Language: Python
- Homepage:
- Size: 103 KB
- Stars: 1
- Watchers: 2
- Forks: 1
- Open Issues: 0
-
Metadata Files:
- Readme: README.md
Awesome Lists containing this project
README
# Using Apache Airflow to Build a Pipeline for Scraped Data
[](https://oxylabs.io/pages/gitoxy?utm_source=877&utm_medium=affiliate&groupid=877&utm_content=building-scraping-pipeline-apache-airflow-github&transaction_id=102f49063ab94276ae8f116d224b67)
[](https://discord.gg/Pds3gBmKMH) [](https://www.youtube.com/@oxylabs)
Using Oxylabs E-Commerce Scraper API (a part of Web Scraper API) has a wide variety of tools depending on your project and scraping goals.
Also, we recommend using the Push-Pull approach – it’s known as the most reliable data delivery method out there.
To use this approach effectively, you have to:
1. Submit a URL of a website you want to scrape
2. Check whether the URL has been scraped
3. Fetch the content
Let's start by building a class that will serve as a wrapper for the API.
```python
import requests
JOB_STATUS_DONE = "done"
HTTP_NO_CONTENT = 204
class Client:
def __init__(self, username, password):
self.username = username
self.password = password
def create_jobs(self, urls):
payload = {
"source": "universal",
"url": urls,
"parse": True,
"parsing_instructions": {
"title": {
"_fns": [
{"_fn": "css_one", "_args": ["h2"]},
{"_fn": "element_text"},
]
},
"price": {
"_fns": [
{"_fn": "css_one", "_args": [".price"]},
{"_fn": "element_text"},
]
},
"availability": {
"_fns": [
{"_fn": "css_one", "_args": [".availability"]},
{"_fn": "element_text"},
]
},
},
}
response = requests.request(
"POST",
"https://data.oxylabs.io/v1/queries/batch",
auth=(self.username, self.password),
json=payload,
)
return response.json()
def is_status_done(self, job_id):
job_status_response = requests.request(
method="GET",
url="http://data.oxylabs.io/v1/queries/%s" % job_id,
auth=(self.username, self.password),
)
job_status_data = job_status_response.json()
return job_status_data["status"] == JOB_STATUS_DONE
def fetch_content_list(self, job_id):
job_result_response = requests.request(
method="GET",
url="http://data.oxylabs.io/v1/queries/%s/results" % job_id,
auth=(self.username, self.password),
)
if job_result_response.status_code == HTTP_NO_CONTENT:
return None
job_results_json = job_result_response.json()
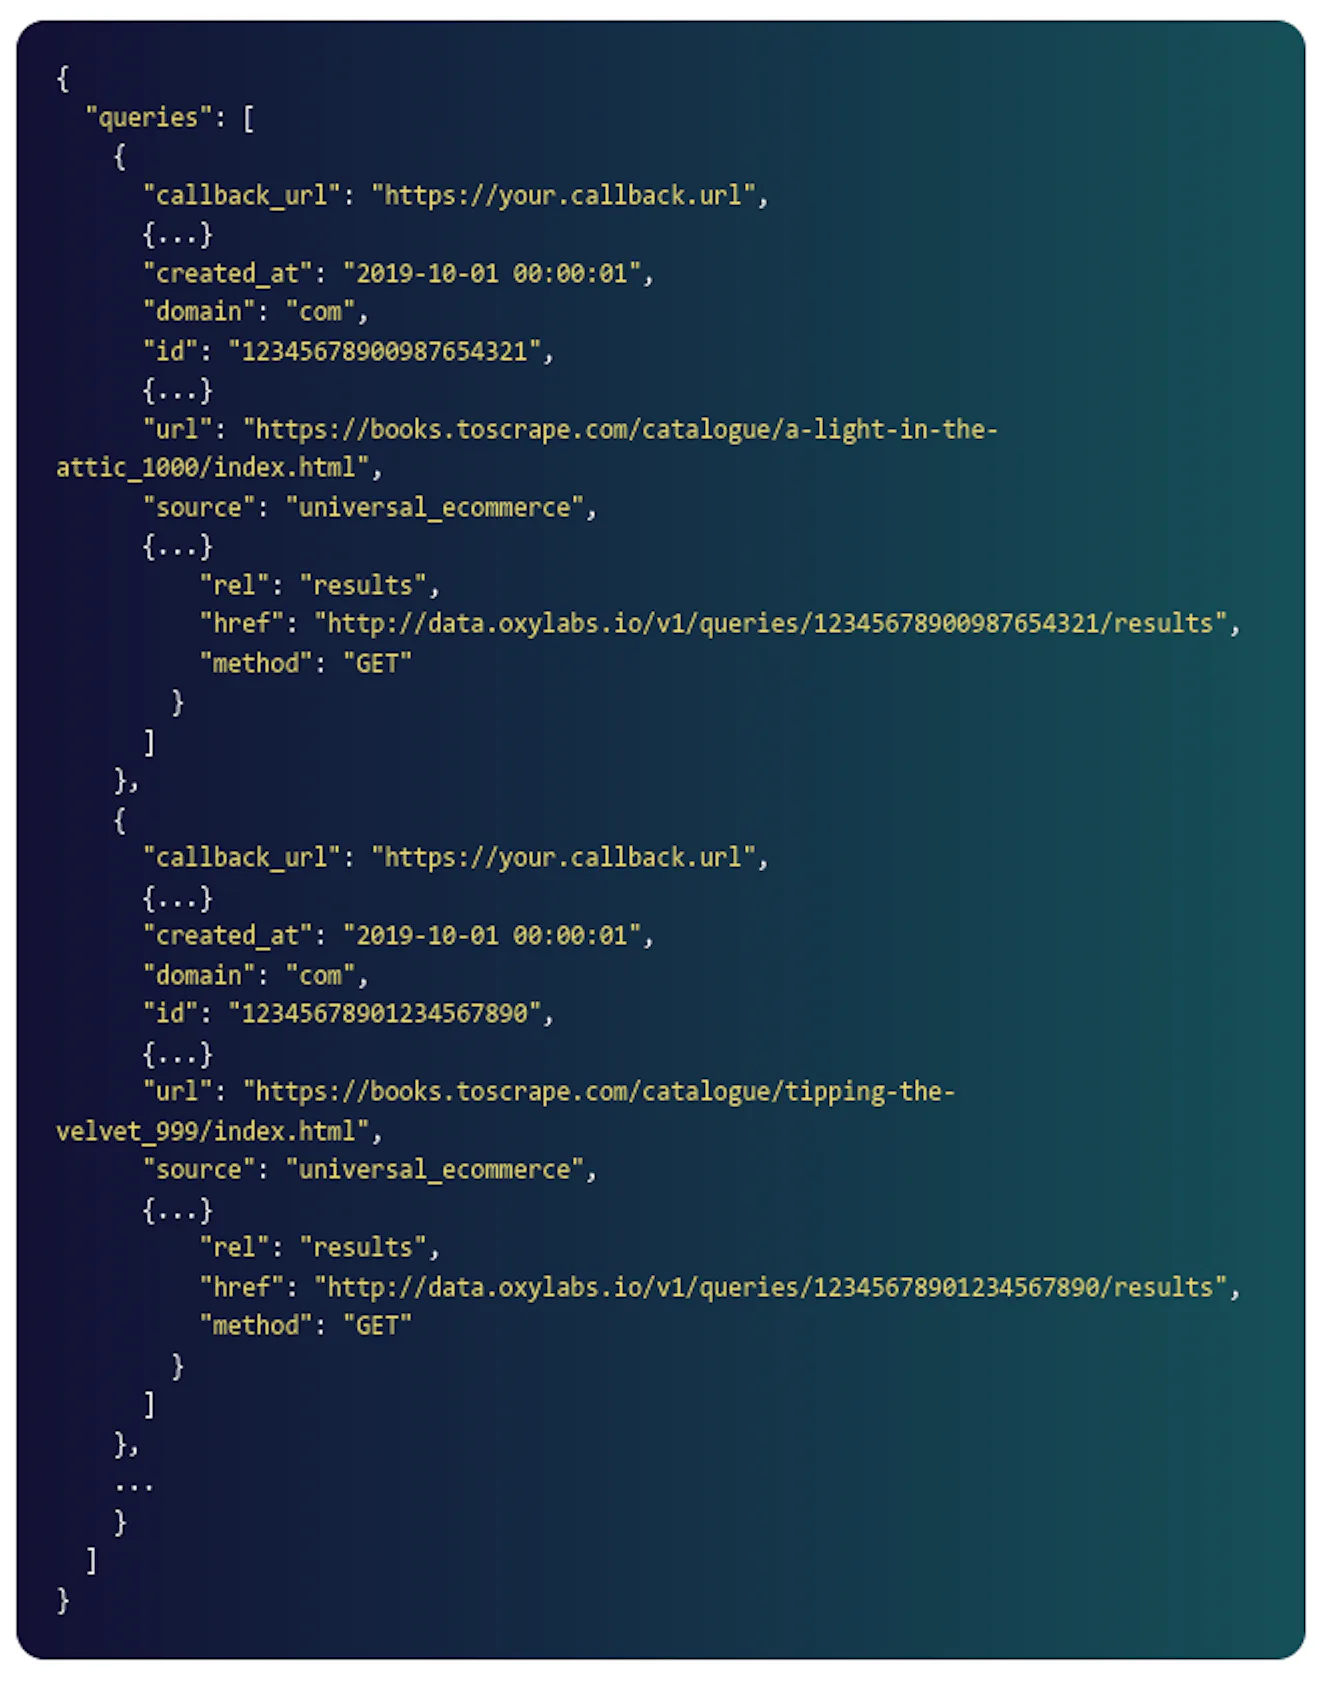
return job_results_json["results"]
```
The client provides 3 methods:
`create_jobs` uses the batch query to submit URLs for scraping.
`is_status_done` checks the status of the previously submitted URL.
`fetch_content_list` retrieves the content of the URL that has been scraped.
Keep in mind that once we push the URL to the API, we’ll receive a job ID for fetching the content later. Hence, the job ID needs to be stored somewhere – we'll use PostgreSQL for it.
Let's design a simple table that will represent queued jobs:
```sql
create sequence queue_seq;
create table queue (
id int check (id > 0) primary key default nextval ('queue_seq'),
created_at timestamp(0) not null DEFAULT CURRENT_TIMESTAMP,
updated_at timestamp(0) not null DEFAULT CURRENT_TIMESTAMP,
status varchar(255) not null DEFAULT 'pending',
job_id varchar(255)
)
```
Our new table contains the following fields:
`id`: a numerical value that uniquely identifies the record.
`created_at`: a timestamp that shows when the record was created.
`updated_at`: a timestamp that shows when the record was last updated.
`job_id`: Oxylabs API job identifier.
`status`: a value that describes what the current state of the job is.
`pending` status means that the job is still processing.
`completed` means that the job is already done.
`deleted` means that we took too long to fetch the data, and the job has been deleted in Oxylabs API.
Now let's create a `Queue` class for interacting with the database:
```python
import atexit
import psycopg2.extras
STATUS_PENDING = 'pending'
STATUS_COMPLETE = 'complete'
STATUS_DELETED = 'deleted'
class Queue:
def __init__(self, connection):
self.connection = connection
atexit.register(self.cleanup)
def setup(self):
cursor = self.connection.cursor()
cursor.execute('''
select table_name
from information_schema.tables
where table_schema='public'
and table_type='BASE TABLE'
''')
for cursor_result in cursor:
if cursor_result[0] == 'queue':
print('Table already exists')
return False
cursor.execute('''
create sequence queue_seq;
create table queue (
id int check (id > 0) primary key default nextval ('queue_seq'),
created_at timestamp(0) not null DEFAULT CURRENT_TIMESTAMP,
updated_at timestamp(0) not null DEFAULT CURRENT_TIMESTAMP,
status varchar(255) not null DEFAULT 'pending',
job_id varchar(255)
)
''')
return True
def push(self, job_id):
self.__execute_and_commit(
'insert into queue (job_id) values (%s)',
[job_id]
)
def pull(self):
cursor = self.connection.cursor(cursor_factory=psycopg2.extras.RealDictCursor)
cursor.execute('start transaction')
cursor.execute(
'''
select * from queue where status = %s and
updated_at < now() - interval '10 second'
order by random()
limit 1
for update
''',
[STATUS_PENDING]
)
return cursor.fetchone()
def delete(self, job_id):
self.__change_status(job_id, STATUS_DELETED)
def complete(self, job_id):
self.__change_status(job_id, STATUS_COMPLETE)
def touch(self, job_id):
self.__execute_and_commit(
'update queue set updated_at = now() where job_id = %s',
[job_id]
)
def __change_status(self, job_id, status):
self.__execute_and_commit(
'update queue set status = %s where job_id = %s',
[status, job_id]
)
def __execute_and_commit(self, sql, val):
cursor = self.connection.cursor()
cursor.execute(sql, val)
self.connection.commit()
def cleanup(self):
self.connection.commit()
```
The most important methods of the `Queue` class are as follows:
`setup`: asks the database whether the table `queue` already exists. If it doesn't, it creates the queue table.
`push`: pushes the job to the database. The job id is retrieved from the Oxylabs Batch Query Endpoint.
`pull`: fetches a single job that is ready to be checked for content.
Let's focus on the pull part:
```sql
select * from queue where status = 'pending' and
updated_at < now() - interval '10 second'
order by random()
limit 1
for update
```
We fetch records that haven't been updated in the last 10 seconds so as not to spam the API with irrelevant requests.
The order by `random()` clause ensures no single record blocks our queue.
`for update` locks the row and prevents other processes from picking it up in case parallelism is needed in the future.
Since we use transactions to lock the row, we also register a commit method in `atexit.register` to perform a commit at the end of the script at all times.
```python
def __init__(self, connection):
self.connection = connection
atexit.register(self.cleanup)
# ...
def cleanup(self):
self.connection.commit()
```
Now that we have `Queue` and `Client` classes, we’re likely to use them in nearly all of our scripts. In addition, we need certain configuration options.
For that purpose, let's create the following bootstrap file:
```python
import os
import psycopg2
from messenger import Queue
from oxylabs import Client
DB_HOST = os.getenv('DB_HOST', 'postgres')
DB_USER = os.getenv('DB_USER', 'airflow')
DB_PASS = os.getenv('DB_PASS', 'airflow')
DB_NAME = os.getenv('DB_NAME', 'scraper')
OXYLABS_USERNAME = os.getenv('OXYLABS_USERNAME', 'your-oxylabs-username')
OXYLABS_PASSWORD = os.getenv('OXYLABS_PASSWORD', 'your-oxylabs-password')
connection = psycopg2.connect(
host=DB_HOST,
user=DB_USER,
password=DB_PASS,
database=DB_NAME
)
queue = Queue(
connection
)
client = Client(
OXYLABS_USERNAME,
OXYLABS_PASSWORD,
)
```
Here, we fetch the Oxylabs API and PostgreSQL configuration variables from the environment – it’s a standard industry practice encouraged by the twelve-factor app principles. Additionally, we create the `Queue` and `Client` classes, and their dependencies.
Now that we have all the main classes initialized, let's create a script that makes the schema for our queue.
```python
from bootstrap import queue
success = queue.setup()
if not success:
exit(1)
```
```python
from bootstrap import queue
success = queue.setup()
if not success:
exit(1)
```
The `exit(1)` on failure is extremely important, as it signifies that the process has not completed successfully. Once the schema is created, we can **push** a collection of jobs in the Oxylabs Batch Query endpoint.
The `exit(1)` on failure is extremely important, as it signifies that the process has not completed successfully.
Once the schema is created, we can **push** a collection of jobs in the Oxylabs Batch Query endpoint.
```python
from bootstrap import queue, client
jobs = client.create_jobs([
"https://sandbox.oxylabs.io/products/1",
"https://sandbox.oxylabs.io/products/2",
"https://sandbox.oxylabs.io/products/3",
"https://sandbox.oxylabs.io/products/4",
"https://sandbox.oxylabs.io/products/5",
])
for job in jobs['queries']:
queue.push(job['id'])
print('job id: %s' % job['id'])
```
The script creates a bunch of jobs using the Oxylabs Client we created earlier. It then goes through each and every result and pushes it into the database using the Queue service.
The submitted jobs will soon be processed. In the meantime, we can use the job ID in our database to fetch the content – let’s create a file that will do exactly that.
```python
from pprint import pprint
from bootstrap import queue, client
queue_item = queue.pull()
if not queue_item:
print('No jobs left in the queue, exiting')
exit(0)
if not client.is_status_done(queue_item['job_id']):
queue.touch(queue_item['job_id'])
print('Job is not yet finished, skipping')
exit(0)
content_list = client.fetch_content_list(queue_item['job_id'])
if content_list is None:
print('Job no longer exists in oxy')
queue.delete(queue_item['job_id'])
exit(0)
queue.complete(queue_item['job_id'])
for content in content_list:
pprint(content)
```
We first use `queue.pull()` to fetch a single pending job and exit if none is found.
```python
queue_item = queue.pull()
if not queue_item:
print('No jobs left in the queue, exiting')
exit(0)
```
Then, we check the status. If the status says the URL is not yet scraped, we use the `touch` method to renew the `updated_at` field in the database. That way, the record will not be checked for at least 10 more seconds (to prevent spamming the API).
```python
if not client.is_status_done(queue_item['job_id']):
queue.touch(queue_item['job_id'])
print('Job is not yet finished, skipping')
exit(0)
```
Once the status is `done`, we try to fetch the content. If no content is returned, it means we fetched an old record that has already been deleted.
```python
content_list = client.fetch_content_list(queue_item['job_id'])
if content_list is None:
print('Job no longer exists in oxy')
queue.delete(queue_item['job_id'])
exit(0)
```
And finally, we go through the content and print it.
```python
queue.complete(queue_item['job_id'])
for content in content_list:
pprint(content)
```
Note: in a real production application, you would likely save the content to files or a database, but this part is beyond the scope of this tutorial.
Here's what we have so far:
```yaml
|-- src
| |-- bootstrap.py
| |-- messenger.py
| |-- oxylabs.py
| |-- puller.py
| |-- pusher.py
| |-- setup.py
```
Now that we're done with the coding part, it's time to run the scripts using Apache Airflow!
## Setting up Apache Airflow
Apache Airflow is a platform created by the community to programmatically author, schedule, and monitor workflows. Let’s set it up following their official tutorial and using the official Docker Compose file.
Before you run docker-compose up, you need to expose the files we created. To do that, change the `docker-compose.yaml` file to include the `src` folder as a volume.
Here’s how it looks before:
```yaml
volumes:
- ./dags:/opt/airflow/dags
- ./logs:/opt/airflow/logs
- ./plugins:/opt/airflow/plugins
```
And after:
```yaml
volumes:
- ./src:/opt/airflow/src
- ./dags:/opt/airflow/dags
- ./logs:/opt/airflow/logs
- ./plugins:/opt/airflow/plugins
```
Once you set it up, a bunch of Airflow specific files and folders are created.
```yaml
|-- dags
|-- docker-compose.yaml
|-- .env
|-- logs
|-- plugins
|-- src
| |-- bootstrap.py
| |-- messenger.py
| |-- oxylabs.py
| |-- puller.py
| |-- pusher.py
| |-- setup.py
```
Now visit `http://localhost:8080` and use the default credentials (`airflow:airflow`) to access the Airflow UI.
Airflow uses a concept called DAG (Directed Acyclic Graph), which is a collection of all the tasks you want to run, organized in a way that reflects their relationships and dependencies.
A DAG is defined in a Python script, which represents the DAGs structure (tasks and their dependencies) as code.
To create a DAG file, we have to create a python script in the `dags` folder of the airflow project.
Let's call it `scrape.py`.
Here's what the final file structure looks like:
```yaml
|-- dags
| |-- scrape.py
|-- docker-compose.yaml
|-- .env
|-- logs
|-- plugins
|-- src
| |-- bootstrap.py
| |-- messenger.py
| |-- oxylabs.py
| |-- puller.py
| |-- pusher.py
| |-- setup.py
```
## Creating a DAG
Let's create a simple DAG that sets up the table by calling the `setup.py` script we created earlier.
```python
from datetime import timedelta
import pendulum
from airflow import DAG
from airflow.operators.bash import BashOperator
default_args = {
'owner': 'airflow',
'depends_on_past': False,
'retries': 2,
'retry_delay': timedelta(hours=3),
}
with DAG(
'setup',
default_args=default_args,
schedule_interval='@once',
description='Setup',
start_date=pendulum.datetime(2022, 5, 1, tz='UTC'),
dagrun_timeout=timedelta(minutes=1),
tags=['scrape', 'database'],
catchup=False
) as dag:
setup_task = BashOperator(
task_id='setup',
bash_command='python /opt/airflow/src/setup.py',
)
```
Every DAG has a bunch of arguments that allow you to configure execution.
```python
default_args = {
'owner': 'airflow',
'depends_on_past': False,
'retries': 2,
'retry_delay': timedelta(hours=3),
}
```
The `owner` property describes the system user that owns this DAG.
`retries` determines how many additional attempts to run this script will be made if it fails.
`retry_delay` tells us how often to retry (related to the previous parameter).
`depends_on_past` is extremely important for multi-stage workflows – it determines whether the previous task needs to be successful to run our setup script.
Next come the DAG parameters:
```python
with DAG(
'setup',
default_args=default_args,
schedule_interval='@once',
description='Setup',
start_date=pendulum.datetime(2022, 5, 1, tz='UTC'),
dagrun_timeout=timedelta(minutes=1),
tags=['scrape', 'database'],
catchup=False
) as dag:
```
Here are the most important parameters:
The first parameter (`setup`) always signifies the name of the DAG, which you will see in the Airflow UI.
`schedule_interval` muses cron-like format to determine how often to run the task.
`start_date` describes when the task has to be started.
`catchup` determines whether Airflow needs to catch up to the current date by running the scripts for earlier dates
Next comes the most important part: every DAG defines what tasks need to be done.
```python
setup_task = BashOperator(
task_id='setup',
bash_command='python /opt/airflow/src/setup.py',
)
```
Tasks are defined using Operators, which allow you to describe what needs to be done. For us, the easiest way is to simply run the `setup.py` file using a bash command.
Our file is automatically registered and displayed in the Airflow UI.

## Defining multiple tasks
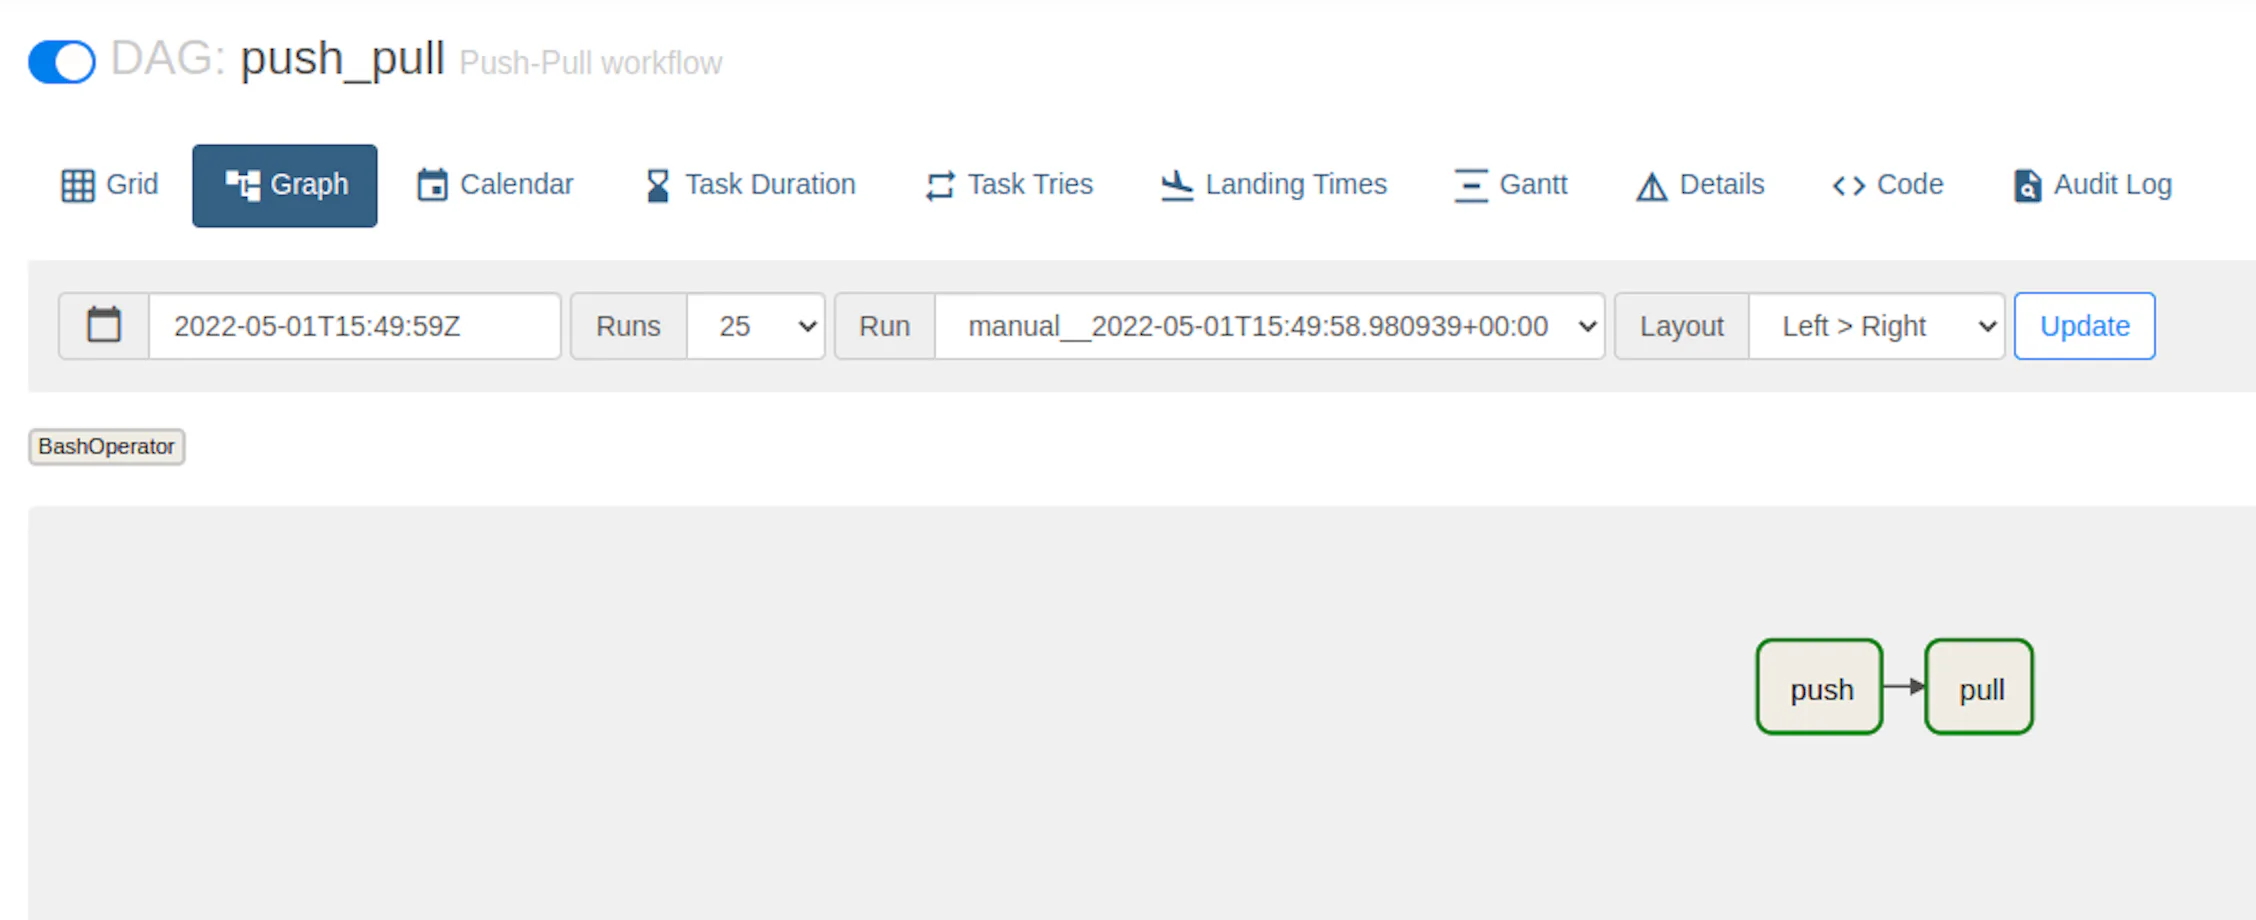
We previously defined a DAG with a single task. While that is a great achievement, the main power of Airflow comes from managing multiple tasks. Let's leverage that by creating a push-pull workflow:
```python
from datetime import timedelta
import pendulum
from airflow import DAG
from airflow.operators.bash import BashOperator
default_args = {
'owner': 'airflow',
'depends_on_past': True,
'retries': 2,
'retry_delay': timedelta(hours=3),
}
with DAG(
'push_pull',
default_args=default_args,
schedule_interval='@daily',
description='Push-Pull workflow',
start_date=pendulum.datetime(2022, 5, 1, tz='UTC'),
dagrun_timeout=timedelta(minutes=1),
tags=['scrape', 'database'],
catchup=False
) as dag:
task_push = BashOperator(
task_id='push',
bash_command='python /opt/airflow/src/pusher.py',
)
task_pull = BashOperator(
task_id='pull',
bash_command='python /opt/airflow/src/puller.py'
)
task_push.set_downstream(task_pull)
```
Most of the code remains the same. There is a major difference though: we now have two tasks: `task_pull` and `task_push`. Once we create them, we use the `set_downstream` to tell Airflow that `task_pull` needs to be executed after `task_push`.
## Using ShortCircuitOperator
Our previous DAG has a glaring issue: we want to execute push once as it uses the batch endpoint. The pull task, however, needs to run multiple times. Unfortunately, tasks in the same dag cannot use different intervals.
```python
task_push = BashOperator(
task_id='push',
bash_command='python /opt/airflow/src/pusher.py',
schedule_interval='daily', # not allowed!
)
task_pull = BashOperator(
task_id='pull',
bash_command='python /opt/airflow/src/puller.py',
schedule_interval='@hourly', # not allowed!
)
```
While it is indeed possible to solve that by creating multiple DAGs, it ruins many advantages Airflow provides in managing the dependencies of the tasks. Let’s take a look at how this can be fixed.
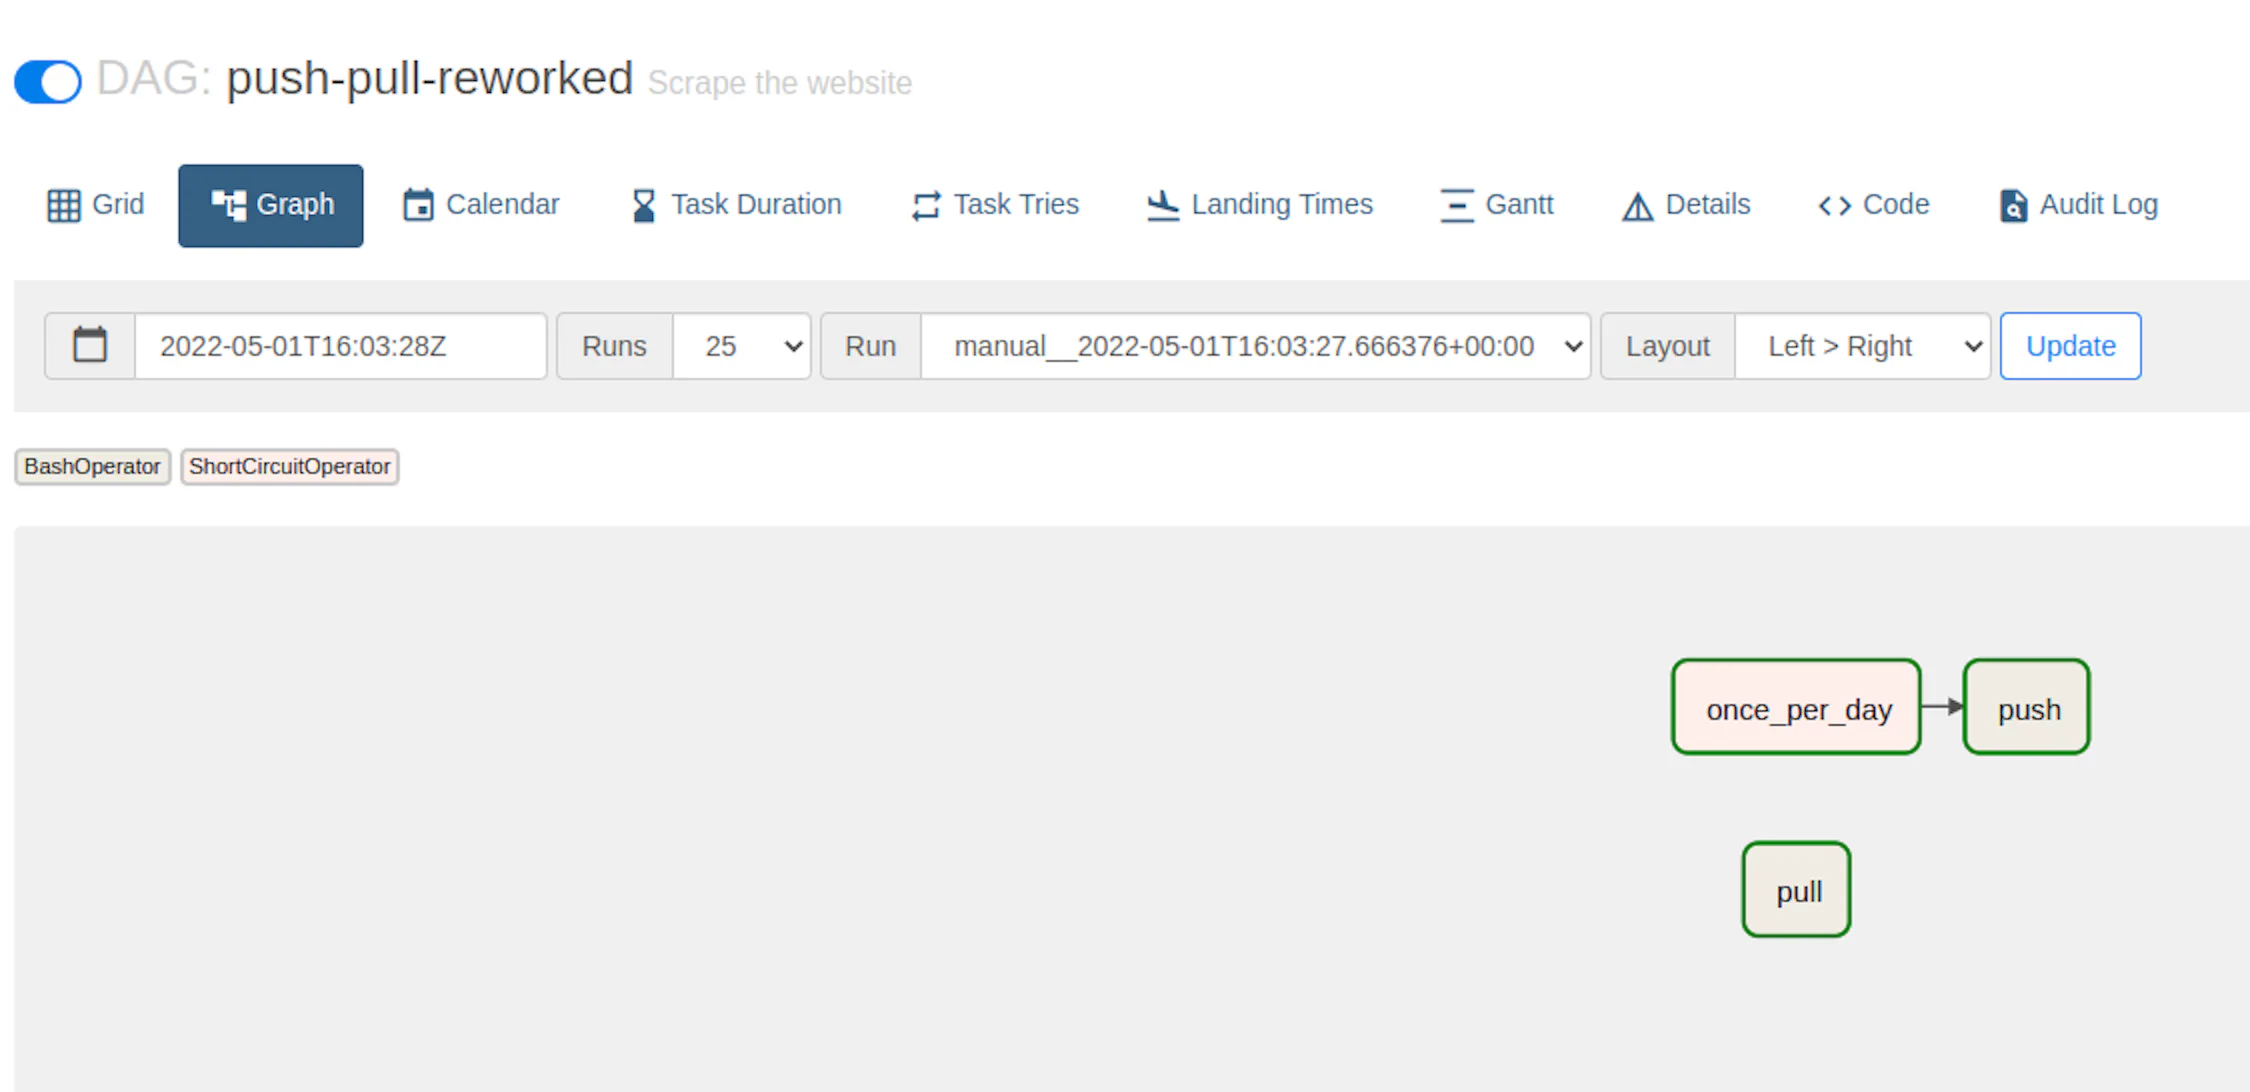
Enter `ShortCircuitOperator`. This powerful operator can skip tasks if conditions are not met.
```python
from datetime import timedelta
import pendulum
from airflow import DAG
from airflow.operators.bash import BashOperator
from airflow.operators.python import ShortCircuitOperator
default_args = {
'owner': 'airflow',
'depends_on_past': True,
'retries': 2,
'retry_delay': timedelta(hours=3),
}
with DAG(
'push-pull-reworked',
default_args=default_args,
schedule_interval='* * * * *',
description='Scrape the website',
start_date=pendulum.datetime(2022, 5, 1, tz='UTC'),
dagrun_timeout=timedelta(minutes=1),
tags=['scrape', 'oxylabs', 'push', 'pull'],
catchup=False
) as dag:
def is_midnight(logical_date):
return logical_date.hour == 0 and logical_date.minute == 0
trigger_once_per_day = ShortCircuitOperator(
task_id='once_per_day',
python_callable=is_midnight,
provide_context=True,
dag=dag
)
task_push = BashOperator(
task_id='push',
bash_command='python /opt/airflow/src/pusher.py',
)
trigger_once_per_day.set_downstream(task_push)
task_pull = BashOperator(
task_id='pull',
bash_command='python /opt/airflow/src/puller.py'
)
```
Even though the schedule interval is set to `* * * * *`, which means `execute every minute`, but we add an additional `once_per_day` task, that prevents the `push` task from running unless the current hour is '0'.
The main player here is the `is_midnight` function, that checks whether the current time is 00:00 (the only time when the push command is allowed to run!)
## Combining all tasks
You might be curious whether combining all our tasks into a single workflow is possible. Luckily, it is – let’s look at how it’s done.
Again, by using `ShortCircuitOperator` we’re able to circumvent the task limitations.
```python
from datetime import timedelta
import pendulum
from airflow import DAG
from airflow.operators.bash import BashOperator
from airflow.operators.python import ShortCircuitOperator
default_args = {
'owner': 'airflow',
'depends_on_past': True,
'retries': 2,
'retry_delay': timedelta(hours=3),
}
with DAG(
'scrape',
default_args=default_args,
schedule_interval='* * * * *',
description='Scrape the website',
start_date=pendulum.datetime(2022, 5, 1, tz='UTC'),
dagrun_timeout=timedelta(minutes=1),
tags=['scrape', 'oxylabs', 'push', 'pull'],
catchup=False
) as dag:
trigger_always = ShortCircuitOperator(
task_id='always',
python_callable=lambda prev_start_date_success: prev_start_date_success is not None,
provide_context=True,
dag=dag
)
trigger_once = ShortCircuitOperator(
task_id='once',
python_callable=lambda prev_start_date_success: prev_start_date_success is None,
provide_context=True,
dag=dag
)
setup_task = BashOperator(
task_id='setup',
bash_command='python /opt/airflow/src/setup.py',
)
trigger_once.set_downstream(setup_task)
def is_midnight(logical_date):
return logical_date.hour == 0 and logical_date.minute == 0
trigger_once_per_day = ShortCircuitOperator(
task_id='once_per_day',
python_callable=is_midnight,
provide_context=True,
dag=dag
)
task_push = BashOperator(
task_id='push',
bash_command='python /opt/airflow/src/pusher.py',
)
trigger_once_per_day.set_downstream(task_push)
task_pull = BashOperator(
task_id='pull',
bash_command='python /opt/airflow/src/puller.py'
)
trigger_always.set_downstream(task_pull)
trigger_always.set_downstream(trigger_once_per_day)
```
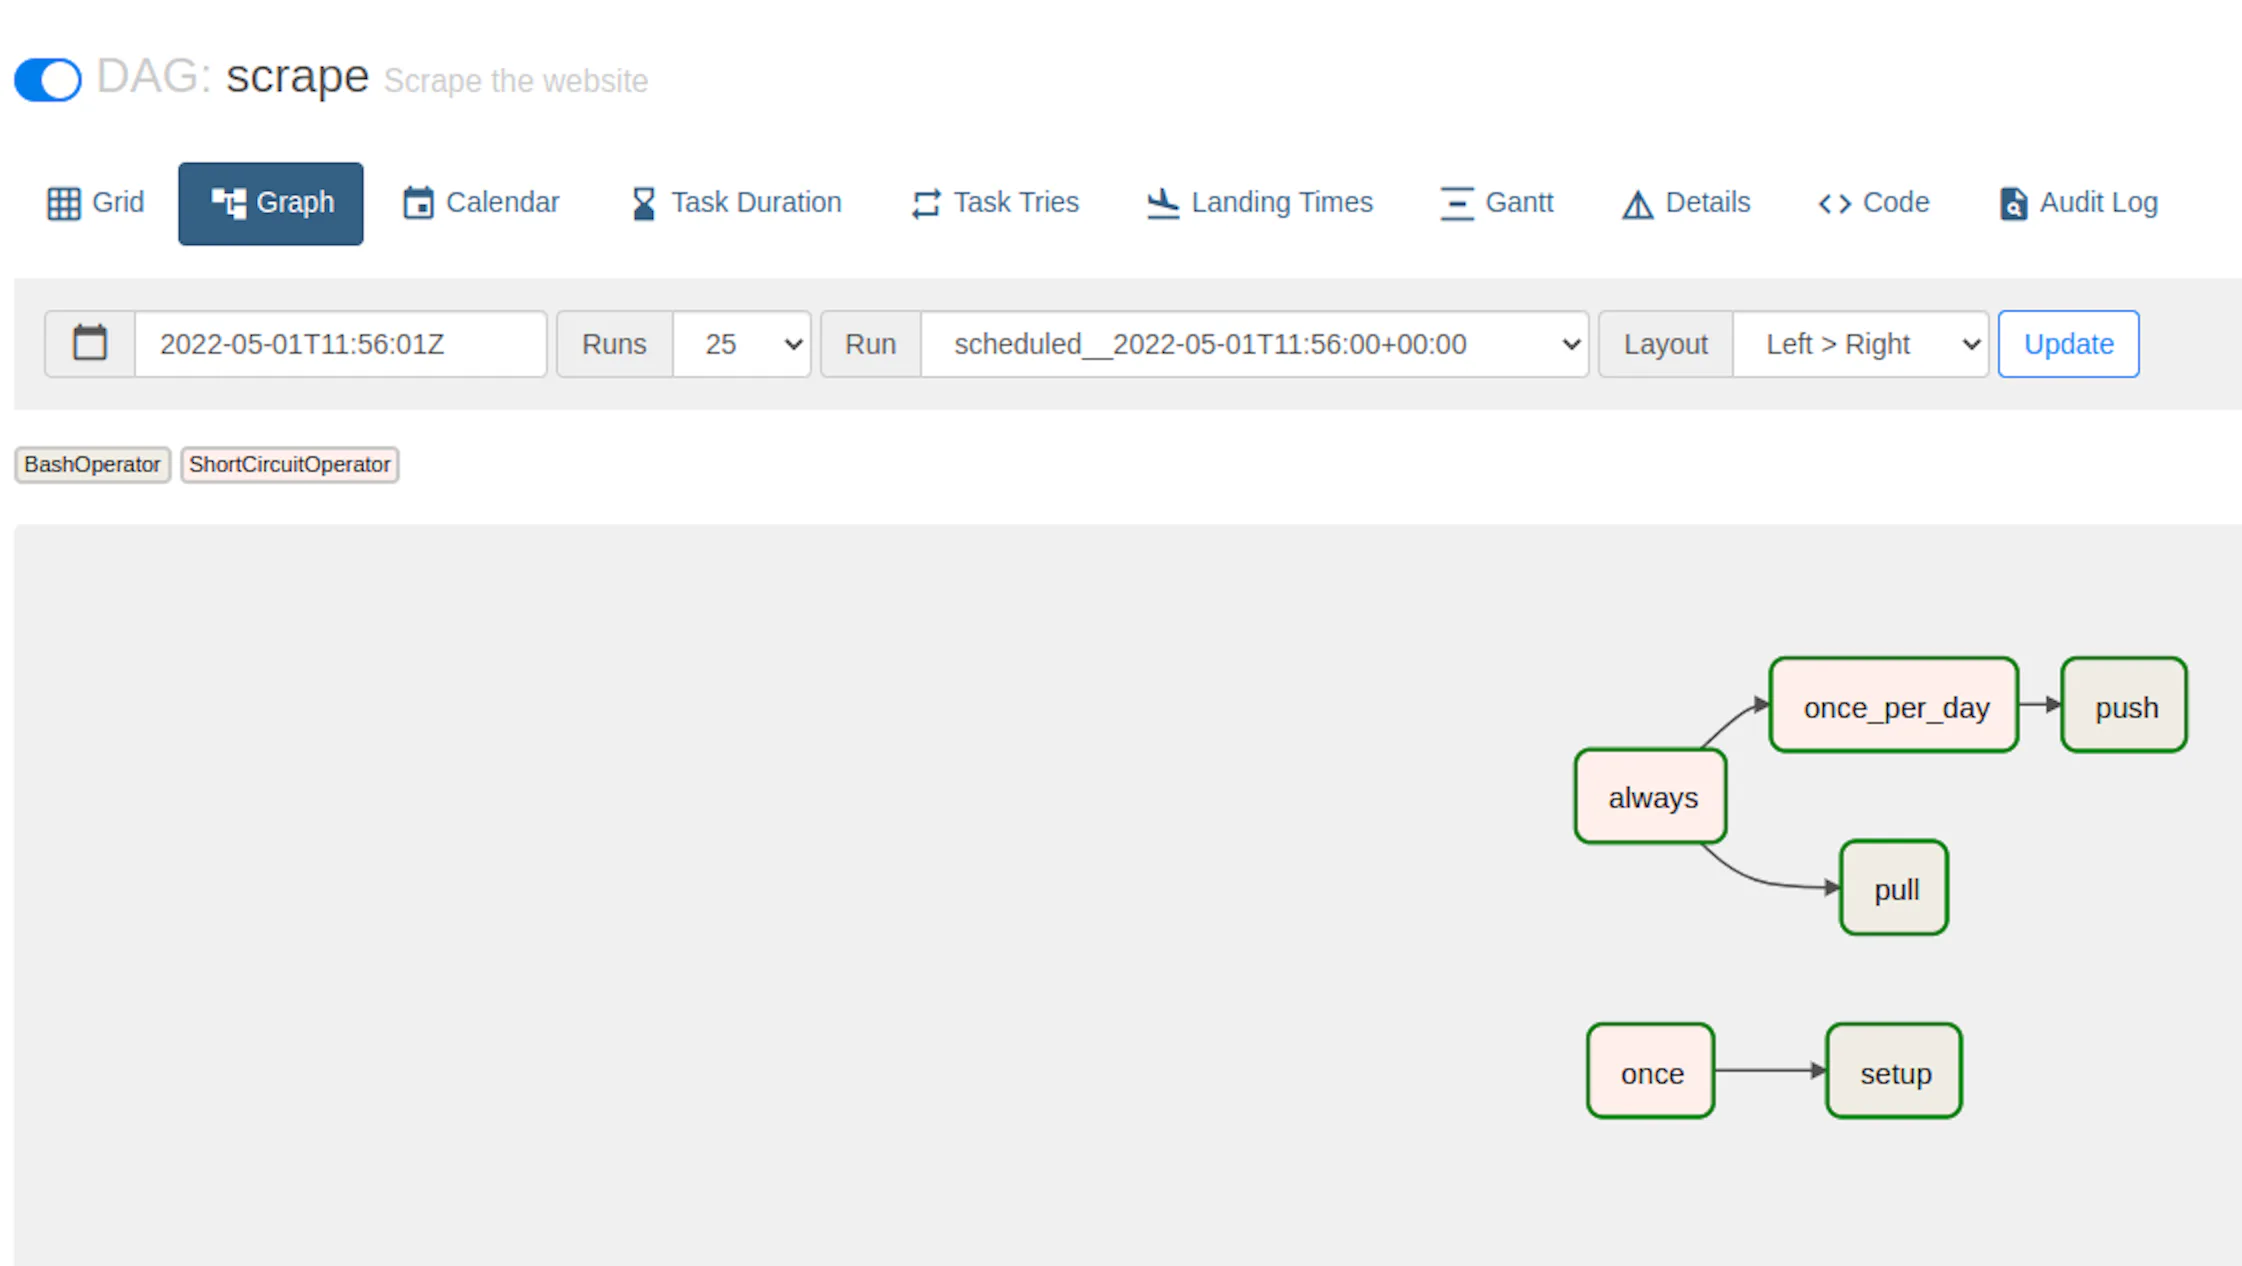
Here we add three helper tasks:
`always` - executed everytime
`once` - executed one time
`once_per_day` - executed daily
The implementation of the new tasks depends on a special variable called `prev_start_date_success`. It contains the start date from the previous run (if available). It allows us to determine whether any previous runs exist.
Here's how our final workflow looks like: