https://github.com/pablotoledom/ESP32-video-streaming-USB
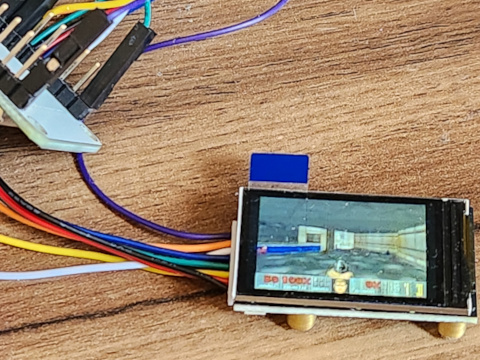
This project allows video streaming from a PC to an **ST7789** screen using an **ESP32** via UART.
https://github.com/pablotoledom/ESP32-video-streaming-USB
esp-32-videp-receiver esp32 esp32-video-streaming esp32-wroom-32
Last synced: about 1 year ago
JSON representation
This project allows video streaming from a PC to an **ST7789** screen using an **ESP32** via UART.
- Host: GitHub
- URL: https://github.com/pablotoledom/ESP32-video-streaming-USB
- Owner: pablotoledom
- Created: 2025-02-06T13:24:25.000Z (over 1 year ago)
- Default Branch: main
- Last Pushed: 2025-02-12T00:09:39.000Z (over 1 year ago)
- Last Synced: 2025-02-12T00:22:34.714Z (over 1 year ago)
- Topics: esp-32-videp-receiver, esp32, esp32-video-streaming, esp32-wroom-32
- Language: C
- Homepage: https://theretrocenter.com/
- Size: 6.75 MB
- Stars: 0
- Watchers: 1
- Forks: 0
- Open Issues: 0
-
Metadata Files:
- Readme: README.md
Awesome Lists containing this project
README
# 📽️ ESP32 Video Streaming to ST7789 Screen
This project allows video streaming from a PC to an **ST7789** screen using an **ESP32** via UART.
[Click aquí para ver el archivo léame en español](https://github.com/pablotoledom/ESP32-video-streaming-USB/blob/main/README_ESPANOL.md)
[](https://www.youtube.com/watch?v=Cykcpi9xnGo)
## 🚀 Features
- ✅ Real-time video streaming from a PC to the ESP32.
- ✅ Frame conversion and compression to **JPEG** to optimize transmission.
- ✅ Decoding on the ESP32 and display on the ST7789 screen.
- ✅ Automatic color adjustment and image rotation in **Python**.
- ✅ FPS optimization (~10-15 FPS with stable UART at 921600 baud).
## 📌 Requirements
### 🔹 **Hardware**
- 📟 **ST7789 screen** (135x240 pixels, SPI)
- 🎛️ **ESP32** (preferably with PSRAM for better performance)
- 🖥️ **PC with Linux or Windows** (to send video)
- 🔌 **USB cable** for programming and communication with the ESP32
### 🔹 **Software and Libraries**
#### 📂 **On the ESP32 (Arduino)**
Make sure to install the following libraries in **Arduino IDE**, If you can't find them in the Arduino library, you can copy them directly to your computer from the **arduino/libraries** directory of this project, copy and paste them into the libraries folder that the Arduino software creates on your PC:
- [`TFT_eSPI`](https://github.com/Bodmer/TFT_eSPI) → To manage the ST7789 screen
- [`JPEGDecoder`](https://github.com/Bodmer/JPEGDecoder) → To decode JPEG images
📌 **Required configurations in `TFT_eSPI`**:
1. Edit `User_Setup.h` and ensure the following settings:
```cpp
#define ST7789_DRIVER
#define TFT_WIDTH 135
#define TFT_HEIGHT 240
#define TFT_MISO -1 // Not use for ST7789
#define TFT_MOSI 23 // GPIO 23
#define TFT_SCLK 18 // GPIO 18
#define TFT_CS 5 // GPIO 5
#define TFT_DC 2 // GPIO 2
#define TFT_RST 4 // GPIO 4
#define TFT_BL 32 // If the display need a enable signal, use 3.3V EN pin or a GPIO
#define SPI_FREQUENCY 40000000 // Optionally, 80 MHz if supported by the screen
#define USE_DMA // For better performance
```
#### 🐍 **On Python (PC)**
Install dependencies using:
```bash
pip install -r requirements.txt
```
📌 **Contents of `requirements.txt`:**
```
opencv-python
pyserial
numpy
```
## 🔧 Installation and Usage
### 1️⃣ **Configure and Upload the Code to ESP32**
1. **Open Arduino IDE** and upload the `display.ino` code.
2. **Close the Serial Monitor** in Arduino before running the Python script.
3. **Connect the ST7789 screen to the ESP32** using SPI:
| **ESP32** | **ST7789** |
|-----------|-----------|
| **3.3V** | **VCC** |
| **GND** | **GND** |
| **18** | **SCK** |
| **19** | **MOSI** |
| **5** | **DC** |
| **23** | **CS** |
| **4** | **RST** |
### 2️⃣ **Run the Code on the PC (Python)**
1. **Open the terminal** and execute:
```bash
python3 send.py
```
2. The video will start streaming to the ST7789 screen via ESP32.
## 🛠️ Troubleshooting
### ❌ **Distorted colors**
✔️ Solution: Ensure that `tft.setSwapBytes(true);` is enabled on the ESP32.
### ❌ **Rotated image**
✔️ Solution: Modify in Python:
```python
frame = cv2.rotate(frame, cv2.ROTATE_90_CLOCKWISE)
```
### ❌ **The image does not occupy the full screen**
✔️ Solution: Ensure that the frame size in Python is `135x240`:
```python
frame = cv2.resize(frame, (135, 240))
```
## 📜 License
This project is licensed under **MIT**, allowing free use and modifications.
Developed by Pablo Toledo
---