Ecosyste.ms: Awesome
An open API service indexing awesome lists of open source software.
https://github.com/paulhoux/Cinder-Warping
A Cinder block that enables you to easily create editable bi-linear and perspective warps, or a combination of the two.
https://github.com/paulhoux/Cinder-Warping
Last synced: 3 months ago
JSON representation
A Cinder block that enables you to easily create editable bi-linear and perspective warps, or a combination of the two.
- Host: GitHub
- URL: https://github.com/paulhoux/Cinder-Warping
- Owner: paulhoux
- License: gpl-3.0
- Created: 2013-06-16T11:52:40.000Z (over 11 years ago)
- Default Branch: master
- Last Pushed: 2022-01-18T16:06:13.000Z (about 3 years ago)
- Last Synced: 2024-04-24T20:23:48.765Z (10 months ago)
- Language: C++
- Size: 1.4 MB
- Stars: 66
- Watchers: 10
- Forks: 31
- Open Issues: 4
-
Metadata Files:
- Readme: README.md
- License: LICENSE.txt
Awesome Lists containing this project
README
[](https://www.paypal.com/donate/?hosted_button_id=TZZBE8N9N8C6L)
Cinder-Warping
==============
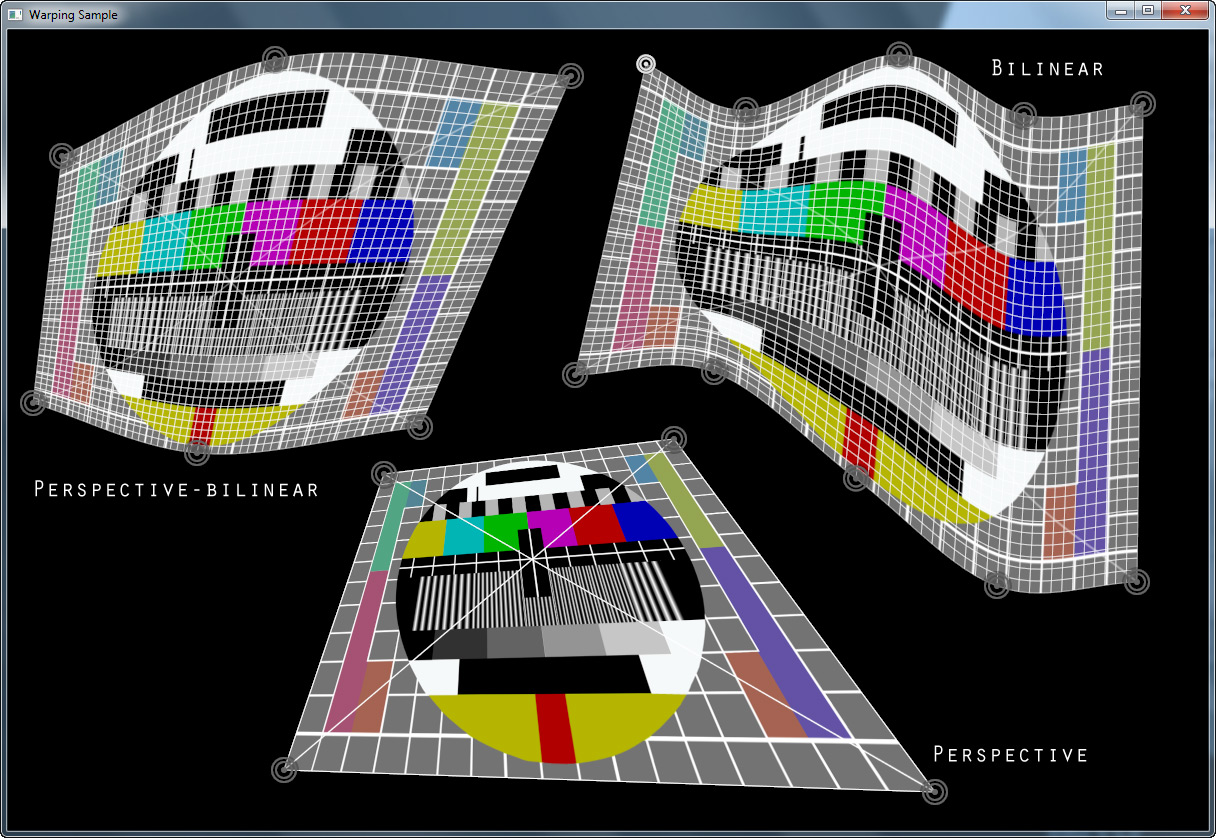
A Cinder block that enables you to easily create editable bi-linear and perspective warps, or a combination of the two.

Image warping, as used in this block, is the process of manipulating an image so that it can be projected onto flat or curved surfaces without distortion. There are three types of warps available:
* **Perspective warp**: performs image correction for projecting onto flat surfaces in case the projector is not horizontally and/or vertically aligned with the wall. Use it to exactly project your content on a rectangular area on a wall or building, regardless of how your projector is setup. For best results, disable any keystone correction on the projector. Then simply drag the four corners of your content where you want them to be on the wall.
* **Bilinear warp**: inferior to perspective warping on flat surfaces, but allows projecting onto curved surfaces. Simply add control points to the warp and drag them to where you want your content to be.
* **Perspective-bilinear warp**: a combination of both techniques, where you first drag the four corners of your content to the desired location on the wall, then adjust for curvatures using the additional control points. If you (accidentally) move your projector later, all you need to do is adjust the four corners and the projection should perfectly fit on the curved wall again.
##### Adding this block to Cinder
This block is meant to be used with version 0.9.0 (or higher) of Cinder.
To add this block to your copy of Cinder, so it will be detected automatically by TinderBox:
* Open a command window (or Terminal)
* Switch to the disk containing the Cinder root folder, e.g.: ```d:```
* Browse to the Cinder root folder: ```cd path\to\cinder_master```
* Add the Warping block to the blocks folder: ```git clone https://github.com/paulhoux/Cinder-Warping.git blocks/Cinder-Warping```
Alternatively, you can download the repository as a [ZIP-file](https://github.com/paulhoux/Cinder-Warping/zipball/master) and manually add the files to a "cinder_master\blocks\Cinder-Warping" folder.
##### Creating a sample application using Tinderbox
The provided sample will show you how to create warps, read them from and write them to a settings file, toggle the editor and handle mouse and key events. To create and compile the sample:
* Run Cinder's TinderBox
* Select "Warping: Basic" from the Template popup menu
* Choose a name for the project
* Choose a location for the project
* Choose your environment(s) of choice
* Press "Next"
* Make sure the "Warping" block is enabled (Install: Copy or Relative)
* Press "Finish"
##### Controls
The block provides a built-in editor to adjust your warps. When activated using the ```Warp::enableEditMode(true)``` function, these are the keys you can use:
* Use mouse or cursor keys to move the currently selected control point
* Press - or + to change brightness
* Press R to reset the warp to its default settings
* Press F1 to reduce the number of horizontal control points
* Press F2 to increase the number of horizontal control points
* Press F3 to reduce the number of vertical control points
* Press F4 to increase the number of vertical control points
* Press F5 to decrease the mesh resolution
* Press F6 to increase the mesh resolution
* Press F7 to toggle adaptive mesh resolution
* Press TAB to select the next control point
* Press M to toggle between linear and curved mapping (unavailable for Perspective warps)
* Press F9 to rotate content counter-clockwise (unavailable for non-Perspective warps)
* Press F10 to rotate content clockwise (unavailable for non-Perspective warps)
* Press F11 to flip content horizontally (unavailable for non-Perspective warps)
* Press F12 to flip content vertically (unavailable for non-Perspective warps)
##### To-Do's
* Support for call-backs or lambda's when iterating over all warps
* Out-of-the-box support for multiple windows
* Support for other warp types, e.g. WarpSpherical
##### Copyright notice
Copyright (c) 2010-2017, Paul Houx - All rights reserved.
This code is intended for use with the Cinder C++ library: http://libcinder.org
Cinder-Warping is free software: you can redistribute it and/or modify it under the terms of the GNU General Public License as published by the Free Software Foundation, either version 3 of the License, or (at your option) any later version.
Cinder-Warping is distributed in the hope that it will be useful, but WITHOUT ANY WARRANTY; without even the implied warranty of MERCHANTABILITY or FITNESS FOR A PARTICULAR PURPOSE. See the GNU General Public License for more details.
You should have received a copy of the GNU General Public License along with Cinder-Warping. If not, see .