https://github.com/pedronjorge/average-face-python
Generate an average face from a given set of images by detecting facial landmarks, aligning features, and blending the images using Delaunay Triangulation. Libraries used: Dlib, OpenCV, NumPy
https://github.com/pedronjorge/average-face-python
dlib image-generation jupyter-notebook numpy opencv python3
Last synced: about 1 year ago
JSON representation
Generate an average face from a given set of images by detecting facial landmarks, aligning features, and blending the images using Delaunay Triangulation. Libraries used: Dlib, OpenCV, NumPy
- Host: GitHub
- URL: https://github.com/pedronjorge/average-face-python
- Owner: PedroNJorge
- License: mit
- Created: 2025-01-25T18:52:38.000Z (over 1 year ago)
- Default Branch: main
- Last Pushed: 2025-02-09T17:46:32.000Z (over 1 year ago)
- Last Synced: 2025-06-21T10:07:59.807Z (about 1 year ago)
- Topics: dlib, image-generation, jupyter-notebook, numpy, opencv, python3
- Language: Jupyter Notebook
- Homepage:
- Size: 68.8 MB
- Stars: 0
- Watchers: 1
- Forks: 0
- Open Issues: 0
-
Metadata Files:
- Readme: README.md
- License: LICENSE
Awesome Lists containing this project
README
# Average-Face-Python
This project generates an average face from a given set of images by detecting facial landmarks, aligning features, and blending the images using Delaunay Triangulation.
# **Import Libraries**
Throughout this project we will use:
* **OpenCV**
* **Dlib**
* **NumPy**
* **Pillow** (will be used to help display images in Jupyter Notebook)
# **Extract facial features**
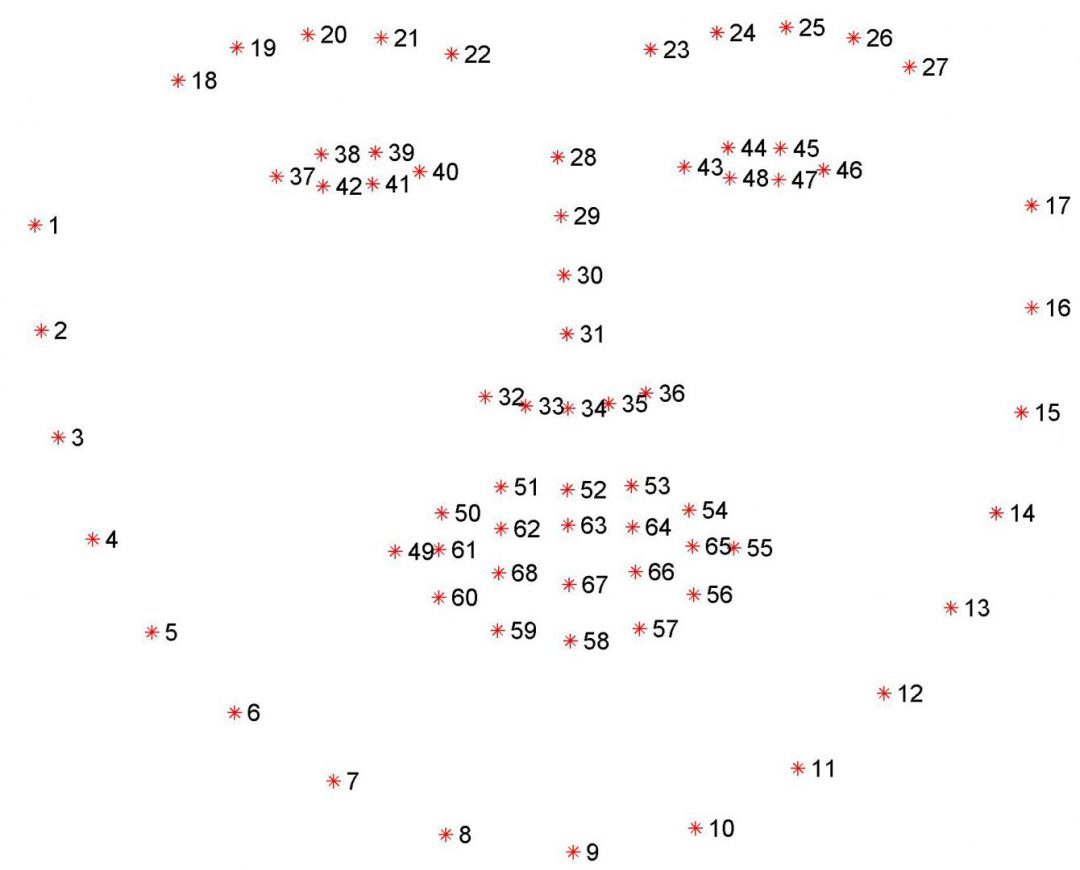
With the help of **dlib**, we will extract the facial features of each image, as demonstrated in the picture above. We will use **get_frontal_face_detector** to detect where the face is, and **shape_predictor_68_face_landmarks.dat** to extract the 68 landmarks of the face. Here is an example:

# **Normalize images**
In drawing, faces can be simplified using the “Rule of Thirds,” which divides the face into horizontal and vertical thirds to help position facial features accurately.
**Rule of Thirds:** The face can be divided into three equal horizontal sections. The top third is from the hairline to the eyebrows, the middle third is from the eyebrows to the bottom of the nose, and the bottom third is from the bottom of the nose to the chin. This method helps ensure that facial features are proportionally placed.
**Facial Features Placement:** Eyes are typically positioned halfway between the top of the head and the chin, which aligns with the horizontal third division. The nose line is found in the middle of the eye line and the bottom of the chin, and the mouth line is about one-third of the way down from the nose line to the chin.
Since each image has a different size, we need to normalize them, warping each to a **600x600 image**. With the drawing rules stated earlier, let's define where certain facial features will warp to:
* Left corner of the **left eye**: (180, 200)
* Right corner of the **right eye**: (420, 200)
* **Bottom lip**: (300, 400)
Now that we know the starting and ending positions, we can use the similarity transform (rotation, translation and scale). To find this transformation, we will use `cv2.getAffineTransform`. With this matrix, we can warp the image with `cv2.warpAffine` and update the landmarks:

The *first* and *second* columns **rotate and scale** the vector. You will need to add the *last* column, which represents the **translation**.
# **Delaunay Triangulation**
Now that the images are normalized, we need to align the rest of the remaining features. To do that, we will first calculate the **Delaunay Triangulation** of the final image:
* Calculate the **landmarks** of the final image, by taking the **average** of the images' landmarks;
* Create a **planar subdivision**, with `cv2.Subdiv2D`, that contains the landmarks of the final image;
* Extract the **Delaunay triangles** with `cv2.getTriangleList` and the respective **indices of the landmarks** used to form each triangle.

# **Align images**
With the Delaunay Triangulation of the final image already computed, our next step is to warp the Delaunay Triangles of each input image so that their landmarks align with those of the final image. To warp, we will use `cv2.getAffineTransform` again. However, `cv2.warpAffine` applies transformations to the entire image, while we only need to warp the pixels within the triangle.
To solve that, we will create a mask for the triangle with the help of `cv2.fillConvexPoly` (this will generate a black image with the triangle painted in white).
# **Generate Average Face**
Now that we have everything set up, we can generate the average face by taking the **mean pixel intensity of all warped images**. Below is the final output generated by averaging the faces of **Elon Musk**, **Donald Trump**, and **Mark Zuckerberg**.
