https://github.com/peterbe/github-pr-triage
A dashboard of Github Pull Requests
https://github.com/peterbe/github-pr-triage
Last synced: about 1 month ago
JSON representation
A dashboard of Github Pull Requests
- Host: GitHub
- URL: https://github.com/peterbe/github-pr-triage
- Owner: peterbe
- License: mpl-2.0
- Archived: true
- Created: 2014-03-02T22:47:52.000Z (about 11 years ago)
- Default Branch: master
- Last Pushed: 2019-01-30T21:32:35.000Z (over 6 years ago)
- Last Synced: 2024-11-04T05:33:39.019Z (6 months ago)
- Language: JavaScript
- Homepage: http://prs.mozilla.io
- Size: 847 KB
- Stars: 149
- Watchers: 13
- Forks: 27
- Open Issues: 4
-
Metadata Files:
- Readme: README.md
- License: LICENSE
Awesome Lists containing this project
- awesome-starred - peterbe/github-pr-triage - A dashboard of Github Pull Requests (others)
README
# GitHub PR Triage
A dashboard of GitHub Pull Requests
An example: [mozilla/socorro](https://prs.mozilla.io/mozilla/socorro)
License: [MPL2](https://www.mozilla.org/MPL/2.0/)
[](https://travis-ci.org/peterbe/github-pr-triage)
## Install
### Dependencies
* python with pip
* memcached
Ubuntu:
sudo apt-get install python-pip memcached
### Requirements
pip install -r requirements.txt
## Configure
### GitHub
Generate a GitHub oauth personal access token with `public_repo` scope using
[instructions here](https://help.github.com/articles/creating-an-access-token-for-command-line-use).
### Environment
export GITHUB_OAUTH_TOKEN=
export MEMCACHE_URL=localhost:11211
## Run
python app.py
point your browser at [http://localhost:5000](http://localhost:5000)
## Deploy
### Prepare (Optional)
You might want to make a "dist version" - a copy of the `./app` directory made
for production use. All CSS and JS is concatenated and minified correctly.
To do that you need to first:
grymt -w ./app
That will create a directory called "./dist" which will contain an optimized
`index.html` which the server app (`app.py`) knows to serve instead.
### Stackato
You can deploy this on Stackato by simply running:
stackato push
### Heroku
Follow standard [Heroku Python
Deployment](https://devcenter.heroku.com/articles/getting-started-with-python#deploy-your-application-to-heroku)
Set the `GITHUB_OAUTH_TOKEN` environment variable on heroku:
heroku config:set GITHUB_OAUTH_TOKEN=
Send your browser to your Heroku app:
heroku open
### Docker
sudo docker run --name memcached -d borja/docker-memcached
sudo docker build -t triage .
sudo docker run --link memcached:memcached -p 5000:5000 -e GITHUB_OAUTH_TOKEN= -d triage
### Cache invalidation Webhook
Once you have your site set up in production, you can set up a GitHub Webhook
that pings this site whenever pull requests are created or updated in some way.
What this does is that it immediately invalidates our cache so that you get
more up to date information.
To do that, go to your favorite GitHub project, click the "Settings".
Then click "Webhooks & Services". Then click the "Add Webhook" button.
Suppose you have this site set up at `http://somedomain.com/` then the
"Payload URL" you need to enter is `http://somedomain.com/webhook`.
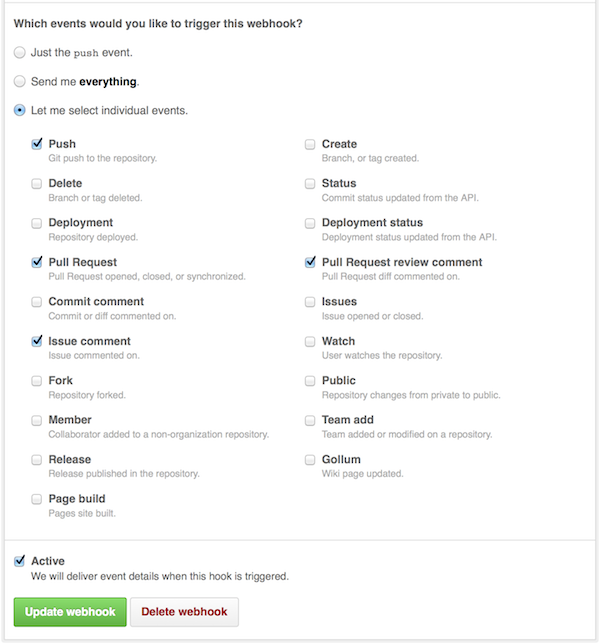
Next, you need to select the "Let me select individual events" radio button.
When a bunch of choices are offered, check:
* Push
* Pull Request
* Issue comment
* Pull Request review comment
Make sure it's Active and then click "Add webhook".
Now it should hopefully inform the site when things change so that the cache
can quickly be invalidated.
