https://github.com/pimoroni/explorer-hat
Python library for Explorer HAT
https://github.com/pimoroni/explorer-hat
explorer-hat explorer-phat phat pypi-package python raspberry-pi raspberry-pi-library touch
Last synced: over 1 year ago
JSON representation
Python library for Explorer HAT
- Host: GitHub
- URL: https://github.com/pimoroni/explorer-hat
- Owner: pimoroni
- License: mit
- Created: 2015-01-28T16:25:05.000Z (over 11 years ago)
- Default Branch: master
- Last Pushed: 2022-03-16T10:25:37.000Z (over 4 years ago)
- Last Synced: 2025-03-29T23:08:40.992Z (over 1 year ago)
- Topics: explorer-hat, explorer-phat, phat, pypi-package, python, raspberry-pi, raspberry-pi-library, touch
- Language: Python
- Homepage: https://shop.pimoroni.com/products/explorer-hat
- Size: 1.23 MB
- Stars: 162
- Watchers: 22
- Forks: 60
- Open Issues: 1
-
Metadata Files:
- Readme: README.md
- License: LICENSE
Awesome Lists containing this project
README

https://shop.pimoroni.com/products/explorer-hat
https://shop.pimoroni.com/products/explorer-phat
The Explorer HAT and Explorer pHAT have a heap of useful input and output options that will take your Raspberry Pi projects to the next level. Great for driving motors, using analog sensors, interfacing with 5V systems, and touch interfaces.
## Installing
### Full install (recommended):
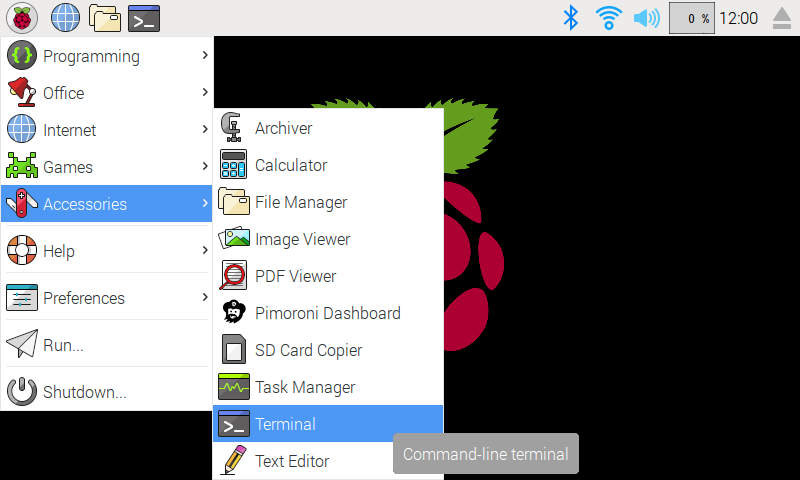
We've created an easy installation script that will install all pre-requisites and get your Explorer HAT/pHAT
up and running with minimal efforts. To run it, fire up Terminal which you'll find in Menu -> Accessories -> Terminal
on your Raspberry Pi desktop, as illustrated below:
In the new terminal window type the command exactly as it appears below (check for typos) and follow the on-screen instructions:
```bash
curl https://get.pimoroni.com/explorerhat | bash
```
### Manual install:
Enable i2c:
```bash
sudo raspi-config nonint do_i2c 0
```
Install the library:
```bash
python3 -m pip install --upgrade explorerhat
```
### Development:
If you want to contribute, or need to run the latest, unreleased code you should clone this repository, `cd` to the library directory, and run:
```bash
sudo python3 setup.py install
```
You will also need to enable the i2c bus:
```bash
sudo raspi-config nonint do_i2c 0
```
## Documentation & Support
* Guides and tutorials
https://learn.pimoroni.com/explorer-hat
https://learn.pimoroni.com/explorer-phat
* Function reference
https://github.com/pimoroni/explorer-hat/blob/master/documentation/
* GPIO Pinout
https://pinout.xyz/pinout/explorer_hat_pro
https://pinout.xyz/pinout/explorer_phat
* Get help
http://forums.pimoroni.com/c/support
## Important Notes
Explorer HAT/pHAT uses an output driver chip called the ULN2003A, which contains a set of transistor pairs called a Darlington Array. It transforms the small logic signal of the Pi into something capable of driving much bigger loads, such as motors, steppers, lights and more.
The 4 outputs on Explorer can sink 5V, but not source. This means you need to connect your load to one of the 5V pins, and then to the output. When you turn the output on it will connect your circuit to ground, allowing current to flow and your load to turn on. This is the opposite of using a bare Pi GPIO pin, where you might connect to the pin and then to ground; keep this in mind!