https://github.com/pinaki82/chatgpt-wrapper-clone
Clone of https://github.com/mmabrouk/chatgpt-wrapper version 0.6.1
https://github.com/pinaki82/chatgpt-wrapper-clone
Last synced: about 1 month ago
JSON representation
Clone of https://github.com/mmabrouk/chatgpt-wrapper version 0.6.1
- Host: GitHub
- URL: https://github.com/pinaki82/chatgpt-wrapper-clone
- Owner: Pinaki82
- License: mit
- Created: 2023-05-24T08:15:49.000Z (about 3 years ago)
- Default Branch: main
- Last Pushed: 2023-05-24T08:56:27.000Z (about 3 years ago)
- Last Synced: 2025-03-02T16:37:07.300Z (over 1 year ago)
- Language: Python
- Size: 70.3 KB
- Stars: 0
- Watchers: 1
- Forks: 0
- Open Issues: 0
-
Metadata Files:
- Readme: README.md
- License: License
- Support: SUPPORT.md
Awesome Lists containing this project
README
**NOTE:** This repository [chatgpt-wrapper-clone](https://github.com/Pinaki82/chatgpt-wrapper-clone.git) is a clone of https://github.com/mmabrouk/chatgpt-wrapper version 0.6.1.
I'm not a Python programmer by any means. So please do not expect updates.
**REASON:** The latest version of [chatgpt-wrapper](https://github.com/mmabrouk/chatgpt-wrapper) supports OpenAI Playground, which comes with limitations. OpenAI Playground is a subscription-based service. The ChatGPT support seems to have been lost there. I noticed that after upgrading the pip package to 10.x.x or something. This repository has been created from a published tag version 0.6.1 of [chatgpt-wrapper](https://github.com/mmabrouk/chatgpt-wrapper), the version that last worked on my Xubuntu machine with the real ChatGPT. The latest version needs OpenAI Playground API Key, which differs from ChatGPT. Hence this effort.
Special Thanks to [mmabrouk](https://github.com/mmabrouk)!
:candy:ChatGPT (and GPT4) Wrapper:candy:
## Welcome!
What would you like to do?
* [Learn about the project](#summary-header)
* [Install the wrapper](#requirements)
* [Learn more about configuration/features](#configuration)
* [Learn how to use it](#usage)
* [Using GPT4](#gpt4)
* [Report a bug](ISSUES.md)
* [Get support](SUPPORT.md)
ChatGPT Wrapper is an open-source unofficial Power CLI, Python API and Flask API that lets you interact programmatically with ChatGPT/GPT4.
## Highlights
**Programmable ChatGPT**. The ChatGPT Wrapper lets you use the powerful ChatGPT/GPT4 bot in your _Python scripts_ or on the _command line_, making it easy to leverage its functionality into your projects.
**Runs in Shell**. You can call and interact with ChatGPT/GPT4 in the terminal.
**Supports official ChatGPT API**. Make API calls directly to the OpenAI ChatGPT endpoint (all supported models accessible by your OpenAI account)
**Python API**. The ChatGPT Wrapper is a Python library that lets you use ChatGPT/GPT4 in your Python scripts.
**Simple plugin architecture**. Extend the wrapper with custom functionality (alpha)
**Docker image**. The ChatGPT Wrapper is also available as a docker image. (experimental)
:test_tube: **Flask API**. You can use the ChatGPT Wrapper as an API. (experimental)
## How it works
Run an interactive CLI in the terminal:

Or just get a quick response for one question:

See below for details on using ChatGPT as an API from Python.
## Requirements
To use this repository, you need `setuptools` installed. You can install it using `pip install setuptools`. Make sure that you have the last version of pip: `pip install --upgrade pip`
To use the 'chatgpt-api' backend, you need a database backend (SQLite by default, any configurable in SQLAlchemy allowed).
## Installation
### Notes for Windows users
Most other operating systems come with SQLite (the default database choice) installed, Windows may not.
If not, you can grab the 32-bit or 64-bit DLL file from [https://www.sqlite.org/download.html](https://www.sqlite.org/download.html), then place the DLL in `C:\Windows\System32` directory.
You also may need to install Python, if so grab the latest stable package from [https://www.python.org/downloads/windows/](https://www.python.org/downloads/windows/) -- make sure to select the install option to `Add Python to PATH`.
For the `/editor` command to work, you'll need a command line editor installed and in your path. You can control which editor is used by setting the `EDITOR` environment variable to the name of the editor executable, e.g. `nano` or `vim`.
### Code
#### From packages
Install the latest version of this software directly from github with pip:
```bash
pip install git+https://github.com/Pinaki82/chatgpt-wrapper-clone.git
```
#### From source (recommended for development)
* Install the latest version of this software directly from git:
```bash
git clone https://github.com/Pinaki82/chatgpt-wrapper-clone.git
```
* Install the the development package:
```bash
cd chatgpt-wrapper
pip install -e .
```
### Backend
The wrapper works with several differnt backends to connect to the ChatGPT models, and installation is different for each backend.
#### Playwright (browser-based)
* Pros:
* Free or paid version available (as of this writing)
* Fairly easy to set up for non-technical users
* Cons:
* Slow (runs a full browser session)
* Clunky authentication method
* No model customizations
* Third party controls your data
Install a browser in playwright (if you haven't already). The program will use firefox by default.
```
playwright install firefox
```
Start up the program in `install` mode:
```bash
chatgpt install
```
This opens up a browser window. Log in to ChatGPT in the browser window, walk through all the intro screens, then exit program.
```bash
1> /exit
```
Restart the program without the `install` parameter to begin using it.
```bash
chatgpt
```
#### API (REST-based)
* Pros:
* Fast (many operations run locally for speed)
* Simple API authentication
* Full model customizations
* You control your data
* Cons:
* Only paid version available (as of this writing)
* More commplex setup suitable for technical users
Grab an API key from [https://platform.openai.com/account/api-keys](https://platform.openai.com/account/api-keys)
Export the key into your local environment:
```bash
export OPENAI_API_KEY=
```
Windows users, see [here](https://www.computerhope.com/issues/ch000549.htm) for how to edit environment variables.
Run the program with the 'config' command:
```bash
chatgpt config
```
This will show all the current configuration settings, the most important ones for installation are:
* **Config dir:** Where configuration files are stored
* **Current profile:** (shown in the 'Profile configuration' section)
* **Config file:** The configuration file current being used
* **Data dir:** The data storage directory
Find the 'Config file' setting, and copy the [config.sample.yaml](/config.sample.yaml) there:
On Linux:
```bash
mkdir -p ~/.config/chatgpt-wrapper/profiles/default
cp config.sample.yaml ~/.config/chatgpt-wrapper/profiles/default/config.yaml
```
Then edit the settings in that file to taste. You'll want to make sure `backend` is set to `chatgpt-api` in order to use the API.
##### Database configuration
The API backend requires a database server to store conversation data. The wrapper leverages [SQLAlchemy](https://www.sqlalchemy.org/) for this.
The simplest supported database is SQLite (which is already installed on most modern operating systems), but you can use any database that is supported by SQLAlchemy.
Check the `database` setting from the `config` command above, which will show you the currently configured connection string for a default SQLite database.
If you're happy with that setting, nothing else needs to be done -- the database will be created automatically in that location when you run the program.
##### Initial user creation and login
Once the database is configured, run the program with no arguments:
```bash
chatgpt
```
It will recognize no users have been created, and prompt you to create the first user:
* Username: Required, no spaces or special characters
* Email: Optional
* Password: Optional, if not provided the user can log in without a password
Once the user is created, execute the `/login` command with the username:
```bash
/login [username]
```
Once you're logged in, you have full access to all commands.
**IMPORTANT NOTE:** The user authorization system from the command line is 'admin party' -- meaning every logged in user has admin privileges, including editing and deleting other users.
## Configuration
From a running `chatgpt` instance, execute `/config` to view the current configuration.
The output will show the location of the configuration directory, the name of
the configuration file (called a 'profile'), and the current configuration.
Configuration is optional, default values will be used if no configuration profile is
provided. The default configuation settings can be seen in
[config.sample.yaml](/config.sample.yaml) -- the file is commented with descriptions
of the settings.
*NOTE:* Not all settings are available on all backends. See the example config for more information.
Command line arguments overrride custom configuration settings, which override default
configuration settings.
## Templates (alpha, subject to change)
The wrapper comes with a full template management system.
Templates allow storing text in template files, and quickly leveraging the contents as your user input.
Features:
* Per-profile templates
* Create/edit templates
* `{{ variable }}` syntax substitution
* Five different workflows for collecting variable values, editing, and running
See the various `/help template` commands for more information.
### Builtin variables
The wrapper exposes some builtin variables that can be used in templates:
* `{{ clipboard }}` - Insert the contents of the clipboard
### Front matter
Templates may include front matter (see [examples](examples/templates)).
These front matter attributes have special functionality:
* title: Sets the title of new conversations to this value
* description: Displayed in the output of `/templates`
* model_customizations: A hash of model customizations to apply when the template is run (see `/config` for available model customizations)
All other attributes will be passed to the template as variable substitutions.
## Plugins (alpha, subject to change)
### Using plugins
1. Place the plugin file in either:
* The main `plugins` directory of this module
* A `plugins` directory in your profile
2. Enable the plugin in your configuration:
```yaml
plugins:
enabled:
# This is a list of plugins to enable, each list item should be the name of a plugin file, without the extension.
- test
```
Note that setting `plugins.enabled` will overwrite the default enabled plugins. see `/config` for a list of default enabled plugins.
### Writing plugins
There is currently no developer documentation for writing plugins.
The `plugins` directory has some default plugins, examining those will give a good idea for how to design a new one.
Currently, plugins for the shell can only add new commands. An instantiated plugin has access to these resources:
* `self.config`: The current instantiated Config object
* `self.log`: The instantiated Logger object
* `self.backend`: The instantiated backend
* `self.shell`: The instantiated shell
## Tutorials:
- **Newest Youtube video:** [ChatCPT intro, walkthrough of features](https://www.youtube.com/watch?v=Ho3-pzAf5e8)
- Youtube Tutorial: [How To Use ChatGPT With Unity: Python And API Setup #2](https://www.youtube.com/watch?v=CthF8c8qk4c) includes a step by step guide to installing this repository on a windows machine
- This [Blog post](https://medium.com/geekculture/using-chatgpt-in-python-eeaed9847e72) provides a visual step-by-step guide for installing this library.
## Usage
### Shell
#### Command line arguments
Run `chatgpt --help`
#### One-shot mode
To run the CLI in one-shot mode, simply follow the command with the prompt you want to send to ChatGPT:
```
chatgpt Hello World!
```
#### Interacive mode
To run the CLI in interactive mode, execute it with no additional arguments:
```
chatgpt
```
Once the interactive shell is running, you can see a list of all commands with:
```
/help
```
...or get help for a specific command with:
```
/help
```
### Python
To use the `ChatGPT` class as an API for talking to ChatGPT, create an instance of the class and use the `ask` method to send a message to OpenAI and receive the response. For example:
```python
from chatgpt_wrapper import ChatGPT
bot = ChatGPT()
success, response, message = bot.ask("Hello, world!")
if success:
print(response)
else:
raise RuntimeError(message)
```
The say method takes a string argument representing the message to send to ChatGPT, and returns a string representing the response received from ChatGPT.
You may also stream the response as it comes in from ChatGPT in chunks using the `ask_stream` generator.
To pass custom configuration to ChatGPT, use the Config class:
```python
from chatgpt_wrapper import ChatGPT
from chatgpt_wrapper.config import Config
config = Config()
config.set('browser.debug', True)
bot = ChatGPT(config)
success, response, message = bot.ask("Hello, world!")
if success:
print(response)
else:
raise RuntimeError(message)
```
### Flask API (experimental)
- Run `python chatgpt_wrapper/gpt_api.py --port 5000` (default port is 5000) to start the server
- Test whether it is working using `python -m unittest tests/api_test.py`
- See an example of interaction with api in `tests/example_api_call.py`
## Docker (experimental)
Build a image for testing `chatgpt-wrapper` with following commands.
```bash
docker-compose build && docker-compose up -d
docker exec -it chatgpt-wrapper-container /bin/bash -c "chatgpt install"
```
Then, visit http://localhost:6901/vnc.html with password `headless` and login ChatGPT.
Then, turn back to terminal and enjoy the chat!

## GPT4
### Backend notes
#### Playwright (browser-based) backend
To use GPT-4 with this backend, you must have a ChatGPT-Plus subscription.
#### API backend
To use GPT-4 with this backend, you must have been granted access to the model in your OpenAI account.
### Using GPT-4
#### From the shell
Follow one of the methods below to utilize GPT-4 in the shell:
##### Method 1: Run the command
Enter the following command in your shell:
```
chatgpt --model=gpt4
```
##### Method 2: Modify the `config.yaml` file
Update your `config.yaml` file to include the following line:
```
model: gpt4
```
#### Via Python module
To use GPT-4 within your Python code, follow the template below:
```python
from chatgpt_wrapper import ChatGPT
from chatgpt_wrapper.config import Config
config = Config()
config.set('chat.model', 'gpt4')
bot = ChatGPT(config)
success, response, message = bot.ask("Hello, world!")
```
## Projects built with chatgpt-wrapper
- [bookast: ChatGPT Podcast Generator For Books](https://github.com/SamMethnani/bookast)
- [ChatGPT.el: ChatGPT in Emacs](https://github.com/joshcho/ChatGPT.el)
- [ChatGPT Reddit Bot](https://github.com/PopDaddyGames/ChatGPT-RedditBot)
## Contributing
We welcome contributions to ChatGPT Wrapper! If you have an idea for a new feature or have found a bug, please open an issue on the GitHub repository.
## License
This project is licensed under the MIT License - see the LICENSE file for details.
## Acknowledgments
- This project is a modification from [Taranjeet](https://github.com/taranjeet/chatgpt-api) code which is a modification of [Daniel Gross](https://github.com/danielgross/whatsapp-gpt) code.
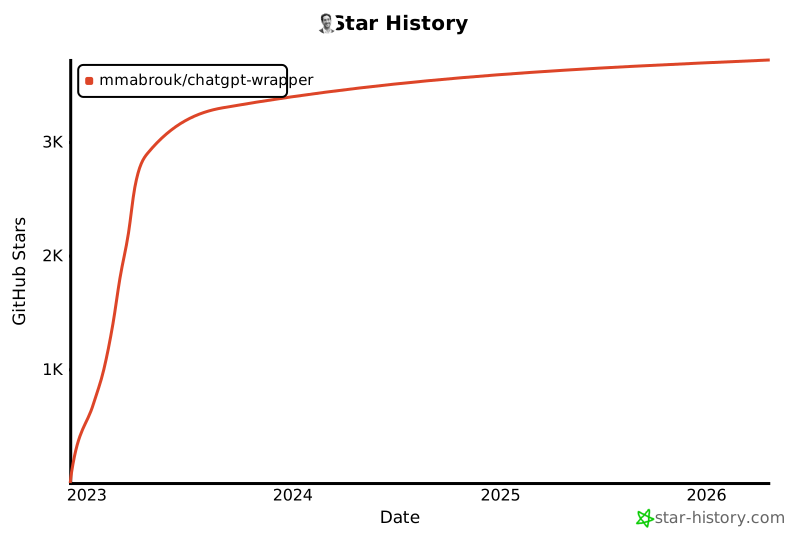
## Star History
[](https://star-history.com/#mmabrouk/chatgpt-wrapper&Date)