Ecosyste.ms: Awesome
An open API service indexing awesome lists of open source software.
https://github.com/pjz9n-pm-pl/mission
Give the player a mission!
https://github.com/pjz9n-pm-pl/mission
pmmp pmmp-plugin
Last synced: 3 months ago
JSON representation
Give the player a mission!
- Host: GitHub
- URL: https://github.com/pjz9n-pm-pl/mission
- Owner: pjz9n-pm-pl
- License: gpl-3.0
- Created: 2020-10-07T19:47:37.000Z (over 4 years ago)
- Default Branch: master
- Last Pushed: 2021-08-30T10:12:10.000Z (over 3 years ago)
- Last Synced: 2024-09-22T16:03:00.476Z (4 months ago)
- Topics: pmmp, pmmp-plugin
- Language: PHP
- Homepage:
- Size: 675 KB
- Stars: 15
- Watchers: 5
- Forks: 8
- Open Issues: 4
-
Metadata Files:
- Readme: README.md
- License: LICENSE
Awesome Lists containing this project
README
# Mission
[](https://poggit.pmmp.io/p/Mission)
[](https://poggit.pmmp.io/p/Mission)
Select language:
[日本語](#日本語)
[English](#English)
## Select the plugin language
By default, the PM language (`pocketmine.yml` or `server.properties`) is used, but if it is not supported, it will be English.
1. Open the `config.yml`
2. Change language setting: `language: `
A list of available languages can be found in `resources/locale/`
(Remove the .ini extension)
e.g. `resources/locale/eng.ini` => `eng`
## 日本語
### 動作例

### コマンド
| コマンド名 | 説明 | 権限 | エイリアス | プレイヤーのみ |
| --- | --- | --- | --- | --- |
| mission | ミッションを表示する | mission.command.mission | mi | はい |
`mission` コマンドでは、引数に名前、ID、短縮IDを指定することができます。
引数を指定しなかった場合と指定したミッションが存在しない場合は全ミッションのリストが送信されます。
#### サブコマンド (/mission)
| サブコマンド名 | 説明 | 権限 | エイリアス | プレイヤーのみ |
| --- | --- | --- | --- | --- |
| edit | ミッションを編集する | mission.command.mission.edit | なし | はい |
| setting | 設定 | mission.command.mission.setting | set, config | はい |
| list | ミッションのリストを表示する | mission.command.mission.list | l | はい |
| info | プラグインの情報を表示する | mission.command.mission.info | i | いいえ |
`edit` サブコマンドでは、引数に名前、ID、短縮IDを指定することができます。
引数を指定しなかった場合と指定したミッションが存在しない場合は全ミッションのリストが送信されます。
`list` サブコマンドでは、引数にグループを指定することができます。
引数を指定しなかった場合は全ミッションのリストが送信されます。
### 権限
| 権限名 | デフォルト |
| --- | --- |
| mission.command.mission | true
| mission.command.mission.edit | op |
| mission.command.mission.setting | op |
| mission.command.mission.list | true |
| mission.command.mission.info | op |
### 使い方
#### 項目の説明
- 最大達成回数: ミッションを達成できる回数
- 目標ステップ数: 目標のステップ数
- ステップトリガー: ミッションのステップを増やすトリガー
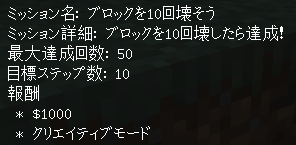
#### ミッションの作成例
- ブロックを10回壊したら達成
- 報酬はダイヤモンド10個
- 1回まで達成できる
1. `/mission edit` コマンドを実行
2. 「ミッション追加」を選択
3. 「最大達成回数」に1を、「目標ステップ数」に10を入力
4. 作成したミッションを選択
5. 「報酬の編集」を選択
6. 「報酬追加」を選択
7. 「報酬の種類」に「アイテム報酬」を指定
8. 「id」に264(ダイヤモンドのID)を、「個数」に10を入力
9. 「ステップトリガー編集」を選択
10. 「ステップトリガー追加」を選択
11. 「ステップトリガーの種類」に「イベント」を指定
12. 「イベント」に「BlockBreakEvent」を指定
このようになっていれば成功です(フォントの乱れはMCBEの仕様です)

### Mineflowとの連携
#### レシピによる報酬を作成
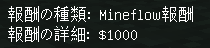
1. [ミッションの作成例](#ミッションの作成例) を参考に「Mineflow報酬」を追加する
2. Mineflow側のトリガーで「ミッション報酬」を選択、対象の実績を指定する
##### 例
- レシピ

- ミッション

##### Tips
- ミッション報酬をトリガに指定したMineflowレシピでは、変数targetが使用できます
- レシピによる報酬を複数作成したい場合でも、「Mineflow報酬」は1つまでにしてください
- レシピによる報酬を複数作成する場合で、2つ目以降の報酬内容を表示したい場合「何もしない(文字表示のみ)」を使用することができます
#### レシピをステップトリガーとして使う
1. Mineflow側でアクション追加画面を開き「ミッション」、「ミッションのステップを増やす」を選択して追加する
##### 例

##### Tips
- ミッション側での設定は不要です
- レシピ側で条件式などを組み合わせることによって、かなり柔軟な設定が可能になります
### 外部プラグインとの連携(開発者向け)
#### 前提条件
- plugin.ymlのdependにこのプラグインを追加する
#### 報酬の種類を追加する
1. Rewardを継承したクラスを作成する(実装例は既存Rewardを参照)
2. そのクラスをRewardsに追加
```php
pjz9n\mission\reward\Rewards::add(ExampleReward::class);
```
#### ステップトリガーの種類を追加する
1. Executorを継承したクラスを作成する(実装例は既存Executorを参照)
2. そのクラスをExecutorsに追加
```php
pjz9n\mission\mission\executor\Executors::add(ExampleExecutor::class);
```
#### Missionを操作
```php
pjz9n\mission\mission\MissionList
```
#### Progressを操作
```php
pjz9n\mission\mission\progress\ProgressList
```
#### イベントステップトリガーにイベントを追加する
`PlayerEvent`のインスタンスもしくは`getPlayer`メソッドを持つイベントはデフォルトで追加されています。
ただし、あなたは`getDamager`メソッドを持つEntityDamageByEntityEvent`イベントを追加したいかもしれません。
そのような場合にはこれを使います。
```php
pjz9n\mission\mission\executor\EventList::addEvent(EntityDamageByEntityEvent::class, function (Event $event): ?Player {
/** @var EntityDamageByEntityEvent $event */
$damager = $event->getDamager();
return $damager instanceof Player ? $damager : null;
});
```
詳しくはソースコードを参照してください
※各操作のタイミングは問いません(基本的にはプラグイン有効化タイミングに行うのが望ましい)
## English
### Operation example
### Command
| command name | description | permission | alias | player only |
| --- | --- | --- | --- | --- |
| mission | Show mission | mission.command.mission | mi | Yes |
The `mission` command allows you to specify a name, ID, and Short ID as arguments.
Returns a all missions list if no arguments are specified or the specified mission does not exist.
#### Sub command (/mission)
| sub command name | description | permission | alias | player only |
| --- | --- | --- | --- | --- |
| edit | Edit mission | mission.command.mission.edit | None | Yes |
| setting | Settings | mission.command.mission.setting | set, config | Yes |
| list | Show the missions list | mission.command.mission.list | l | Yes |
| info | Show plugin information | mission.command.mission.info | i | No |
The `edit` subcommand allows you to specify a name, ID, and Short ID as arguments.
Returns a all missions list if no arguments are specified or the specified mission does not exist.
The `list` subcommand allows you to specify a group name as arguments.
Returns a all missions list if no arguments are specified.
### Permission
| permission name | default |
| --- | --- |
| mission.command.mission | true
| mission.command.mission.edit | op |
| mission.command.mission.setting | op |
| mission.command.mission.list | true |
| mission.command.mission.info | op |
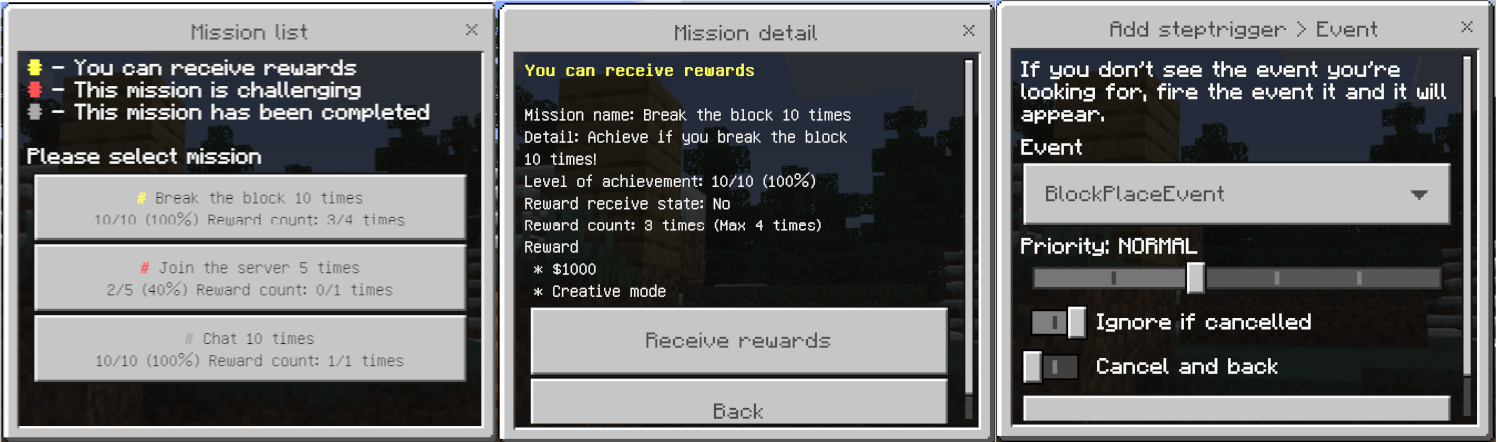
### Usage
#### Item description
- Maximum number of achievements: Number of times you can complete a mission
- Target step: Target number of steps
- Steptrigger: Trigger to increase mission steps
#### Mission creation example
- Achieved after breaking blocks 10 times
- The reward is 10 diamonds
- Can be achieved up to once
1. Execute command: `/mission edit`
2. Select "Add mission"
3. Input the 1 to "Maximum number of achievements" and 10 to "Target step"
4. Select the created mission
5. Select "Edit reward"
6. Select "Add reward"
7. Specify "Item reward" for "Reward type"
8. Input the 264(Diamond ID) to "ID" and 10 to "Amount"
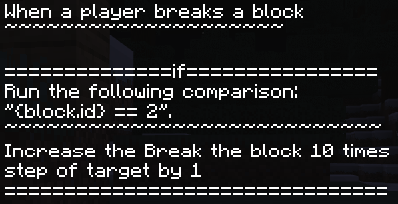
9. Select "Edit steptrigger"
10. Select "Add steptrigger"
11. Specify "Event" for "Steptrigger type"
12. Specify "BlockBreakEvent" for "Event"
If it looks like this, it ’s a success.

### Cooperation with Mineflow plugin
#### Create reward with recipe
1. Add "Mineflow reward" by referring to [Mission creation example](#Mission creation example)
2. Select "MissionReward" with the trigger on the Mineflow plugin side and specify the target mission
##### Examples
- Recipe

- Mission


##### Tips
- The variable "target" can be used in Mineflow recipes triggered by mission rewards
- Even if you want to create multiple recipe rewards, please limit the number of "Mineflow reward" to one
- If you want to create multiple rewards based on recipes and want to display the second and subsequent rewards, you can use "Nothing (text show only)"
#### Use the recipe as a Steptrigger
1. Open the action addition screen on the Mineflow plugin side and select "Mission", "Increase the mission step" to add
##### Examples
##### Tips
- No setting is required on the mission side
- By combining conditional expressions on the recipe side, it is possible to make fairly flexible settings
### Cooperation with external plugins (for developers)
#### Prerequisites
- Add this plugin to depend in plugin.yml
#### Add reward type
1. Create a class that inherits Reward (see existing Reward for implementation example)
2. Add that class to Reward
```php
pjz9n\mission\reward\Rewards::add(ExampleReward::class);
```
#### Add Steptrigger type
1. Create a class that inherits Executor (see existing Executor for implementation example)
2. Add that class to Executor
```php
pjz9n\mission\mission\executor\Executors::add(ExampleExecutor::class);
```
#### Operate Mission
```php
pjz9n\mission\mission\MissionList
```
#### Operate Progress
```php
pjz9n\mission\mission\progress\ProgressList
```
#### Add event to Event Steptrigger
Instances of `PlayerEvent` or events with` getPlayer` methods are added by default.
However, you may want to add an `EntityDamageByEntityEvent` event that has a `getDamager` method.
It can be used in such cases.
```php
pjz9n\mission\mission\executor\EventList::addEvent(EntityDamageByEntityEvent::class, function (Event $event): ?Player {
/** @var EntityDamageByEntityEvent $event */
$damager = $event->getDamager();
return $damager instanceof Player ? $damager : null;
});
```
See the source code for details
\* The timing of each operation does not matter (basically, it is desirable to perform it at the plug-in activation timing)