https://github.com/plusk01/teensyimu
real-time processing of imu on desktop sampled from teensy
https://github.com/plusk01/teensyimu
Last synced: 2 months ago
JSON representation
real-time processing of imu on desktop sampled from teensy
- Host: GitHub
- URL: https://github.com/plusk01/teensyimu
- Owner: plusk01
- Created: 2020-11-23T12:14:23.000Z (over 5 years ago)
- Default Branch: main
- Last Pushed: 2024-08-28T00:48:10.000Z (almost 2 years ago)
- Last Synced: 2025-09-20T10:42:18.948Z (9 months ago)
- Language: C++
- Size: 1.07 MB
- Stars: 4
- Watchers: 1
- Forks: 1
- Open Issues: 2
-
Metadata Files:
- Readme: README.md
Awesome Lists containing this project
README
Real-time IMU Processing from Teensy
====================================
Supporting software to stream IMU (Adafruit ICM-20948) connected to Teensy 4.0 via SPI onto desktop computer via serial. Serial IO is handled in C++ and exposed to Python with pybind11.
## Getting Started
This repo provides the `teensytools` Python package to allow easy access to the hardware from Python. The Python package includes the C++ serial driver for quickly communicating with the teensy. The C++ is transparent to the user via `pybind11`. This Python package can be installed using the pre-built binaries via `pip` or by building from source yourself.
Once `teensytools` is installed on your machine, you will be able to quickly plot data (see **Examples** below) like:

### Installing via `pip`
***Note**: Only Python 3 is supported. When a command uses `python` or `pip`, you may need to replace with `python3` or `pip3` depending on your system. You can always use `python --version` or `pip --version` to check which version is being used.*
For the following systems, the `teensyimu` Python package can be easily installed using `pip` and without requiring building from source: `ubuntu-18.04`, `ubuntu20.04`, `macos-catalina` (potentially `macos-bigsur`), `windows-10`. To do this, we will leverage the pre-built binaries posted on the [releases page](https://github.com/plusk01/teensyimu/releases).
Under the desired release version, expand the **Assets** list. Then, right-click the appropriate `*.tar.gz` link and copy the link address. You can simply direct `pip` to install the package at the URL. For example, using release version 0.1 on macos you would run:
```bash
$ pip install https://github.com/plusk01/teensyimu/releases/download/0.1/teensyimu-py3-macos-0.1.tar.gz
```
Once installed, the installation can be verified with `python -m teensyimu.plotimu`. If the device is not plugged in, you should see a message (`Could not find Teensy!`) and the script should quit gracefully. If the device is plugged in data should apppear in the terminal and a plot should open.
***Note**: If the latest version is desired (check [here](https://github.com/plusk01/teensyimu/blob/main/CMakeLists.txt#L2)) and there is not a release matching this version, then this package needs to be built from source (see below, e.g., Linux / MacOS, and then follow "Installing Python Package from Source").*
### Building from Source
Linux / MacOS
After cloning this project onto your computer:
1. Build C++ driver with Python bindings (requires Boost):
```bash
mkdir build
cd build
cmake ..
make
```
Once the package builds successfully, you can install the `teensyimu` Python package as described below.
Windows
Compilation of this package has been tested on a Windows 10 machine. The environment was setup as follows. Explicit versions used are listed, but these steps are expected to work with reasonably recent versions of these tools.
1. Install [git bash](https://git-scm.com/downloads) (*2.30.1*)
2. Install [CMake](https://cmake.org/download/) (*3.19.5*)
3. Install [Python](https://www.python.org/) (*3.9.1*)
4. Install [Visual Studio Community](https://visualstudio.microsoft.com/vs/community/) or Professional (*Pro 2019, v16.8.5* with *MSVC 14.28.29333*)
5. Install [Boost](https://sourceforge.net/projects/boost/files/boost-binaries) (*1.75.0*, [`boost_1_75_0-msvc-14.2-64.exe`](https://sourceforge.net/projects/boost/files/boost-binaries/1.75.0/))
Once the development environment is setup, use `git bash` (or `cmd`) to run the following commands
```bash
$ git clone https://github.com/plusk01/teensyimu # clone this repo in your preferred directory
$ cd teensyimu
$ mkdir build
$ cd build
$ cmake -DBUILD_SHARED_LIBS=OFF ..
$ cmake --build . --target ALL_BUILD --config Release # or open in VS: start teensyimu.sln
$ cmake --build . --target pypkg --config Release # to tar python pkg
```
Once the package builds successfully, you can install the `teensyimu` Python package as described below.
Installing Python Package from Source
Install the built-from-source Python package with `pip`:
```bash
cd build
make pip-install
```
## Setting up the Teensy firmware
Flash Teensy with `firmware/firmware.ino` sketch.
## Examples
See an IMU data plot in real-time with `python -m teensyimu.plotimu`. Alternatively, you can see the frequency spectrum with `python -m teensyimu.plotfreq`
## Creating New Messages
To create new or change existing messages, changes need to be made in `teensyimu_serial.h` and in `serial_driver.cpp`. For these changes to appear in Python, `py_teensyimu.cpp` also needs to be changed. For an example of necessary changes, see [this commit](https://github.com/plusk01/teensyimu/commit/2f2101865d4a2deb641b958747ef80e209a2884f) where two new messages (*IMU_NoMag* and *IMU_3DOF*) were added.
If messages are changed, this project must be built from source.
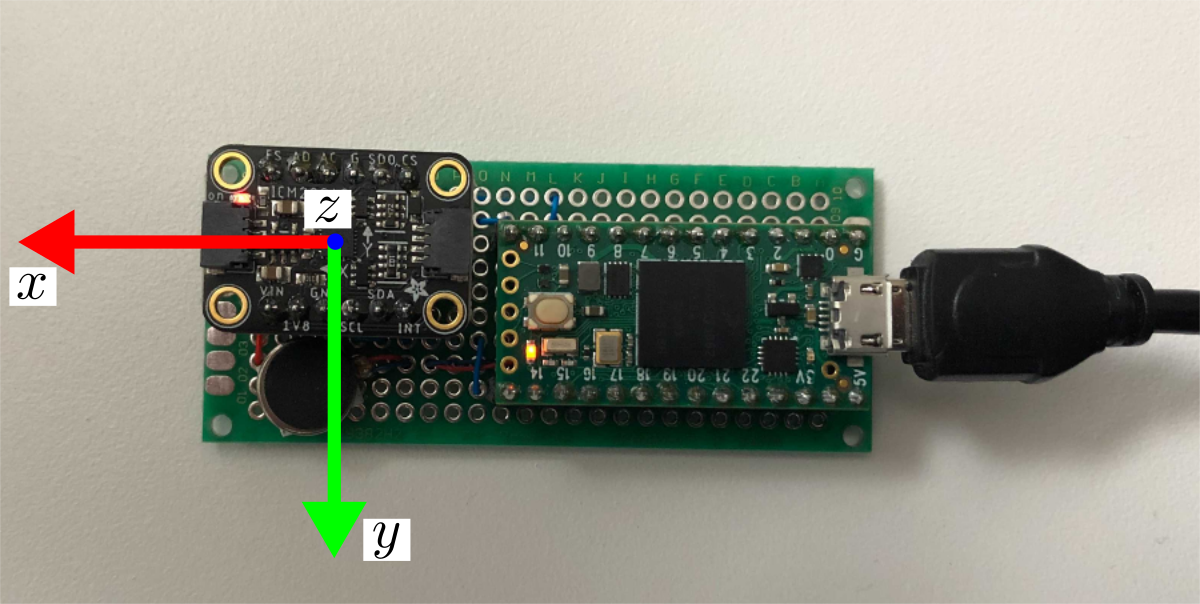
## Coordinate Frame