https://github.com/ppogg/retinaface_ghost
This is a project based on retinaface face detection, including ghostnet and mobilenetv3
https://github.com/ppogg/retinaface_ghost
ghostnet mobilenetv3 pytorch retinaface
Last synced: 4 months ago
JSON representation
This is a project based on retinaface face detection, including ghostnet and mobilenetv3
- Host: GitHub
- URL: https://github.com/ppogg/retinaface_ghost
- Owner: ppogg
- Created: 2021-06-11T05:11:29.000Z (over 4 years ago)
- Default Branch: master
- Last Pushed: 2021-12-02T07:10:54.000Z (almost 4 years ago)
- Last Synced: 2023-03-04T18:51:32.962Z (over 2 years ago)
- Topics: ghostnet, mobilenetv3, pytorch, retinaface
- Language: Python
- Homepage:
- Size: 22.7 MB
- Stars: 60
- Watchers: 2
- Forks: 47
- Open Issues: 8
-
Metadata Files:
- Readme: README.md
Awesome Lists containing this project
README
English | [简体中文](https://github.com/pengtougu/Retinaface_Ghost/blob/master/README_CH.md)
# RetinaFace in PyTorch
### Chinese detailed blog:https://zhuanlan.zhihu.com/p/379730820

### Face recognition with masks is still robust-----------------------------------
## Version Run Library Test of pytorch_retinaface
How well retinaface works can only be verified by comparison experiments. Here we test the pytorch_retinaface version, which is the one with the highest star among all versions in the community.
#### Data set preparation
This address contains the clean Wideface dataset:[https://github.com/Linzaer/Ultra-Light-Fast-Generic-Face-Detector-1MB](https://github.com/Linzaer/Ultra-Light-Fast-Generic-Face-Detector-1MB)

The downloaded dataset contains a total of these three.

At this point the folder is image only, however the author requires the data in the format of:

So we are still missing the index file for the data, and this is the time to use the script provided by the author`wider_val.py`. Export the image information to a txt file, the full format of the export is as follows.

Each dataset has a txt file containing the sample information. The content of the txt file is roughly like this (take train.txt as an example), containing image information and face location information.
```
# 0--Parade/0_Parade_marchingband_1_849.jpg
449 330 122 149 488.906 373.643 0.0 542.089 376.442 0.0 515.031 412.83 0.0 485.174 425.893 0.0 538.357 431.491 0.0 0.82
# 0--Parade/0_Parade_Parade_0_904.jpg
361 98 263 339 424.143 251.656 0.0 547.134 232.571 0.0 494.121 325.875 0.0 453.83 368.286 0.0 561.978 342.839 0.0 0.89
```
#### Model Training
```
python train.py --network mobile0.25
```
If necessary, please download the pre-trained model first and put it in the weights folder. If you want to start training from scratch, specify `'pretrain': False,` in the data/config.py file.
#### Model Evaluation
```
cd ./widerface_evaluate
python setup.py build_ext --inplace
python test_widerface.py --trained_model ./weights/mobilenet0.25_Final.pth --network mobile0.25
python widerface_evaluate/evaluation.py
```
## GhostNet and MobileNetv3 migration backbone
#### 3.1 pytorch_retinaface source code modification
After the test in the previous section, and took a picture containing only one face for detection, it can be found that resnet50 for the detection of a single picture and the picture contains only a single face takes longer, if the project focuses on real-time then mb0.25 is a better choice, but for the face dense and small-scale scenario is more strenuous.
If the skeleton is replaced by another backbone, is it possible to balance real-time and accuracy?
The backbone replacement here temporarily uses ghostnet and mobilev3 network (mainly also want to test whether the effect of these two networks can be as outstanding as the paper).
We specify the relevant reference in the parent class of the retinaface.py file,and specify the network layer ID to be called in IntermediateLayerGetter(backbone, cfg['return_layers']), which is specified in the config.py file as follows.
```
def __init__(self, cfg=None, phase='train'):
"""
:param cfg: Network related settings.
:param phase: train or test.
"""
super(RetinaFace, self).__init__()
self.phase = phase
backbone = None
if cfg['name'] == 'mobilenet0.25':
backbone = MobileNetV1()
if cfg['pretrain']:
checkpoint = torch.load("./weights/mobilenetV1X0.25_pretrain.tar", map_location=torch.device('cpu'))
from collections import OrderedDict
new_state_dict = OrderedDict()
for k, v in checkpoint['state_dict'].items():
name = k[7:] # remove module.
new_state_dict[name] = v
# load params
backbone.load_state_dict(new_state_dict)
elif cfg['name'] == 'Resnet50':
import torchvision.models as models
backbone = models.resnet50(pretrained=cfg['pretrain'])
elif cfg['name'] == 'ghostnet':
backbone = ghostnet()
elif cfg['name'] == 'mobilev3':
backbone = MobileNetV3()
self.body = _utils.IntermediateLayerGetter(backbone, cfg['return_layers'])
```
We specify the number of network channels of the FPN and fix the `in_channels` of each layer for the three-layer FPN structure formulated in the model.
```
in_channels_stage2 = cfg['in_channel']
in_channels_list = [
in_channels_stage2 * 2,
in_channels_stage2 * 4,
in_channels_stage2 * 8,
]
out_channels = cfg['out_channel']
# self.FPN = FPN(in_channels_list, out_channels)
self.FPN = FPN(in_channels_list, out_channels)
```
We insert the ghontnet network in models/ghostnet.py, and the network structure comes from the Noah's Ark Labs open source address[https://github.com/huawei-noah/ghostnet](https://github.com/huawei-noah/ghostnet):
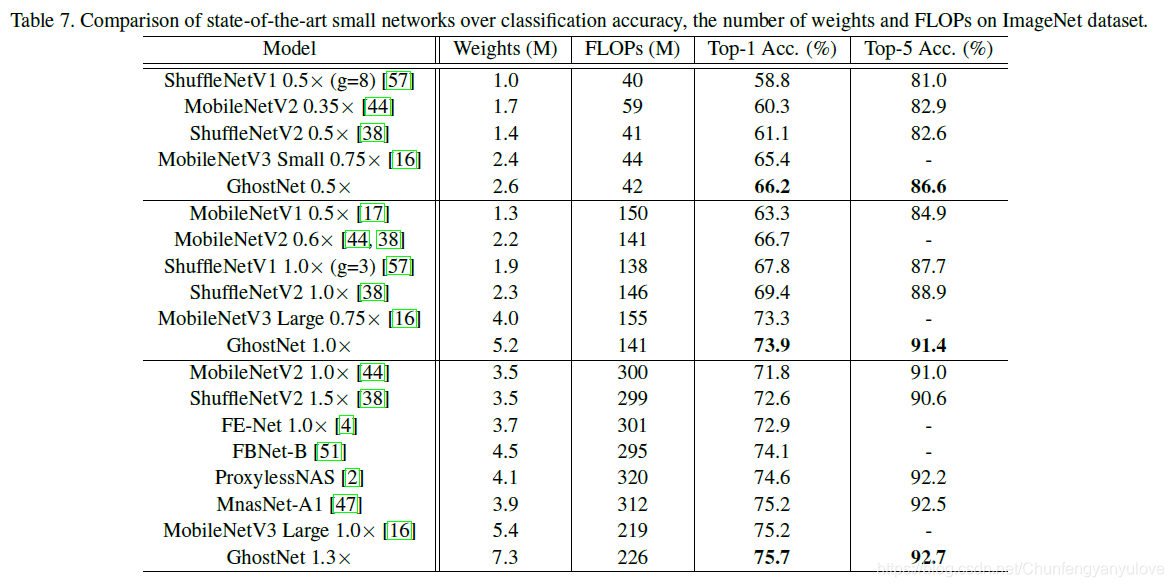
**Lightweight network classification effect comparison:**

Because of the inclusion of the residual convolution separation module and the SE module, the source code is relatively long, and the source code of the modified network is as follows`models/ghostnet.py`
We insert the MobileNetv3 network in models/mobilev3.py. The network structure comes from the pytorch version reproduced by github users, so it's really plug-and-play:
The modified source code is as follows.`models/mobilenetv3.py`
#### 3.2 Model Training
Execute the command: `python train.py --network ghostnet` to start training

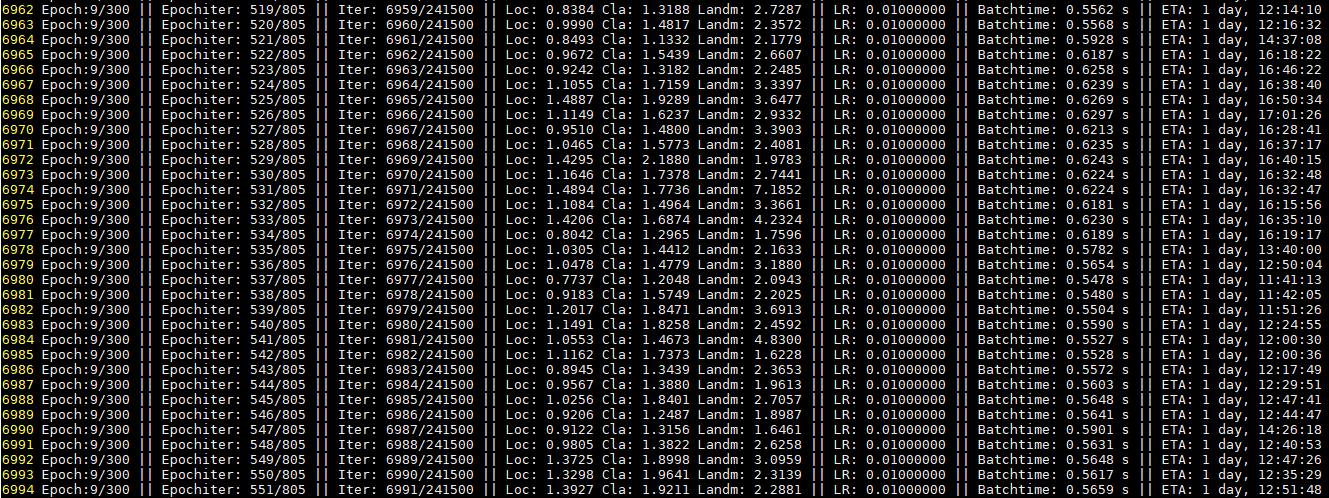
Counting the duration of training a single epoch per network.
- **resnet50>>mobilenetv3>ghostnet-m>ghostnet-s>mobilenet0.25**
#### 3.3 Model Testing and Evaluation
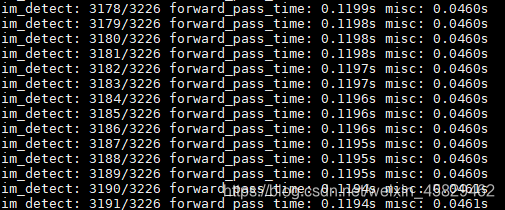
**Test GhostNet(se-ratio=0.25):**

As you can see, a batch test is about 56ms
**Evaluation GhostNet(se-ratio=0.25):**

It can be seen that ghostnet is relatively poor at recognizing small sample data and face occlusion.
**Test MobileNetV3(se-ratio=1):**

可以看出,一份batch的测试大概在120ms左右
**Evaluation MobileNetV3(se-ratio=1):**

The evaluation here outperforms ghostnet on all three subsets (the comparison here is actually a bit unscientific, because the full se_ratio of mbv3 is used to benchmark ghostnet's se_ratio by 1/4, but the full se_ratio of ghostnet will cause the model memory to skyrocket (at se-ratio=0) weights=6M, se-ratio=0.25 when weights=12M, se-ratio=1 when weights=30M, and the accuracy barely exceeds that of MobileNetV3 with se-ratio=1, I personally feel that the cost performance is too low)
Translated with www.DeepL.com/Translator (free version)
#### 3.4 Model Demo
- Use webcam:
python detect.py -fourcc 0
- Detect Face:
python detect.py --image img_path
- Detect Face and save:
python detect.py --image img_path --sava_image True
#### 3.2 comparision of resnet & mbv3 & gnet & mb0.25
**Reasoning Performance Comparison:**
Backbone | Computing backend | size(MB) | Framework | input_size| Run time
:-----:|:-----:|:-----:|:----------:|:----:|:----:|
resnet50| Core i5-4210M |106 | torch| 640| 1571 ms
$GhostNet-m^{Se=0.25}$| Core i5-4210M |12 | torch| 640| 403 ms
MobileNet v3| Core i5-4210M | 8 | torch| 640| 576 ms
MobileNet0.25| Core i5-4210M | 1.7| torch| 640| 187 ms
MobileNet0.25| Core i5-4210M | 1.7 | onnxruntime| 640| 73 ms
**Testing performance comparison:**
Backbone | Easy | Medium | Hard
:-----:|:-----:|:-----:|:----------:|
resnet50| 95.48% |94.04% | 84.43%|
$MobileNet v3^{Se=1}$| 93.48%| 91.23% | 80.19%|
$GhostNet-m^{Se=0.25}$| 93.35% |90.84% | 76.11%|
MobileNet0.25| 90.70% | 88.16%| 73.82%|
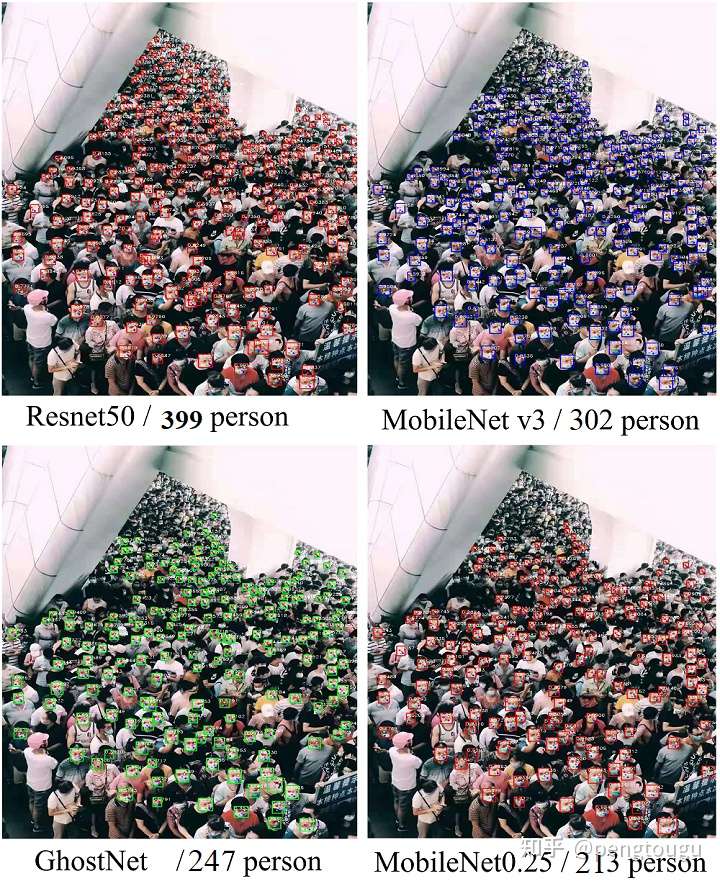
**Comparison of the effect of single chart test:**

### Chinese detailed blog:https://zhuanlan.zhihu.com/p/379730820
## References
- [FaceBoxes](https://github.com/zisianw/FaceBoxes.PyTorch)
- [Retinaface (mxnet)](https://github.com/deepinsight/insightface/tree/master/RetinaFace)
- [biubug6/Pytorch_Retinaface](https://github.com/biubug6/Pytorch_Retinaface)
```