https://github.com/processone/xmpp-messenger-ios
iOS XMPP Messenger Framework
https://github.com/processone/xmpp-messenger-ios
xmpp xmpp-client xmppframework
Last synced: about 1 year ago
JSON representation
iOS XMPP Messenger Framework
- Host: GitHub
- URL: https://github.com/processone/xmpp-messenger-ios
- Owner: processone
- License: mit
- Created: 2015-06-03T14:21:21.000Z (about 11 years ago)
- Default Branch: master
- Last Pushed: 2018-04-21T19:09:32.000Z (about 8 years ago)
- Last Synced: 2025-04-02T11:53:53.637Z (about 1 year ago)
- Topics: xmpp, xmpp-client, xmppframework
- Language: Swift
- Size: 4.22 MB
- Stars: 220
- Watchers: 30
- Forks: 93
- Open Issues: 27
-
Metadata Files:
- Readme: README.md
- License: LICENSE
Awesome Lists containing this project
README
# XMPP-MESSENGER-IOS
[](http://cocoapods.org/pods/xmpp-messenger-ios)
[](http://cocoapods.org/pods/xmpp-messenger-ios)
[](http://cocoapods.org/pods/xmpp-messenger-ios)
## Installation
xmpp-messenger-ios is available through [CocoaPods](http://cocoapods.org). To install
it, simply add the following line to your ```Podfile```:
```ruby
pod "xmpp-messenger-ios"
```
If you can't use cocoapod, you will have to download the files and add it to your ```Xcode```project.
### UPDATE 04/19/16
If you encounter compilation errors after the installation, you may change the following file:
1. In `XMPPFramework/Core/XMPPStream.h`, change `#import "CocoaAsyncSocket/GCDAsyncSocket.h"` to `@import CocoaAsyncSocket;`
2. In `XMPPFramework/Core/XMPPLogging.h`, change `#import "CocoaLumberjack/DDLog.h"` to `@import CocoaLumberjack;`
3. In `JSQMessagesViewController/JSQSystemSoundPlayer+JSQMessages.h`, change to `@import JSQSystemSoundPlayer;`
A pull request will be made to the XMPPFramework to include thoses changes.
### Disclaimer
xmpp-messenger-ios was build for ```Xcode 7``` and ```Swift 2```, if you haven't upgraded yet, you should.
## Author
Made in Paris by [ProcessOne](https://www.process-one.net/en/)
## License
xmpp-messenger-ios is available under the MIT license. See the LICENSE file for more info.
# Tutorial example: OneChat
We will build a Swift XMPP client built on [XMPP Framework](https://github.com/processone/XMPPFramework), using [xmpp-messenger-ios](https://github.com/processone/xmpp-messenger-ios) and [JSQMessageViewControllerSwift](https://github.com/jessesquires/JSQMessagesViewController)
## Project setup
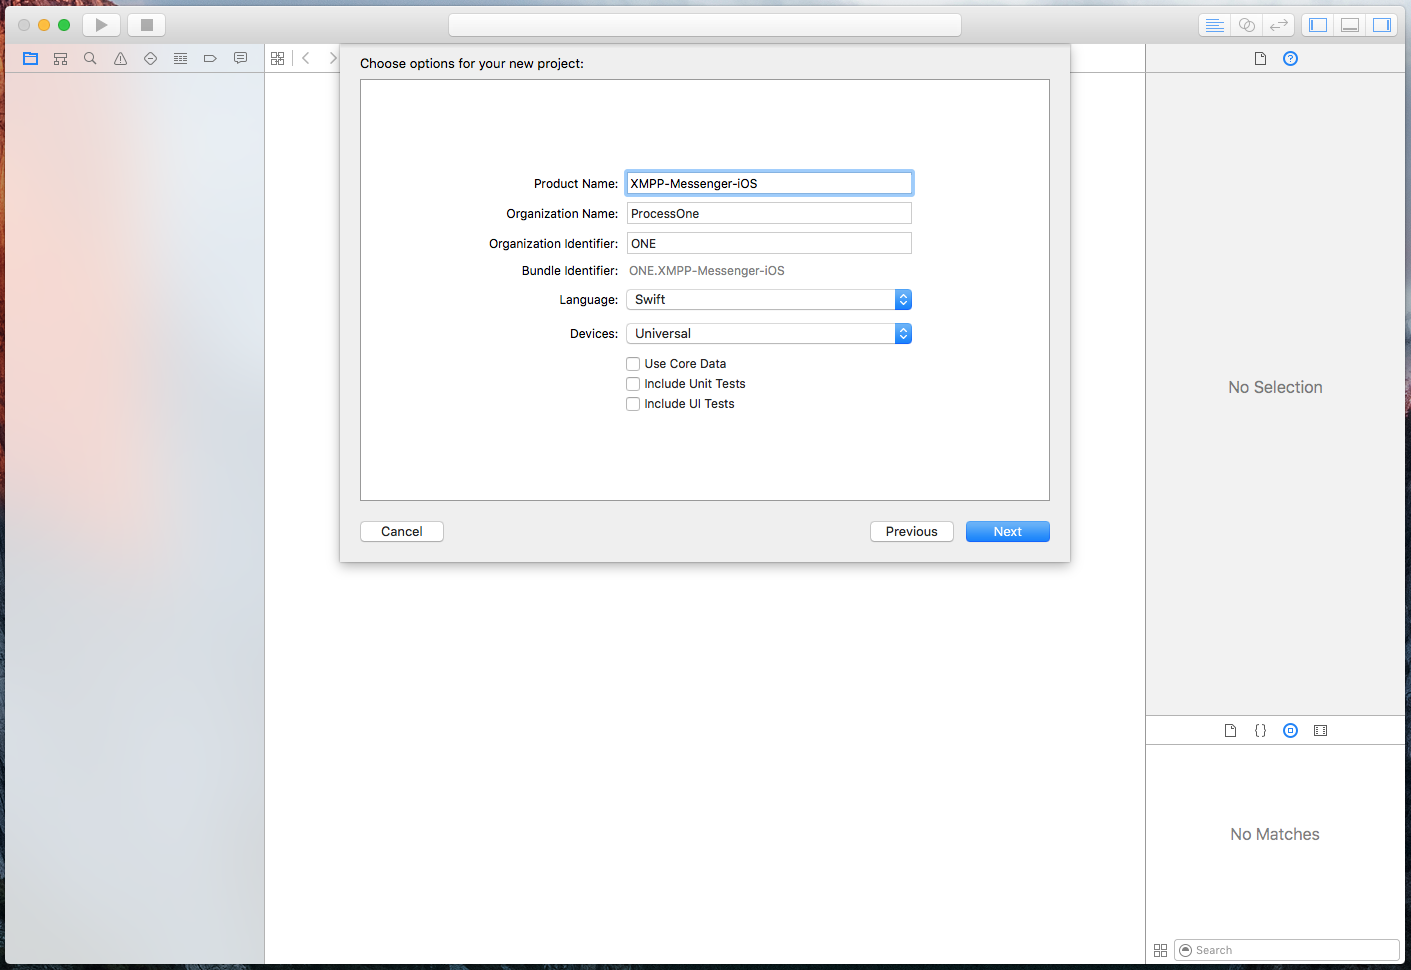
1. Open ```Xcode``` and select ```create a new project```, you are free to choose wich kind of template you want, for this example, we will use the ```single view application```. Fill up the required information, select ```Swift``` language and choose the folder location.
2. Now quit ```Xcode``` and launch the terminal app (terminal.app)

3. Navigate to your project directory, and type ```pod init``` like so:

```pod init``` will setup [cocoapods](https://cocoapods.org) for this project, so make sure that you're using the latest version.
4. Edit the newly created *Podfile* by taping ```emacs Podfile``` (Feel free to use ```vim``` :)). It should look like this:
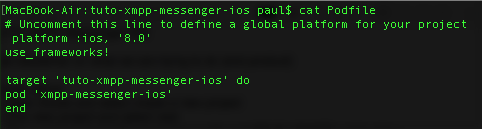
*Press ctrl+x, ctrl+s to save, then ctrl+x, ctrl+c to end editing*
5. Almost good to go, type ```pod install```, and wait until the installation is over.
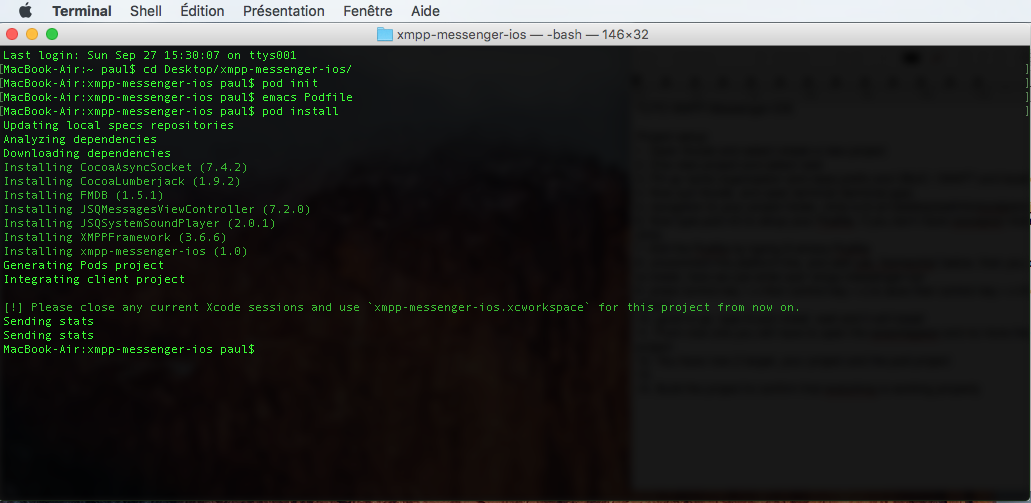
*From now one you will have to open your project using the ```xcworkspace``` file, and no more the ```xcodeproject``` file*
6. Open the project, add:
```swift
import xmpp_messenger_ios
```
to your ``` AppDelegate.swift``` file. Build & run to confirm that everything went well.
*if you encounter an error, try to deep clean ```Xcode``` (```command+alt+shift+k```)*
## Let's create your chat client !
**At this point your project should compile without errors**
We are going to create 4 classes, one to display the conversations, name it ```OpenChatsTableViewController.swift```, one for chatting, name it ```ChatViewController.swift```, one to display the list of contacts, name it ```ContactListTableViewController.swift``` and one to act as a settings page, name it ```SettingsViewController.swift```.
*You can remove or reuse the apple-provided ```ViewController.swift``` file*
### Let's start with the Storyboard
1. Open your ```Main.storyboard``` file, and remove the current ViewController.
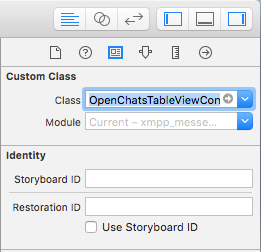
2. Drop in a ```UITableViewController```, and asign it to ```OpenChatsTableViewController.swift```
Now you will select this Controller as the ```initial view controller```
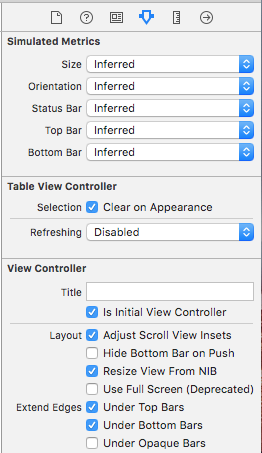
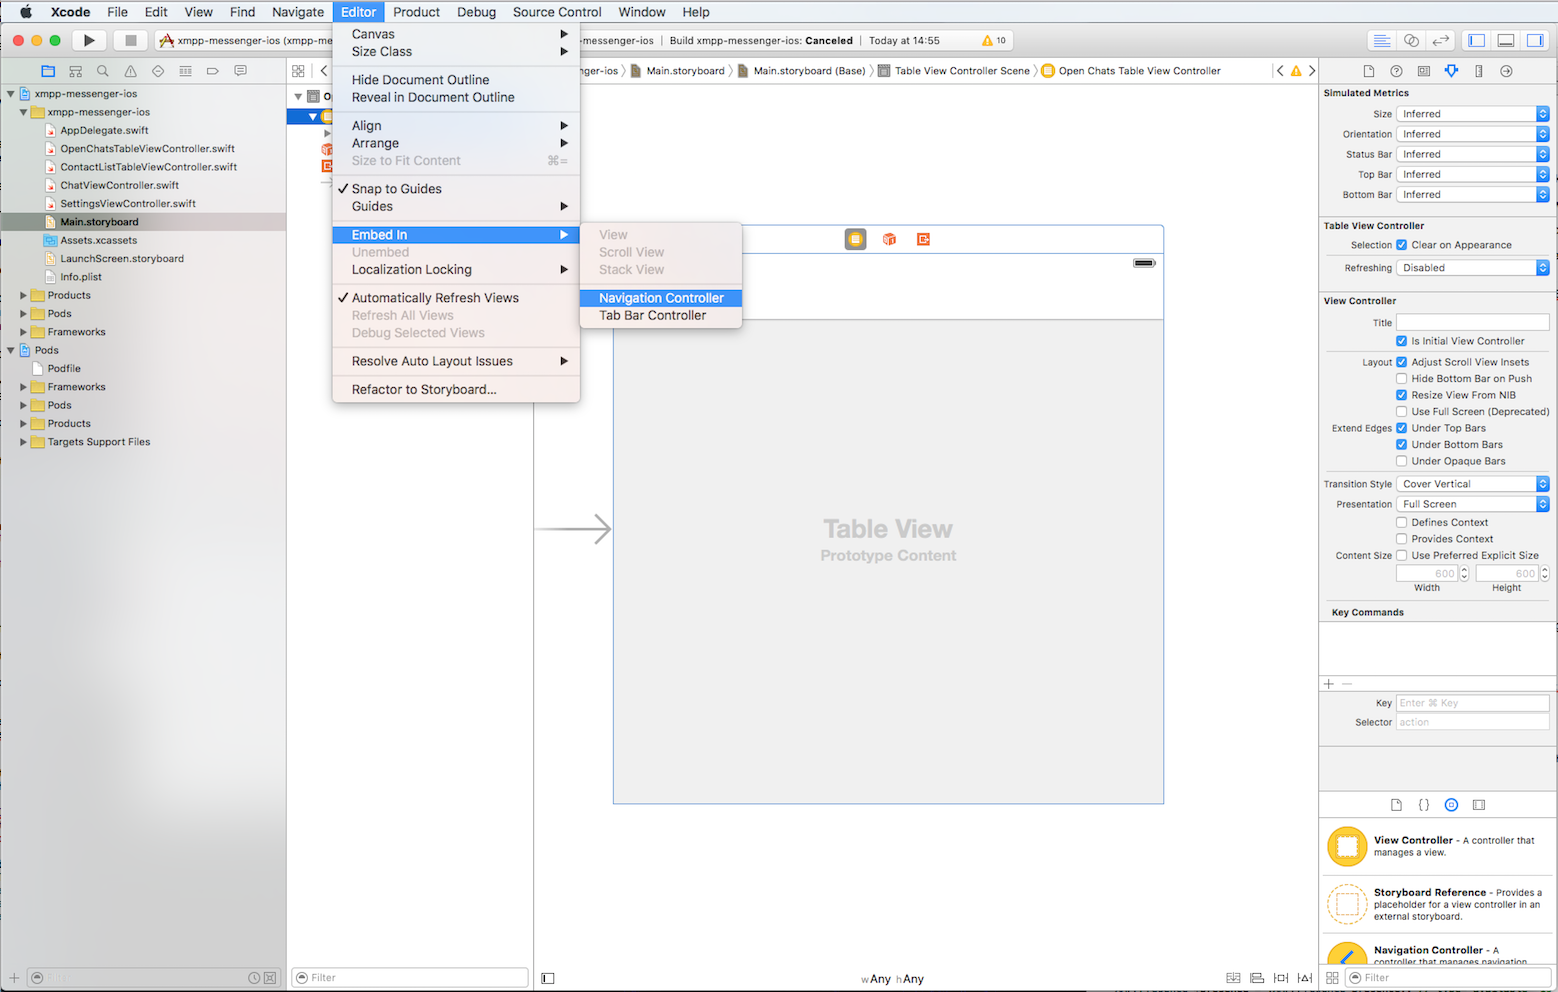
We will now embed an ```UINavigationController```: within ```Xcode```, go to ```editor```->```Embed in```->```Navigation controller```
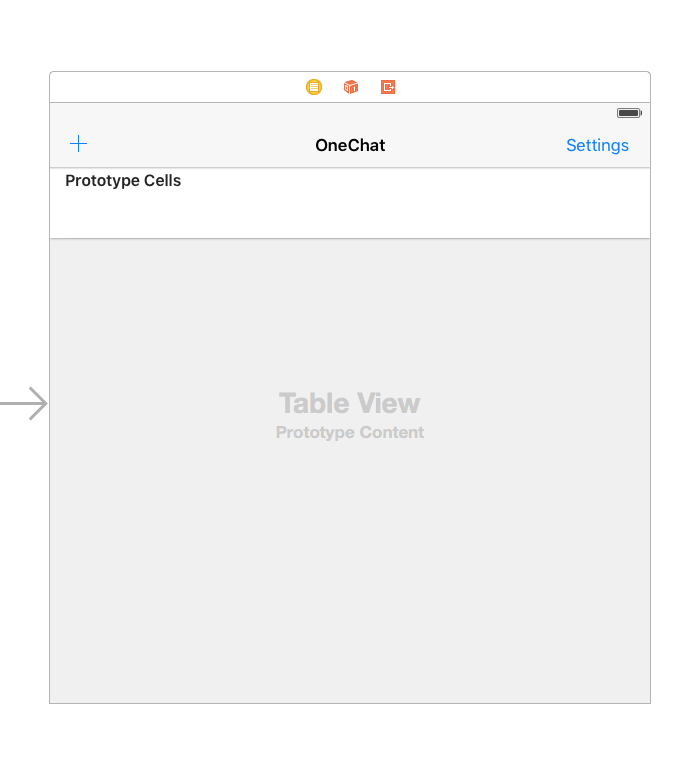
Now that we have a ```UINavigationBar``` on ```OpenChatsViewController```, we will add two ```UIBarButtonItem```:
- On the left, select system item ```add```
- On the right, simply name it "Settings"
Once finished, it should look like this:
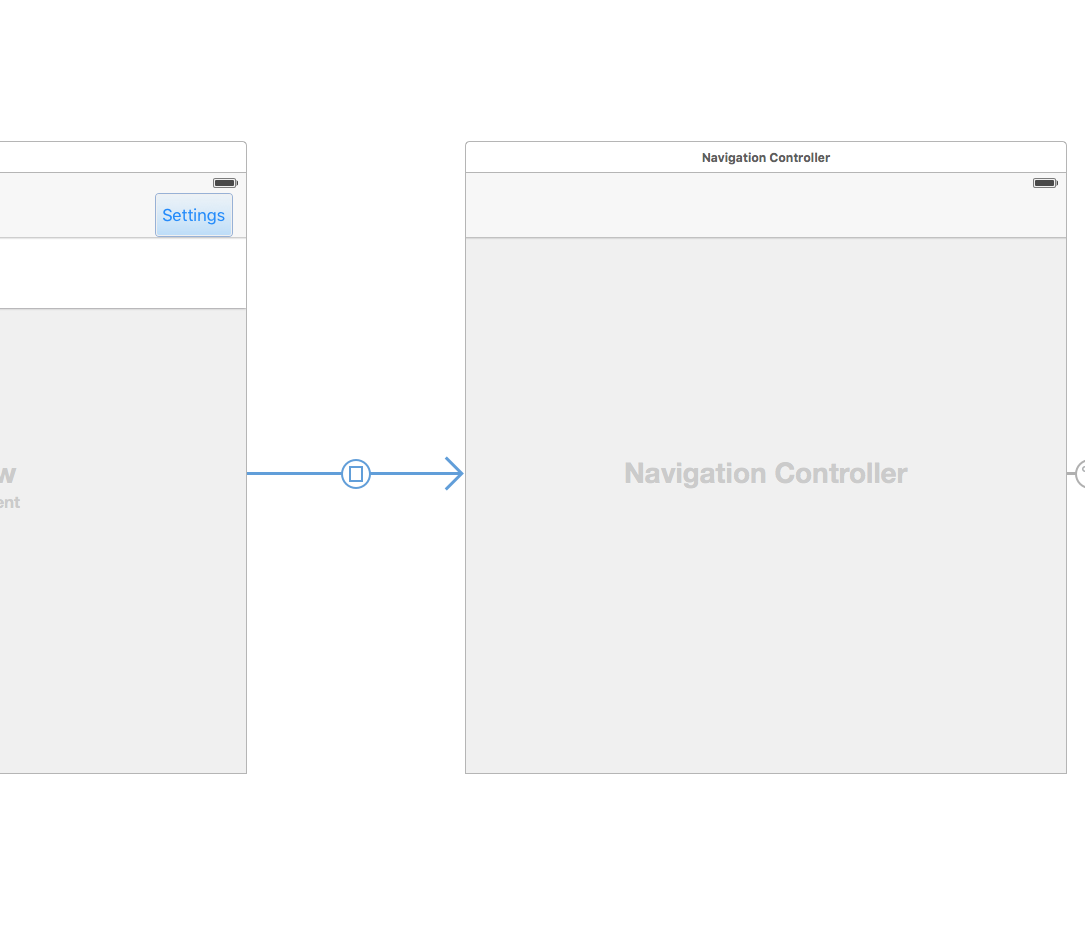
3. Drop an ```UIViewController```, asign it to ```SettingsViewController.swift```, then embed it inside an ```UINavigationController```.
Return on ```OpenChatsTableViewController```. Select the ```settings``` ```UIBarButtonItem``` with the ```ctrl``` key and drag the cursor on the ```SettingsViewController```'s ```UINavigationController``` to create a ```segue``` between the ```ViewControllers```.
It should look like this:
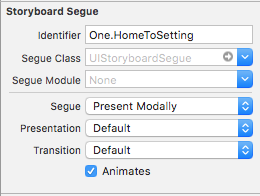
Now select the ```Segue```, and in the properties, name it ```One.HomeToSettings```
Return on ```SettingsViewController```, and on the ```UINavigationBar```, add an ```UIBarButtonItem```, and name it "Done".
Also drop two ```UITextField```, and one ```UIButton```.
Name the ```UIbutton```'s title "validate" and set the ```UITextField```'s placeholder to "Username" and "Password".
It should look like this:
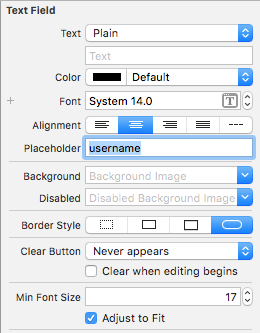
**Note: you should select -secure entry- on the password's ```UITextField``` to replace every entered letter into dots**
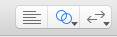
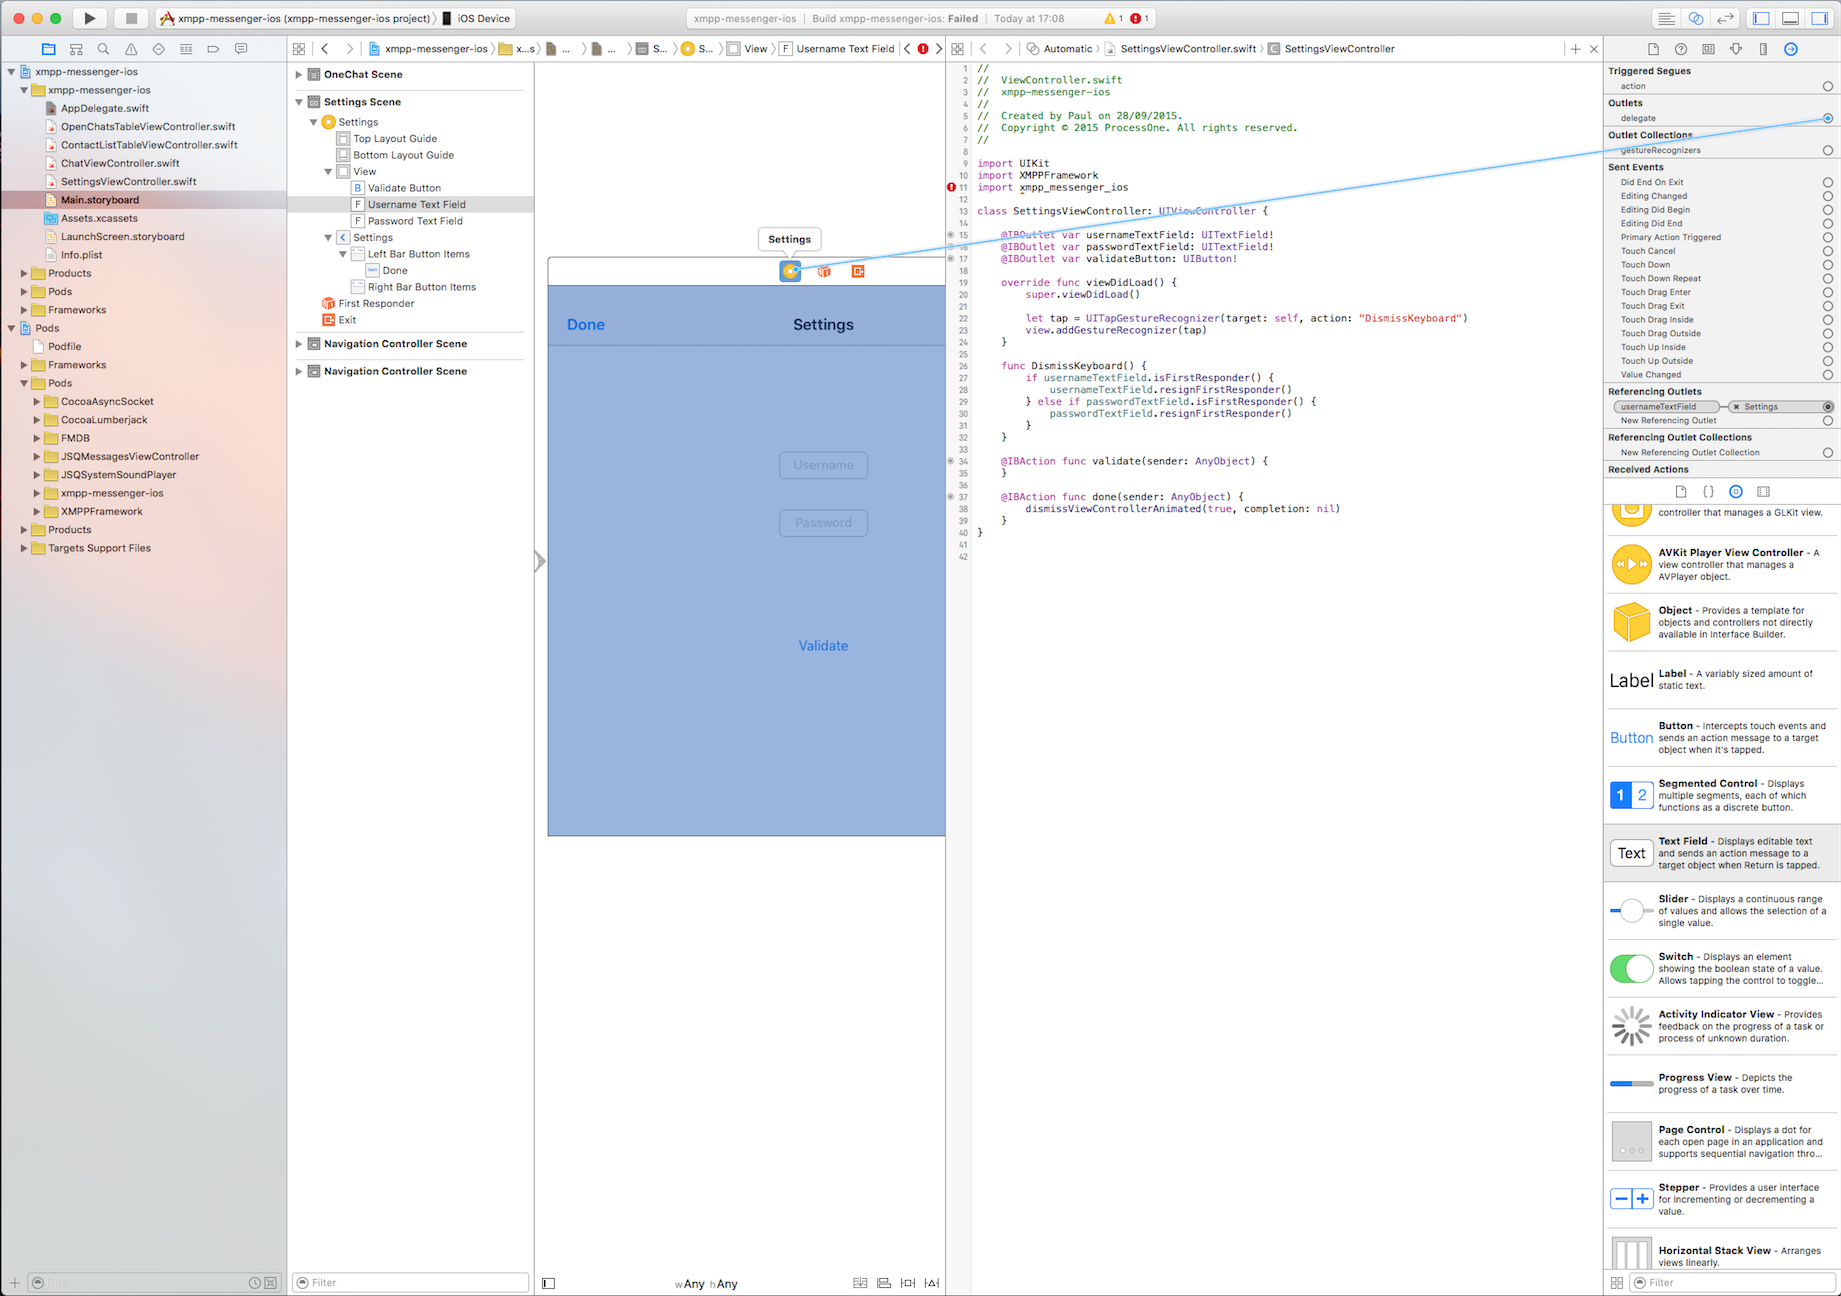
You will now split ```Xcode```'s screen to display side by side both ```interface``` and ```code```, simply by selecting this button:
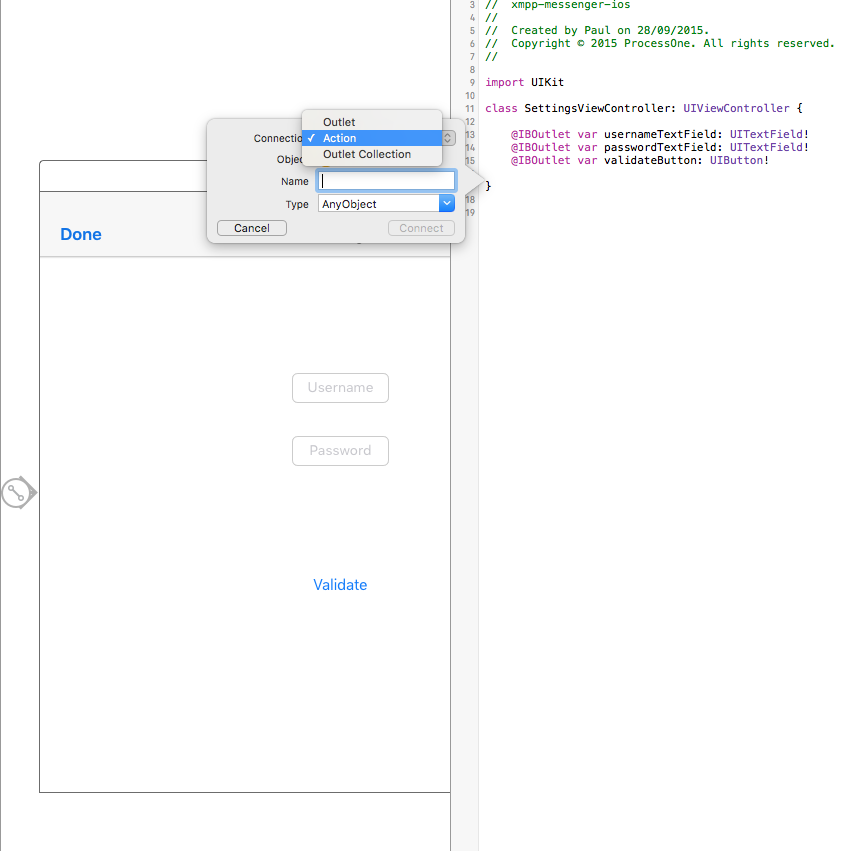
Once done, ```ctrl``` select the textfield's and validate's button to the class to create ```IBOutlet```'s. Name them respetctivly userNameTextField, passwordTextField and validateButton.
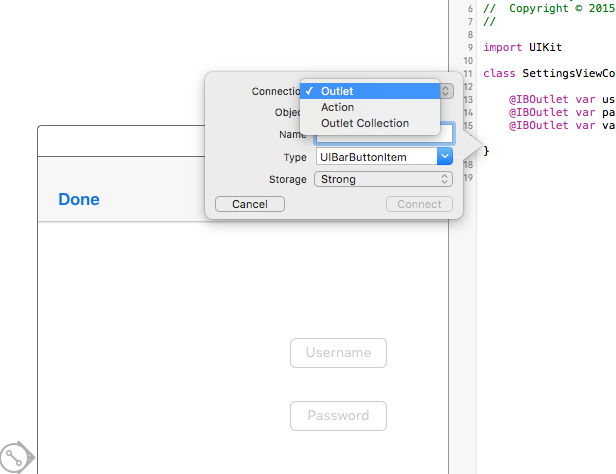
For the last one, the validate button, you will have to ```ctrl``` drag again, but this time, select ```action``` instead of ```outlet```, and name the ```IBAction``` "close".
Do the same operation, but on the "Done" ```UIBarButtonItem```, and name the method "close"
We need to do one last operation: setting the ```UITextField```'s ```delegates```. For this, you will have to select a ```UITextField``` at the time, go to the connection tab and click-drag your cursor on the ```SettingsViewController```.
###This is all about 'connection'
1. Open ```AppDelegate.swift```. We will add to calls in here. One to start the services, and the other one to stop them.
In:
```swift
func application(application: UIApplication, didFinishLaunchingWithOptions launchOptions: [NSObject: AnyObject]?) -> Bool
```
Add the following code:
```swift
OneChat.start(archiving: true, delegate: nil) { (stream, error) -> Void in
if let _ = error {
//handle start errors here
} else {
//Activate online UI
}
}
```
And in:
```swift
func applicationWillTerminate(application: UIApplication)
```
Add:
```swift
OneChat.stop()
```
2. Go back to ```SettingsViewController.swift```, and add the following ```import``` at the top of the file:
```swift
import XMPPFramework
import xmpp_messenger_ios
```
We will now take care of the ```UITextField```'s ```delegates```: we will add a method to hide the keyboard if the user if out of focus, and a method to trigger the validation if the user click on the keyboard's return key.
To hide the keyboard, Add:
```swift
let tap = UITapGestureRecognizer(target: self, action: "DismissKeyboard")
```
In your ```viewDidLoad``` method, then implement the ```DismissKeyboard``` method:
```swift
func DismissKeyboard() {
if usernameTextField.isFirstResponder() {
usernameTextField.resignFirstResponder()
} else if passwordTextField.isFirstResponder() {
passwordTextField.resignFirstResponder()
}
}
```
And to trigger the validation, we'll use the ```UITextField``` delegates:
```swift
func textFieldShouldReturn(textField: UITextField) -> Bool {
if passwordTextField.isFirstResponder() {
textField.resignFirstResponder()
validate(self)
} else {
textField.resignFirstResponder()
}
return true
}
```
Now we are going to set default values in the ```UITextfield```'s, and add a way to change the "validate" ```UIButton``` if the user is already connected.
Add the following in your ```viewWillappear```:
```swift
if OneChat.sharedInstance.isConnected() {
usernameTextField.hidden = true
passwordTextField.hidden = true
validateButton.setTitle("Disconnect", forState: UIControlState.Normal)
} else {
if NSUserDefaults.standardUserDefaults().stringForKey(kXMPP.myJID) != "kXMPPmyJID" {
usernameTextField.text = NSUserDefaults.standardUserDefaults().stringForKey(kXMPP.myJID)
passwordTextField.text = NSUserDefaults.standardUserDefaults().stringForKey(kXMPP.myPassword)
}
```
Here we just change the name of the "validate" ```UIButton``` and hide the ```UITextField```'s in case the user is already connected, if not, and if the user already gave credentials, we place them in the ```UITextField```.
Place this inside the ```validate()``` method:
```swift
if OneChat.sharedInstance.isConnected() {
OneChat.sharedInstance.disconnect()
usernameTextField.hidden = false
passwordTextField.hidden = false
validateButton.setTitle("Validate", forState: UIControlState.Normal)
} else {
OneChat.sharedInstance.connect(username: self.usernameTextField.text!, password: self.passwordTextField.text!) { (stream, error) -> Void in
if let _ = error {
let alertController = UIAlertController(title: "Sorry", message: "An error occured: \(error)", preferredStyle: UIAlertControllerStyle.Alert)
alertController.addAction(UIAlertAction(title: "Ok", style: UIAlertActionStyle.Default, handler: { (UIAlertAction) -> Void in
//do something
}))
self.presentViewController(alertController, animated: true, completion: nil)
} else {
self.dismissViewControllerAnimated(true, completion: nil)
}
}
```
The ```validate``` method will connect the user and dismiss the settings screen if the ```connect()``` succeed, and if the user is already connected, it will disconnect him and reset the ```UI```
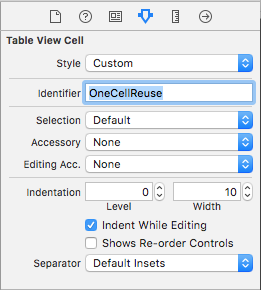
3. Return to the ```Storyboard```, select the ```OpenChatsTableViewController```, then select the ```UITableViewCell``` inside the ```UITableView``` and in the property tabs, fill the ```reuse identifier``` to ```OneCellReuse```:
Open up the source code, ```OpenChatsTableViewController.swift```, and add the following imports at the top of the file:
```swift
import XMPPFramework
import xmpp_messenger_ios
```
This ```Controller``` will be displaying all the open / stored chat conversation between two or more participants, so we need to set both ```datasource``` and ```delegate``` for the ```UITableView```, as well as a way to know if a new conversation was added to the list.
Create a ```variable``` witch will contains the conversation:
```swift
var chatList = NSArray()
```
Then, implement the following ```datasource``` methods:
```swift
override func tableView(tableView: UITableView, numberOfRowsInSection section: Int) -> Int {
return OneChats.getChatsList().count
}
override func numberOfSectionsInTableView(tableView: UITableView) -> Int {
return 1
}
```
And the most important ```delegate```:
```swift
override func tableView(tableView: UITableView, cellForRowAtIndexPath indexPath: NSIndexPath) -> UITableViewCell {
let cell: UITableViewCell? = tableView.dequeueReusableCellWithIdentifier("OneCellReuse", forIndexPath: indexPath)
let user = OneChats.getChatsList().objectAtIndex(indexPath.row) as! XMPPUserCoreDataStorageObject
cell!.textLabel!.text = user.displayName
OneChat.sharedInstance.configurePhotoForCell(cell!, user: user)
cell?.imageView?.layer.cornerRadius = 24
cell?.imageView?.clipsToBounds = true
return cell!
}
```
If, like me, you don't like the extra lines on the ```UITableView```, you can add the following ```delegate```:
```swift
override func tableView(tableView: UITableView, heightForFooterInSection section: Int) -> CGFloat {
return 0.01
}
override func tableView(tableView: UITableView, viewForFooterInSection section: Int) -> UIView? {
return UIView()
}
```
Last ```UITableView```'s touch, add ```tableView.rowHeight = 50``` at the end of your ```viewDidLoad```.
You can now conform the class to the ```OneRosterDelegate```:
```swift
class OpenChatsTableViewController: UITableViewController, OneRosterDelegate
```
An error should now pop:

This is because we **have** to conform to the ```OneRosterProtocol```. Do it by implementing the following method:
```swift
func oneRosterContentChanged(controller: NSFetchedResultsController) {
//Will reload the tableView to reflect roster's changes
tableView.reloadData()
}
```
Implementing a ```delegate``` method is great, but we need to set yourself as the delegate if we want to be notified when the roster content change.
You will do this in your ```viewWillAppear``` method:
```swift
OneRoster.sharedInstance.delegate = self
```
Following the same logic, remove yourself as ```delegate``` in your ```viewWillDisapear``` method:
```swift
OneRoster.sharedInstance.delegate = nil
```
Return to the top, in your ```viewWillAppear```, and add the ```connect()``` function, to present the ```SettingViewController``` if the user isn't logged in:
```swift
OneChat.sharedInstance.connect(username: kXMPP.myJID, password: kXMPP.myPassword) { (stream, error) -> Void in
if let _ = error {
self.performSegueWithIdentifier("One.HomeToSetting", sender: self)
} else {
//set up online UI
}
}
```
### Build & Run, you should be redirected to the settings page, where you can login sucessfully.
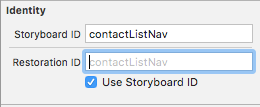
4. Displaying a list of chat conversation is great, but creating one is even better ! Switch back to your ```Storyboard```, and drop a ```UITableViewController```. Asing it to ```ContactListTableViewController.swift```. Embed a ```UINavigationController``` and name it's ```Storyboard ID``` "contactListNav":
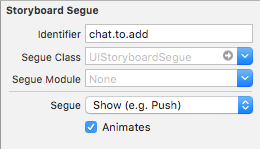
Now you will create a ```Modal presentation``` segue between the ```+ UIBarButtonItem``` in the ```OpenChatsTableViewController``` and the ```ContactListViewController```.
Name this segue "chat.to.add"
Return to ```ContactListTableViewController``` and drop a ```UIBarButtonItem```, select the ```system style``` "done" and create an action method named "close":
```swift
@IBAction func close(sender: AnyObject) {
self.dismissViewControllerAnimated(true, completion: nil)
}
```
Now select the ```UITableViewCell``` and set the ```reuse identifier``` like you did for the ```OpenChatsTableViewController```.
Let's take care of this ```ContactListTableViewController```, at the top of the file, add:
```swift
import XMPPFramework
import xmpp_messenger_ios
```
Like you did for the ```OpenChatsTableViewController```, add ```OneRosterDelegate``` to your class declaration, set up the delegate in ```viewWillAppear``` and ```viewWillDisapear```, as well as implementing the required protocol method ```oneRosterContentChanged```.
Let's implement the ```UITableViewDelegate``` now:
```swift
override func tableView(tableView: UITableView, numberOfRowsInSection section: Int) -> Int {
let sections: NSArray? = OneRoster.buddyList.sections
if section < sections!.count {
let sectionInfo: AnyObject = sections![section]
return sectionInfo.numberOfObjects
}
return 0;
}
override func numberOfSectionsInTableView(tableView: UITableView) -> Int {
return OneRoster.buddyList.sections!.count
}
override func tableView(tableView: UITableView, titleForHeaderInSection section: Int) -> String? {
let sections: NSArray? = OneRoster.sharedInstance.fetchedResultsController()!.sections
if section < sections!.count {
let sectionInfo: AnyObject = sections![section]
let tmpSection: Int = Int(sectionInfo.name)!
switch (tmpSection) {
case 0 :
return "Available"
case 1 :
return "Away"
default :
return "Offline"
}
}
return ""
}
override func tableView(tableView: UITableView, cellForRowAtIndexPath indexPath: NSIndexPath) -> UITableViewCell {
let cell: UITableViewCell? = tableView.dequeueReusableCellWithIdentifier("OneCellReuse", forIndexPath: indexPath)
let user = OneRoster.userFromRosterAtIndexPath(indexPath: indexPath)
cell!.textLabel!.text = user.displayName;
if user.unreadMessages.intValue > 0 {
cell!.backgroundColor = .orangeColor()
} else {
cell!.backgroundColor = .whiteColor()
}
OneChat.sharedInstance.configurePhotoForCell(cell!, user: user)
return cell!;
}
```
This will populate the ```UITableView``` with the content of your ```roster```. It will display the name and picture of your contacts, ordered by status *available, away, offline*.
### Build & Run, tap on the + button to see if everything is working properly.
5. In this section we will add the ability to select a contact and start chatting !
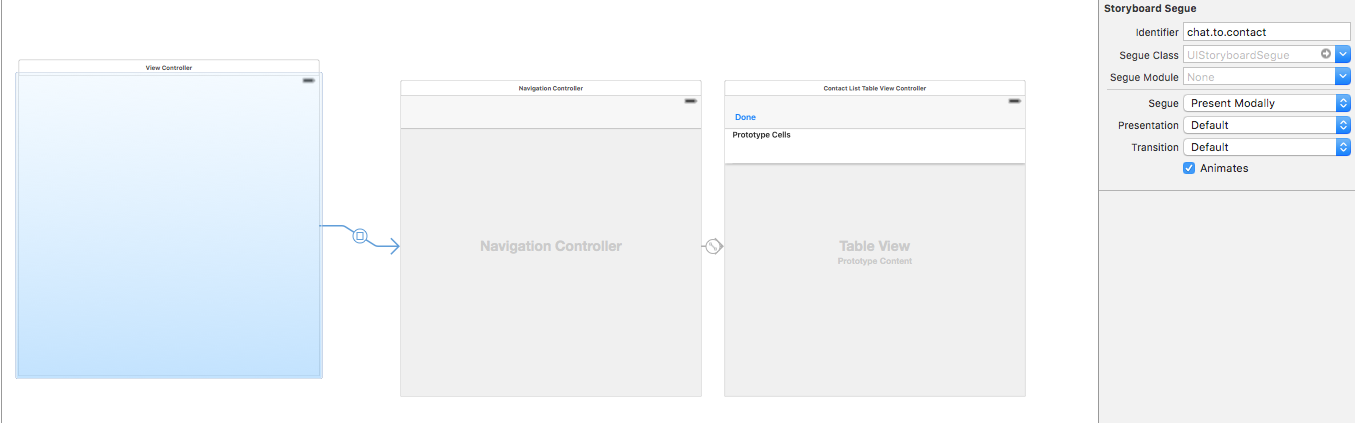
Open your ```Storyboard``` and drop a ```UIViewController```. Asign it to ```ChatViewController.swift```.
Remove the ```chat.to.add``` segue *from the + button to the ```ContactListTableViewController```* and re-create it from the ```ChatViewController``` itself. Name it "chat.to.contact". It should look like this:
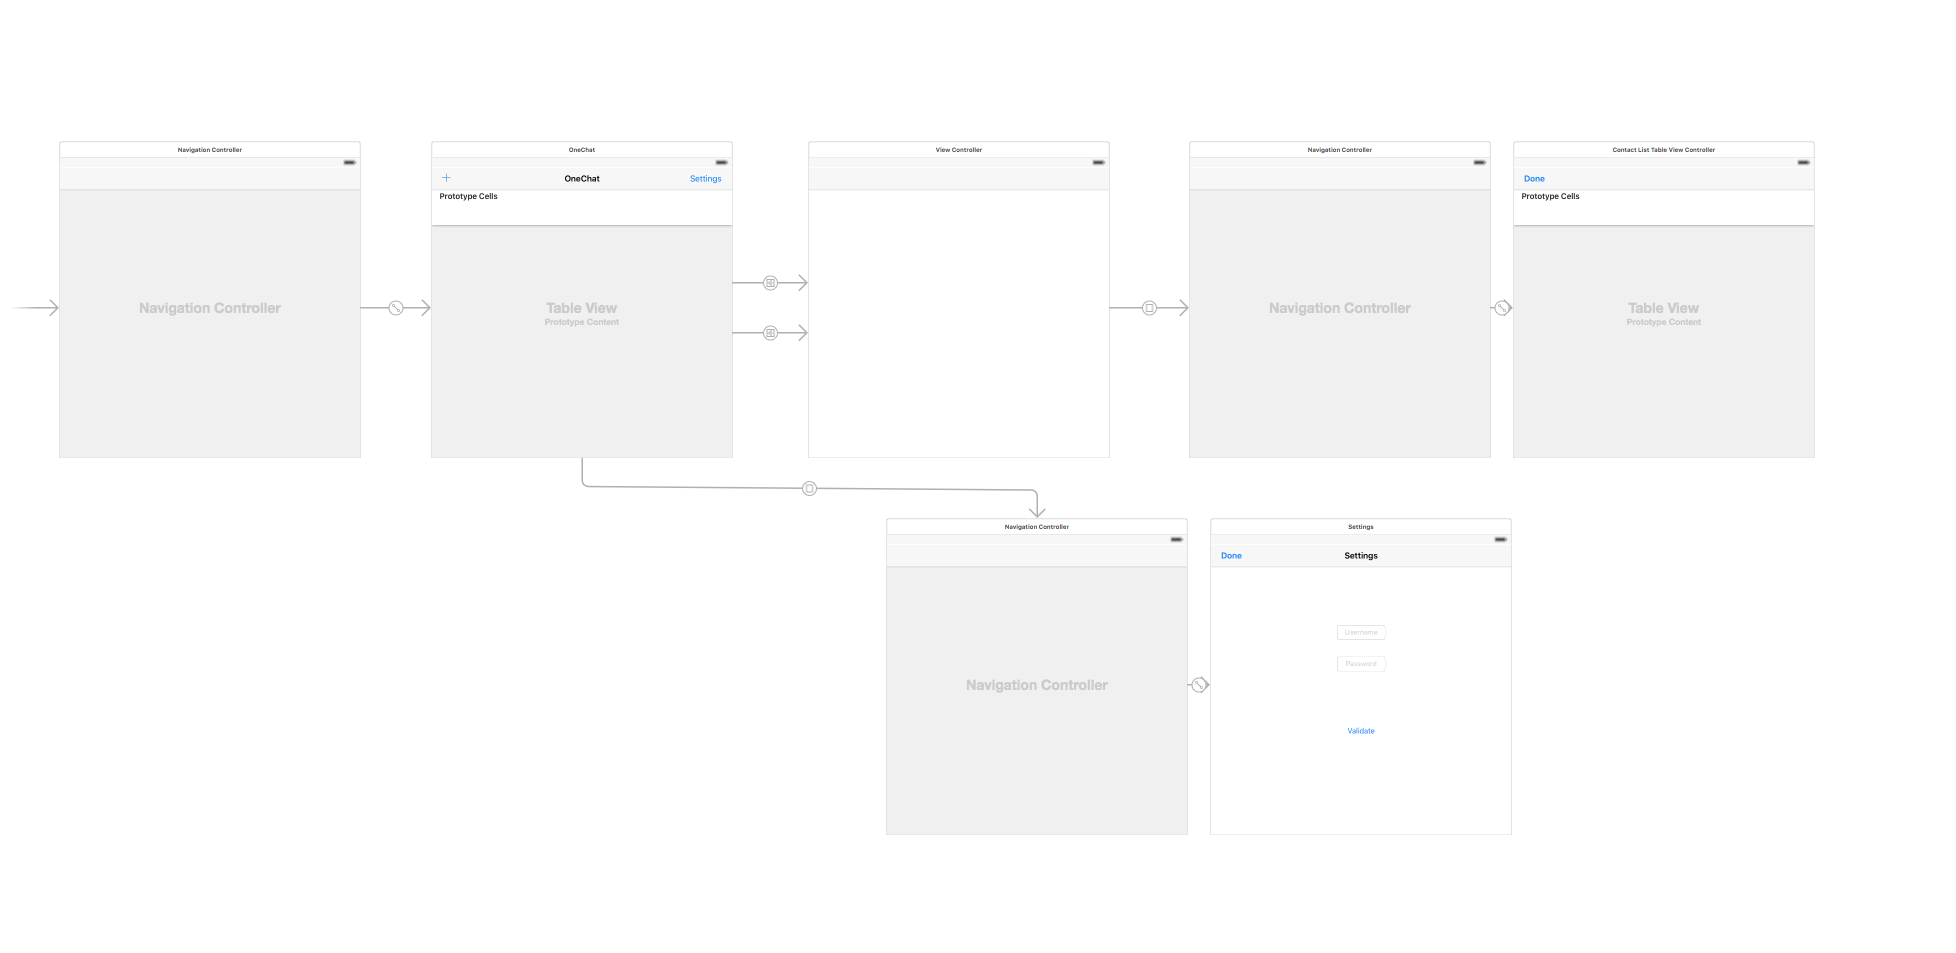
Now you will create two more ```push/show segue```, from ```OpenChatsTableViewController``` to ```ChatViewController```. One from the ```+``` button, you will name it ```chat.to.add```, and the other from the ```UITableViewCell``` of ```OpenChatsTableViewController``` to ```ChatViewController```, name it ```chat.to.chat```. The completed ```Storyboard``` should now look like this:
You can return to ```ChatViewController.swift```. There will be a lot going on in this ```ViewController``` so make sure you're fully loaded with cafeine !
As usual, add the following ```import``` at the top of the file:
```swift
import xmpp_messenger_ios
import JSQMessagesViewController
import XMPPFramework
```
There will be some interesting stuff in that class, we will need a variable to store the recipient, and a library to give us the ```User Interface```.
Create the recipient variable:
```swift
var recipient: XMPPUserCoreDataStorageObject?
```
In your ```viewWillAppear``` method, we will check if a recipient has been set, in that case we will display the chat history, if not we’ll present the ```ContactListTableViewCcontroller``` to allow the user to select a contact. It’ll look like this :
```swift
if let recipient = recipient {
navigationItem.rightBarButtonItems = []
navigationItem.title = recipient.displayName
} else {
navigationItem.title = "New message"
navigationItem.setRightBarButtonItem(UIBarButtonItem(barButtonSystemItem: .Add, target: self, action: "addRecipient"), animated: true)
addRecipient()
}
```
Implement the ```addRecipient()``` method:
```swift
func addRecipient() {
let navController = storyboard?.instantiateViewControllerWithIdentifier("contactListNav") as? UINavigationController
presentViewController(navController!, animated: true, completion: nil)
}
```
If you Build and run at this point, you will notice that every time you tap on ```done```, the ```ContactListViewController``` is displayed over and over, and that the cell selection does nothing … yet ! We will use a ```bool``` to solve the first problem, and a ```delegate``` for the second !
Add the ```var firstTime = true```, then, in your ```viewWillAppear```, encapsulate the ```addRecipient()``` like this :
```swift
if firstTime {
firstTime = false
addRecipient()
}
```
Now, it’s time to create your ```delegate``` ! Open ```ContactListTableViewController```, and add the following ```protocol``` behind the import’s statement
```swift
protocol ContactPickerDelegate {
func didSelectContact(recipient: XMPPUserCoreDataStorageObject)
}
```
It will be called whenever an user select a contact in the list.
Add the following property to call on :
```swift
var delegate:ContactPickerDelegate?
```
And implement it in the ```UITableView didselectRowAtIndex``` method:
```swift
override func tableView(tableView: UITableView, didSelectRowAtIndexPath indexPath: NSIndexPath) {
delegate?.didSelectContact(OneRoster.userFromRosterAtIndexPath(indexPath: indexPath))
close(self)
}
```
Now that the protocol is setup, go back to ```ChatViewController.swift```, and add ```ContactPickerDelegate``` to the class declaration. Implement the mandatory method ```didSelectContact()```:
```swift
func didSelectContact(recipient: XMPPUserCoreDataStorageObject) {
self.recipient = recipient
navigationItem.title = recipient.displayName
}
```
However, it will not work until you set yourself as ```ContactPickerDelegate```. In the ```addRecipient()```, just before ```presentViewController```, add this line:
```swift
let contactController: ContactListTableViewController? = navController?.viewControllers[0] as? ContactListTableViewController
contactController?.delegate = self
```
We will now extend the contact selection, open up ```OpenChatsViewController``` and implement the ```segue delegates```:
```swift
override func shouldPerformSegueWithIdentifier(identifier: String, sender: AnyObject?) -> Bool {
if identifier == "chat.to.add" {
if !OneChat.sharedInstance.isConnected() {
let alert = UIAlertController(title: "Attention", message: "You have to be connected to start a chat", preferredStyle: UIAlertControllerStyle.Alert)
alert.addAction(UIAlertAction(title: "Ok", style: UIAlertActionStyle.Default, handler: nil))
self.presentViewController(alert, animated: true, completion: nil)
return false
}
}
return true
}
override func prepareForSegue(segue: UIStoryboardSegue?, sender: AnyObject?) {
if segue?.identifier == "chats.to.chat" {
if let controller = segue?.destinationViewController as? ChatViewController {
if let cell: UITableViewCell? = sender as? UITableViewCell {
let user = OneChats.getChatsList().objectAtIndex(tableView.indexPathForCell(cell!)!.row) as! XMPPUserCoreDataStorageObject
controller.recipient = user
}
}
}
}
```
The first one will prevent contact selection if the user is offline, the second will fill the ```recipient``` corresponding at the selected cell.
### BUILD & RUN, you should be able to select a contact !
6. Now go back to ChatViewController, for the final part, the Chat !
Add ```JSQMessagesViewController``` to the class declaration, and create a variable message witch will hold the fetched message if there is some:
```swift
var messages = NSMutableArray()
```
Now, you will need to implement the ```JSQMessageViewController``` delegates. Thoses methods are pretty simple, they will display and create an interface for the stored messages:
```swift
override func collectionView(collectionView: JSQMessagesCollectionView!, messageDataForItemAtIndexPath indexPath: NSIndexPath!) -> JSQMessageData! {
let message: JSQMessage = self.messages[indexPath.item] as! JSQMessage
return message
}
override func collectionView(collectionView: JSQMessagesCollectionView!, messageBubbleImageDataForItemAtIndexPath indexPath: NSIndexPath!) -> JSQMessageBubbleImageDataSource! {
let message: JSQMessage = self.messages[indexPath.item] as! JSQMessage
let bubbleFactory = JSQMessagesBubbleImageFactory()
let outgoingBubbleImageData = bubbleFactory.outgoingMessagesBubbleImageWithColor(UIColor.jsq_messageBubbleLightGrayColor())
let incomingBubbleImageData = bubbleFactory.incomingMessagesBubbleImageWithColor(UIColor.jsq_messageBubbleGreenColor())
if message.senderId == self.senderId {
return outgoingBubbleImageData
}
return incomingBubbleImageData
}
override func collectionView(collectionView: JSQMessagesCollectionView!, avatarImageDataForItemAtIndexPath indexPath: NSIndexPath!) -> JSQMessageAvatarImageDataSource! {
let message: JSQMessage = self.messages[indexPath.item] as! JSQMessage
if message.senderId == self.senderId {
if let photoData = OneChat.sharedInstance.xmppvCardAvatarModule?.photoDataForJID(OneChat.sharedInstance.xmppStream?.myJID) {
let senderAvatar = JSQMessagesAvatarImageFactory.avatarImageWithImage(UIImage(data: photoData), diameter: 30)
return senderAvatar
} else {
let senderAvatar = JSQMessagesAvatarImageFactory.avatarImageWithUserInitials("SR", backgroundColor: UIColor(white: 0.85, alpha: 1.0), textColor: UIColor(white: 0.60, alpha: 1.0), font: UIFont(name: "Helvetica Neue", size: 14.0), diameter: 30)
return senderAvatar
}
} else {
if let photoData = OneChat.sharedInstance.xmppvCardAvatarModule?.photoDataForJID(recipient!.jid!) {
let recipientAvatar = JSQMessagesAvatarImageFactory.avatarImageWithImage(UIImage(data: photoData), diameter: 30)
return recipientAvatar
} else {
let recipientAvatar = JSQMessagesAvatarImageFactory.avatarImageWithUserInitials("SR", backgroundColor: UIColor(white: 0.85, alpha: 1.0), textColor: UIColor(white: 0.60, alpha: 1.0), font: UIFont(name: "Helvetica Neue", size: 14.0)!, diameter: 30)
return recipientAvatar
}
}
}
override func collectionView(collectionView: JSQMessagesCollectionView!, attributedTextForCellTopLabelAtIndexPath indexPath: NSIndexPath!) -> NSAttributedString! {
if indexPath.item % 3 == 0 {
let message: JSQMessage = self.messages[indexPath.item] as! JSQMessage
return JSQMessagesTimestampFormatter.sharedFormatter().attributedTimestampForDate(message.date)
}
return nil;
}
override func collectionView(collectionView: JSQMessagesCollectionView!, attributedTextForMessageBubbleTopLabelAtIndexPath indexPath: NSIndexPath!) -> NSAttributedString! {
let message: JSQMessage = self.messages[indexPath.item] as! JSQMessage
if message.senderId == self.senderId {
return nil
}
if indexPath.item - 1 > 0 {
let previousMessage: JSQMessage = self.messages[indexPath.item - 1] as! JSQMessage
if previousMessage.senderId == message.senderId {
return nil
}
}
return nil
}
override func collectionView(collectionView: JSQMessagesCollectionView!, attributedTextForCellBottomLabelAtIndexPath indexPath: NSIndexPath!) -> NSAttributedString! {
return nil
}
// Mark: UICollectionView DataSource
override func collectionView(collectionView: UICollectionView, numberOfItemsInSection section: Int) -> Int {
return self.messages.count
}
override func collectionView(collectionView: UICollectionView, cellForItemAtIndexPath indexPath: NSIndexPath) -> UICollectionViewCell {
let cell: JSQMessagesCollectionViewCell = super.collectionView(collectionView, cellForItemAtIndexPath: indexPath) as! JSQMessagesCollectionViewCell
let msg: JSQMessage = self.messages[indexPath.item] as! JSQMessage
if !msg.isMediaMessage {
if msg.senderId == self.senderId {
cell.textView!.textColor = UIColor.blackColor()
cell.textView!.linkTextAttributes = [NSForegroundColorAttributeName:UIColor.blackColor(), NSUnderlineStyleAttributeName: NSUnderlineStyle.StyleSingle.rawValue]
} else {
cell.textView!.textColor = UIColor.whiteColor()
cell.textView!.linkTextAttributes = [NSForegroundColorAttributeName:UIColor.whiteColor(), NSUnderlineStyleAttributeName: NSUnderlineStyle.StyleSingle.rawValue]
}
}
return cell
}
// Mark: JSQMessages collection view flow layout delegate
override func collectionView(collectionView: JSQMessagesCollectionView!, layout collectionViewLayout: JSQMessagesCollectionViewFlowLayout!, heightForCellTopLabelAtIndexPath indexPath: NSIndexPath!) -> CGFloat {
if indexPath.item % 3 == 0 {
return kJSQMessagesCollectionViewCellLabelHeightDefault
}
return 0.0
}
override func collectionView(collectionView: JSQMessagesCollectionView!, layout collectionViewLayout: JSQMessagesCollectionViewFlowLayout!, heightForMessageBubbleTopLabelAtIndexPath indexPath: NSIndexPath!) -> CGFloat {
let currentMessage: JSQMessage = self.messages[indexPath.item] as! JSQMessage
if currentMessage.senderId == self.senderId {
return 0.0
}
if indexPath.item - 1 > 0 {
let previousMessage: JSQMessage = self.messages[indexPath.item - 1] as! JSQMessage
if previousMessage.senderId == currentMessage.senderId {
return 0.0
}
}
return kJSQMessagesCollectionViewCellLabelHeightDefault
}
override func collectionView(collectionView: JSQMessagesCollectionView!, layout collectionViewLayout: JSQMessagesCollectionViewFlowLayout!, heightForCellBottomLabelAtIndexPath indexPath: NSIndexPath!) -> CGFloat {
return 0.0
}
```
7. Now we can handle the ```UI```, but we still need to be able to send and receive messages ! Add ```OneMessageDelegate``` to the class declaration, and implement the mandatory ```protocol```:
```swift
func oneStream(sender: XMPPStream, didReceiveMessage message: XMPPMessage, from user: XMPPUserCoreDataStorageObject) {
if message.isChatMessageWithBody() {
JSQSystemSoundPlayer.jsq_playMessageReceivedSound()
if let msg: String = message.elementForName("body")?.stringValue() {
if let from: String = message.attributeForName("from")?.stringValue() {
let message = JSQMessage(senderId: from, senderDisplayName: from, date: NSDate(), text: msg)
messages.addObject(message)
self.finishReceivingMessageAnimated(true)
}
}
}
}
func oneStream(sender: XMPPStream, userIsComposing user: XMPPUserCoreDataStorageObject) {
self.showTypingIndicator = !self.showTypingIndicator
self.scrollToBottomAnimated(true)
}
```
The first method will be called whenever a message is received, while the second will be called when the remote user is composing a new message.
### We can now receive messages ! It would be great if we could send some too no ?
8. Add this to your ```viewDidLoad``` method :
```swift
OneMessage.sharedInstance.delegate = self
if OneChat.sharedInstance.isConnected() {
self.senderId = OneChat.sharedInstance.xmppStream?.myJID.bare()
self.senderDisplayName = OneChat.sharedInstance.xmppStream?.myJID.bare()
}
self.inputToolbar!.contentView!.leftBarButtonItem!.hidden = true
self.collectionView!.collectionViewLayout.springinessEnabled = true
```
We will now add a method in your ```viewWillApear``` to fetch stored messages, if there is some:
```swift
self.messages = OneMessage.sharedInstance.loadArchivedMessagesFrom(jid: recipient.jidStr)
self.collectionView?.reloadData()
```
The completed ```viewWillAppear``` function should now look like this:
```swift
override func viewWillAppear(animated: Bool) {
if let recipient = recipient {
navigationItem.rightBarButtonItems = []
navigationItem.title = recipient.displayName
self.messages = OneMessage.sharedInstance.loadArchivedMessagesFrom(jid: recipient.jidStr)
self.collectionView?.reloadData()
} else {
navigationItem.title = "New message"
navigationItem.setRightBarButtonItem(UIBarButtonItem(barButtonSystemItem: .Add, target: self, action: "addRecipient"), animated: true)
if firstTime {
firstTime = false
addRecipient()
}
}
}
```
Now, edit ```didSelectContact```, and add the following:
```swift
if !OneChats.knownUserForJid(jidStr: recipient.jidStr) {
OneChats.addUserToChatList(jidStr: recipient.jidStr)
} else {
messages = OneMessage.sharedInstance.loadArchivedMessagesFrom(jid: recipient.jidStr)
finishReceivingMessageAnimated(true)
}
```
It will fetch the stored message of un user we just select form the roster.
##### The final touch, sending a message !
8. Implement the ```JSQMessageViewController``` delegate:
```swift
override func didPressSendButton(button: UIButton!, withMessageText text: String!, senderId: String!, senderDisplayName: String!, date: NSDate!) {
let fullMessage = JSQMessage(senderId: OneChat.sharedInstance.xmppStream?.myJID.bare(), senderDisplayName: OneChat.sharedInstance.xmppStream?.myJID.bare(), date: NSDate(), text: text)
messages.addObject(fullMessage)
if let recipient = recipient {
OneMessage.sendMessage(text, to: recipient.jidStr, completionHandler: { (stream, message) -> Void in
JSQSystemSoundPlayer.jsq_playMessageSentSound()
self.finishSendingMessageAnimated(true)
})
}
}
```
### Build & run, CONGRATULATION, you have a fully functionnal chat client !