Ecosyste.ms: Awesome
An open API service indexing awesome lists of open source software.
https://github.com/purgeteam/swagger-spring-boot
简化swagger集成,支持配置化启动。
https://github.com/purgeteam/swagger-spring-boot
swagger
Last synced: 8 days ago
JSON representation
简化swagger集成,支持配置化启动。
- Host: GitHub
- URL: https://github.com/purgeteam/swagger-spring-boot
- Owner: purgeteam
- Created: 2019-08-30T06:04:11.000Z (about 5 years ago)
- Default Branch: master
- Last Pushed: 2021-05-12T00:16:08.000Z (over 3 years ago)
- Last Synced: 2023-07-28T17:18:42.202Z (over 1 year ago)
- Topics: swagger
- Language: Java
- Homepage:
- Size: 55.7 KB
- Stars: 16
- Watchers: 1
- Forks: 9
- Open Issues: 1
-
Metadata Files:
- Readme: README.md
Awesome Lists containing this project
README
# swagger-spring-boot
[](https://search.maven.org/search?q=g:com.purgeteam%20AND%20a:swagger-spring-boot-starter)


[](https://www.apache.org/licenses/LICENSE-2.0.html)
🔥🔥🔥相关文档请访问 [PurgeTeam docs](http://www.purgeteam.com)🔥🔥🔥
## 简介
可能大家都有用过`swagger`,可以通过`ui`页面显示接口信息,快速和前端进行联调。
现在基本都是多模块微服务化,每个服务都有这样的ui页面也是很不方便,`swagger` 也可以聚合在网关页面。
有开发过微服务的小伙伴应该体验过。当微服务模块多的情况下,每个模块都需要配置这样的一个类进行加载 `swagger` 。造成每个模块都存在大致一样的 `SwaggerConfig` ,极端的情况下,有些朋友复制其他模块的 `SwaggerConfig` 进行改造之后,发现仍然加载不出 `swagger` 的情况,造成明明是复制的,为何还加载不出,排查此bug极其费时间。
在此之上,可以构建出一个 `swagger-starter` 模块,只需要引用一个 `jar` ,加载一些特殊的配置,就可以快速地使用到 `swagger` 的部分功能了。
**新特性**
在原有 `swagger` 功能之上集成 `knife4j`。
`knife4j` 是 `springfox-swagger` 的增强UI实现,为Java开发者在使用Swagger的时候,能拥有一份简洁、强大的接口文档体验。
该UI增强包主要包括两大核心功能:**文档说明** 和 **在线调试**
**文档说明:** 根据Swagger的规范说明,详细列出接口文档的说明,包括接口地址、类型、请求示例、请求参数、响应示例、响应参数、响应码等信息,使用swagger-bootstrap-ui能根据该文档说明,对该接口的使用情况一目了然。
**在线调试:** 提供在线接口联调的强大功能,自动解析当前接口参数,同时包含表单验证,调用参数可返回接口响应内容、headers、Curl请求命令实例、响应时间、响应状态码等信息,帮助开发者在线调试,而不必通过其他测试工具测试接口是否正确,简介、强大。
## 功能使用
### 添加依赖
**ps:** 实际version版本请使用最新版
**最新版本:** [](https://search.maven.org/search?q=g:com.purgeteam%20AND%20a:swagger-spring-boot-starter)
[点击查看最新新版本](https://search.maven.org/search?q=g:com.purgeteam%20AND%20a:swagger-spring-boot-starter)
```
com.purgeteam
swagger-spring-boot-starter
0.2.0.RELEASE
```
### 配置swagger.properties文件
在自己项目模块的`resources`目录下 创建`swagger.properties`配置
```
swagger.basePackage="swagger扫描项目包路径"
swagger.title="swagger网页显示标题"
swagger.description="swagger网页显示介绍"
```
### `@EnableSwaggerPlugins`注解。
```
@EnableSwaggerPlugins
@SpringBootApplication
public class FrontDemoApplication {
public static void main(String[] args) {
SpringApplication.run(FrontDemoApplication.class, args);
}
}
```
访问`http://ip:端口/swagger-ui.html`检查swagger-ui是否正常。

## Zuul网关集成
做完上面步骤一个单体服务已经完成了 `swagger` 的配置。
集成到 `zuul` 网关上还需要配置其他的集成配置。
不过使用 `swagger-spring-boot-starter` 之后,流程变得很轻松。
只需要添加下面 `@EnableSwaggerZuul` 注解即可完成集成动作。
```
@EnableSwaggerZuul
@SpringBootApplication
public class ZuulApplication {
public static void main(String[] args) {
SpringApplication.run(ZuulApplication.class, args);
}
}
```
访问`http://ip:端口/swagger-ui.html`检查swagger-ui是否正常。

**状态支持**
在 `Select a spec` 选择框里可以选择网关下的微服务列表进行聚合展示。
这里也支持了服务状态显示。
```
health > "用户服务"(user)
health > "认证服务"(auth)
sick > front-demo(已下线)
sick > giant-demo(已下线)
```
这里的 `用户服务` `认证服务` 名称是根据相应服务的 `swagger.properties` 文件属性名 `swagger.title` 获取。


### UI访问
访问地址: `http://ip:端口/doc.html`
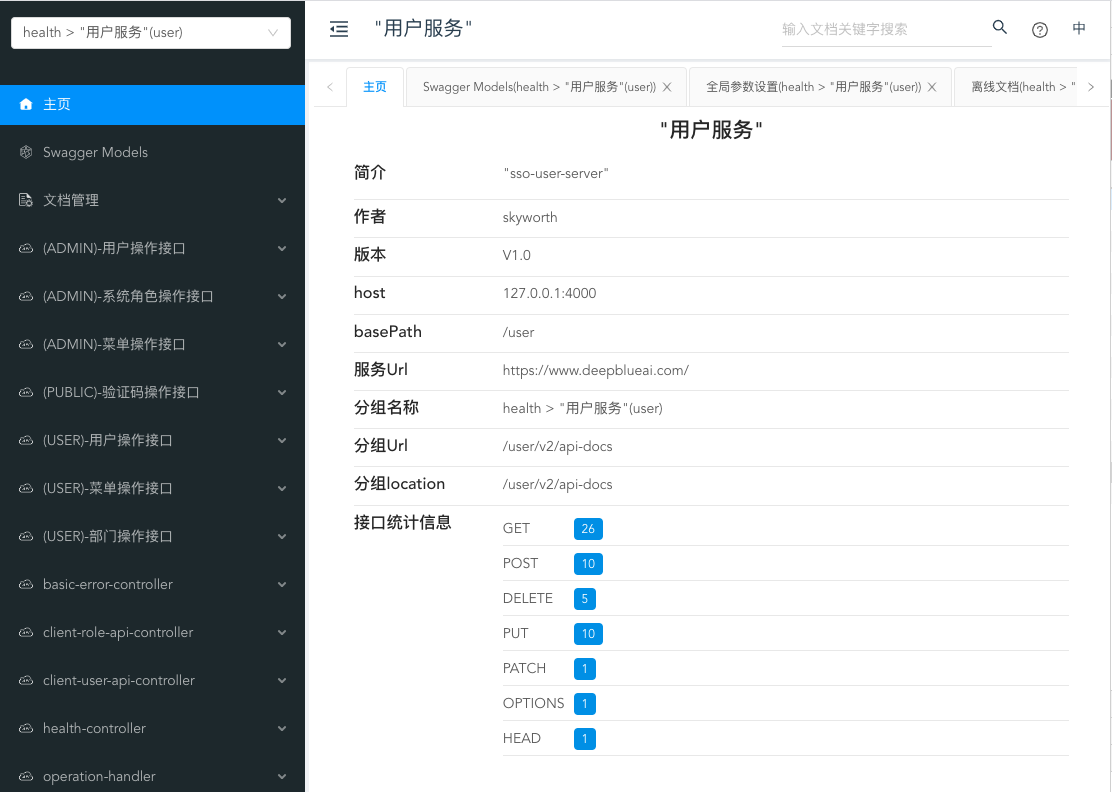
可以访问基本ok。
### 全局token
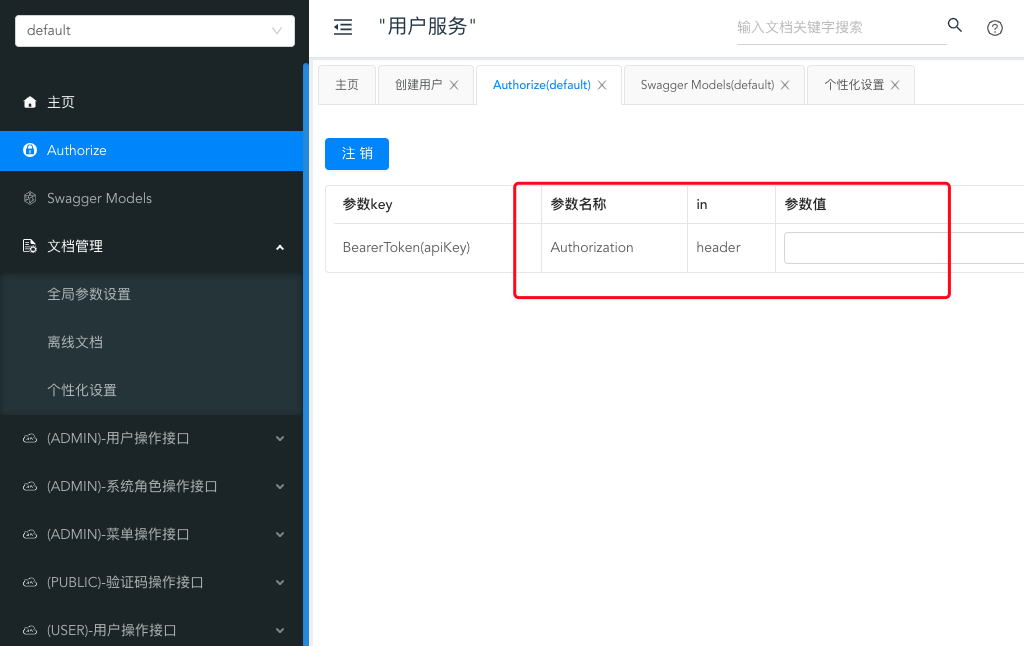
新增 `Authorize` 全局 `token`
默认参数设置为了 `Authorization` 储存在 `header`, 如和自己的参数不一致请在 `通用参数配置` 设置。
### 通用参数配置
通用参数配置是一个比较常用的功能,如 携带 `token` 访问接口。
和 `postman` 功能类似,解决 `swagger` 缺陷。
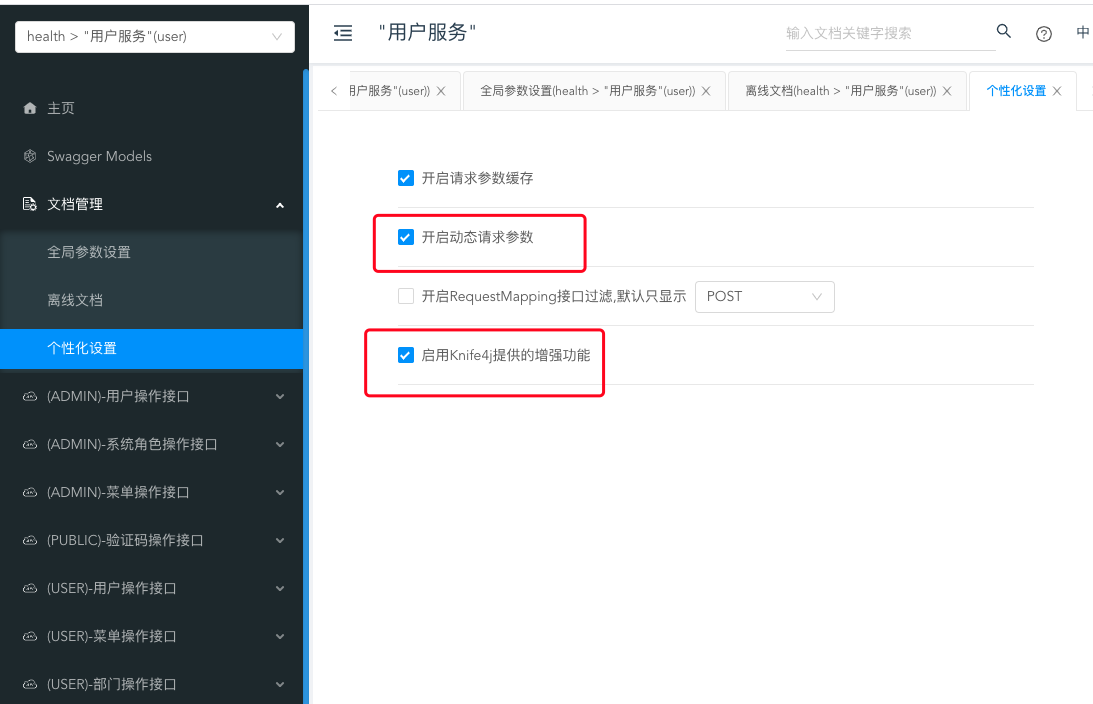
**开启功能**
**路径:** `文档管理/个性化设置`
- 启用Knife4j提供的增强功能
- 开启动态请求参数
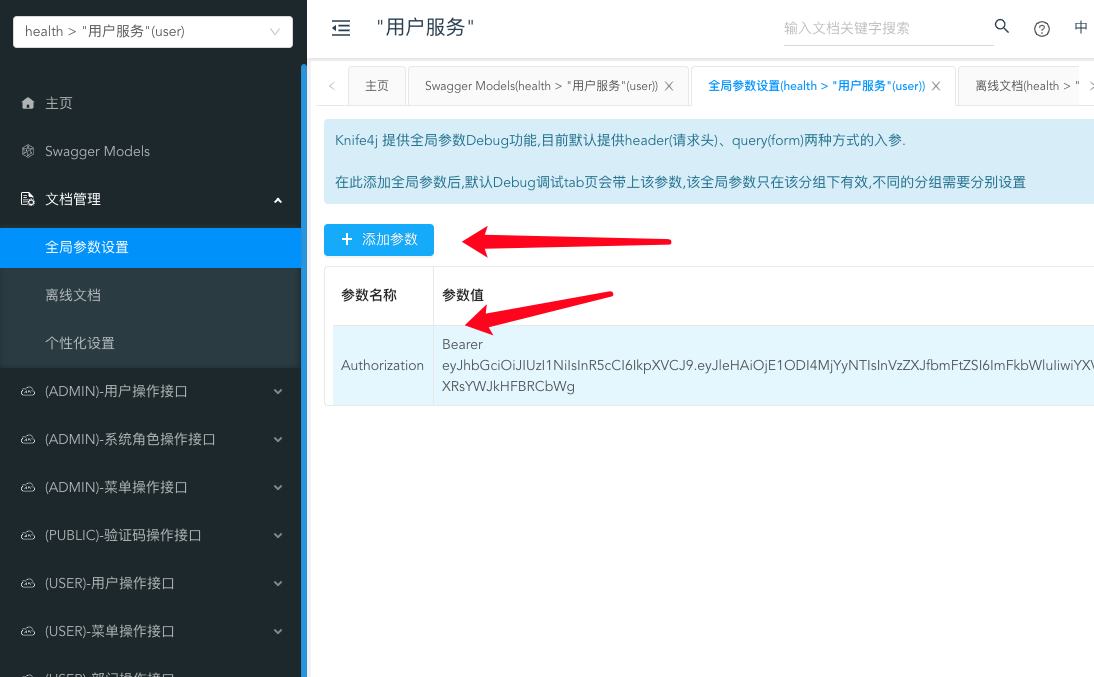
**添加参数**
**路径:** `文档管理/全局参数设置`
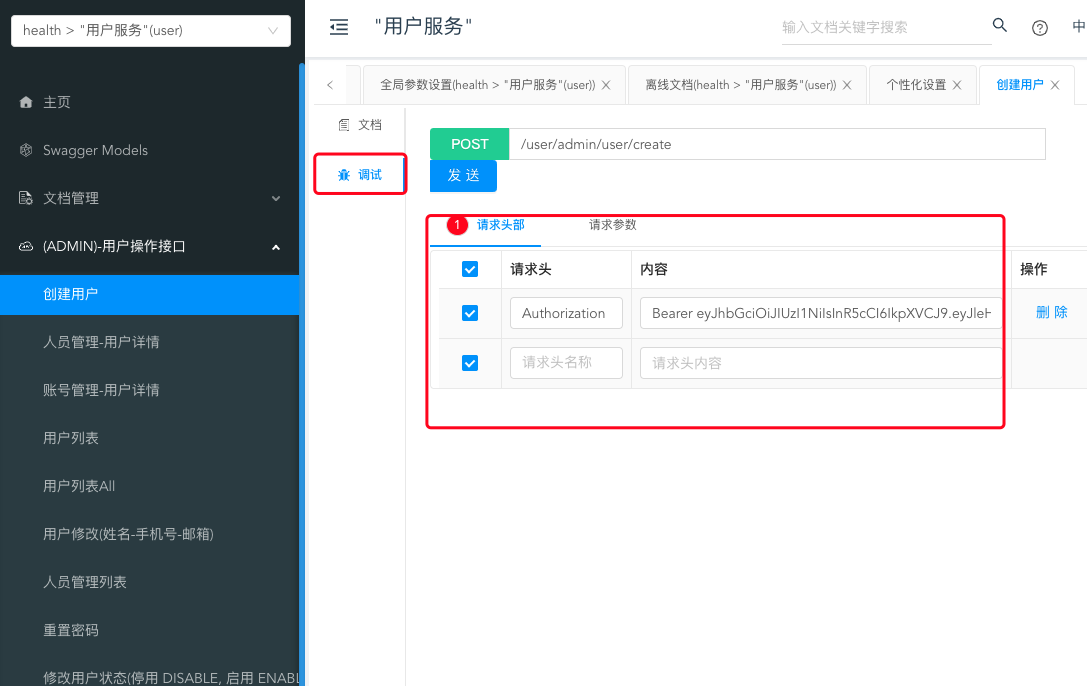
添加 `oauth2 token` 值已自己登陆token 前缀记得添加 `Bearer `。
```
参数名称: Authorization
参数值: Bearer eyJhbGciOiJIUzI1NiIsInR5cCI6IkpXVCJ9.eyJleHAiOjE1ODI4MjYyNTIsInVzZXJfbmFtZSI6ImFkbWluIiwiYXV0aG9yaXRpZXMiOlsiUk9MRV9KSUFPU0UxIiwiUk9MRV9NRU1CRVJTIl0sImp0aSI6IjA3YWZjMDVhLWU3NjYtNDMxOC1iZGRmLWJkMWU4NTExOWU5MiIsImNsaWVudF9pZCI6InNzby1hdXRoLXNlcnZlciIsInNjb3BlIjpbInNlcnZlciJdfQ.LFMcZTXb0g4xTzRo8kVAwBbXe12-XRsYWJkHFBRCbWg
```
**访问接口**
需要登陆的接口 在请求头里会默认都添加有 `Authorization`。
### 离线文档
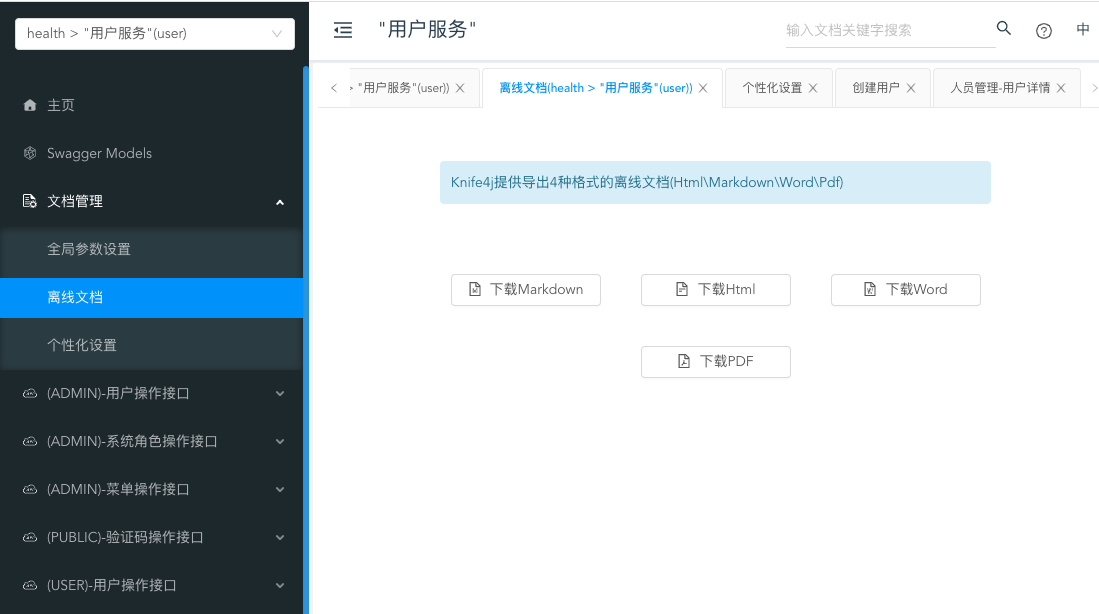
Knife4j提供导出4种格式的离线文档(Html\Markdown\Word\Pdf)
**路径:** 文档管理/离线文档
## 总结
简单的`starter`代码编写可以减少新模块的复杂性,只需要简单的配置就可以使用相应的特性,减少复制代码不必要的错误。
> 示例代码地址:[swagger-spring-boot](https://github.com/purgeteam/swagger-spring-boot)
> 作者GitHub:
[Purgeyao](https://github.com/purgeyao) 欢迎关注
> qq交流群: `812321371` 微信交流群: `MercyYao`
> 微信公众号:
