Ecosyste.ms: Awesome
An open API service indexing awesome lists of open source software.
https://github.com/qiubaiying/qiubaiying.github.io
BY Blog ->
https://github.com/qiubaiying/qiubaiying.github.io
blog github-pages jekyll-theme
Last synced: about 1 month ago
JSON representation
BY Blog ->
- Host: GitHub
- URL: https://github.com/qiubaiying/qiubaiying.github.io
- Owner: qiubaiying
- License: mit
- Created: 2017-02-10T08:45:46.000Z (almost 8 years ago)
- Default Branch: master
- Last Pushed: 2024-08-15T07:29:29.000Z (3 months ago)
- Last Synced: 2024-09-29T02:41:27.787Z (about 1 month ago)
- Topics: blog, github-pages, jekyll-theme
- Language: HTML
- Homepage: https://qiubaiying.github.io/
- Size: 12.2 MB
- Stars: 3,141
- Watchers: 45
- Forks: 8,140
- Open Issues: 288
-
Metadata Files:
- Readme: README.md
- License: LICENSE
Awesome Lists containing this project
README

[](https://travis-ci.org/qiubaiying/qiubaiying.github.io)
[](https://codebeat.co/projects/github-com-qiubaiying-qiubaiying-github-io-master)
[](https://github.com/qiubaiying/qiubaiying.github.io/issues)
[](https://github.com/home-assistant/home-assistant-iOS/blob/master/LICENSE)
[](https://github.com/qiubaiying/qiubaiying.github.io)
[](https://github.com/qiubaiying/qiubaiying.github.io)
博客的搭建教程修改自 [Hux](https://github.com/Huxpro/huxpro.github.io)
更为详细的教程戳这 [《利用 GitHub Pages 快速搭建个人博客》](http://www.jianshu.com/p/e68fba58f75c) 或 [wiki](https://github.com/qiubaiying/qiubaiying.github.io/wiki/%E5%8D%9A%E5%AE%A2%E6%90%AD%E5%BB%BA%E8%AF%A6%E7%BB%86%E6%95%99%E7%A8%8B)
>
### [查看博客戳这里 👆](http://qiubaiying.github.io)
## 使用
* 开始
* [环境](#环境)
* [开始](#开始)
* [撰写博文](#撰写博文)
* 组件
* [侧边栏](#侧边栏)
* [迷你关于我](#mini-about-me)
* [推荐标签](#featured-tags)
* [好友链接](#friends)
* [HTML5 演示文档布局](#keynote-layout)
* 评论与 Google/Baidu Analytics
* [评论](#comment)
* [网站分析](#analytics)
* 高级部分
* [自定义](#customization)
* [标题底图](#header-image)
* [搜索展示标题-头文件](#seo-title)
### 环境
如果你安装了 [jekyll](http://jekyllcn.com/),那你只需要在命令行输入`jekyll serve` 或 `jekyll s`就能在本地浏览器中输入`http://127.0.0.1:4000/`预览主题,对主题的修改也能实时展示(需要强刷浏览器)。
### 开始
你可以通用修改 `_config.yml`文件来轻松的开始搭建自己的博客:
```
# Site settings
title: BY Blog # 你的博客网站标题
SEOTitle: 柏荧的博客 | BY Blog # SEO 标题
description: "Hey" # 随便说点,描述一下
# SNS settings
github_username: qiubaiying # 你的github账号
jianshu_username: e71990ada2fd # 你的简书ID。
# Build settings
# paginate: 10 # 一页你准备放几篇文章
```
Jekyll官方网站还有很多的参数可以调,比如设置文章的链接形式...网址在这里:[Jekyll - Official Site](http://jekyllrb.com/) 中文版的在这里:[Jekyll中文](http://jekyllcn.com/).
### 撰写博文
要发表的文章一般以 **Markdown** 的格式放在这里`_posts/`,你只要看看这篇模板里的文章你就立刻明白该如何设置。
yaml 头文件长这样:
```
---
layout: post
title: 定时器 你真的会使用吗?
subtitle: iOS定时器详解
date: 2016-12-13
author: BY
header-img: img/post-bg-ios9-web.jpg
catalog: true
tags:
- iOS
- 定时器
---
```
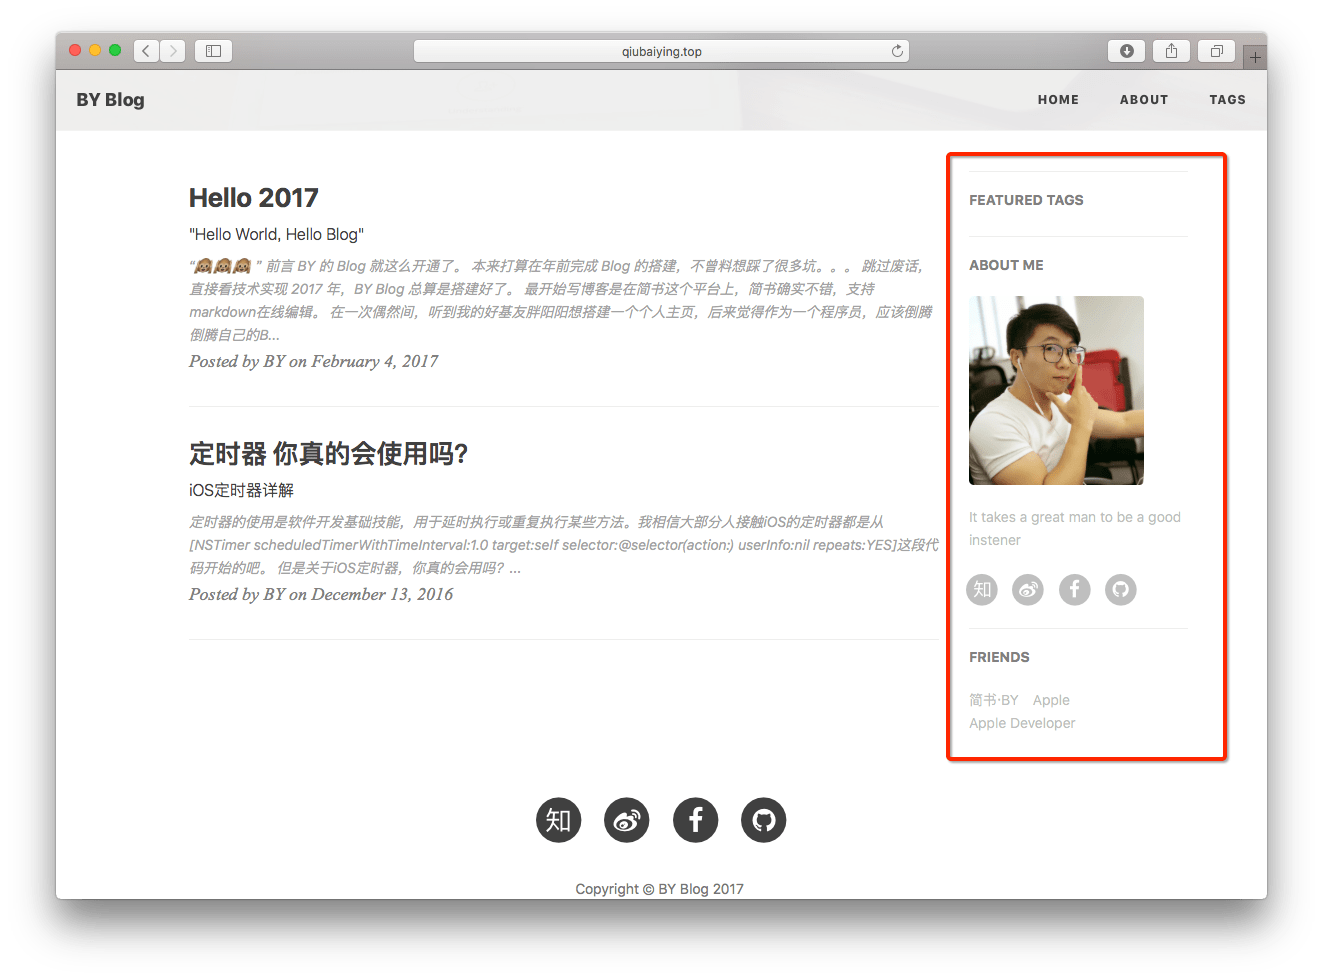
### 侧边栏
看右边:

设置是在 `_config.yml`文件里面的`Sidebar settings`那块。
```
# Sidebar settings
sidebar: true #添加侧边栏
sidebar-about-description: "简单的描述一下你自己"
sidebar-avatar: /img/avatar-by.jpg #你的大头贴,请使用绝对地址.注意:名字区分大小写!后缀名也是
```
侧边栏是响应式布局的,当屏幕尺寸小于992px的时候,侧边栏就会移动到底部。具体请见bootstrap栅格系统
### Mini About Me
Mini-About-Me 这个模块将在你的头像下面,展示你所有的社交账号。这个也是响应式布局,当屏幕变小时候,会将其移动到页面底部,只不过会稍微有点小变化,具体请看代码。
### Featured Tags
看到这个网站 [Medium](http://medium.com) 的推荐标签非常的炫酷,所以我将他加了进来。
这个模块现在是独立的,可以呈现在所有页面,包括主页和发表的每一篇文章标题的头上。
```
# Featured Tags
featured-tags: true
featured-condition-size: 1 # A tag will be featured if the size of it is more than this condition value
```
唯一需要注意的是`featured-condition-size`: 如果一个标签的 SIZE,也就是使用该标签的文章数大于上面设定的条件值,这个标签就会在首页上被推荐。
内部有一个条件模板 `{% if tag[1].size > {{site.featured-condition-size}} %}` 是用来做筛选过滤的.
### Social-media Account
在下面输入的社交账号,没有的添加的不会显示在侧边框中。新加入了[简书](https:/www.jianshu.com)链接,
# SNS settings
RSS: false
jianshu_username: jianshu_id
zhihu_username: username
facebook_username: username
github_username: username
# weibo_username: username

### Friends
好友链接部分。这会在全部页面显示。
设置是在 `_config.yml`文件里面的`Friends`那块,自己加吧。
```
# Friends
friends: [
{
title: "BY Blog",
href: "https://qiubaiying.github.io/"
},
{
title: "Apple",
href: "https://apple.com/"
}
]
```
### Keynote Layout
HTML5幻灯片的排版:

这部分是用于占用html格式的幻灯片的,一般用到的是 Reveal.js, Impress.js, Slides, Prezi 等等.我认为一个现代化的博客怎么能少了放html幻灯的功能呢~
其主要原理是添加一个 `iframe`,在里面加入外部链接。你可以直接写到头文件里面去,详情请见下面的yaml头文件的写法。
```
---
layout: keynote
iframe: "http://huangxuan.me/js-module-7day/"
---
```
iframe在不同的设备中,将会自动的调整大小。保留内边距是为了让手机用户可以向下滑动,以及添加更多的内容。
### Comment
博客不仅支持 [Disqus](http://disqus.com) 评论系统,还加入了 [Gitalk](https://gitalk.github.io/) 评论系统,[支持 Markdwon 语法](https://guides.github.com/features/mastering-markdown/),cool~
#### Disqus
优点:国际比较流行,界面也很大气、简洁,如果有人评论,还能实时通知,直接回复通知的邮件就行了;
缺点:评论必须要去注册一个disqus账号,分享一般只有Facebook和Twitter,另外在墙内加载速度略慢了一点。想要知道长啥样,可以看以前的版本点[这里](http://brucezhaor.github.io/about.html) 最下面就可以看到。
> Node:有很多人反映 Disqus 插件加载不出来,可能墙又架高了,有条件的话翻个墙就好了~
**使用:**
**首先**,你需要去注册一个Disqus帐号。**不要直接使用我的啊!**
**其次**,你只需要在下面的 yaml 头文件中设置一下就可以了。
```
# 评论系统
# Disqus(https://disqus.com/)
disqus_username: qiubaiying
```
#### Gitalk
优点:界面干净简洁,利用 Github issue API 做的评论插件,使用 Github 帐号进行登录和评论,最喜欢的支持 Markdown 语法,对于程序员来说真是太 cool 了。
缺点:配置比较繁琐,每篇文章的评论都需要初始化。
**使用:**
参考我的这篇文章:[《为博客添加 Gitalk 评论插件》](http://qiubaiying.top/2017/12/19/%E4%B8%BA%E5%8D%9A%E5%AE%A2%E6%B7%BB%E5%8A%A0-Gitalk-%E8%AF%84%E8%AE%BA%E6%8F%92%E4%BB%B6/)
### Analytics
网站分析,现在支持百度统计和Google Analytics。需要去官方网站注册一下,然后将返回的code贴在下面:
```
# Baidu Analytics
ba_track_id: 4cc1f2d8f3067386cc5cdb626a202900
# Google Analytics
ga_track_id: 'UA-49627206-1' # 你用Google账号去注册一个就会给你一个这样的id
ga_domain: huangxuan.me # 默认的是 auto, 这里我是自定义了的域名,你如果没有自己的域名,需要改成auto。
```
### Customization
如果你喜欢折腾,你可以去自定义这个模板的 Code。
**如果你可以理解 `_include/` 和 `_layouts/`文件夹下的代码(这里是整个界面布局的地方),你就可以使用 Jekyll 使用的模版引擎 [Liquid](https://github.com/Shopify/liquid/wiki)的语法直接修改/添加代码,来进行更有创意的自定义界面啦!**
### Header Image
博客每页的标题底图是可以自己选的,看看几篇示例post你就知道如何设置了。
标题底图的选取完全是看个人的审美了。每一篇文章可以有不同的底图,你想放什么就放什么,最后宽度要够,大小不要太大,否则加载慢啊。
> 上传的图片最好先压缩,这里推荐 imageOptim 图片压缩软件,让你的博客起飞。
但是需要注意的是本模板的标题是**白色**的,所以背景色要设置为**灰色**或者**黑色**,总之深色系就对了。当然你还可以自定义修改字体颜色,总之,用github pages就是可以完全的个性定制自己的博客。
### SEO Title
我的博客标题是 **“BY Blog”** 但是我想要在搜索的时候显示 **“柏荧的博客 | BY Blog”** ,这个就需要 SEO Title 来定义了。
其实这个 SEO Title 就是定义了标题这个里面的东西和多说分享的标题,你可以自行修改的。
### 关于收到"Page Build Warning"的 Email
由于jekyll升级到3.0.x,对原来的 pygments 代码高亮不再支持,现只支持一种-rouge,所以你需要在 `_config.yml`文件中修改`highlighter: rouge`.另外还需要在`_config.yml`文件中加上`gems: [jekyll-paginate]`.
同时,你需要更新你的本地 jekyll 环境.
使用`jekyll server`的同学需要这样:
1. `gem update jekyll` # 更新jekyll
2. `gem update github-pages` #更新依赖的包
使用`bundle exec jekyll server`的同学在更新 jekyll 后,需要输入`bundle update`来更新依赖的包.
> Note:
> 可以使用 `jekyll -s` 命令在本地实时配置博客,提高效率。详见 [Jekyll.com](http://jekyllcn.com/)
参考文档:[using jekyll with pages](https://help.github.com/articles/using-jekyll-with-pages/) & [Upgrading from 2.x to 3.x](http://jekyllrb.com/docs/upgrading/2-to-3/)
## 致谢
1. 这个模板是从这里 [Hux](https://github.com/Huxpro/huxpro.github.io) fork 的, 感谢这个作者。
2. 感谢 Jekyll、Github Pages 和 Bootstrap!
## License
遵循 MIT 许可证。有关详细,请参阅 [LICENSE](https://github.com/qiubaiying/qiubaiying.github.io/blob/master/LICENSE)。