https://github.com/r0b0/debian-installer
Opinionated Debian Installer - alternative debian installer for laptops and desktop PCs
https://github.com/r0b0/debian-installer
debian
Last synced: about 1 year ago
JSON representation
Opinionated Debian Installer - alternative debian installer for laptops and desktop PCs
- Host: GitHub
- URL: https://github.com/r0b0/debian-installer
- Owner: r0b0
- License: gpl-3.0
- Created: 2021-08-29T13:36:56.000Z (almost 5 years ago)
- Default Branch: master
- Last Pushed: 2025-06-01T17:11:06.000Z (about 1 year ago)
- Last Synced: 2025-06-02T03:11:13.211Z (about 1 year ago)
- Topics: debian
- Language: Shell
- Homepage:
- Size: 3.19 MB
- Stars: 61
- Watchers: 2
- Forks: 5
- Open Issues: 9
-
Metadata Files:
- Readme: README.md
- License: LICENSE
Awesome Lists containing this project
README
# Opinionated Debian Installer
This tool can be used to create a modern installation of Debian.
Our opinions of what a modern installation of Debian should look like in 2025 are:
- Debian 13 (Trixie)
- Backports and non-free enabled
- Firmware installed
- Installed on btrfs subvolumes
- Full disk encryption, unlocked by TPM
- Fast installation using an image
- Browser-based installer
## Limitations
- **The installer will take over your whole disk**
- Amd64 with EFI only
- The installer is in english only
## Downloads
| Desktop environment | Download | SHA-256 Checksum |
|---------------------|---------------------------------------------------------------------------------------------------------------------------------------------------------------------------------------------------------------------|-------------------------------------------------------------------------|
| **Trixie** | Debian 13 (testing) | |
| KDE Plasma | [opinionated-debian-installer-trixie-kde-plasma-20250601a.img (5.5GB)](https://objectstorage.eu-frankfurt-1.oraclecloud.com/n/fr2rf1wke5iq/b/public/o/opinionated-debian-installer-trixie-kde-plasma-20250601a.img) | b16a8d4d edd39ba0 6eaaf8b6 9ed7ca96 6087fc54 30ee63db 3098a932 423e5767 |
| Gnome | [opinionated-debian-installer-trixie-gnome-20250602a.img (4.0GB)](https://objectstorage.eu-frankfurt-1.oraclecloud.com/n/fr2rf1wke5iq/b/public/o/opinionated-debian-installer-trixie-gnome-20250602a.img) | b102c542 cbfd0d2c d9564d50 a281b28d 0f229d28 60749c5b b9ed2eb1 bae8256e |
| Server | [opinionated-debian-installer-trixie-server-20250602a.img (2.5GB)](https://objectstorage.eu-frankfurt-1.oraclecloud.com/n/fr2rf1wke5iq/b/public/o/opinionated-debian-installer-trixie-server-20250602a.img) | 09fa62ec 04f3201b db5557e5 61215c70 d706be85 c0034d1f 8cff893a ee884a1a |
| **Bookworm** | Debian 12 (stable) | |
| KDE Plasma | [opinionated-debian-installer-bookworm-kde-plasma-20250201a.img (5.6GB)](https://debian-installer.lamac.cc/opinionated-debian-installer-bookworm-kde-plasma-20250201a.img) | 8116fe40 ae3a4eb9 7d4d3294 8b2cafcd f5690aa5 02fa8be2 94ba26e5 61a7344d |
| Gnome | [opinionated-debian-installer-bookworm-gnome-20250223a.img (4.3GB)](https://debian-installer.lamac.cc/opinionated-debian-installer-bookworm-gnome-20250223a.img) | 154459c5 2ae267c0 80e58c0b d47a9ecb 1d993154 dba516f8 eefe1187 7ad187ef |
| Server | [opinionated-debian-installer-bookworm-server-20250111a.img (1.9GB)](https://debian-installer.lamac.cc/opinionated-debian-installer-bookworm-server-20250111a.img) | 261d5a25 05de1f19 22a153e8 bad31258 d043c87b 5d2ba266 780ca3d9 ff14f7be |
## Instructions
1. Download one of the live image files from the table above
2. Write the image file to a USB flash drive. **Do not use ventoy** or similar "clever" tools - they are not compatible with these images. If you need a GUI, use [etcher](https://github.com/balena-io/etcher/releases) or [win32DiskImager](https://sourceforge.net/projects/win32diskimager/files/Archive/) or just use dd - `dd if=opinionated-debian-installer*.img of=/dev/sdX bs=256M oflag=dsync status=progress` where sdX is your USB flash drive
3. Boot from the USB flash drive
4. Start the installer icon from the desktop/dash, fill in the form in the browser and press the big _Install_ button
5. Reboot and enjoy
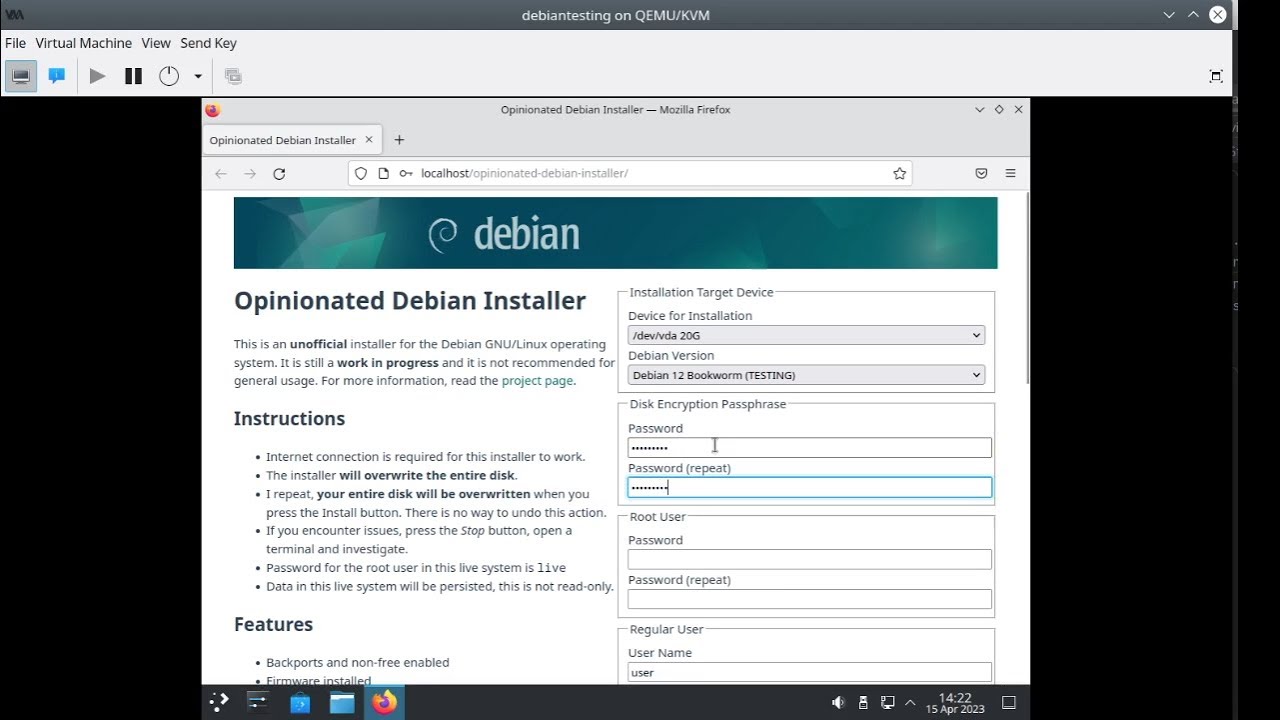
## Screencast & Screenshot
Screenshot of the full installer GUI:

Video of installation of Debian with KDE Plasma (Bookworm version):
[](https://youtu.be/sbnKvGMcagI?si=W9NvZygB8Z7-LCT8&t=92)
## Details
- GPT disk partitions are created on the designated disk drive:
- UEFI ESP partition
- Optional swap partition - LUKS encrypted
- Root partition - [LUKS](https://cryptsetup-team.pages.debian.net/cryptsetup/README.Debian.html) encrypted (rest of the drive)
- GPT root partition is [auto-discoverable](https://www.freedesktop.org/software/systemd/man/systemd-gpt-auto-generator.html)
- Btrfs subvolumes will be called `@` for `/` and `@home` for `/home` (compatible with [timeshift](https://github.com/teejee2008/timeshift#supported-system-configurations)); the top-level subvolume will be mounted to `/root/btrfs1`
- The system is installed using an image from the live iso. This will speed up the installation significantly and allow off-line installation.
- [Dracut](https://github.com/dracutdevs/dracut/wiki/) is used instead of initramfs-tools
- [Systemd-boot](https://www.freedesktop.org/wiki/Software/systemd/systemd-boot/) is used instead of grub
- [Network-manager](https://wiki.debian.org/NetworkManager) is used for networking
- [Systemd-cryptenroll](https://www.freedesktop.org/software/systemd/man/systemd-cryptenroll.html#--tpm2-device=PATH) is used to unlock the disk, using TPM (if available)
- [Sudo](https://wiki.debian.org/sudo) is installed and configured for the created user
## (Optional) Configuration, Automatic Installation
Edit [installer.ini](installer-files/boot/efi/installer.ini) on the first (vfat) partition of the installer image.
It will allow you to pre-seed and automate the installation.
If you edit it directly in the booted installer image, it is /boot/efi/installer.ini
Reboot after editing the file for the new values to take effect.
## Headless Installation
You can use the installer for server installation.
As a start, edit the configuration file installer.ini (see above), set option BACK_END_IP_ADDRESS to 0.0.0.0 and reboot the installer.
**There is no encryption or authentication in the communication so only do this on a trusted network.**
You have several options to access the installer.
Assuming the IP address of the installed machine is 192.168.1.29 and you can reach it from your PC:
* Use the web interface in a browser on a PC - open `http://192.168.1.29/opinionated-debian-installer/`
* Use the text mode interface - start `opinionated-installer tui -baseUrl http://192.168.1.29:5000`
* Use curl - again, see the [installer.ini](installer-files/boot/efi/installer.ini) file for list of all options for the form data in -F parameters:
curl -v -F "DISK=/dev/vda" -F "USER_PASSWORD=hunter2" \
-F "ROOT_PASSWORD=changeme" -F "LUKS_PASSWORD=luke" \
http://192.168.1.29:5000/install
* Use curl to prompt for logs:
curl http://192.168.1.29:5000/download_log
## Testing
If you are testing in a virtual machine, attaching the downloaded image file as a virtual disk, you need to extend it first.
The image file that you downloaded is shrunk, there is no free space left in the filesystems.
Use `truncate -s +500M opinionated*.img` to add 500MB to the virtual disk before you attach it to a virtual machine.
The installer will expand the partitions and filesystem to fill the device.
### Libvirt
To test with [libvirt](https://libvirt.org/), make sure to create the VM with UEFI:
1. Select the _Customize configuration before install_ option at the end of the new VM dialog
2. In the VM configuration window, _Overview_ tab, _Hypervisor Details_ section, select _Firmware_: _UEFI_

To add a TPM module, you need to install the [swtpm-tools](https://packages.debian.org/trixie/swtpm-tools) package.
Attach the downloaded installer image file as _Device type: Disk device_, not ~~CDROM device~~.
### Hyper-V
To test with the MS hyper-v virtualization, make sure to create your VM with [Generation 2](https://learn.microsoft.com/en-us/windows-server/virtualization/hyper-v/plan/Should-I-create-a-generation-1-or-2-virtual-machine-in-Hyper-V).
This will enable UEFI.
TPM can be enabled and Secure Boot disabled in the Security tab of the Hyper-V settings.
You will also need to convert the installer image to VHDx format and make the file not sparse.
You can use [qemu-img](https://www.qemu.org/docs/master/tools/qemu-img.html) ([windows download](https://qemu.weilnetz.de/w64/)) and fsutil like this:
qemu-img convert -f raw -O vhdx opinionated-debian-installer-*.img odin.vhdx
fsutil sparse setflag odin.vhdx 0
Attach the generated VHDx file as a disk, not as a ~~CD~~.
## Hacking
Alternatively to running the whole browser based GUI, you can run the `installer.sh` script manually from a root shell.
The end result will be exactly the same.
Just don't forget to edit the configuration options (especially the `DISK` variable) before running it.
### Creating Your Own Installer Image
1. Insert a blank storage device
2. Edit the **DISK** variable at the top of files `make_image_*.sh`
3. Execute the `make_image_*.sh` files as root
In the first stage of image generation, you will get a _tasksel_ prompt where you can select a different set of packages for your image.
### Installer Image Structure
There are 3 GPT partitions on the installer image:
1. EFI boot partition
2. Base Image - Btrfs partition with maximum zstd compression.
When the live system is running, this is used as a [read-only lower device for overlayfs](https://docs.kernel.org/filesystems/overlayfs.html).
When installing the target system, the installer will copy this to the target system, mount it read-write, resize to expand to the whole partition and continue with the system installation.
3. Top Overlay - upper and work device for the overlayfs for the live system. The changes you make while the live system is running are persisted here.
### Building the Front-End
The front-end is a [vue](https://vuejs.org/) application.
You need [npm](https://www.npmjs.com/) to build it.
Run the following commands to build it:
cd frontend
npm run build
### Building the HTTP Backend and the Text-User-Interface Frontend
The HTTP backend and TUI frontend is a [go](https://go.dev/) application.
Run the following commands to build it:
cd backend
go build -o opinionated-installer
### Configuration Flow
```mermaid
flowchart LR
A[installer.ini] -->|EnvironmentFile| B(installer_backend.service)
B -->|ExecStart| C[backend]
D(Web Frontend) --->|HTTP POST| C
E(TUI Frontend) --->|HTTP POST| C
G(curl) --->|HTTP POST| C
C -->|environment| F[installer.sh]
```
### Output Flow
```mermaid
flowchart RL
C[backend] -->|stdout| B(installer_backend.service)
C --->|websocket| D(Web Frontend)
C --->|websocket| E(TUI Frontend)
C --->|HTTP GET| G(curl)
F[installer.sh] -->|stdout| C
```
## Comparison
The following table contains comparison of features between our opinionated debian installer and official debian installers.
| Feature | ODIN | [Netinstall](https://www.debian.org/CD/netinst/) | [Calamares](https://get.debian.org/debian-cd/current-live/amd64/iso-hybrid/) |
|-----------------------------------------------------|-------|--------------------------------------------------|------------------------------------------------------------------------------|
| Installer internationalization | N | Y | Y |
| Mirror selection, HTTP proxy support | N | Y | N |
| Manual disk partitioning, LVM, filesystem selection | N[4] | Y | Y |
| Btrfs subvolumes | Y[2] | Y[3] | Y[2] |
| Full drive encryption | **Y** | Y[1] | Y |
| Passwordless unlock (TPM) | **Y** | N | N |
| Image-based installation | **Y** | N | N |
| Non-free and backports | **Y** | N | N |
| Browser-based installer | **Y** | N | N |
[1] `/boot` needs a separate unencrypted partition
[2] `@` and `@home` ([timeshift](https://github.com/linuxmint/timeshift#supported-system-configurations) compatible)
[3] `@rootfs`
[4] Fixed partitioning (see Details above), LUKS is automatic, BTRFS is used as filesystem