Ecosyste.ms: Awesome
An open API service indexing awesome lists of open source software.
https://github.com/ramitsurana/ansible-ec2-docker-deployment
Deploying wordpress blog using docker & ansible on AWS
https://github.com/ramitsurana/ansible-ec2-docker-deployment
ansible aws docker
Last synced: 3 months ago
JSON representation
Deploying wordpress blog using docker & ansible on AWS
- Host: GitHub
- URL: https://github.com/ramitsurana/ansible-ec2-docker-deployment
- Owner: ramitsurana
- License: mit
- Created: 2017-06-06T06:42:16.000Z (over 7 years ago)
- Default Branch: master
- Last Pushed: 2018-10-06T12:16:56.000Z (over 6 years ago)
- Last Synced: 2024-04-17T20:13:22.091Z (10 months ago)
- Topics: ansible, aws, docker
- Homepage: https://ramitsurana.github.io/ansible-ec2-docker-deployment/
- Size: 34.2 KB
- Stars: 18
- Watchers: 5
- Forks: 55
- Open Issues: 0
-
Metadata Files:
- Readme: README.md
- License: LICENSE
Awesome Lists containing this project
README
# Ansible-ec2-docker-deployment
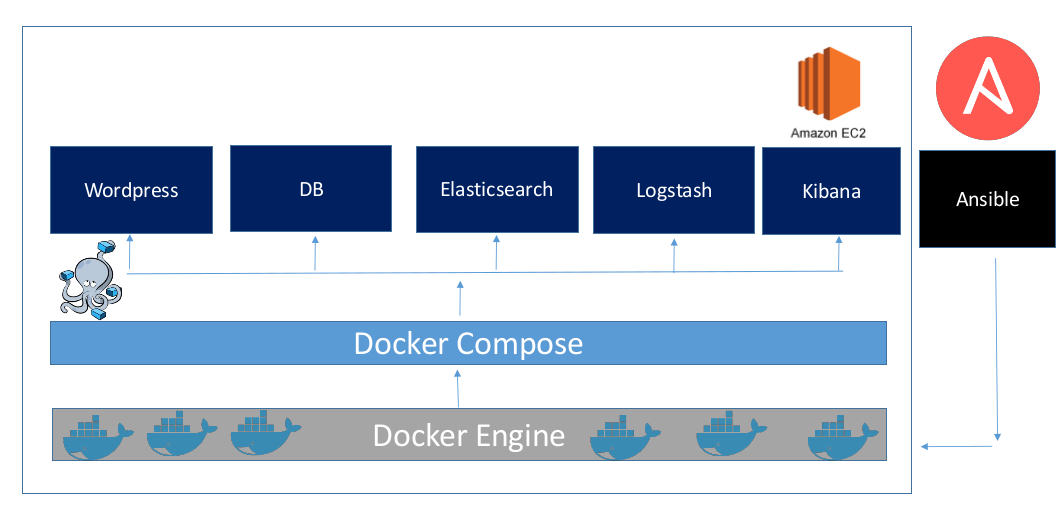
Using Ansible to setup Wordpress, MariaDB & ELK Stack to an AWS EC2 instance with Docker Compose
## Prerequisites
* Pythonv2.7
* Ansible
* Python Boto
* Git
( For Manual Installation - https://github.com/ramitsurana/ansible-ec2-docker-deployment/blob/master/Installation.md)
## Design

The design of the model is to deploy the ELK stack,Wordpress and Redis on top of the docker in an EC2 instance.This is done using docker compose and dockerfiles.The provisioning of the system is done using ansible.The base os is Ubuntu 14.04.For successful results,please avoid Ubuntu 16.04 as it does not contain pre-installed python. For the same, you can use:
````
$ sudo apt-get install python-minimal -y
````
[Ref](https://github.com/ansible/ansible/issues/19584)
The file structure is as follows:
* Docker
- app
- app1
- docker-compose.app.yml
- app-deploy.yml
- elk
- elk1
- docker-compose.yml
- elk-deploy.yml
* Deploy
- ec2-configure.yml
* Ansible
- Info
- aws-credentials.yml
- specs.yml
- provision.yml
- vpc-provision.yml
- hosts
## Steps:
```
$ git clone https://github.com/ramitsurana/ansible-ec2-docker-deployment/
$ cd ansible-ec2-docker-deployment/
```
### Configuring Hosts
Please create and add the following lines at **/etc/ansible/hosts** file :
````
[local]
127.0.0.1
[ec2]
ansible_user=ubuntu
````
You can choose the EC2 IP by choosing an elastic Ip for your instance.This is good way to fix an IP as it may change after a reboot of EC2 instance. This setting can be observed at EC2 Dashboard > Elastic IP.
Similarly you should also create another file at /etc/ansible/ansible.cfg.This is the main configuration file for ansible to run.You can uncomment add some sections in it as represented below:
````
[defaults]
# some basic default values...
inventory = /etc/ansible/hosts
library = /usr/share/my_modules/
remote_tmp = $HOME/.ansible/tmp
local_tmp = $HOME/.ansible/tmp
forks = 5
poll_interval = 15
sudo_user = root
#ask_sudo_pass = True
#ask_pass = True
#transport = smart
remote_port = 22
#module_lang = C
#module_set_locale = True
````
### Creating VPC
This can be done using the vpc-provision.yml file present in the ansible dir.It requires you to put your aws credentials [here](https://github.com/ramitsurana/ansible-ec2-docker-deployment/blob/master/ansible/info/aws-credentials.yml).The [specs.yml](https://github.com/ramitsurana/ansible-ec2-docker-deployment/blob/master/ansible/info/specs.yml) file is already configured. The command to run the ansible playbook is as follows:
````
$ sudo ansible-playbook vpc-provision.yml -i hosts -vv
````
### Creating EC2
This can be done using the provision.yml file present in the ansible dir.It requires you to put your aws credentials [here](https://github.com/ramitsurana/ansible-ec2-docker-deployment/blob/master/ansible/info/aws-credentials.yml).The [specs.yml](https://github.com/ramitsurana/ansible-ec2-docker-deployment/blob/master/ansible/info/specs.yml) file stated the region,ami and instance type.The command to run the ansible playbook is as follows:
````
$ sudo ansible-playbook provision.yml -i hosts -vv
````
Remember to associate your Elastic IP with the EC2 instance.This can be observed under Elastic IP > Associate.
### Configuring EC2
We can start configuring our EC2 instance by running some basic commands such as:
````
//Installing Docker
$ sudo apt-get clean && update -y
$ apt-get install apt-transport-https ca-certificates curl software-properties-common -y
$ apt-get install curl -y
$ sudo apt-get install docker.io -y
$ sudo usermod -aG docker ${USER}
$ sudo service docker restart
//Installing docker compose
$ sudo sudo apt-get install python-pip python-dev build-essential -y
$ sudo pip install docker-compose==1.3.0
````
This can be done using the ec2-configure.yml file present in the repo.The command would be:
````
$ sudo ansible-playbook ec2-configure.yml -vv --private-key
````
### Deploying ELK Stack using Docker Compose
It can be done using the ansible playbook.
````
$ sudo ansible-playbook elk-deploy.yml -vv --private-key
````
The playbook consists of the below commands:
````
$ cp elk1/docker-compose.yml ~/home/ubuntu/
$ sudo docker-compose -f ~/home/ubuntu/docker-compose.yml up -d
$ sudo rm -f ~/home/ubuntu/docker-compose.yml
````
### Deploying Wordpress and Mariadb Containers using Docker Compose
It can be done using the ansible playbook.
````
$ sudo ansible-playbook app-deploy.yml -vv --private-key
````
The playbook consists of the following below commands:
````
$ cp app1/docker-compose.yml ~/home/ubuntu/
$ sudo docker-compose -f ~/home/ubuntu/docker-compose.app.yml up -d
$ sudo rm -f ~/home/ubuntu/docker-compose.app.yml
````
### Output
**Add tag Owner : in EC2 instance.**
The output can be observed using the ip address of the ec2 instance.The Public DNS would be like ec2-xxx-xxx-xxx.compute.amazonaws.com.
Service | Port |
|:--------|------:|
|Wordpress | 8080|
|Kibana | 5601|
**Please check the inbound and outbound rules in case of any page loading and reloading errors.You can check it out at EC2 Dashboard > Security Groups.**
Sample video output can be found out [here](https://youtu.be/BHcSNVzWRlo) :
## License
MIT License
