https://github.com/raphaelcoeffic/sport_ecu
Exports telemetry data from ProJET ECU to Frsky S.PORT
https://github.com/raphaelcoeffic/sport_ecu
Last synced: about 1 year ago
JSON representation
Exports telemetry data from ProJET ECU to Frsky S.PORT
- Host: GitHub
- URL: https://github.com/raphaelcoeffic/sport_ecu
- Owner: raphaelcoeffic
- Created: 2016-05-07T10:24:17.000Z (about 10 years ago)
- Default Branch: master
- Last Pushed: 2017-07-26T20:24:40.000Z (almost 9 years ago)
- Last Synced: 2025-03-20T20:17:49.298Z (over 1 year ago)
- Language: Arduino
- Size: 1.82 MB
- Stars: 5
- Watchers: 2
- Forks: 4
- Open Issues: 3
-
Metadata Files:
- Readme: README.md
Awesome Lists containing this project
README
# SportECU
This small project allows you to export telemetry data from a ProJET Hornet III ECU
(or any of the re-branded version among which IQ-Hammer, Behotec, etc...) to a
Frsky S.PORT compatible receiver (X-series).
Following sensors are implemented:
- RPM
- Temp1: EGT
- A3: ECU battery voltage
- A4: pump voltage
- Fuel: qantity left in ml as reported by the ECU.
- Temp2: hijacked to transmit the status.
## LUA script / OpenTx
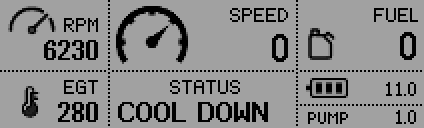
If you are using a Frsky Taranis with OpenTx (2.1.x), you can use the provided LUA script
to display these values (see screenshot below) as well as the air speed (Frsky air speed sensor).
Possibly, the names of the sensors need to be changed/configured for the script to work properly.
## Hardware
It has been tested with Teensy LC and Arduino Pro Mini (5V/16Mhz). However, it should
probably work with any Teensy 3.x as well or any other kind of Arduino board.
### ECU cable pinout

### Teensy
Teensy LC & 3.X have hardware support for half duplex inverted serial (as used by the S.PORT protocol),
which makes things quite simple on the S.PORT side. The TX line is directly connected to the S.PORT signal.
However, on the Hornet III ECU side, the ATmega uses 5V levels, which means that you might need to protect
the serial input, especially if you use a teensy LC (NOT 5V tolerant). This is easily done with a 3.3V Zener
diode backward against GND and a 1KOhm resistor in the ECU's TX line.
In case you plan to use a teensy 3.2, nothing special is needed here as it is 5V tolerant (not tested however).
Please connect the teensy as shown here:
| Teensy PIN | Connect to |
| ----------------- | ----------------------------- |
| GND (near pin 0) | GND on ECU & S.PORT receiver |
| 5V | ECU +5V |
| 10 | ECU RX |
| 9 | ECU TX (possibly limiting the voltage as described previously) |
| 1 | S.PORT signal |
Please note that if just connect 2 single 90 degree pin header to G & pin 1, you have a connector
which can be directly used with a straight servo type cable between the teensy and the X-series
receiver (in case you are using one of X6R or X8R).
On the Teensy LC, I soldered the Zener diode (3.3V) directly on the board between pin 9 and the
nearby GND pin and a 1k resistor between pin 9 and the wire going to ECU TX as shown on the next picture.

### Arduino Pro Mini
On the pro mini, S.PORT is implemented with a special software serial S.PORT library
([FrskySport](https://github.com/raphaelcoeffic/FrskySport)). A big thanks to Mike Bland (er9x/ersky9x) for the code!
This library is configured by default to use pin 4 on the Arduino. However, you can configure it to use pin 2 instead.
Then you just need to connect the arduino serial port with the ECU's. Do not forget to flash the arduino before soldering
the cable into the serial pins.
Please connect the arduino as follows:
| Arduino PIN | Connect to |
| ----------------------- | ----------------------- |
| GND (between RESET & 2) | GND on S.PORT receiver |
| 4 | S.PORT signal |
| TXD | ECU RX |
| RXD | ECU TX |
| VCC (FTDI adapter side) | ECU +5 |
| GND (FTDI adapter side) | ECU GND |
## Software
If you are using a teensy, please refer to the [teensyduino page](https://www.pjrc.com/teensy/td_download.html) for more instructions on how to install everything.
I'm currently using Arduino 1.6.7 to compile & flash both teensy & arduino software.
If you are using an arduino board, you will need to install the [FrskySport](https://github.com/raphaelcoeffic/FrskySport) library into your custom library directory.
Once everything is installed, just compile & flash!
### ECU configuration
This project uses the wireless telemetry interface on the ECU.
This means that it needs to be enabled first using a regular ECU terminal by setting the proper frequency.
I recommend using the highest frequency you can select (10x per second) to get the best experience. However, anything will work just the same.
### OpenTX configuration
I assume here that you are using OpenTx >= 2.1.8. It will not work with version 2.0.x, as the LUA & telemetry interfaces have changed between versions.
Once everything is plugged and powered on, go to the telemetry configuration screen and discover the new sensors.
If you wish to install the LUA script, here is how it should look like on your SD card:
| File | SD card location |
| ------------- | ------------------------------- |
| RxHornet.lua | /SCRIPTS/TELEMETRY/RxHornet.lua |
| *.bmp | /SCRIPTS/BMP/ |
You should then be able to select the script on the model telemetry configuration screen.
If you are not using the Frsky air speed sensor or prefer to use the GPS speed over ground, edit the LUA script and change this line:
```
local speed = "ASpd" -- change ASpd to whatever the name of the speed sensor is
```