https://github.com/realvjy/nxt-lnk
Custom bio links for creatives who love coding. A perfect custom alternative for linktree, bio and other shortner platform.
https://github.com/realvjy/nxt-lnk
link linktree linktree-clone nextjs portfolio template vercel
Last synced: about 1 year ago
JSON representation
Custom bio links for creatives who love coding. A perfect custom alternative for linktree, bio and other shortner platform.
- Host: GitHub
- URL: https://github.com/realvjy/nxt-lnk
- Owner: realvjy
- License: mit
- Created: 2022-08-21T19:44:46.000Z (almost 4 years ago)
- Default Branch: main
- Last Pushed: 2024-02-01T10:25:27.000Z (over 2 years ago)
- Last Synced: 2025-03-30T07:11:51.856Z (about 1 year ago)
- Topics: link, linktree, linktree-clone, nextjs, portfolio, template, vercel
- Language: JavaScript
- Homepage: https://mytiny.page
- Size: 6.61 MB
- Stars: 325
- Watchers: 5
- Forks: 55
- Open Issues: 0
-
Metadata Files:
- Readme: README.md
- License: LICENSE.md
Awesome Lists containing this project
README
# Nxt Lnk
**Custom bio links for creatives who love coding. Made this first to use for my own weblinks vjy.me/lnk**
A perfect custom alternative for linktree, bio and other shortner platform. Check live version here [nxtlnk.xyz](https://nxtlnk.xyz)
Pull requests are always welcome. In case you want inspiration or new features on what to add, check out the issues for feature requests.
Coffee fuels coding ☕️

**Table of Contents**
- [Usage](#usage)
- [Quick Start](#quick-start)
- [Manual Setup](#manual-setup)
- [Getting Started](#getting-started)
- [Images](#images)
- [Update Bio](#update-bio)
- [Add/Update](#update-bio)
- [Enable/Disable](#update-bio)
- [Featured Banner](#update-bio)
- [Update Links](#update-links)
- [Enable/Disable](#update-links)
- [Add/Update](#update-links)
- [Frontend](#frontend)
- [SEO](#seo)
- [Google Analytics](#google-analytics)
- [Custom Domain](#custom-domain)
- [Favicon](#favicon)
- [Contributors](#contributors)
## Usage
`nxt-lnk` template used to create your custom bio link and self-host on Vercel or Netlify using your own domain. Need little understanding of code :) ☕
Usually, you don't need to worry a lot about coding if you're just updating information in `BioData.js` and `LinkData.js`. To deep dive know more [Next.js](https://nextjs.org/docs) and [React](https://reactjs.org/docs/getting-started.html) official documentaion.
For customization used [styled components](https://styled-components.com/). If you want to customize styling you can [learn more here](https://styled-components.com/docs).
**Template auto support dark-mode depending on system cofig.**
## Quick Start
[](https://vercel.com/import/git?s=https://github.com/realvjy/nxt-lnk) [](https://app.netlify.com/start/deploy?repository=https://github.com/realvjy/nxt-lnk)
## Manual Setup
Run the following command to create a new project with this template:
```bash
yarn create next-app your-app-name -e https://github.com/realvjy/nxt-lnk
# or
npx create-next-app your-app-name -e https://github.com/realvjy/nxt-lnk
```
## Getting Started
Use any editor to work on editing. I use [vscode](https://code.visualstudio.com/)
First, run the development server:
```bash
npm run dev
# or
yarn dev
```
Open [http://localhost:3000](http://localhost:3000) with your browser to see the result.
**Important files to edit or update info**
`data/BioData.js` All basic info update here
`data/LinksData.js` Contain all the links
`Components/WebLinks.js` UI and stylesheet
`Components/icons/index.js` Contain all SVG icon compo
You can start editing the page by modifying `data/BioData.js` and `data/LinksData.js`. The page auto-updates as you edit the file.
## Images
All images stored inside `public` folder of the project.
## Update Bio
**Example from** `BioData.js` :
```jsx
const bioData = [
{
name: 'vijay verma',
username: '@realvjy',
url: 'https://vjy.me',
titleImg: true,
avatar: '/avatar.png',
nftAvatar: true,
description: 'A short description/bio about you goes here',
subdesc: 'This is secondary description. If you do not need, you can remove it',
newProductUrl: 'https://vjy.me/lnk',
newProduct: true,
},
];
export default bioData;
```
**Avatar**
Just replace `avatar.png`. 200x200px will be good.
**Hex/NFT avatar view**
`nftAvatar: true` enable hex shape on avatar image.
`nftAvatar: false` made it in oval shape.
**Title**
By default `titleImg: true` and it look for `title.svg`. Replace svg with logo **logo**. Make sure to use `title.svg ` name.
**Featured banner**
`newProductUrl` and `newProduct` used for getting featured banner. You can replace the image `newproduct.png` with any design you like.
`newProduct: true` show banner. Default is `true` make it false to hide.
## Update Links
**Example from** `LinksData.js` :
```jsx
const webLinks = [
// All social profile
{
title: 'Twitter',
url: 'https://twitter.com/realvjy',
type: 'social',
icon: '/twitter.svg',
on: true
},
...
...
{
title: 'Instagram',
url: 'https://instagram.com/realvjy',
type: 'social',
icon: '/insta.svg',
on: true
}
];
export default webLinks;
```
**Enable/Disable Social Media**
Find `type: social` and change `on:true|false`
| Title | on (default) |
| --------- | -------- |
| `Twitter` | `true` |
| `Instagram` | `true` |
| `Dribbble` | `false` |
| `Medium` | `false` |
| `Github` | `true` |
| `Youtube` | `false` |
| `Behance` | `true` |
| `Figma` | `true` |
| `Linkedin` | `false` |
| `Mastodon` | `false` |
| `Hive Social` | `false` |
| `Post.news` | `false` |
Setting `on: true` show the social icon.
The social media icons are arranged in a single row at the top of the page below description. If you want to use as list, chagne type to `type: 'other'`
**Add new Social Media link**
create a new block by copying this
```jsx
{
title: 'Social Name',
url: 'https://link.com/whateverurl',
type: 'social',
icon: '/newiconname.svg',
on: true
}
```
Update all info and make sure to add a `newiconname.svg` file in [public](#images) folder.
Then you have to add new section to frontend `components/WebLinks.js`
## Frontend
All frontend customization done inside `components/WebLinks.js`. If you wante to update and add new section just look this file and update according to your need.
**Update section**
Look for Section codes. Like if you want to change `install` type to `featured` Update the `type: 'featured'` in `LinkData.js` then update all `install` related code in `WebLinks.js` to `featured`
```js
// Collect all links filter by type - social, project, nft and other etc=
// get data for install section
const install = allLinks.filter((el) => {
return el.type === "install" && el.on
});
...
...
{/* Featured Section */ }
{install[0].type}
{
install.map((i) => {
return (
 {i.title}
)
})
}
{/* End Featured Section */ }
```
**Add New section**
Add new section with specific `type` in `Linkdata.js`. Then copy `LinkSection` Code to create new section in `WebLinks.js` file. Make sure to create get data of that section as well.
## SEO
Already added `next-seo`. All you have to do is `update next-seo.config.js` file. Make sure to add direct link of `preview.jpg`file, like - `https://vjy.me/preview.jpg`.
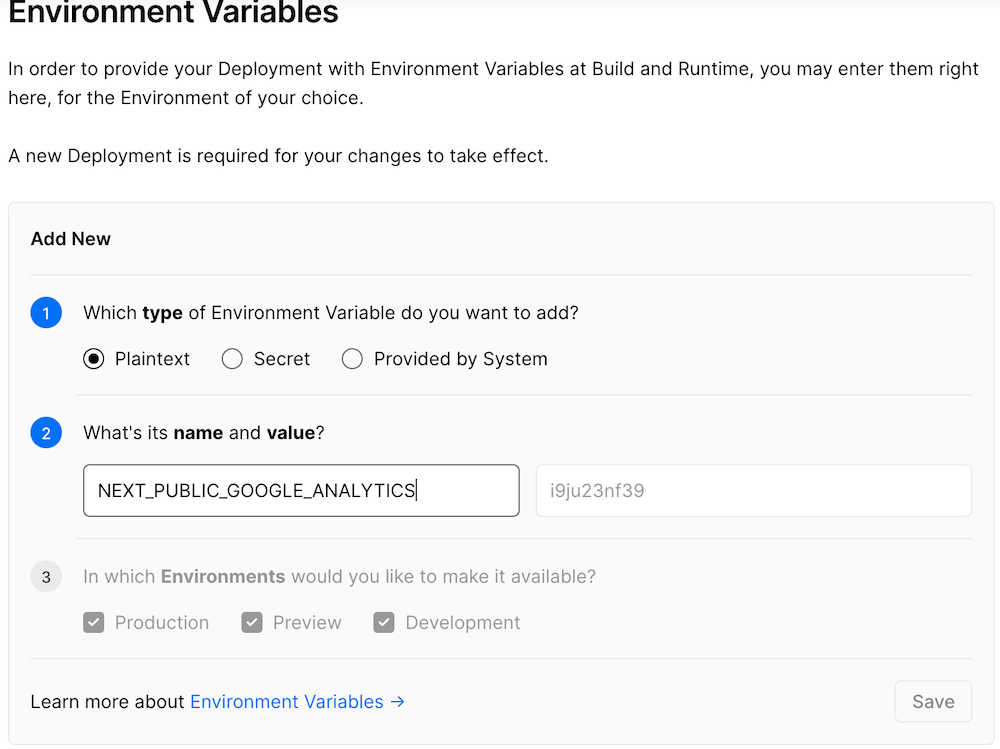
## Google Analytics
In Vercel, you can set this by going to your project, then Settings and finally [Environments Variables](https://vercel.com/docs/concepts/projects/environment-variables). To get GA 4 code `G-ZXX0000XXX` follow [these steps ](https://support.google.com/analytics/answer/9304153?hl=en)
## Custom Domain
By default vercel give you a subdomain with your project name like - [nxtlnk.vercel.app](https:nxtlnk.vercel.app). But you can add own domain.
Vercel/Netlify give you option to add any domain to the deployed project like [vjy.me/lnk](https://vjy.me/lnk) or [nxtlnk.xyz](https://nxtlnk.xyz). All you have to do is follow official [Vercel documentaion](https://vercel.com/docs/concepts/projects/domains/add-a-domain) or [Netlify Documentaion](https://www.netlify.com/blog/2021/12/20/how-to-add-custom-domains-to-netlify-sites/)
## Favicon
Create a `favicon.ico` file and place inside `public` folder. I use [favicon.io](https://favicon.io/favicon-converter/)
## Contributors
Created by [realvjy](https://twitter.com/realvjy). You are always welcome to share your feedback on twitter or any social media platform.
If you want to contribute. Just create a pull request.