https://github.com/roboflow/rf-detr
[ICLR 2026] RF-DETR is a real-time object detection and segmentation model architecture developed by Roboflow, SOTA on COCO, designed for fine-tuning.
https://github.com/roboflow/rf-detr
computer-vision detr instance-segmentation machine-learning object-detection rf-detr sota
Last synced: 3 months ago
JSON representation
[ICLR 2026] RF-DETR is a real-time object detection and segmentation model architecture developed by Roboflow, SOTA on COCO, designed for fine-tuning.
- Host: GitHub
- URL: https://github.com/roboflow/rf-detr
- Owner: roboflow
- License: apache-2.0
- Created: 2025-03-19T20:43:00.000Z (over 1 year ago)
- Default Branch: develop
- Last Pushed: 2026-04-10T09:31:51.000Z (4 months ago)
- Last Synced: 2026-04-10T10:26:32.069Z (4 months ago)
- Topics: computer-vision, detr, instance-segmentation, machine-learning, object-detection, rf-detr, sota
- Language: Python
- Homepage: https://rfdetr.roboflow.com
- Size: 14.8 MB
- Stars: 6,311
- Watchers: 58
- Forks: 762
- Open Issues: 84
-
Metadata Files:
- Readme: README.md
- Changelog: CHANGELOG.md
- Contributing: .github/CONTRIBUTING.md
- License: LICENSE
- Citation: CITATION.cff
- Codeowners: .github/CODEOWNERS
- Security: .github/SECURITY.md
- Agents: AGENTS.md
Awesome Lists containing this project
- awesome-hacking-lists - roboflow/rf-detr - RF-DETR is a real-time object detection model architecture developed by Roboflow, SOTA on COCO & designed for fine-tuning. (Python)
- StarryDivineSky - roboflow/rf-detr - DETR是由Roboflow开发的实时目标检测模型架构,在COCO数据集上表现出色,专为微调而设计。它基于DETR(Detection Transformer)架构,但进行了优化以提高速度和效率,使其更适合实际应用。RF-DETR的关键特性包括快速推理速度、高精度和易于定制。该项目提供了预训练模型和微调工具,方便用户在自己的数据集上进行训练和部署。RF-DETR利用Transformer架构的优势,能够捕捉图像中的全局上下文信息,从而提高目标检测的准确性。它旨在成为一个强大且易于使用的目标检测解决方案,适用于各种应用场景。该项目还提供了详细的文档和示例,帮助用户快速上手。RF-DETR是一个开源项目,欢迎社区贡献和改进。 (对象检测_分割 / 资源传输下载)
- awesome-computer-vision - rf-detr - RF-DETR: Real-time detection transformer | 7.5k | 2026-05-29 | +8.2% | (Instance Segmentation)
README
# RF-DETR: Real-Time SOTA Detection and Segmentation
[](https://badge.fury.io/py/rfdetr)
[](https://pypistats.org/packages/rfdetr)
[](https://codecov.io/gh/roboflow/rf-detr)
[](https://badge.fury.io/py/rfdetr)
[](https://github.com/roboflow/rfdetr/blob/main/LICENSE)
[](https://arxiv.org/abs/2511.09554)
[](https://huggingface.co/spaces/SkalskiP/RF-DETR)
[](https://colab.research.google.com/github/roboflow-ai/notebooks/blob/main/notebooks/how-to-finetune-rf-detr-on-detection-dataset.ipynb)
[](https://blog.roboflow.com/rf-detr)
[](https://discord.gg/GbfgXGJ8Bk)
RF-DETR is a real-time transformer architecture for object detection and instance segmentation developed by Roboflow. Built on a DINOv2 vision transformer backbone, RF-DETR delivers state-of-the-art accuracy and latency trade-offs on [Microsoft COCO](https://cocodataset.org/#home) and [RF100-VL](https://github.com/roboflow/rf100-vl).
RF-DETR uses a DINOv2 vision transformer backbone and supports both detection and instance segmentation in a single, consistent API. The open-source `rfdetr` package and Apache-designated models are released under Apache 2.0, while Plus components (`rfdetr_plus`, including RF-DETR-XL/2XL detection models) are licensed under PML 1.0.
https://github.com/user-attachments/assets/add23fd1-266f-4538-8809-d7dd5767e8e6
## Install
To install RF-DETR, install the `rfdetr` package in a [**Python>=3.10**](https://www.python.org/) environment with `pip`.
```bash
pip install rfdetr
```
Install from source
By installing RF-DETR from source, you can explore the most recent features and enhancements that have not yet been officially released. **Please note that these updates are still in development and may not be as stable as the latest published release.**
```bash
pip install https://github.com/roboflow/rf-detr/archive/refs/heads/develop.zip
```
## Benchmarks
RF-DETR achieves state-of-the-art results in both object detection and instance segmentation, with benchmarks reported on Microsoft COCO and RF100-VL. The charts and tables below compare RF-DETR against other top real-time models across accuracy and latency for detection and segmentation. All latency numbers were measured on an NVIDIA T4 using TensorRT, FP16, and batch size 1. For full benchmarking methodology and reproducibility details, see [roboflow/sab](https://github.com/roboflow/single_artifact_benchmarking).
### Detection
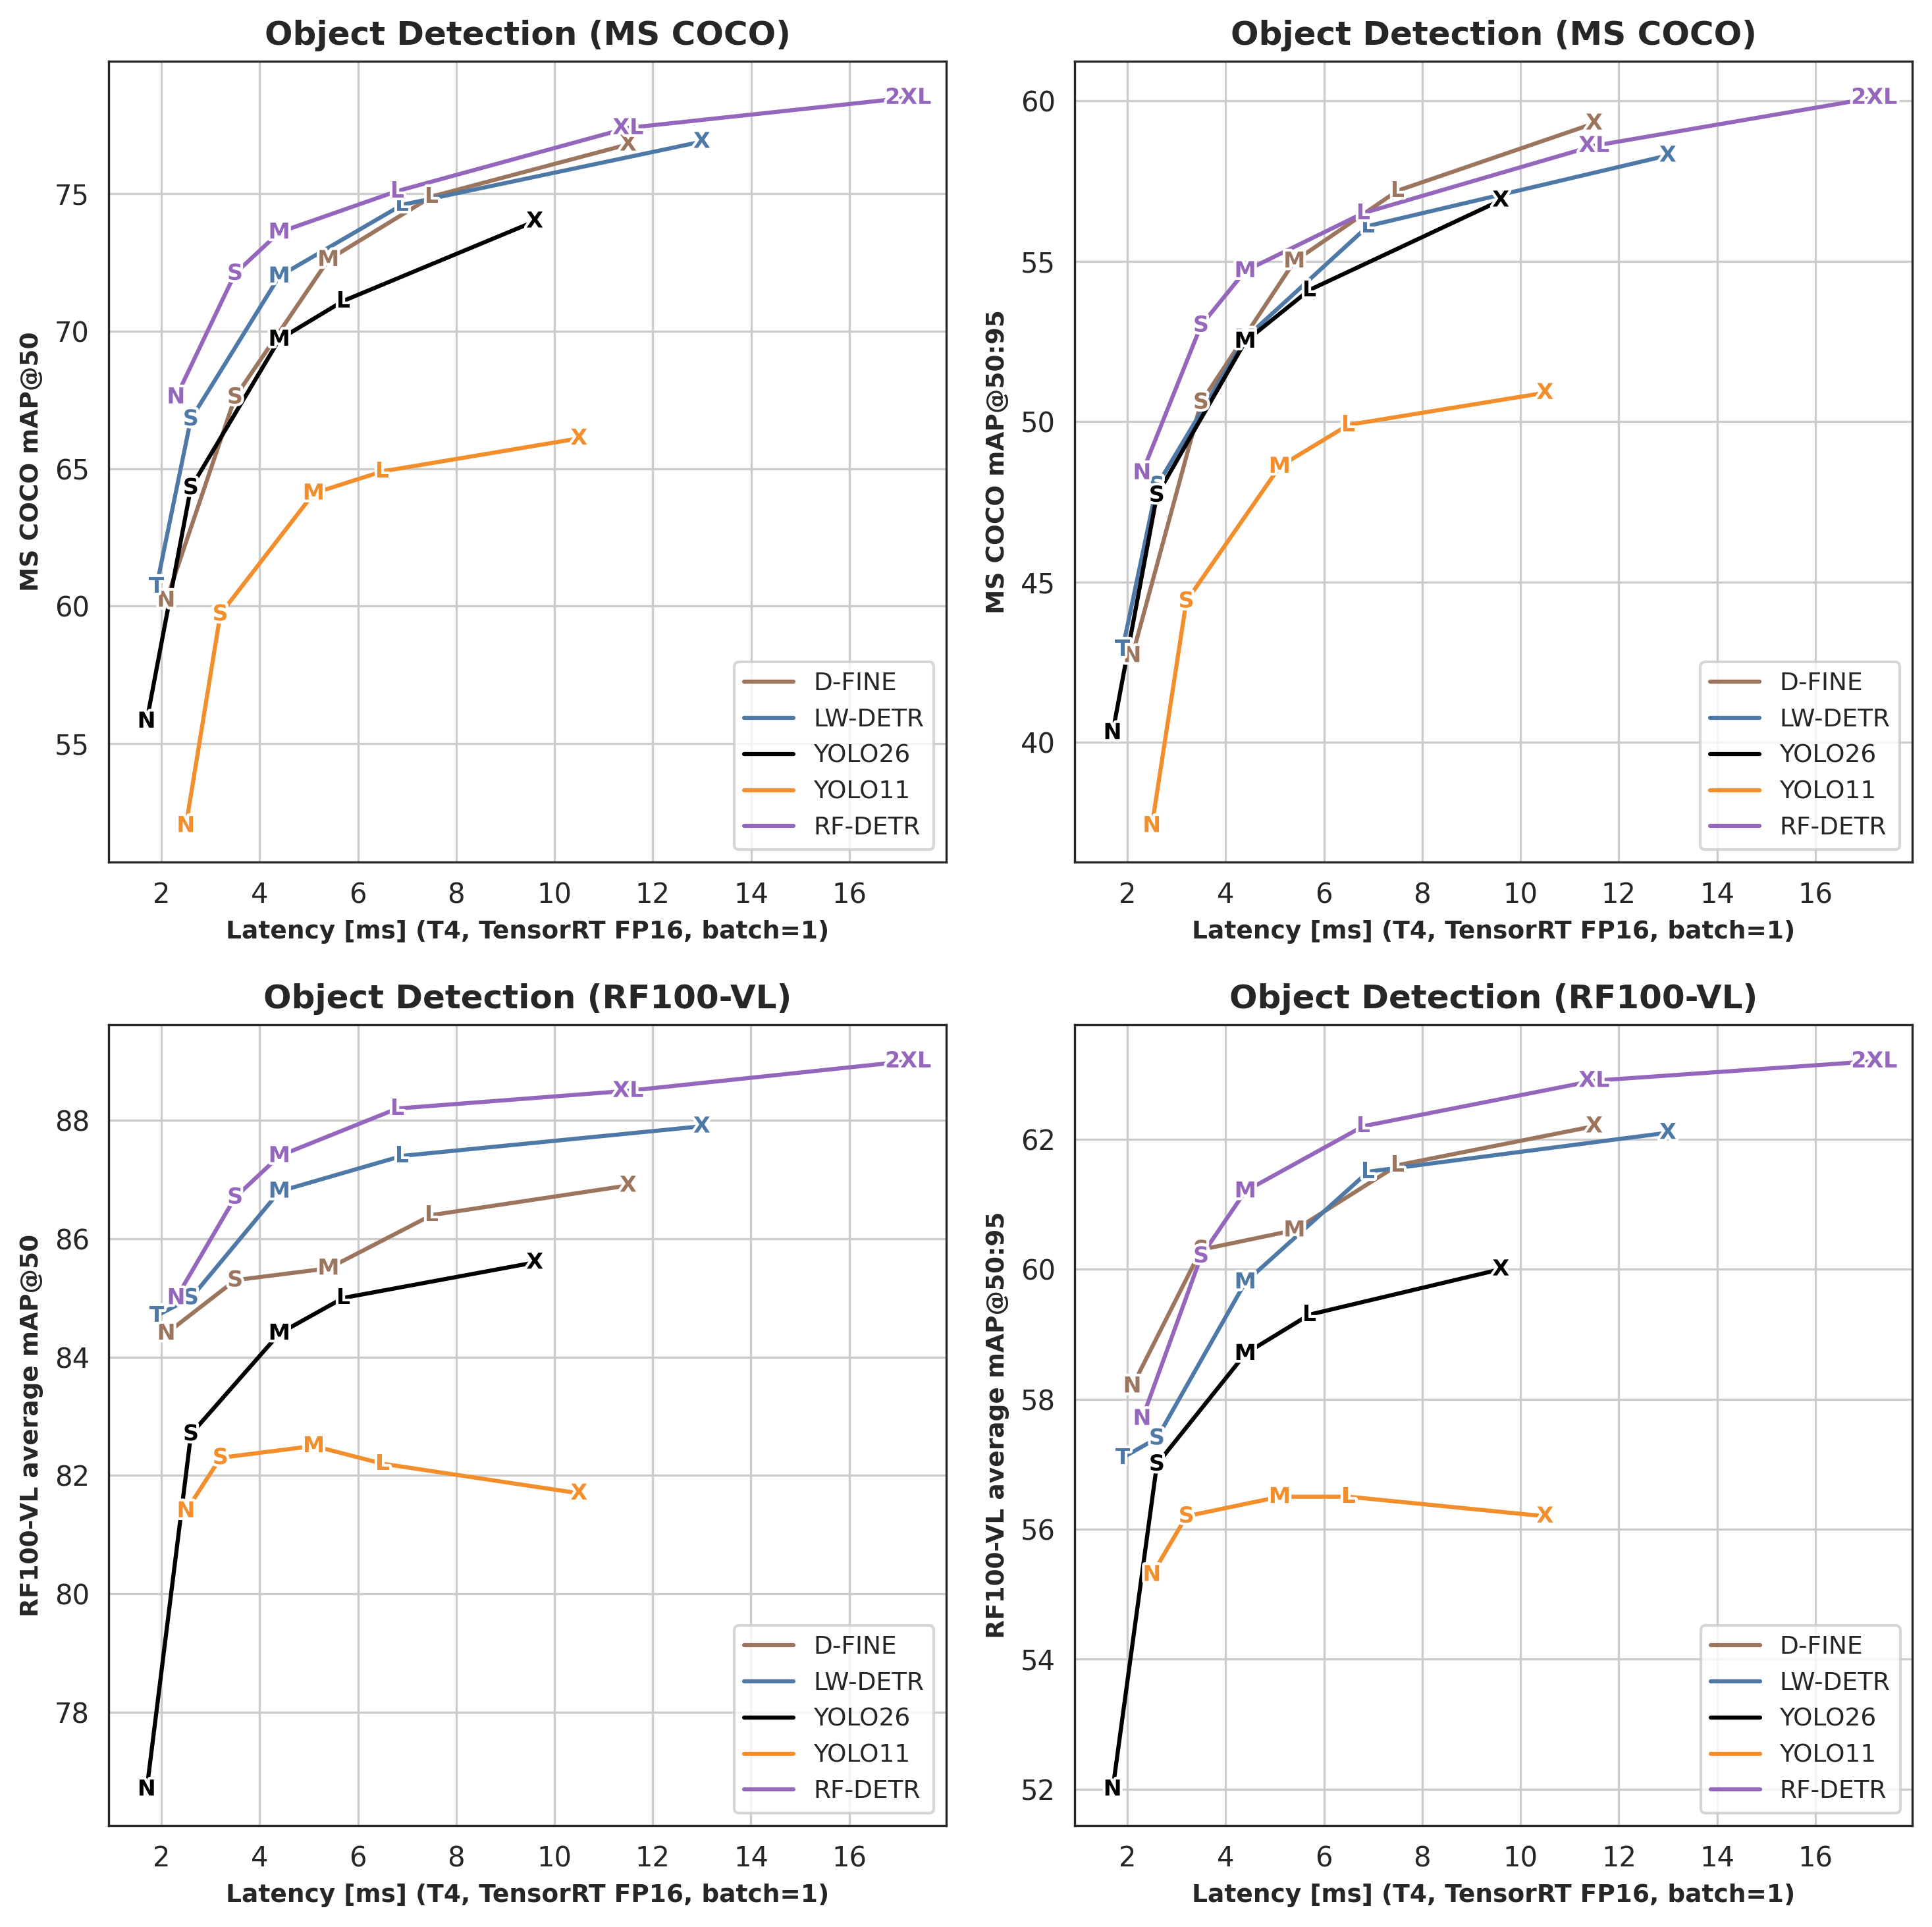
See object detection benchmark numbers
| Architecture | COCO AP50 | COCO AP50:95 | RF100VL AP50 | RF100VL AP50:95 | Latency (ms) | Params (M) | Resolution | License |
| :-----------: | :------------------: | :---------------------: | :---------------------: | :------------------------: | :----------: | :--------: | :--------: | :--------: |
| RF-DETR-N | 67.6 | 48.4 | 85.0 | 57.7 | 2.3 | 30.5 | 384x384 | Apache 2.0 |
| RF-DETR-S | 72.1 | 53.0 | 86.7 | 60.2 | 3.5 | 32.1 | 512x512 | Apache 2.0 |
| RF-DETR-M | 73.6 | 54.7 | 87.4 | 61.2 | 4.4 | 33.7 | 576x576 | Apache 2.0 |
| RF-DETR-L | 75.1 | 56.5 | 88.2 | 62.2 | 6.8 | 33.9 | 704x704 | Apache 2.0 |
| RF-DETR-XL △ | 77.4 | 58.6 | 88.5 | 62.9 | 11.5 | 126.4 | 700x700 | PML 1.0 |
| RF-DETR-2XL △ | 78.5 | 60.1 | 89.0 | 63.2 | 17.2 | 126.9 | 880x880 | PML 1.0 |
| YOLO11-N | 52.0 | 37.4 | 81.4 | 55.3 | 2.5 | 2.6 | 640x640 | AGPL-3.0 |
| YOLO11-S | 59.7 | 44.4 | 82.3 | 56.2 | 3.2 | 9.4 | 640x640 | AGPL-3.0 |
| YOLO11-M | 64.1 | 48.6 | 82.5 | 56.5 | 5.1 | 20.1 | 640x640 | AGPL-3.0 |
| YOLO11-L | 64.9 | 49.9 | 82.2 | 56.5 | 6.5 | 25.3 | 640x640 | AGPL-3.0 |
| YOLO11-X | 66.1 | 50.9 | 81.7 | 56.2 | 10.5 | 56.9 | 640x640 | AGPL-3.0 |
| YOLO26-N | 55.8 | 40.3 | 76.7 | 52.0 | 1.7 | 2.6 | 640x640 | AGPL-3.0 |
| YOLO26-S | 64.3 | 47.7 | 82.7 | 57.0 | 2.6 | 9.4 | 640x640 | AGPL-3.0 |
| YOLO26-M | 69.7 | 52.5 | 84.4 | 58.7 | 4.4 | 20.1 | 640x640 | AGPL-3.0 |
| YOLO26-L | 71.1 | 54.1 | 85.0 | 59.3 | 5.7 | 25.3 | 640x640 | AGPL-3.0 |
| YOLO26-X | 74.0 | 56.9 | 85.6 | 60.0 | 9.6 | 56.9 | 640x640 | AGPL-3.0 |
| LW-DETR-T | 60.7 | 42.9 | 84.7 | 57.1 | 1.9 | 12.1 | 640x640 | Apache 2.0 |
| LW-DETR-S | 66.8 | 48.0 | 85.0 | 57.4 | 2.6 | 14.6 | 640x640 | Apache 2.0 |
| LW-DETR-M | 72.0 | 52.6 | 86.8 | 59.8 | 4.4 | 28.2 | 640x640 | Apache 2.0 |
| LW-DETR-L | 74.6 | 56.1 | 87.4 | 61.5 | 6.9 | 46.8 | 640x640 | Apache 2.0 |
| LW-DETR-X | 76.9 | 58.3 | 87.9 | 62.1 | 13.0 | 118.0 | 640x640 | Apache 2.0 |
| D-FINE-N | 60.2 | 42.7 | 84.4 | 58.2 | 2.1 | 3.8 | 640x640 | Apache 2.0 |
| D-FINE-S | 67.6 | 50.6 | 85.3 | 60.3 | 3.5 | 10.2 | 640x640 | Apache 2.0 |
| D-FINE-M | 72.6 | 55.0 | 85.5 | 60.6 | 5.4 | 19.2 | 640x640 | Apache 2.0 |
| D-FINE-L | 74.9 | 57.2 | 86.4 | 61.6 | 7.5 | 31.0 | 640x640 | Apache 2.0 |
| D-FINE-X | 76.8 | 59.3 | 86.9 | 62.2 | 11.5 | 62.0 | 640x640 | Apache 2.0 |
### Segmentation
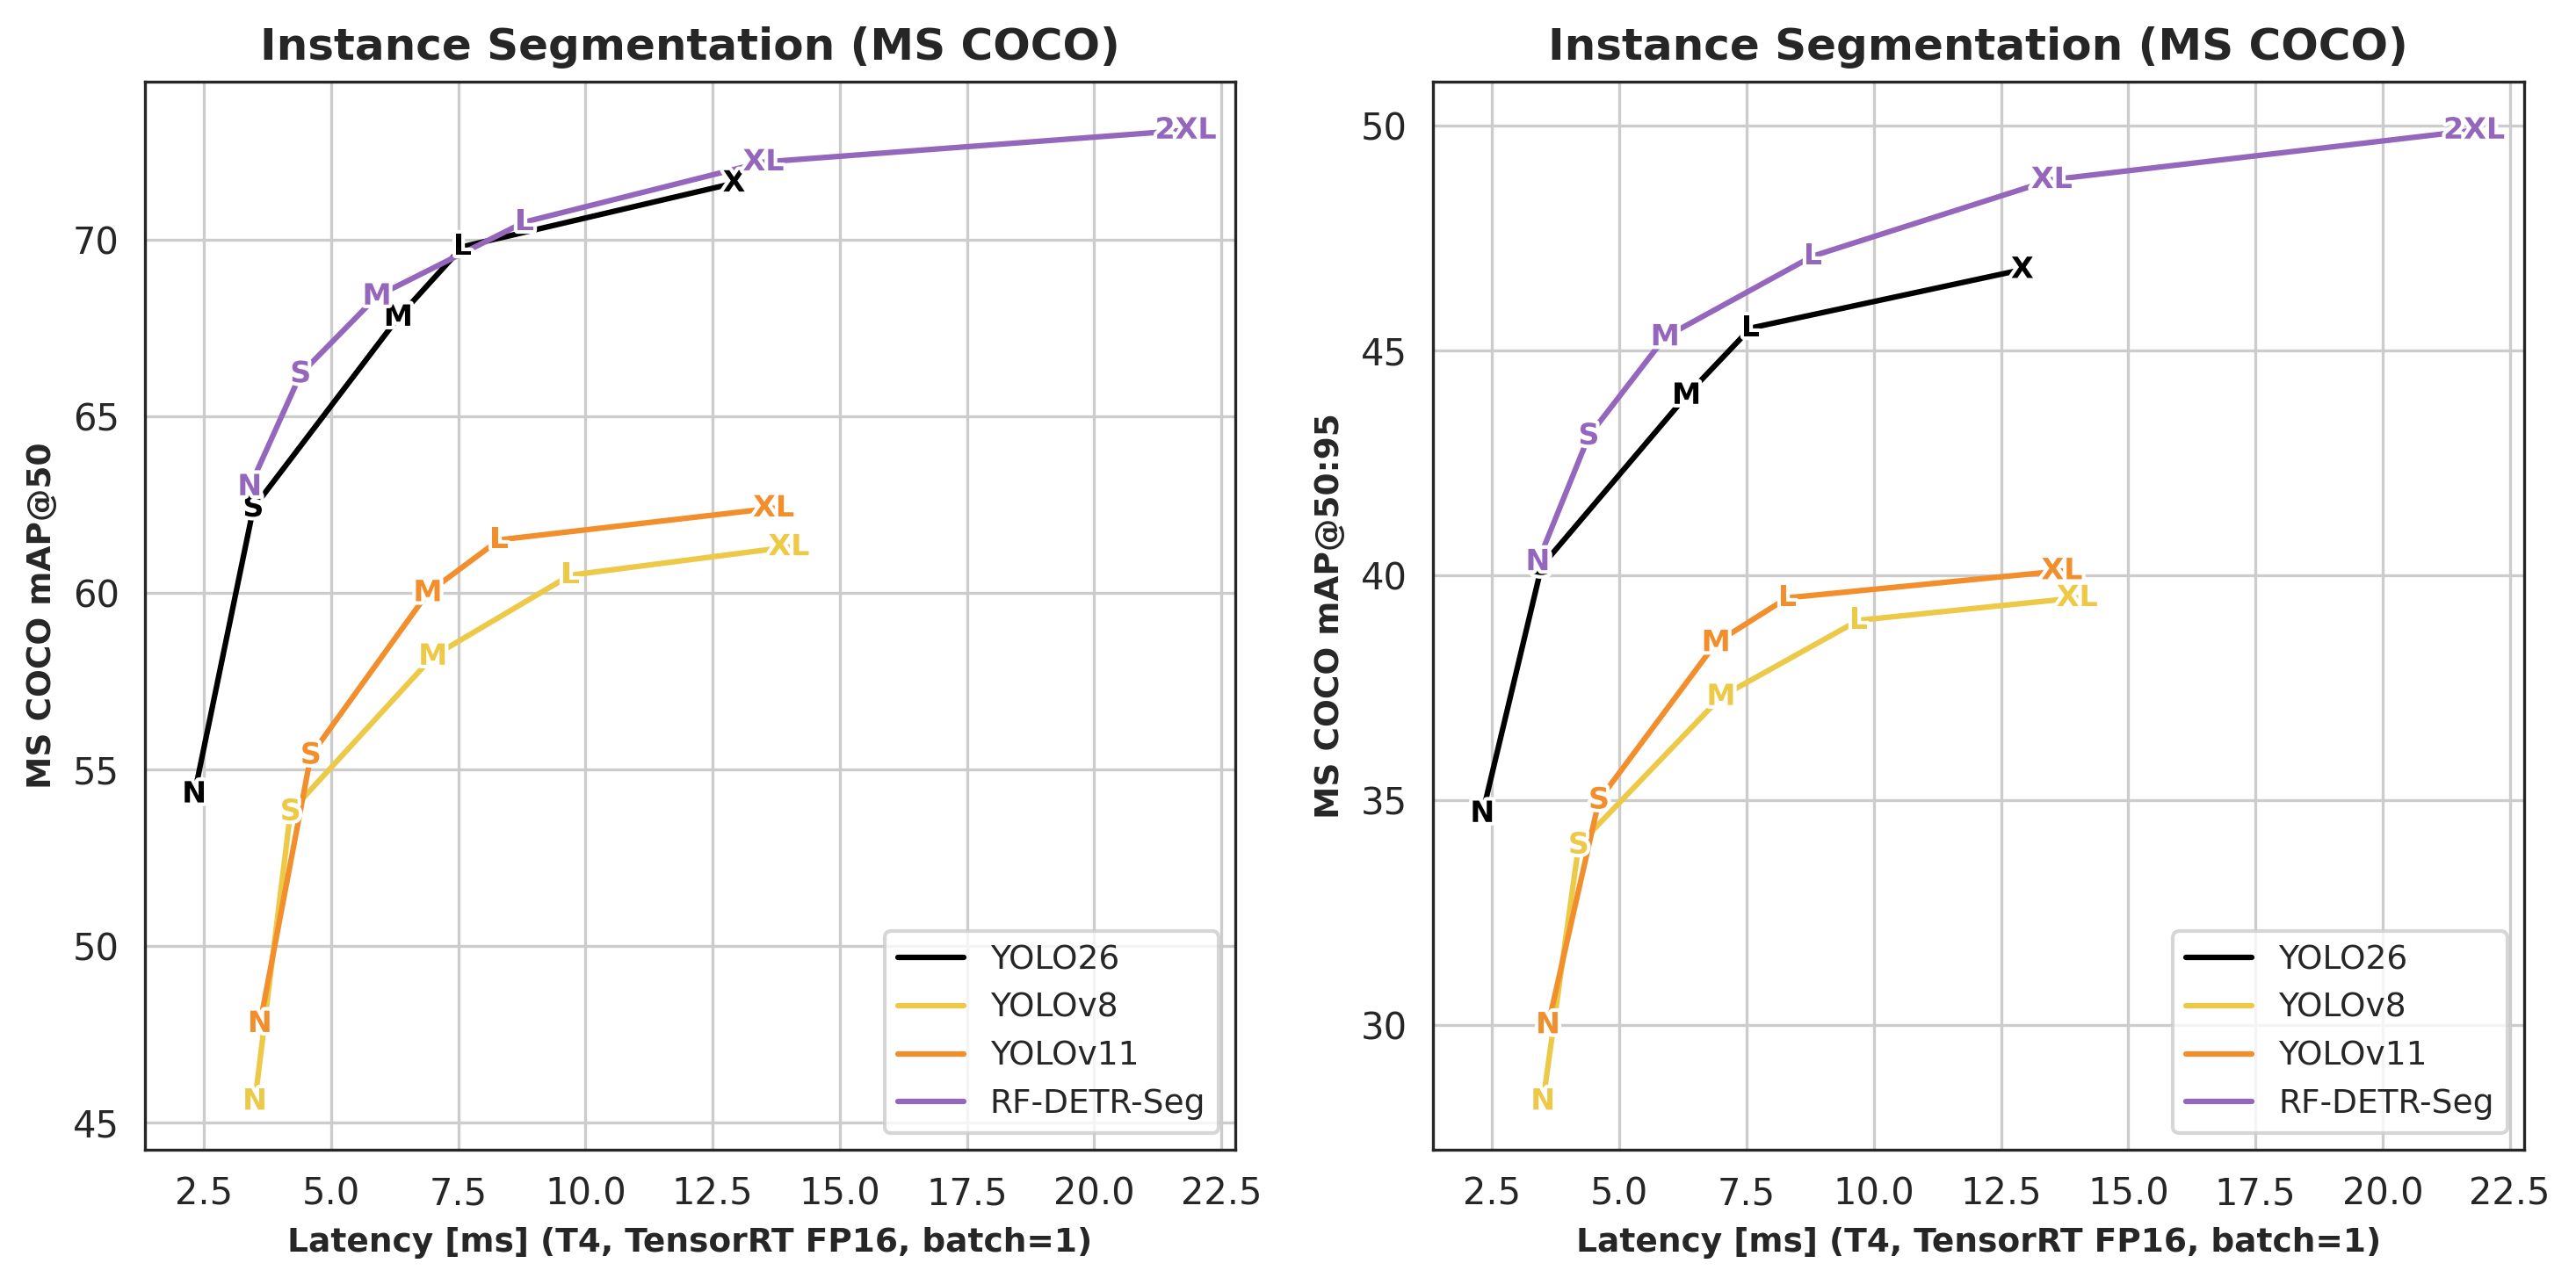
See instance segmentation benchmark numbers
| Architecture | COCO AP50 | COCO AP50:95 | Latency (ms) | Params (M) | Resolution | License |
| :-------------: | :------------------: | :---------------------: | :----------: | :--------: | :--------: | :--------: |
| RF-DETR-Seg-N | 63.0 | 40.3 | 3.4 | 33.6 | 312x312 | Apache 2.0 |
| RF-DETR-Seg-S | 66.2 | 43.1 | 4.4 | 33.7 | 384x384 | Apache 2.0 |
| RF-DETR-Seg-M | 68.4 | 45.3 | 5.9 | 35.7 | 432x432 | Apache 2.0 |
| RF-DETR-Seg-L | 70.5 | 47.1 | 8.8 | 36.2 | 504x504 | Apache 2.0 |
| RF-DETR-Seg-XL | 72.2 | 48.8 | 13.5 | 38.1 | 624x624 | Apache 2.0 |
| RF-DETR-Seg-2XL | 73.1 | 49.9 | 21.8 | 38.6 | 768x768 | Apache 2.0 |
| YOLOv8-N-Seg | 45.6 | 28.3 | 3.5 | 3.4 | 640x640 | AGPL-3.0 |
| YOLOv8-S-Seg | 53.8 | 34.0 | 4.2 | 11.8 | 640x640 | AGPL-3.0 |
| YOLOv8-M-Seg | 58.2 | 37.3 | 7.0 | 27.3 | 640x640 | AGPL-3.0 |
| YOLOv8-L-Seg | 60.5 | 39.0 | 9.7 | 46.0 | 640x640 | AGPL-3.0 |
| YOLOv8-XL-Seg | 61.3 | 39.5 | 14.0 | 71.8 | 640x640 | AGPL-3.0 |
| YOLOv11-N-Seg | 47.8 | 30.0 | 3.6 | 2.9 | 640x640 | AGPL-3.0 |
| YOLOv11-S-Seg | 55.4 | 35.0 | 4.6 | 10.1 | 640x640 | AGPL-3.0 |
| YOLOv11-M-Seg | 60.0 | 38.5 | 6.9 | 22.4 | 640x640 | AGPL-3.0 |
| YOLOv11-L-Seg | 61.5 | 39.5 | 8.3 | 27.6 | 640x640 | AGPL-3.0 |
| YOLOv11-XL-Seg | 62.4 | 40.1 | 13.7 | 62.1 | 640x640 | AGPL-3.0 |
| YOLO26-N-Seg | 54.3 | 34.7 | 2.31 | 2.7 | 640x640 | AGPL-3.0 |
| YOLO26-S-Seg | 62.4 | 40.2 | 3.47 | 10.4 | 640x640 | AGPL-3.0 |
| YOLO26-M-Seg | 67.8 | 44.0 | 6.32 | 23.6 | 640x640 | AGPL-3.0 |
| YOLO26-L-Seg | 69.8 | 45.5 | 7.58 | 28.0 | 640x640 | AGPL-3.0 |
| YOLO26-X-Seg | 71.6 | 46.8 | 12.92 | 62.8 | 640x640 | AGPL-3.0 |
## Run Models
### Detection
RF-DETR provides multiple model sizes, ranging from Nano to 2XLarge. To use a different model size, replace the class name in the code snippet below with another class from the table.
```python
import supervision as sv
from rfdetr import RFDETRMedium
from rfdetr.assets.coco_classes import COCO_CLASSES
model = RFDETRMedium()
detections = model.predict("https://media.roboflow.com/dog.jpg", threshold=0.5)
labels = [f"{COCO_CLASSES[class_id]}" for class_id in detections.class_id]
annotated_image = sv.BoxAnnotator().annotate(detections.metadata["source_image"], detections)
annotated_image = sv.LabelAnnotator().annotate(annotated_image, detections, labels)
```
Run RF-DETR with Inference
You can also run RF-DETR models using the Inference library. To switch model size, select the appropriate inference package alias from the table below.
```python
import requests
import supervision as sv
from PIL import Image
from inference import get_model
model = get_model("rfdetr-medium")
image = Image.open(requests.get("https://media.roboflow.com/dog.jpg", stream=True).raw)
predictions = model.infer(image, confidence=0.5)[0]
detections = sv.Detections.from_inference(predictions)
annotated_image = sv.BoxAnnotator().annotate(image, detections)
annotated_image = sv.LabelAnnotator().annotate(annotated_image, detections)
```
| Size | RF-DETR package class | Inference package alias | COCO AP50 | COCO AP50:95 | Latency (ms) | Params (M) | Resolution | License |
| :--: | :-------------------: | :---------------------- | :------------------: | :---------------------: | :----------: | :--------: | :--------: | :--------: |
| N | `RFDETRNano` | `rfdetr-nano` | 67.6 | 48.4 | 2.3 | 30.5 | 384x384 | Apache 2.0 |
| S | `RFDETRSmall` | `rfdetr-small` | 72.1 | 53.0 | 3.5 | 32.1 | 512x512 | Apache 2.0 |
| M | `RFDETRMedium` | `rfdetr-medium` | 73.6 | 54.7 | 4.4 | 33.7 | 576x576 | Apache 2.0 |
| L | `RFDETRLarge` | `rfdetr-large` | 75.1 | 56.5 | 6.8 | 33.9 | 704x704 | Apache 2.0 |
| XL | `RFDETRXLarge` △ | `rfdetr-xlarge` | 77.4 | 58.6 | 11.5 | 126.4 | 700x700 | PML 1.0 |
| 2XL | `RFDETR2XLarge` △ | `rfdetr-2xlarge` | 78.5 | 60.1 | 17.2 | 126.9 | 880x880 | PML 1.0 |
> △ Requires the `rfdetr_plus` extension: `pip install rfdetr[plus]`. See [License](#license) for details.
### Segmentation
RF-DETR supports instance segmentation with model sizes from Nano to 2XLarge. To use a different model size, replace the class name in the code snippet below with another class from the table.
```python
import supervision as sv
from rfdetr import RFDETRSegMedium
from rfdetr.assets.coco_classes import COCO_CLASSES
model = RFDETRSegMedium()
detections = model.predict("https://media.roboflow.com/dog.jpg", threshold=0.5)
labels = [f"{COCO_CLASSES[class_id]}" for class_id in detections.class_id]
annotated_image = sv.MaskAnnotator().annotate(detections.metadata["source_image"], detections)
annotated_image = sv.LabelAnnotator().annotate(annotated_image, detections, labels)
```
Run RF-DETR-Seg with Inference
You can also run RF-DETR-Seg models using the Inference library. To switch model size, select the appropriate inference package alias from the table below.
```python
import requests
import supervision as sv
from PIL import Image
from inference import get_model
model = get_model("rfdetr-seg-medium")
image = Image.open(requests.get("https://media.roboflow.com/dog.jpg", stream=True).raw)
predictions = model.infer(image, confidence=0.5)[0]
detections = sv.Detections.from_inference(predictions)
annotated_image = sv.MaskAnnotator().annotate(image, detections)
annotated_image = sv.LabelAnnotator().annotate(annotated_image, detections)
```
| Size | RF-DETR package class | Inference package alias | COCO AP50 | COCO AP50:95 | Latency (ms) | Params (M) | Resolution | License |
| :--: | :-------------------: | :---------------------- | :------------------: | :---------------------: | :----------: | :--------: | :--------: | :--------: |
| N | `RFDETRSegNano` | `rfdetr-seg-nano` | 63.0 | 40.3 | 3.4 | 33.6 | 312x312 | Apache 2.0 |
| S | `RFDETRSegSmall` | `rfdetr-seg-small` | 66.2 | 43.1 | 4.4 | 33.7 | 384x384 | Apache 2.0 |
| M | `RFDETRSegMedium` | `rfdetr-seg-medium` | 68.4 | 45.3 | 5.9 | 35.7 | 432x432 | Apache 2.0 |
| L | `RFDETRSegLarge` | `rfdetr-seg-large` | 70.5 | 47.1 | 8.8 | 36.2 | 504x504 | Apache 2.0 |
| XL | `RFDETRSegXLarge` | `rfdetr-seg-xlarge` | 72.2 | 48.8 | 13.5 | 38.1 | 624x624 | Apache 2.0 |
| 2XL | `RFDETRSeg2XLarge` | `rfdetr-seg-2xlarge` | 73.1 | 49.9 | 21.8 | 38.6 | 768x768 | Apache 2.0 |
### Train Models
RF-DETR supports training for both object detection and instance segmentation. You can train models in [Google Colab](https://colab.research.google.com/github/roboflow-ai/notebooks/blob/main/notebooks/how-to-finetune-rf-detr-on-detection-dataset.ipynb) or directly on the Roboflow platform. Below you will find a step-by-step video fine-tuning tutorial.
[](https://youtu.be/-OvpdLAElFA)
## Documentation
Visit our [documentation website](https://rfdetr.roboflow.com) to learn more about how to use RF-DETR.
## License
Licensing is split by component:
- The open-source `rfdetr` package and Apache-designated model weights are licensed under Apache License 2.0. See [`LICENSE`](LICENSE).
- Plus components, including the `rfdetr_plus` extension and RF-DETR-XL / RF-DETR-2XL detection models, are licensed under PML 1.0.
## Acknowledgements
Our work is built upon [LW-DETR](https://arxiv.org/pdf/2406.03459), [DINOv2](https://arxiv.org/pdf/2304.07193), and [Deformable DETR](https://arxiv.org/pdf/2010.04159). Thanks to their authors for their excellent work!
## Citation
If you find our work helpful for your research, please consider citing the following BibTeX entry.
```bibtex
@misc{rf-detr,
title={RF-DETR: Neural Architecture Search for Real-Time Detection Transformers},
author={Isaac Robinson and Peter Robicheaux and Matvei Popov and Deva Ramanan and Neehar Peri},
year={2025},
eprint={2511.09554},
archivePrefix={arXiv},
primaryClass={cs.CV},
url={https://arxiv.org/abs/2511.09554},
}
```
## Contribute
We welcome and appreciate all contributions! If you notice any issues or bugs, have questions, or would like to suggest new features, please [open an issue](https://github.com/roboflow/rf-detr/issues/new) or pull request. By sharing your ideas and improvements, you help make RF-DETR better for everyone.