https://github.com/rodrigokamada/angular-amazon-cognito
Application example built with Angular 14 with authentication using the Amazon Cognito service.
https://github.com/rodrigokamada/angular-amazon-cognito
amazon angular authentication aws awscommunity beginners cognito devcommunity ghactions ghpages hacktoberfest login signin signup stackblitz tutorial
Last synced: 4 months ago
JSON representation
Application example built with Angular 14 with authentication using the Amazon Cognito service.
- Host: GitHub
- URL: https://github.com/rodrigokamada/angular-amazon-cognito
- Owner: rodrigokamada
- License: mit
- Created: 2022-01-15T02:42:23.000Z (about 4 years ago)
- Default Branch: main
- Last Pushed: 2023-07-10T20:56:37.000Z (over 2 years ago)
- Last Synced: 2025-04-05T14:38:09.239Z (10 months ago)
- Topics: amazon, angular, authentication, aws, awscommunity, beginners, cognito, devcommunity, ghactions, ghpages, hacktoberfest, login, signin, signup, stackblitz, tutorial
- Language: TypeScript
- Homepage: https://rodrigokamada.github.io/angular-amazon-cognito/
- Size: 3.87 MB
- Stars: 20
- Watchers: 2
- Forks: 20
- Open Issues: 2
-
Metadata Files:
- Readme: README.md
- Funding: .github/FUNDING.yml
- License: LICENSE.md
Awesome Lists containing this project
README
# Angular Amazon Cognito
Application example built with [Angular](https://angular.io/) 15 with authentication using the [Amazon Cognito](https://aws.amazon.com/cognito/) service.
This tutorial was posted on my [blog](https://rodrigo.kamada.com.br/blog/autenticacao-usando-o-amazon-cognito-em-uma-aplicacao-angular) in portuguese and on the [DEV Community](https://dev.to/rodrigokamada/authentication-using-the-amazon-cognito-to-an-angular-application-ilh) in english.
[](https://rodrigo.kamada.com.br)
[](https://www.linkedin.com/in/rodrigokamada)
[](https://twitter.com/rodrigokamada)
[](https://www.instagram.com/rodrigokamada)
## Prerequisites
Before you start, you need to install and configure the tools:
* [git](https://git-scm.com/)
* [Node.js and npm](https://nodejs.org/)
* [Angular CLI](https://angular.io/cli)
* IDE (e.g. [Visual Studio Code](https://code.visualstudio.com/))
## Getting started
### Create and configure the account on the Amazon Cognito
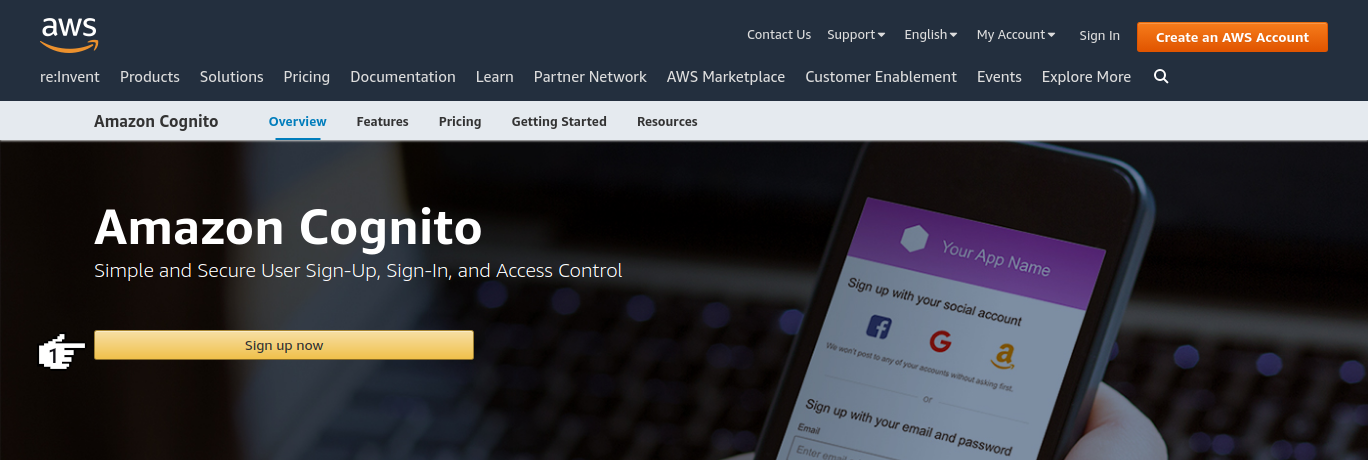
**1.** Let's create the account. Access the site [https://aws.amazon.com/cognito/](https://aws.amazon.com/cognito/) and click on the button *Sign up now*.
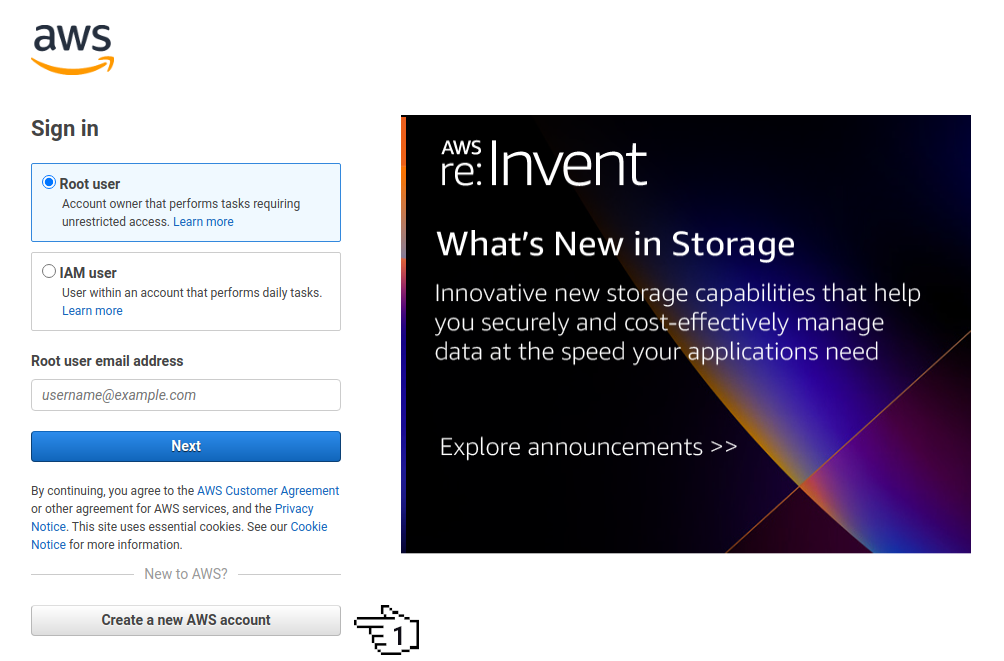
**2.** Click on the button *Create a new AWS account*.
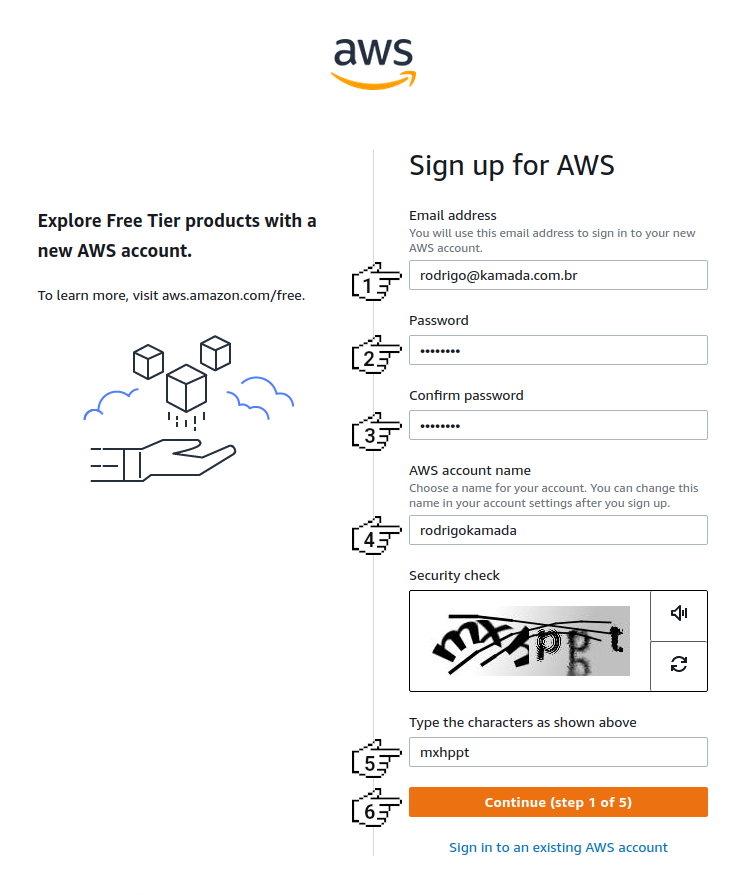
**3.** Fill in the fields *Email Address*, *Password*, *Confirm password*, *AWS account name*, *Security check* and click on the button *Continue (step 1 of 5)*.
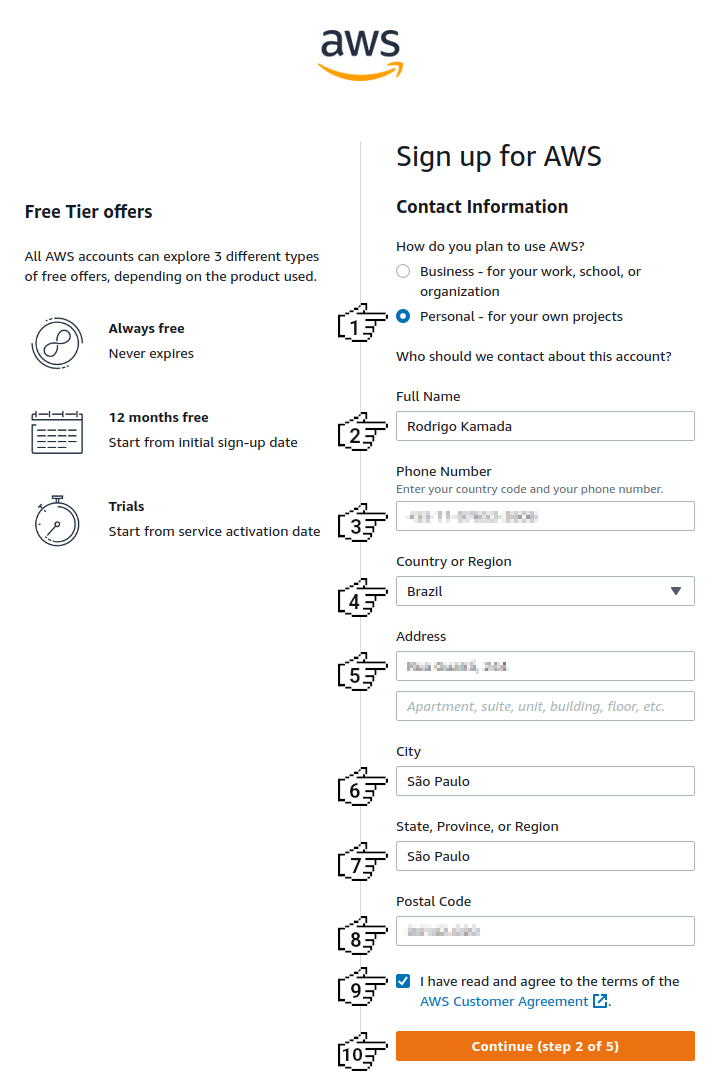
**4.** Click on the option *Personal - for your own projects*, fill in the fields *Full Name*, *Phone Number*, *Country or Region*, *Address*, *City*, *State, Province or Region*, *Postal Code*, click on the checkbox *I have read and agree to the terms of the AWS Customer Agreement.* and click on the button *Continue (step 2 of 5)*.
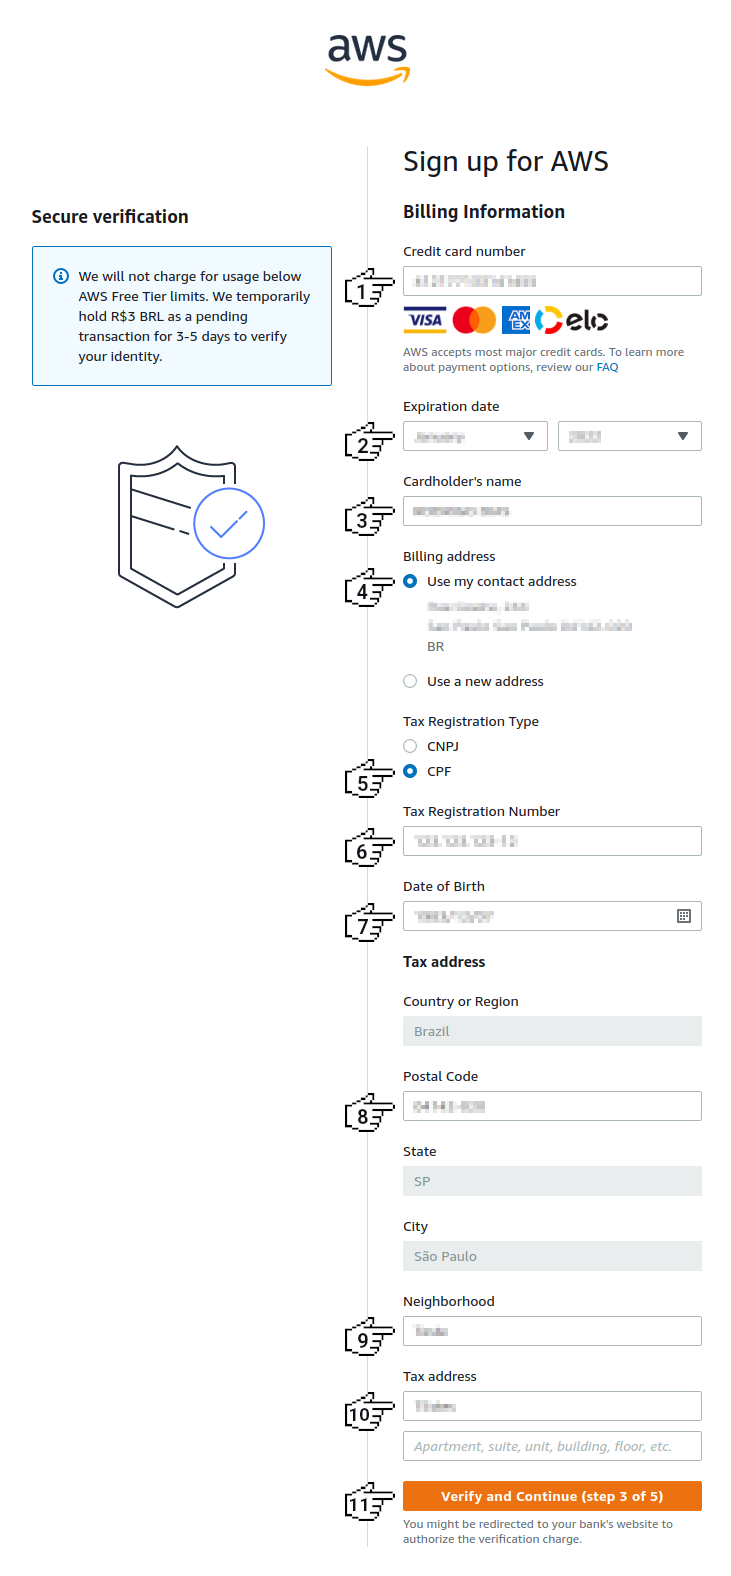
**5.** Fill in the fields *Credit card number*, *Expiration date*, *Cardholder's name*, click on the optiond *Use my contact address*, *CPF*, fill in the fields *Tax Registration Number*, *Date of birth*, *Postal Code*, *Neighbothood*, *Tax address* and click on the button *Verify and Continue (step 3 of 5)*.
**Note:**
* Some fields may be different for your country.
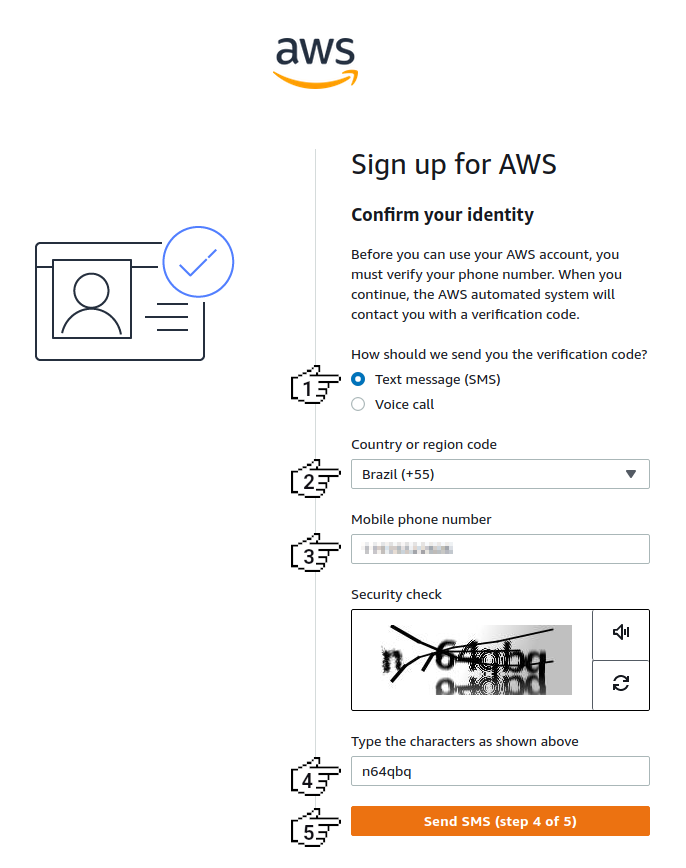
**6.** Click on the option *Text message (SMS)*, select an option in the field *Country or region code*, fill in the fields *Mobile phone number*, *Type the characters as shown above* and click on the button *Send SMS (step 4 of 5)*.
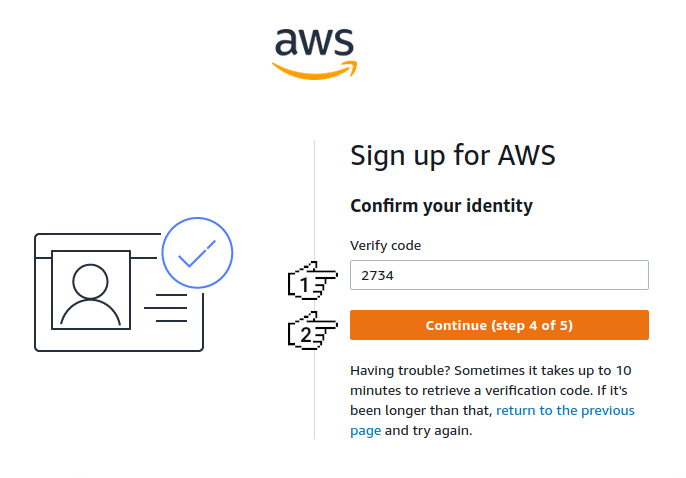
**7.** Fill in the field *Verify code* and click on the button *Continue (step 4 of 5)*.
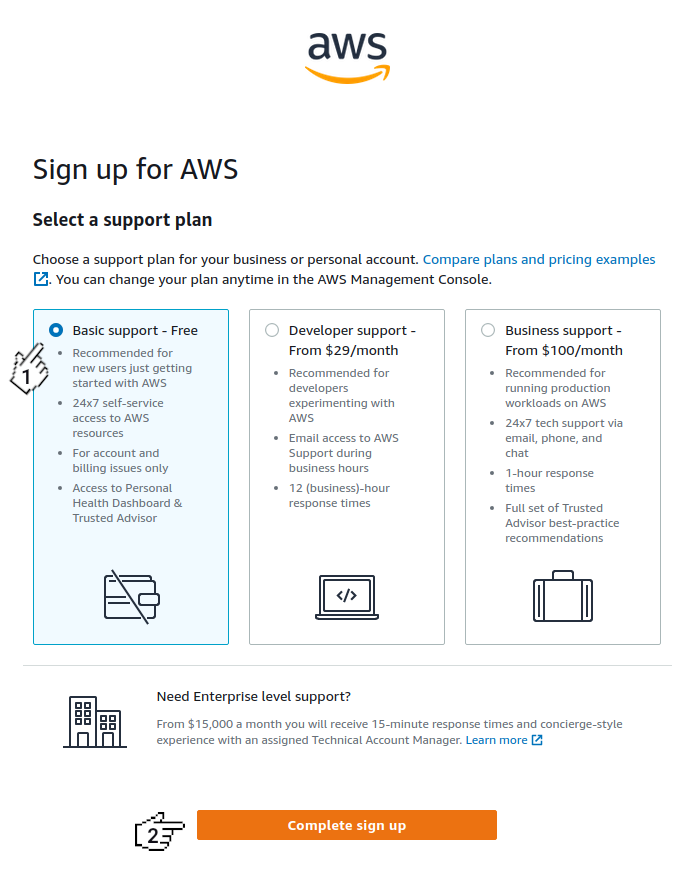
**8.** Click on the option *Basic support - Free* and click on the button *Complete sign up*.
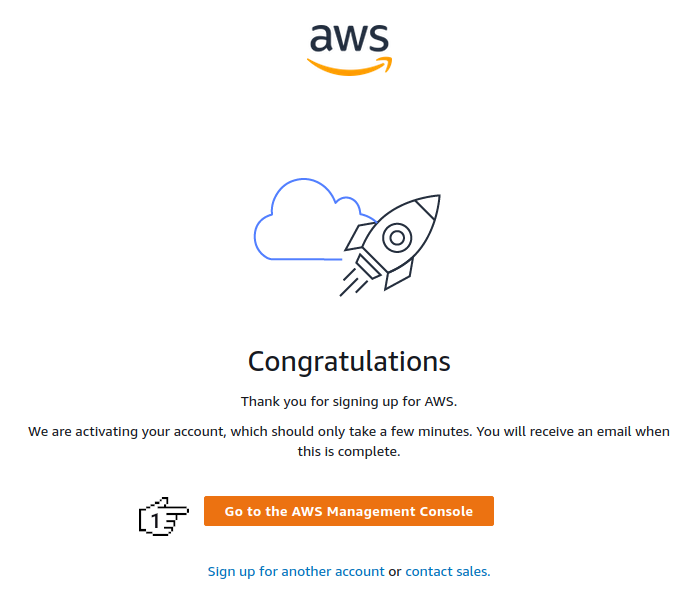
**9.** Click on the button *Go to the AWS Management Console*.
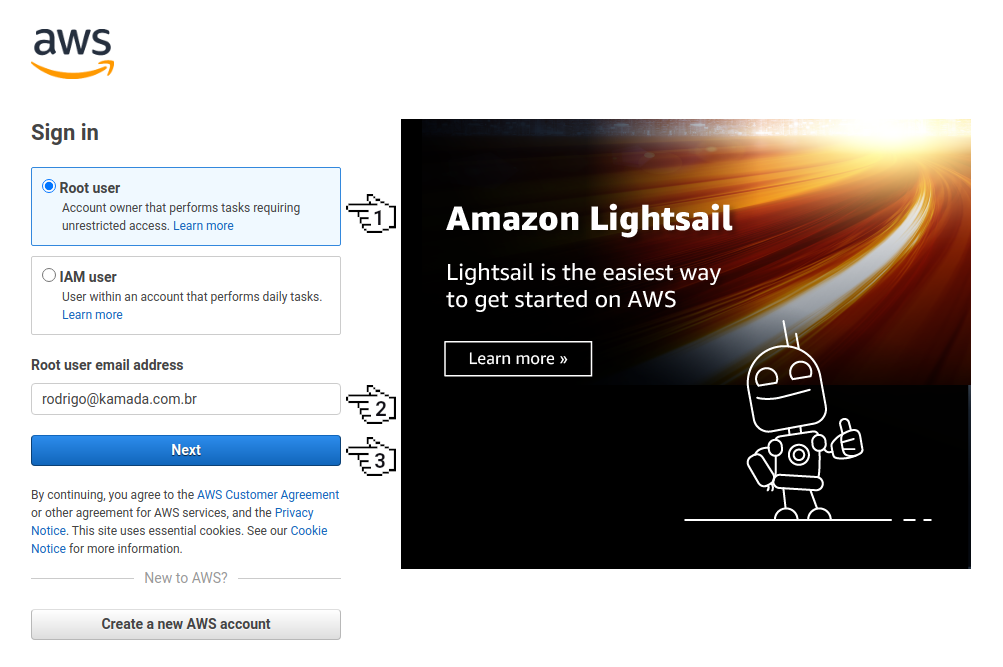
**10.** Click on the option *Root user*, fill in the field *Root user email address* and click on the button *Next*.
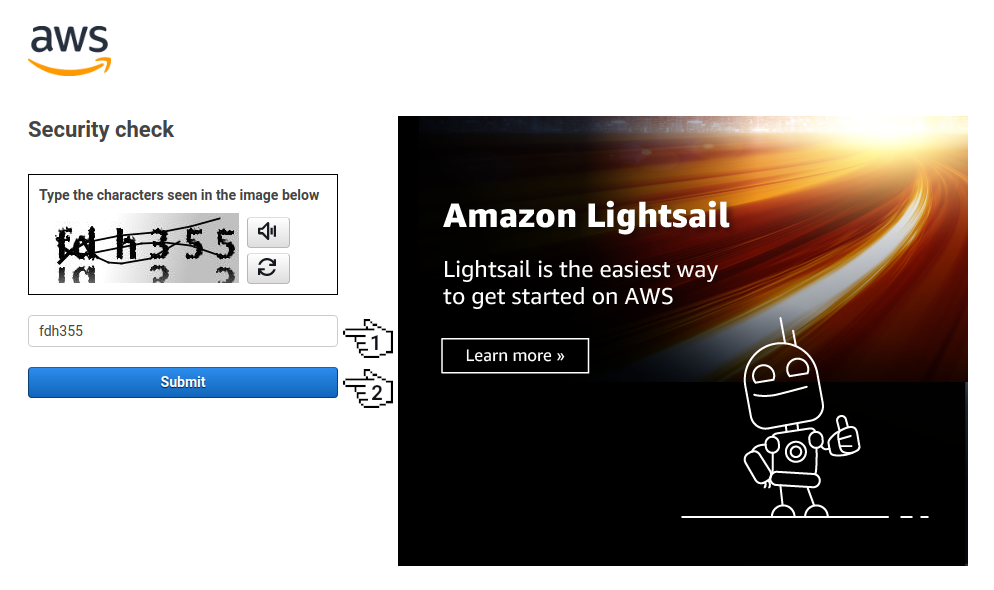
**11.** Fill in the field *Security check* and click on the button *Submit*.
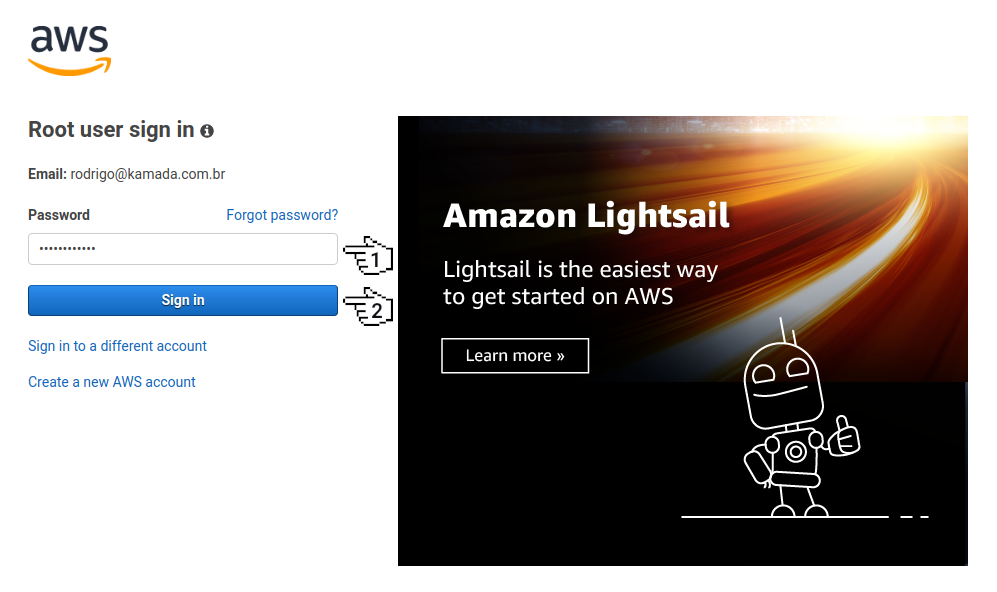
**12.** Fill in the field *Password* and click on the button *Sign in*.
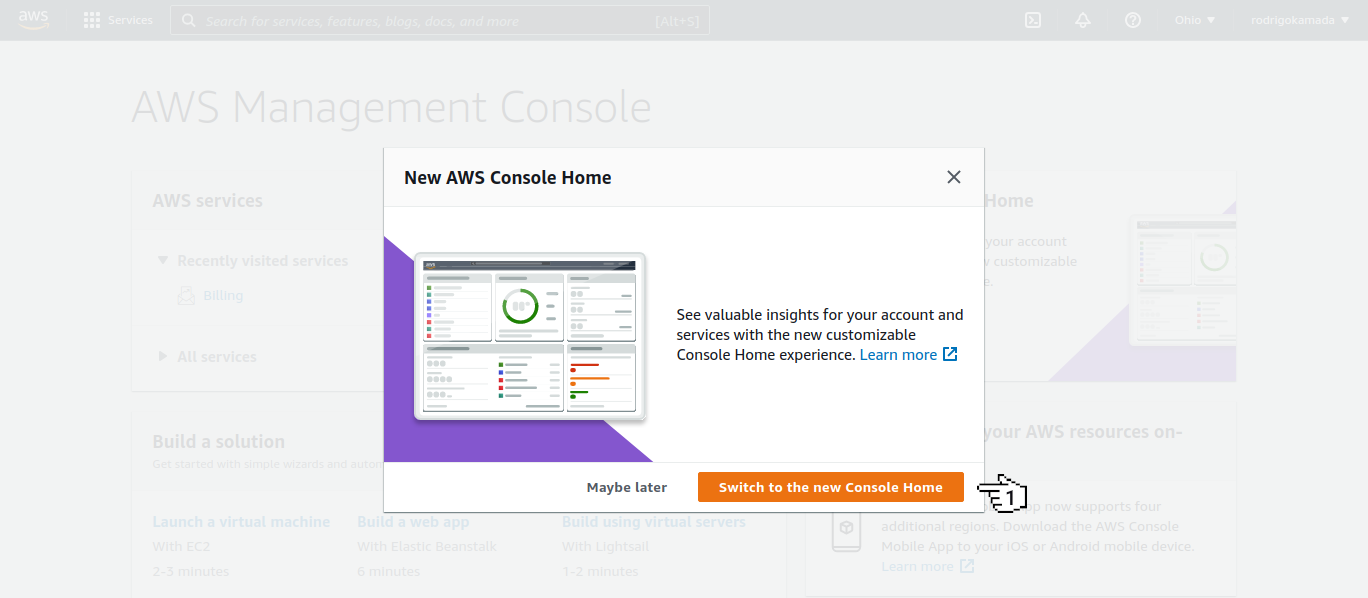
**13.** Click on the button *Switch to the new Console Home*.
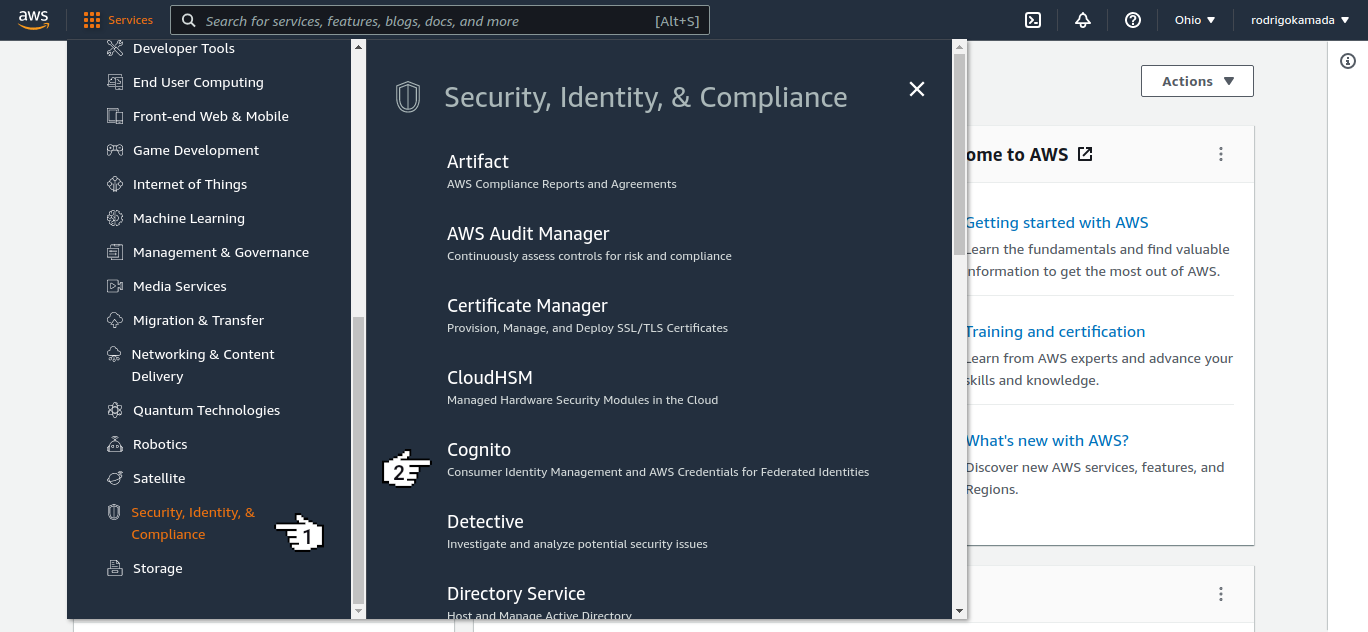
**14.** Click on the menu *Security, Identity & Compliance* and on the submenu *Cognito*.
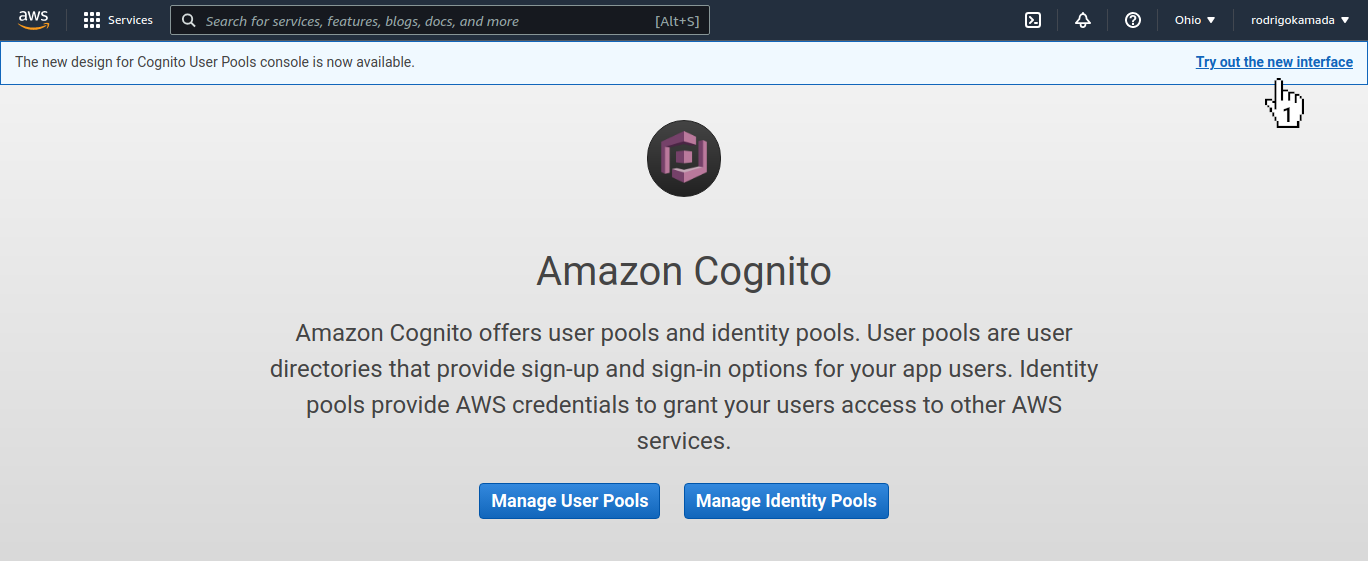
**15.** Click on the link *Try out the new interface.*.
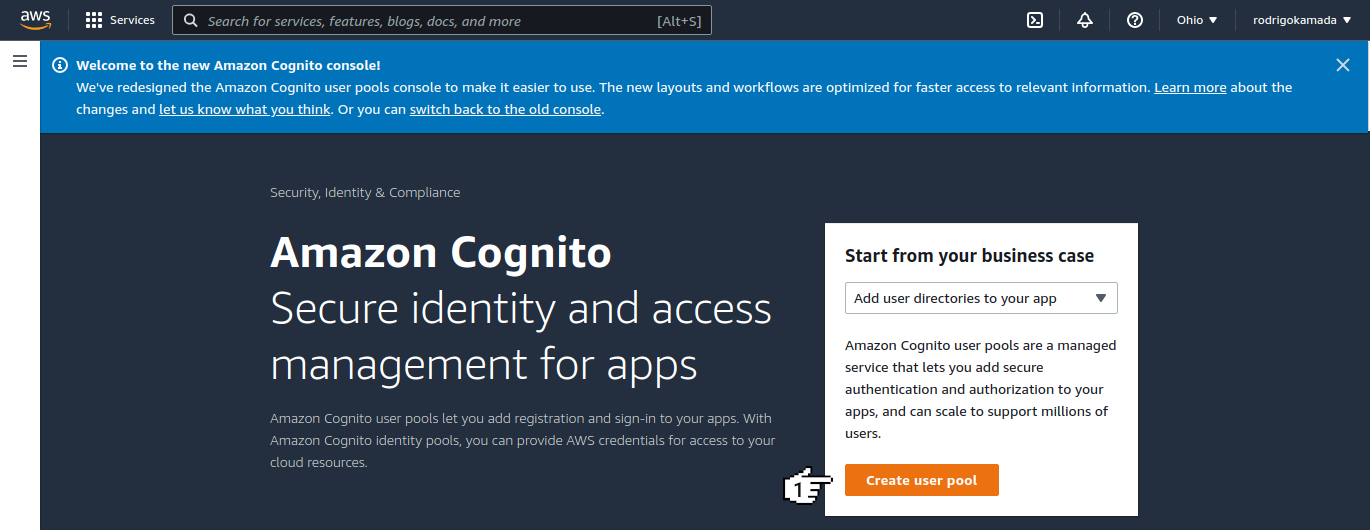
**16.** Click on the button *Create user pool*.
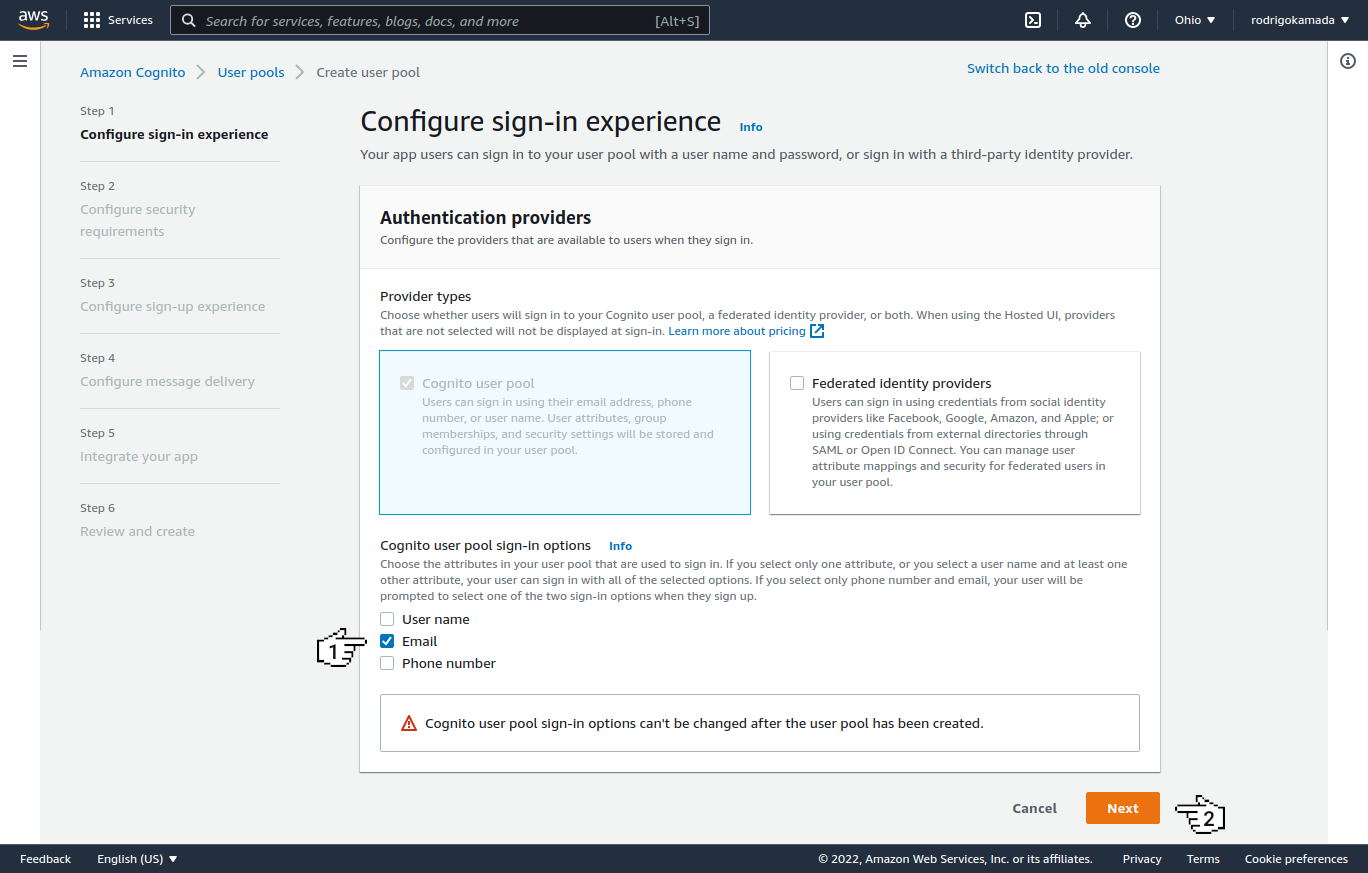
**17.** Click on the option *Email* and click on the button *Next*.
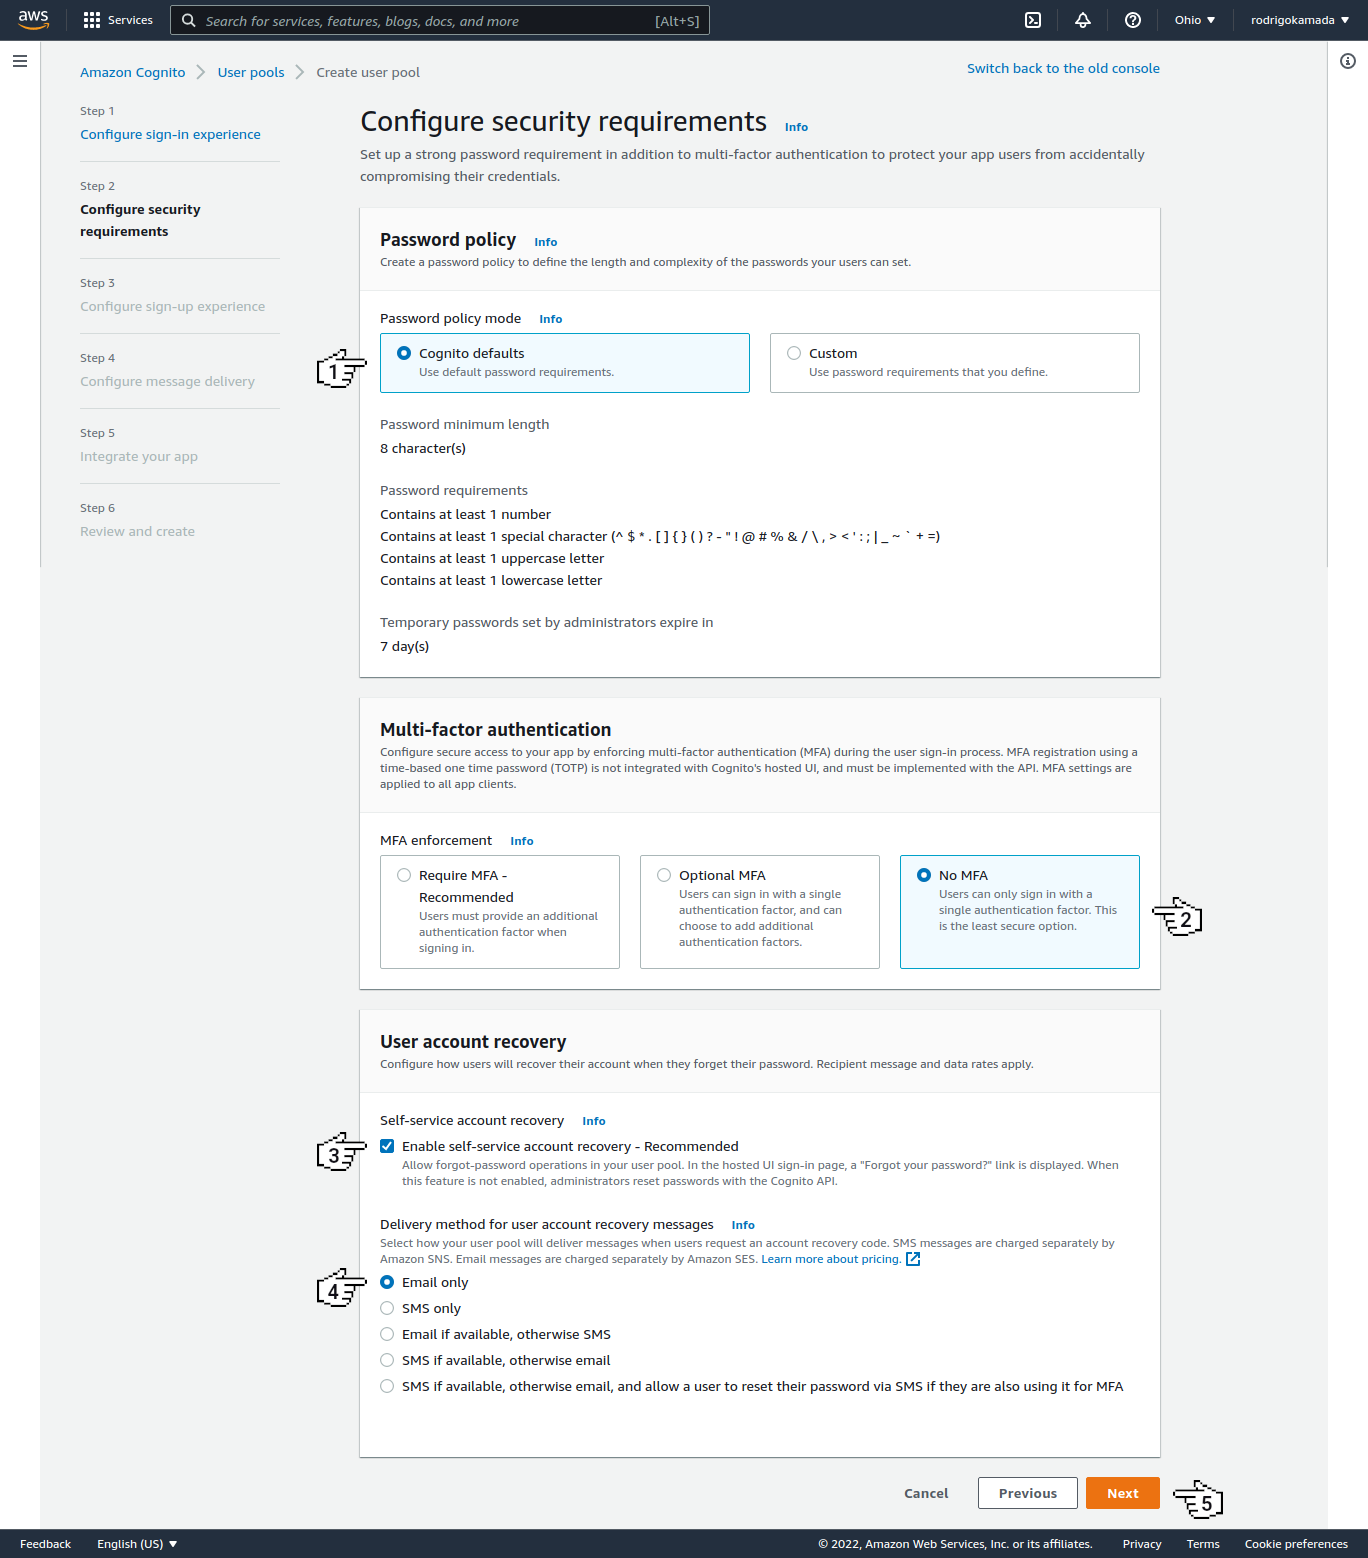
**18.** Click on the options *Cognito defaults*, *No MFA*, *Enable self-service account recovery - Recommended*, *Email only* and click on the button *Next*.
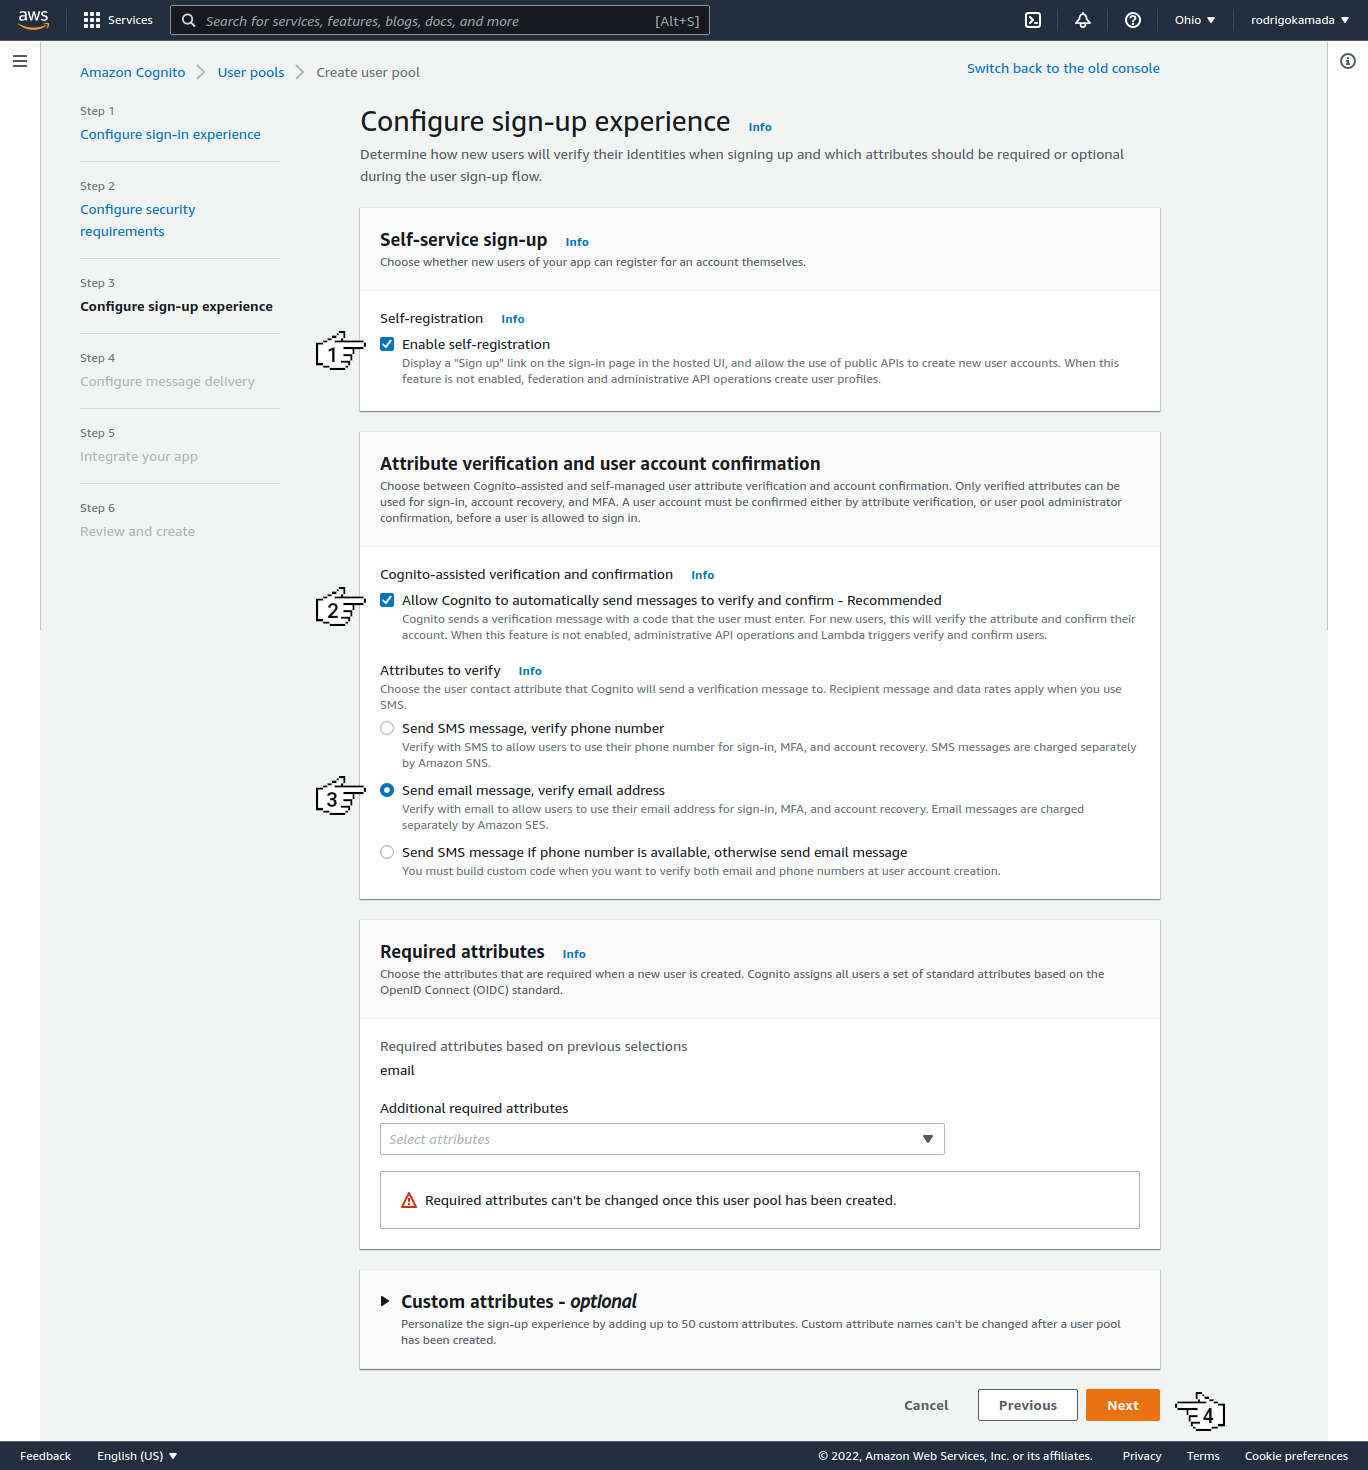
**19.** Click on the options *Enable self-registration*, *Allow Cognito to automatically send messages to verify and confirm - Recommended*, *Send email message, verify email address* and click on the button *Next*.
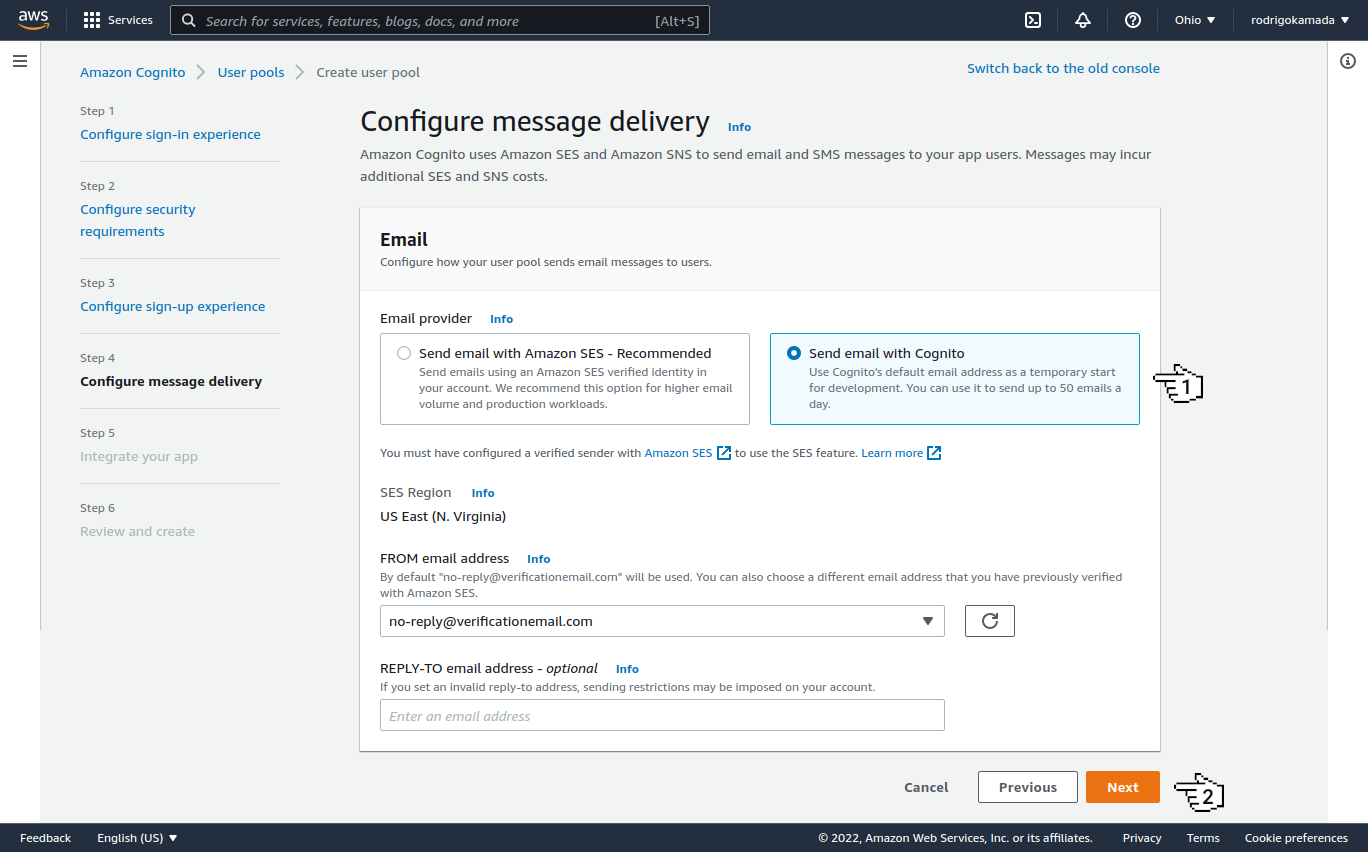
**20.** Click on the option *Send email with Cognito* and click on the button *Next*.
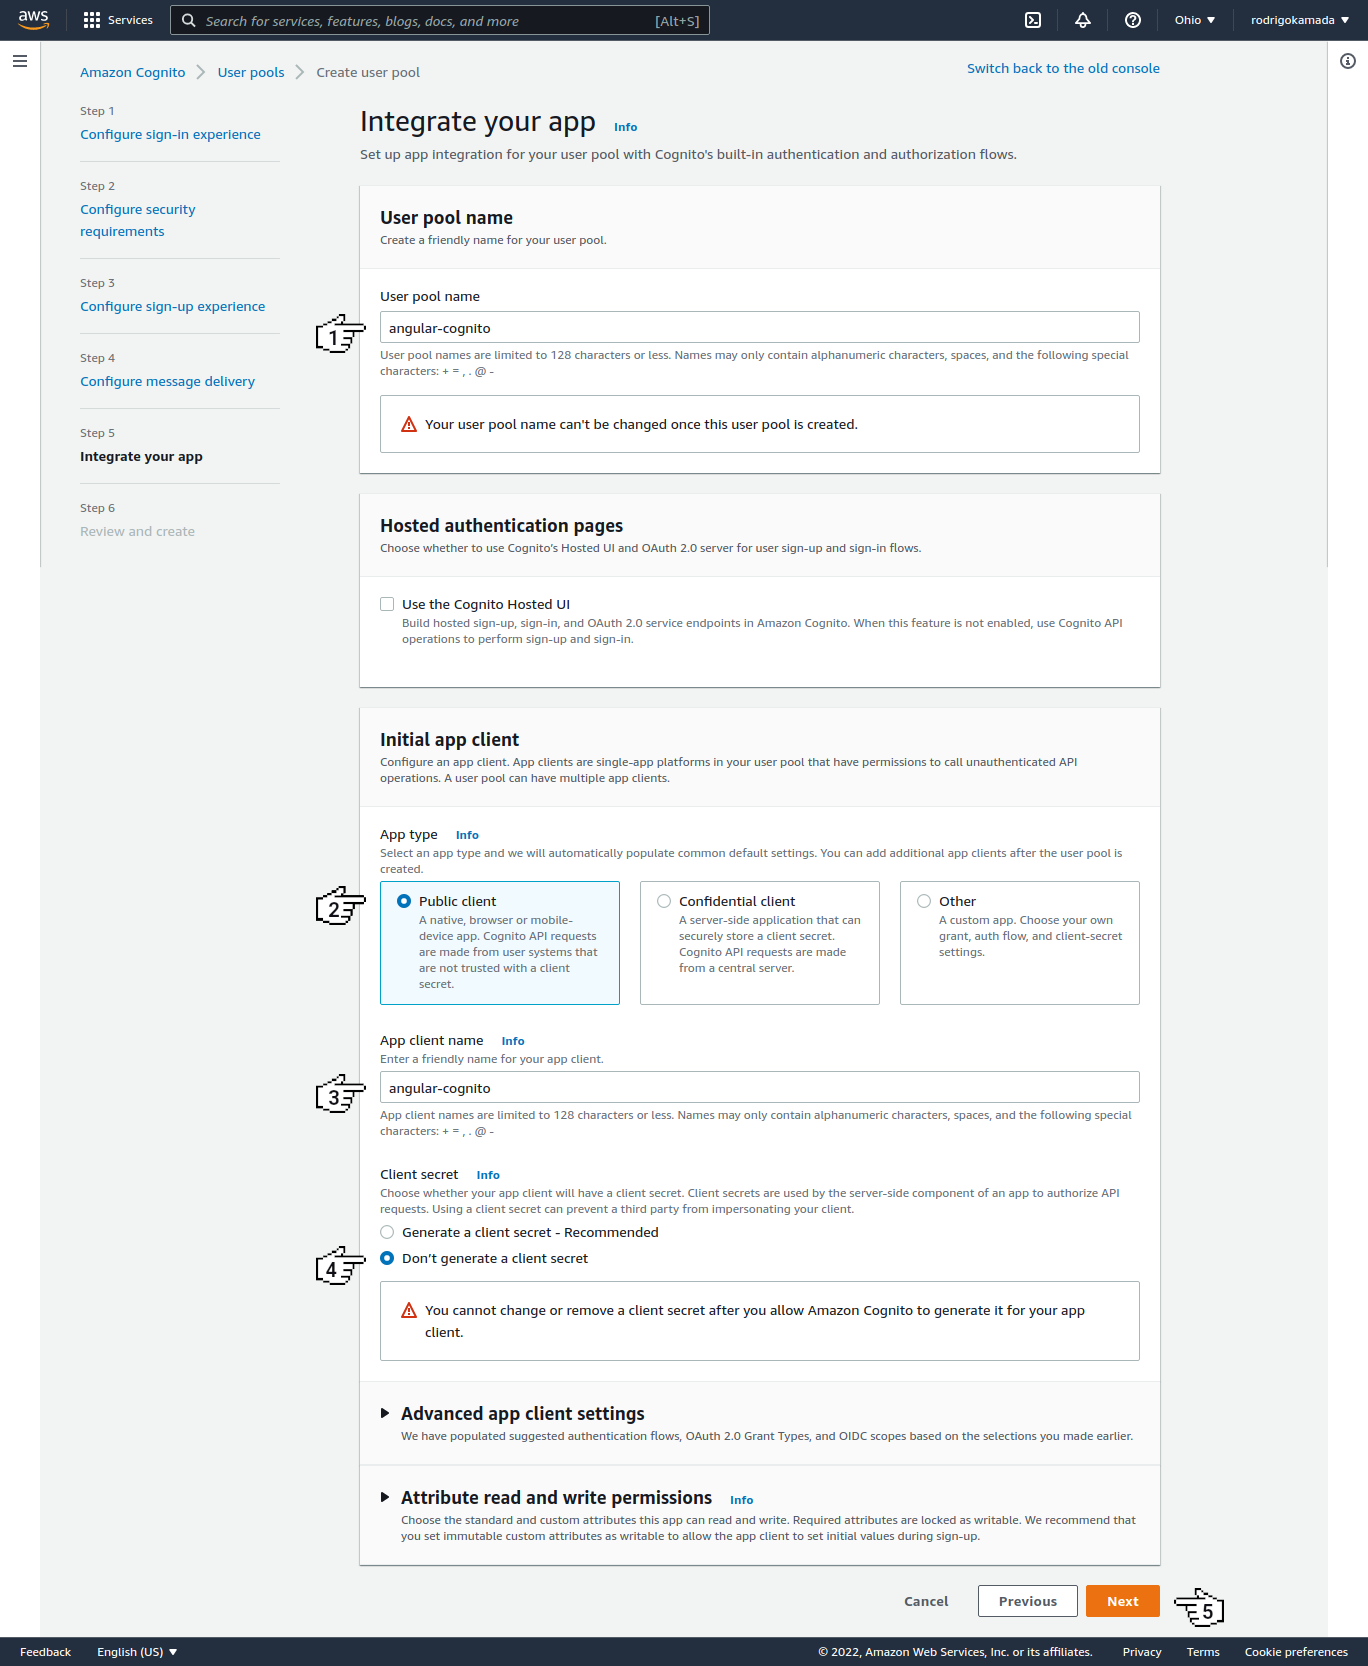
**21.** Fill in the field *User pool name*, click on the option *Public client*, fill in the field *App client name*, click on the option *Don't generate a client secret* and click on the button *Sign in*.
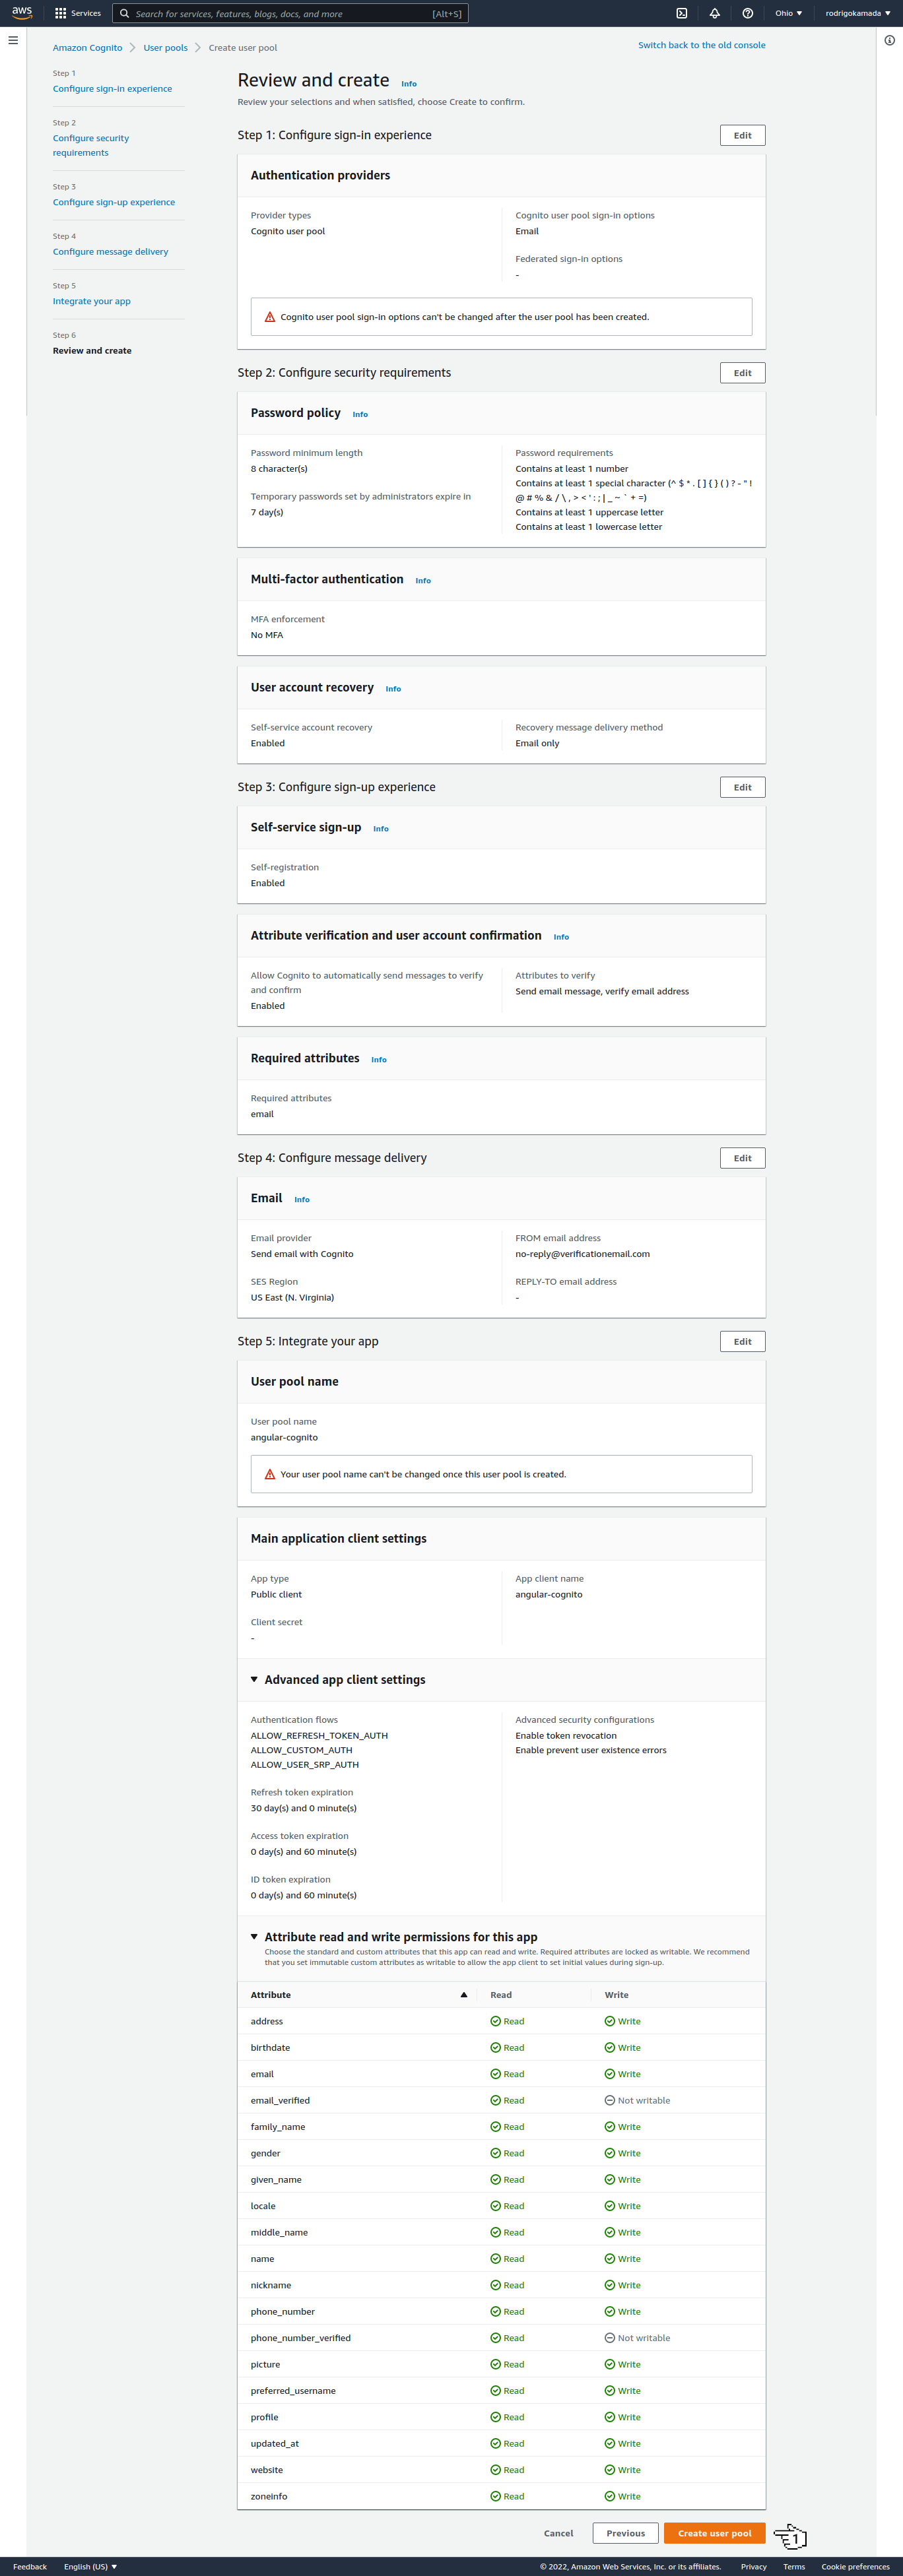
**22.** Click on the button *Create user pool*.
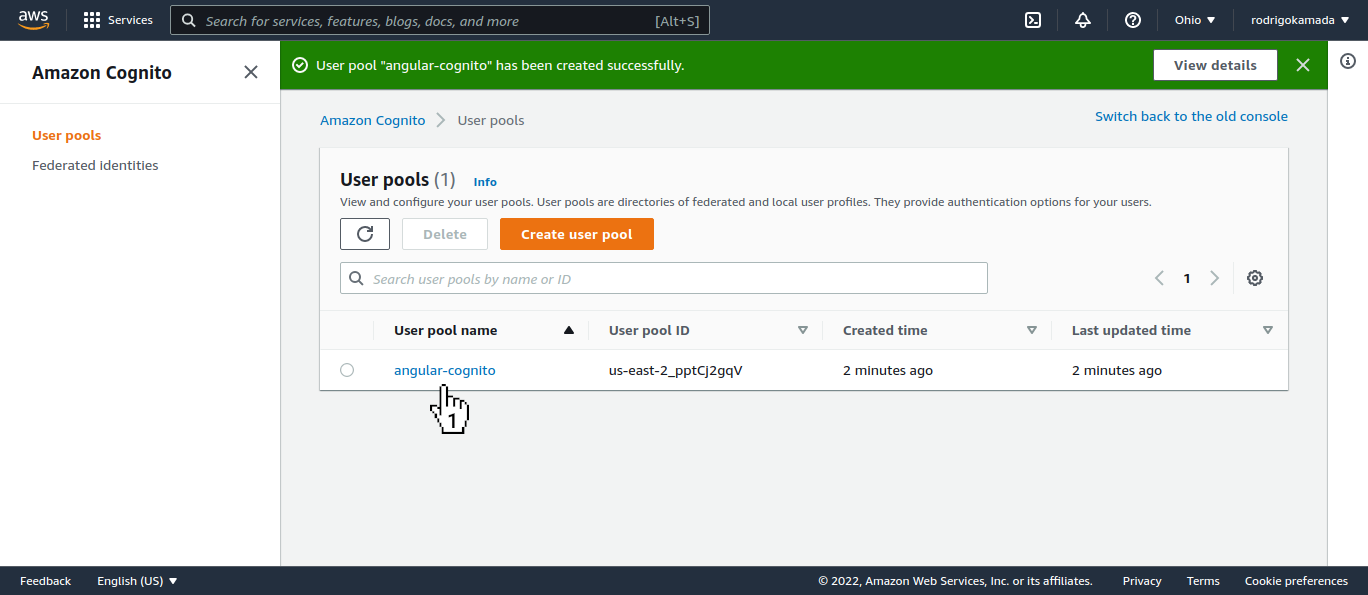
**23.** Click on the link *angular-cognito* with the user pool name.
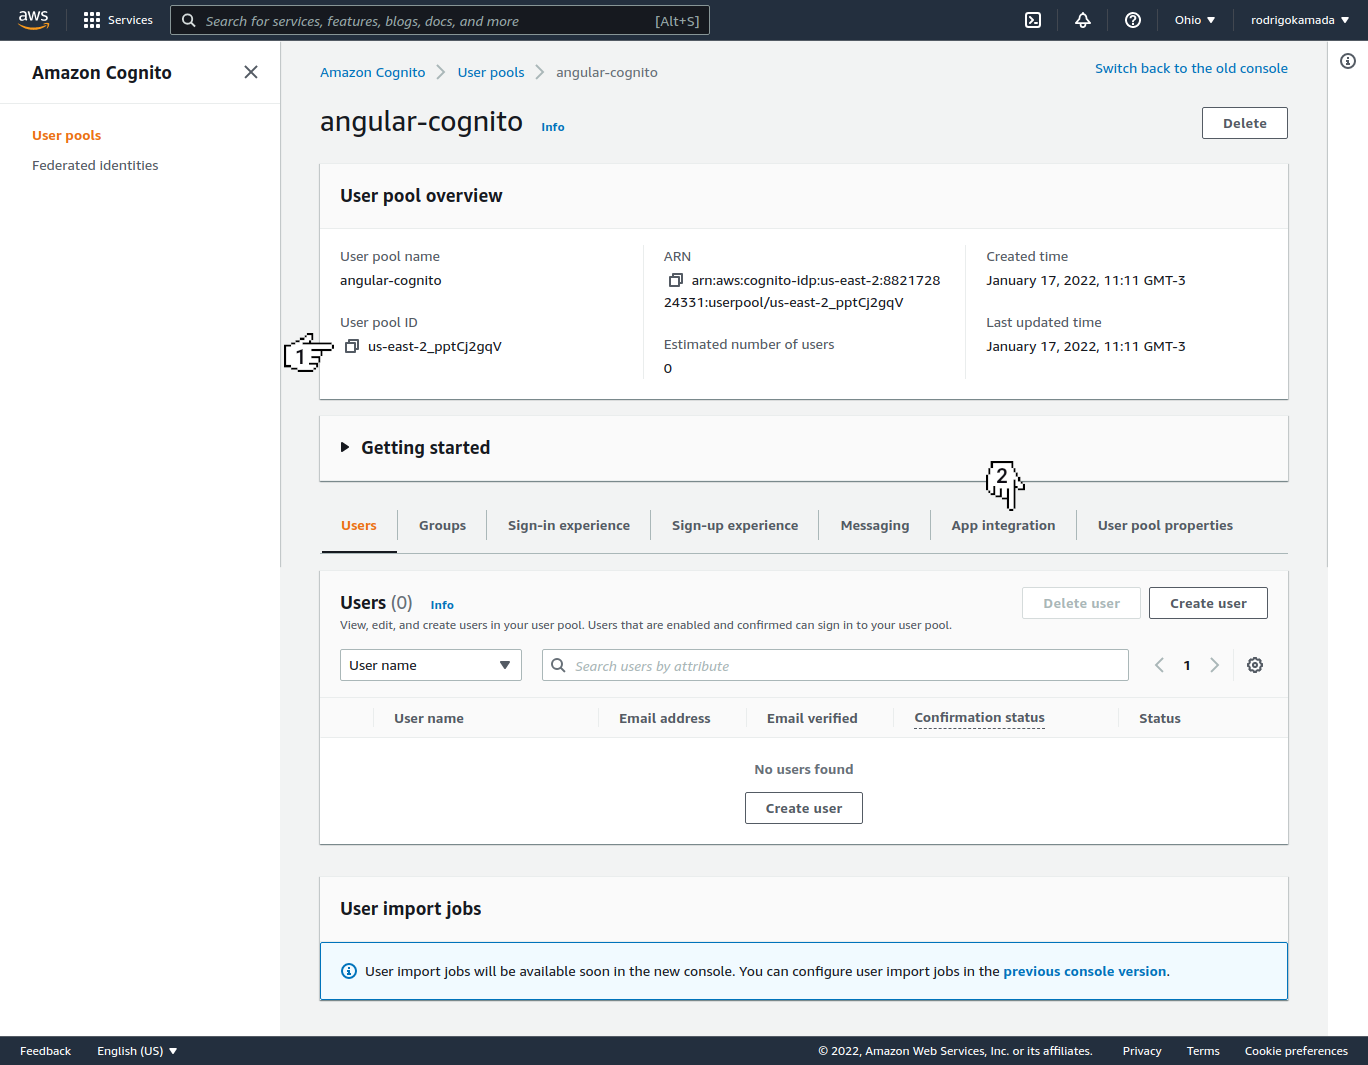
**24.** Copy the user pool ID displayed, in my case, the ID `us-east-2_pptCj2gqV` was displayed because this ID will be configured in the Angular application and click on the link *App integration*.
**25.** Copy the client ID displayed, in my case, the ID `1452opnjll0ldmocs201b1oimu` was displayed because this ID will be configured in the Angular application.
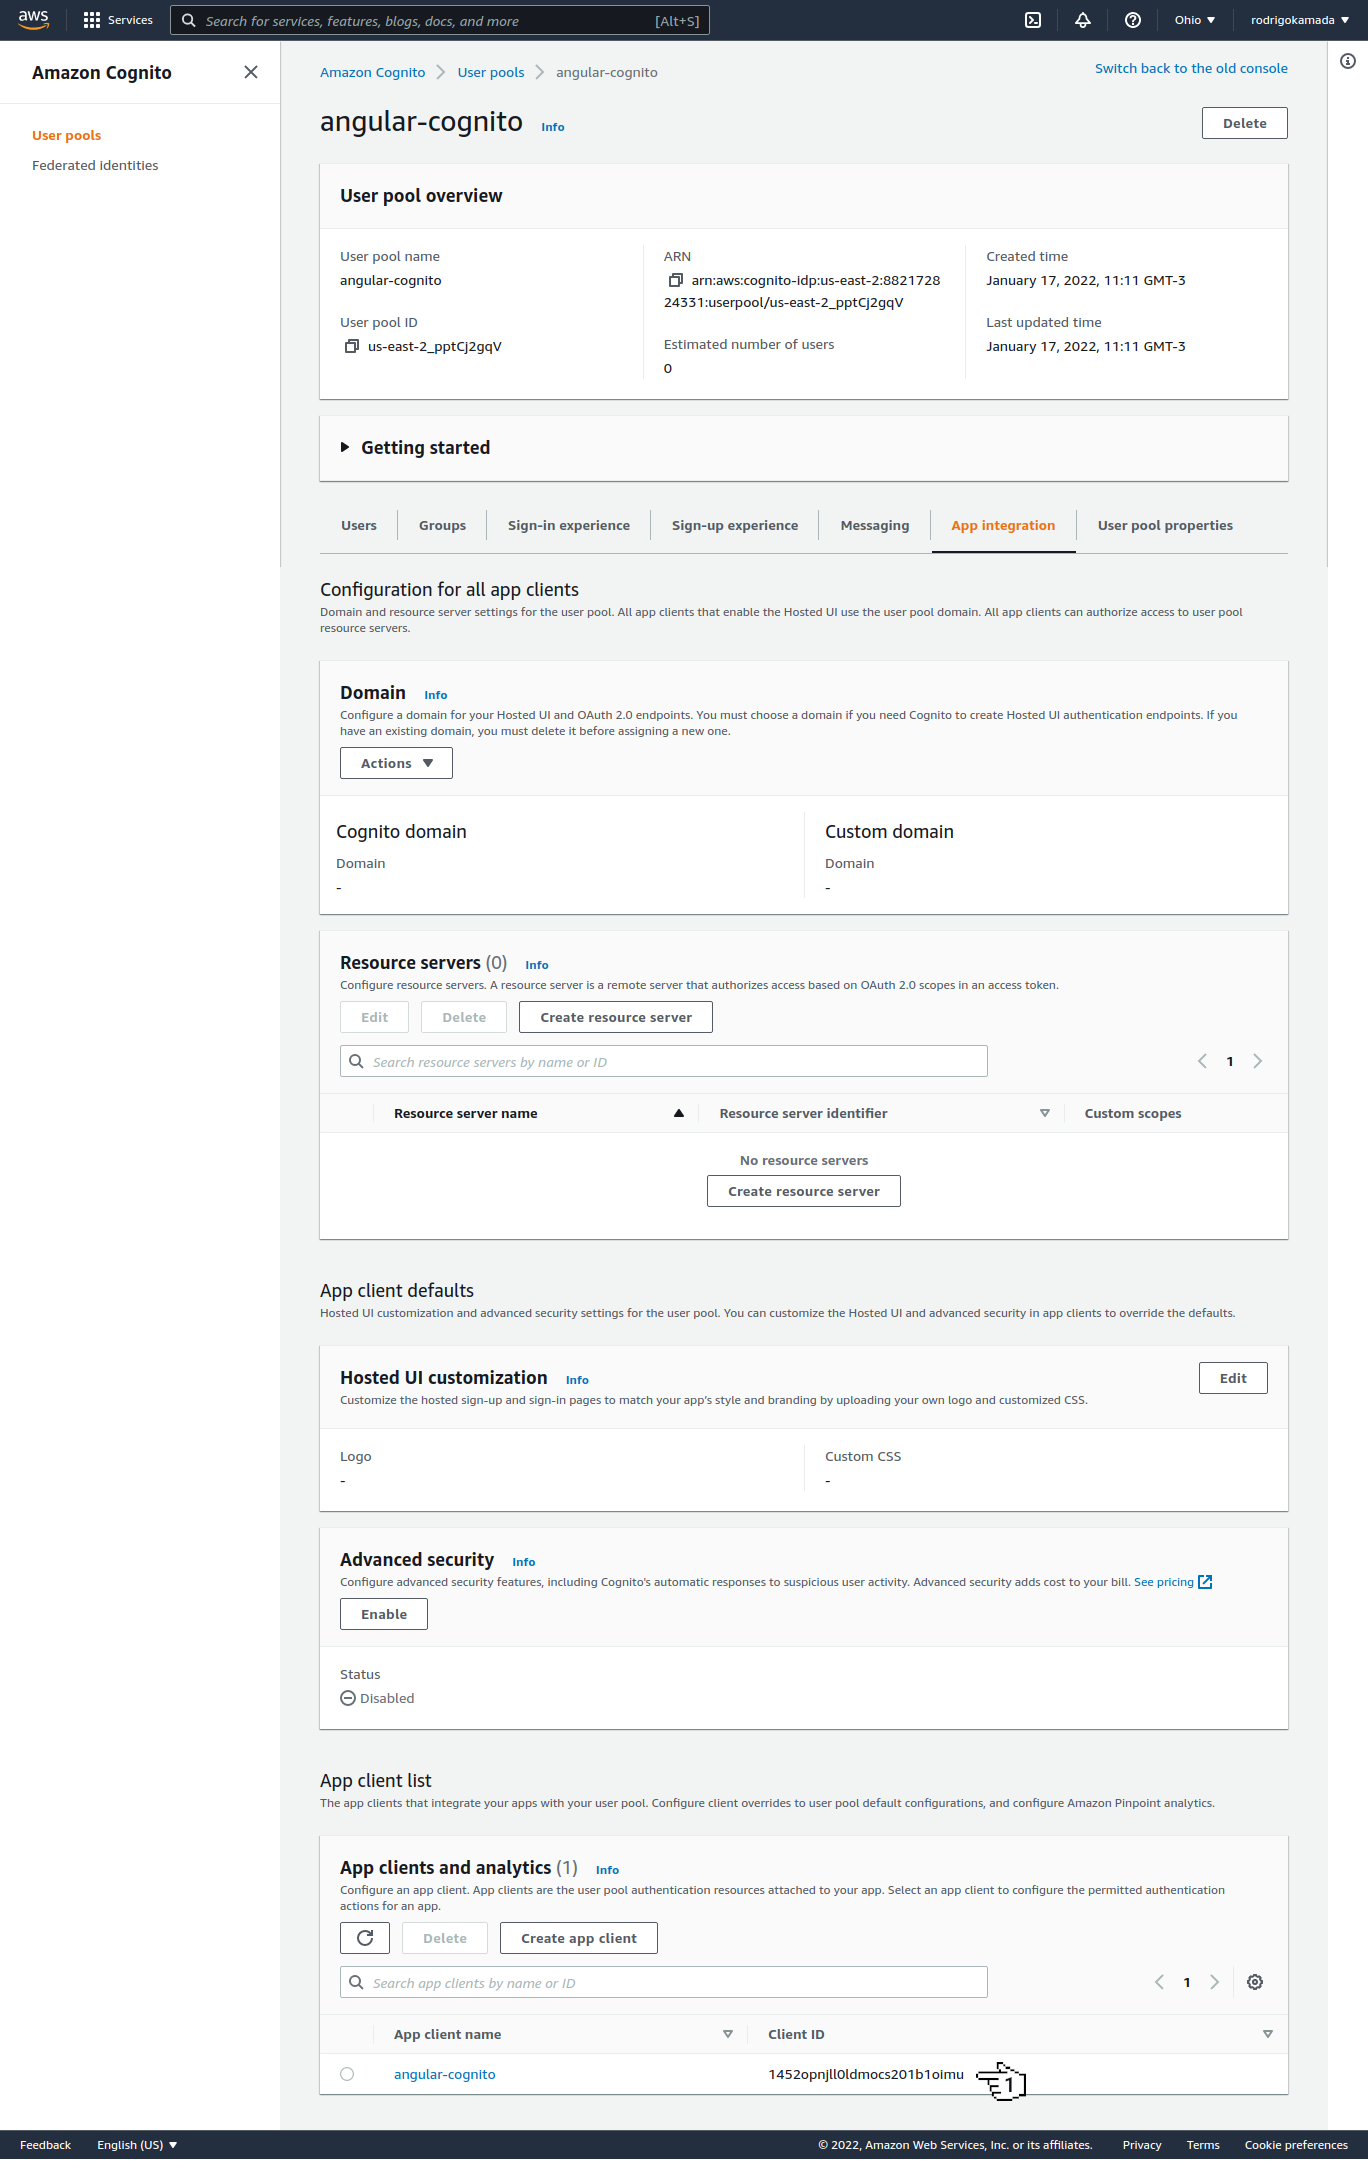
**26.** Ready! Account created, user pool ID and client ID generated.
### Create the Angular application
**1.** Let's create the application with the Angular base structure using the `@angular/cli` with the route file and the SCSS style format.
```powershell
ng new angular-cognito --routing true --style scss
CREATE angular-cognito/README.md (1060 bytes)
CREATE angular-cognito/.editorconfig (274 bytes)
CREATE angular-cognito/.gitignore (548 bytes)
CREATE angular-cognito/angular.json (3261 bytes)
CREATE angular-cognito/package.json (1079 bytes)
CREATE angular-cognito/tsconfig.json (863 bytes)
CREATE angular-cognito/.browserslistrc (600 bytes)
CREATE angular-cognito/karma.conf.js (1432 bytes)
CREATE angular-cognito/tsconfig.app.json (287 bytes)
CREATE angular-cognito/tsconfig.spec.json (333 bytes)
CREATE angular-cognito/.vscode/extensions.json (130 bytes)
CREATE angular-cognito/.vscode/launch.json (474 bytes)
CREATE angular-cognito/.vscode/tasks.json (938 bytes)
CREATE angular-cognito/src/favicon.ico (948 bytes)
CREATE angular-cognito/src/index.html (300 bytes)
CREATE angular-cognito/src/main.ts (372 bytes)
CREATE angular-cognito/src/polyfills.ts (2338 bytes)
CREATE angular-cognito/src/styles.scss (80 bytes)
CREATE angular-cognito/src/test.ts (745 bytes)
CREATE angular-cognito/src/assets/.gitkeep (0 bytes)
CREATE angular-cognito/src/environments/environment.prod.ts (51 bytes)
CREATE angular-cognito/src/environments/environment.ts (658 bytes)
CREATE angular-cognito/src/app/app-routing.module.ts (245 bytes)
CREATE angular-cognito/src/app/app.module.ts (393 bytes)
CREATE angular-cognito/src/app/app.component.scss (0 bytes)
CREATE angular-cognito/src/app/app.component.html (23364 bytes)
CREATE angular-cognito/src/app/app.component.spec.ts (1100 bytes)
CREATE angular-cognito/src/app/app.component.ts (220 bytes)
✔ Packages installed successfully.
Successfully initialized git.
```
**2.** Install and configure the Bootstrap CSS framework. Do steps 2 and 3 of the post *[Adding the Bootstrap CSS framework to an Angular application](https://github.com/rodrigokamada/angular-bootstrap)*.
**3.** Configure the variable `cognito.userPoolId` with the Amazon Cognito User Pool ID and the variable `cognito.userPoolWebClientId` with the Amazon Cognito WEB Client ID in the `src/environments/environment.ts` and `src/environments/environment.prod.ts` files as below.
```typescript
cognito: {
userPoolId: 'us-east-2_pptCj2gqV',
userPoolWebClientId: '1452opnjll0ldmocs201b1oimu',
},
```
**4.** Install the `aws-amplify` library.
```powershell
npm install aws-amplify
```
**5.** Change the `src/polyfills.ts` file. Add the global declaration as below. This configuration is required starting with Angular version 6.
```typescript
(window as any).global = window;
```
**6.** Create the `CognitoService` service.
```powershell
ng generate service cognito --skip-tests=true
CREATE src/app/cognito.service.ts (136 bytes)
```
**7.** Change the `src/app/cognito.service.ts` file and add the lines as below.
```typescript
import { Injectable } from '@angular/core';
import { BehaviorSubject } from 'rxjs';
import Amplify, { Auth } from 'aws-amplify';
import { environment } from '../environments/environment';
export interface IUser {
email: string;
password: string;
showPassword: boolean;
code: string;
name: string;
}
@Injectable({
providedIn: 'root',
})
export class CognitoService {
private authenticationSubject: BehaviorSubject;
constructor() {
Amplify.configure({
Auth: environment.cognito,
});
this.authenticationSubject = new BehaviorSubject(false);
}
public signUp(user: IUser): Promise {
return Auth.signUp({
username: user.email,
password: user.password,
});
}
public confirmSignUp(user: IUser): Promise {
return Auth.confirmSignUp(user.email, user.code);
}
public signIn(user: IUser): Promise {
return Auth.signIn(user.email, user.password)
.then(() => {
this.authenticationSubject.next(true);
});
}
public signOut(): Promise {
return Auth.signOut()
.then(() => {
this.authenticationSubject.next(false);
});
}
public isAuthenticated(): Promise {
if (this.authenticationSubject.value) {
return Promise.resolve(true);
} else {
return this.getUser()
.then((user: any) => {
if (user) {
return true;
} else {
return false;
}
}).catch(() => {
return false;
});
}
}
public getUser(): Promise {
return Auth.currentUserInfo();
}
public updateUser(user: IUser): Promise {
return Auth.currentUserPoolUser()
.then((cognitoUser: any) => {
return Auth.updateUserAttributes(cognitoUser, user);
});
}
}
```
**8.** Create the `SignUpComponent` component.
```powershell
ng generate component sign-up --skip-tests=true
CREATE src/app/sign-up/sign-up.component.scss (0 bytes)
CREATE src/app/sign-up/sign-up.component.html (22 bytes)
CREATE src/app/sign-up/sign-up.component.ts (279 bytes)
UPDATE src/app/app.module.ts (638 bytes)
```
**9.** Change the `src/app/sign-up/sign-up.component.ts` file. Import the `Router` and `CognitoService` services and create the `signUp` and `confirmSignUp` methods as below.
```typescript
import { Component } from '@angular/core';
import { Router } from '@angular/router';
import { IUser, CognitoService } from '../cognito.service';
@Component({
selector: 'app-sign-up',
templateUrl: './sign-up.component.html',
styleUrls: ['./sign-up.component.scss'],
})
export class SignUpComponent {
loading: boolean;
isConfirm: boolean;
user: IUser;
constructor(private router: Router,
private cognitoService: CognitoService) {
this.loading = false;
this.isConfirm = false;
this.user = {} as IUser;
}
public signUp(): void {
this.loading = true;
this.cognitoService.signUp(this.user)
.then(() => {
this.loading = false;
this.isConfirm = true;
}).catch(() => {
this.loading = false;
});
}
public confirmSignUp(): void {
this.loading = true;
this.cognitoService.confirmSignUp(this.user)
.then(() => {
this.router.navigate(['/signIn']);
}).catch(() => {
this.loading = false;
});
}
}
```
**10.** Change the `src/app/sign-up/sign-up.component.html` file. Add the lines as below.
```html
Email:
Password:
Sign up
Code:
Confirm
```
**11.** Create the `SignInComponent` component.
```powershell
ng generate component sign-in --skip-tests=true
CREATE src/app/sign-in/sign-in.component.scss (0 bytes)
CREATE src/app/sign-in/sign-in.component.html (22 bytes)
CREATE src/app/sign-in/sign-in.component.ts (279 bytes)
UPDATE src/app/app.module.ts (490 bytes)
```
**12.** Change the `src/app/sign-in/sign-in.component.ts` file. Import the `Router` and `CognitoService` service and create the `signIn` method as below.
```typescript
import { Component } from '@angular/core';
import { Router } from '@angular/router';
import { IUser, CognitoService } from '../cognito.service';
@Component({
selector: 'app-sign-in',
templateUrl: './sign-in.component.html',
styleUrls: ['./sign-in.component.scss'],
})
export class SignInComponent {
loading: boolean;
user: IUser;
constructor(private router: Router,
private cognitoService: CognitoService) {
this.loading = false;
this.user = {} as IUser;
}
public signIn(): void {
this.loading = true;
this.cognitoService.signIn(this.user)
.then(() => {
this.router.navigate(['/profile']);
}).catch(() => {
this.loading = false;
});
}
}
```
**13.** Change the `src/app/sign-in/sign-in.component.html` file. Add the lines as below.
```html
Email:
Password:
Sign in
```
**14.** Create the `ProfileComponent` component.
```powershell
ng generate component profile --skip-tests=true
CREATE src/app/profile/profile.component.scss (0 bytes)
CREATE src/app/profile/profile.component.html (22 bytes)
CREATE src/app/profile/profile.component.ts (280 bytes)
UPDATE src/app/app.module.ts (726 bytes)
```
**15.** Change the `src/app/profile/profile.component.ts` file. Import the `CognitoService` service and create the `update` method as below.
```typescript
import { Component, OnInit } from '@angular/core';
import { IUser, CognitoService } from '../cognito.service';
@Component({
selector: 'app-profile',
templateUrl: './profile.component.html',
styleUrls: ['./profile.component.scss'],
})
export class ProfileComponent implements OnInit {
loading: boolean;
user: IUser;
constructor(private cognitoService: CognitoService) {
this.loading = false;
this.user = {} as IUser;
}
public ngOnInit(): void {
this.cognitoService.getUser()
.then((user: any) => {
this.user = user.attributes;
});
}
public update(): void {
this.loading = true;
this.cognitoService.updateUser(this.user)
.then(() => {
this.loading = false;
}).catch(() => {
this.loading = false;
});
}
}
```
**16.** Change the `src/app/profile/profile.component.html` file. Add the lines as below.
```html
Email:
Name:
Update
```
**17.** Change the `src/app/app.component.ts` file. Import the `Router` and `CognitoService` services and create the `isAuthenticated` and `signOut` methods as below.
```typescript
import { Component, OnInit } from '@angular/core';
import { Router } from '@angular/router';
import { CognitoService } from './cognito.service';
@Component({
selector: 'app-root',
templateUrl: './app.component.html',
styleUrls: ['./app.component.scss'],
})
export class AppComponent implements OnInit {
isAuthenticated: boolean;
constructor(private router: Router,
private cognitoService: CognitoService) {
this.isAuthenticated = false;
}
public ngOnInit(): void {
this.cognitoService.isAuthenticated()
.then((success: boolean) => {
this.isAuthenticated = success;
});
}
public signOut(): void {
this.cognitoService.signOut()
.then(() => {
this.router.navigate(['/signIn']);
});
}
}
```
**18.** Change the `src/app/app.component.html` file and add the menu as below.
```html
```
**19.** Change the `src/app/app-routing.module.ts` file and add the routes as below.
```typescript
import { NgModule } from '@angular/core';
import { RouterModule, Routes } from '@angular/router';
import { ProfileComponent } from './profile/profile.component';
import { SignInComponent } from './sign-in/sign-in.component';
import { SignUpComponent } from './sign-up/sign-up.component';
const routes: Routes = [
{
path: '',
redirectTo: 'signIn',
pathMatch: 'full',
},
{
path: 'profile',
component: ProfileComponent,
},
{
path: 'signIn',
component: SignInComponent,
},
{
path: 'signUp',
component: SignUpComponent,
},
{
path: '**',
redirectTo: 'signIn',
},
];
@NgModule({
imports: [
RouterModule.forRoot(routes),
],
exports: [
RouterModule,
],
})
export class AppRoutingModule {
}
```
**20.** Change the `src/app/app.module.ts` file. Import the `FormsModule` module, the `ProfileComponent`, `SignInComponent`, `SignUpComponent` components as below.
```typescript
import { NgModule } from '@angular/core';
import { BrowserModule } from '@angular/platform-browser';
import { FormsModule } from '@angular/forms';
import { AppRoutingModule } from './app-routing.module';
import { AppComponent } from './app.component';
import { ProfileComponent } from './profile/profile.component';
import { SignInComponent } from './sign-in/sign-in.component';
import { SignUpComponent } from './sign-up/sign-up.component';
@NgModule({
declarations: [
AppComponent,
ProfileComponent,
SignInComponent,
SignUpComponent,
],
imports: [
BrowserModule,
FormsModule,
AppRoutingModule,
],
providers: [
],
bootstrap: [
AppComponent,
],
})
export class AppModule {
}
```
**21.** Run the application with the command below.
```powershell
npm start
> angular-cognito@1.0.0 start
> ng serve
✔ Browser application bundle generation complete.
Initial Chunk Files | Names | Raw Size
vendor.js | vendor | 9.98 MB |
styles.css, styles.js | styles | 486.91 kB |
polyfills.js | polyfills | 339.28 kB |
scripts.js | scripts | 76.33 kB |
main.js | main | 47.13 kB |
runtime.js | runtime | 6.87 kB |
| Initial Total | 10.91 MB
Build at: 2022-01-18T16:33:13.971Z - Hash: ce7a03498c95d4f5 - Time: 25230ms
** Angular Live Development Server is listening on localhost:4200, open your browser on http://localhost:4200/ **
✔ Compiled successfully.
```
**Note:**
* It may display some warnings when running the application.
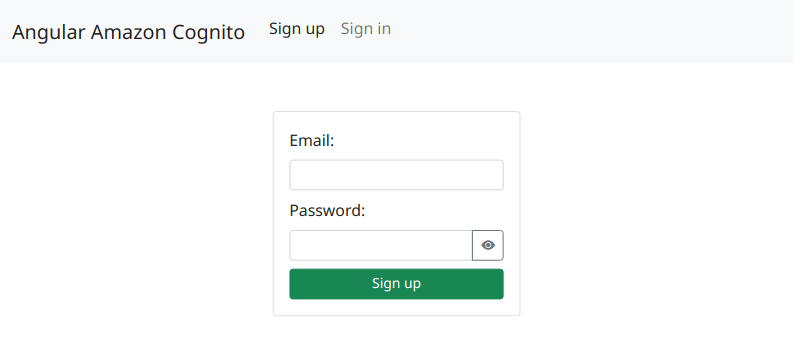
**22.** Ready! Access the URL `http://localhost:4200/` and check if the application is working. See the application working on [GitHub Pages](https://rodrigokamada.github.io/angular-cognito/) and [Stackblitz](https://stackblitz.com/edit/angular14-cognito).
### Testing the application
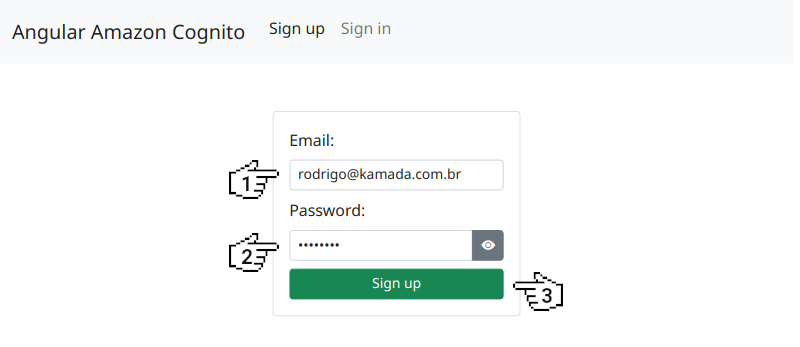
**1.** Let's test the application. Access the URL `http://localhost:4200/`, fill in the field *Email*, *Password* and click on the button *Sign up*.
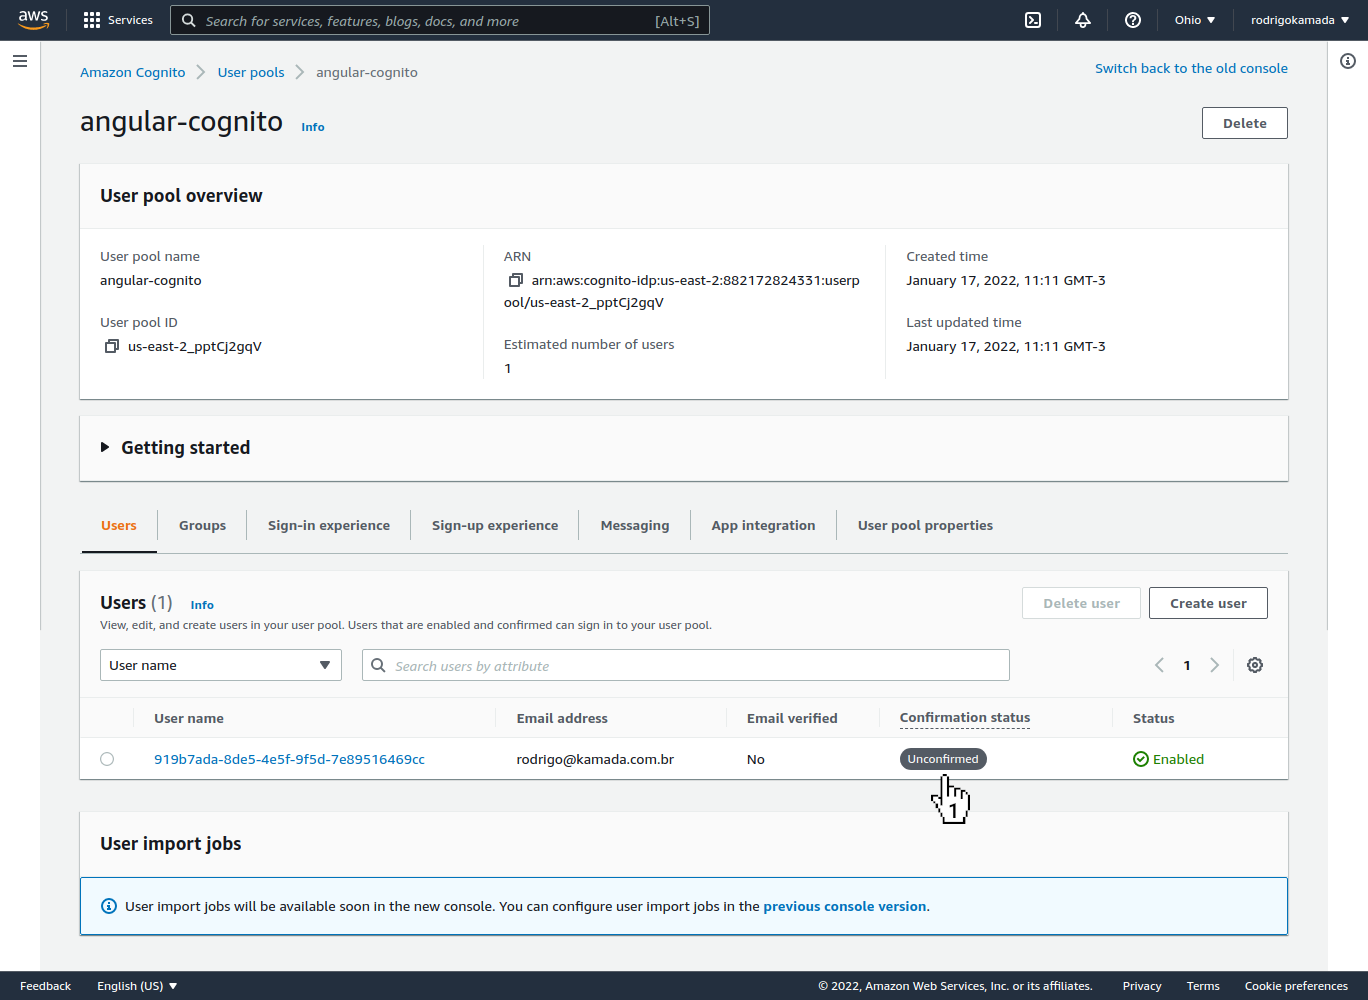
**2.** Check that the user was created in Amazon Cognito.
**3.** Open the email with the subject *Your verification code* and copy the code generated, in my case, the code `308386` was generated.
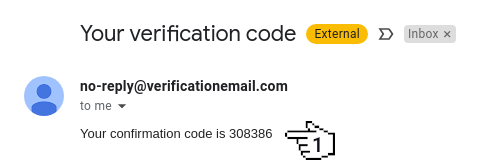
**4.** Fill in the field *Code* with the code copied and click on the button *Confirm*.

**5.** Check that the user was confirmed in Amazon Cognito.
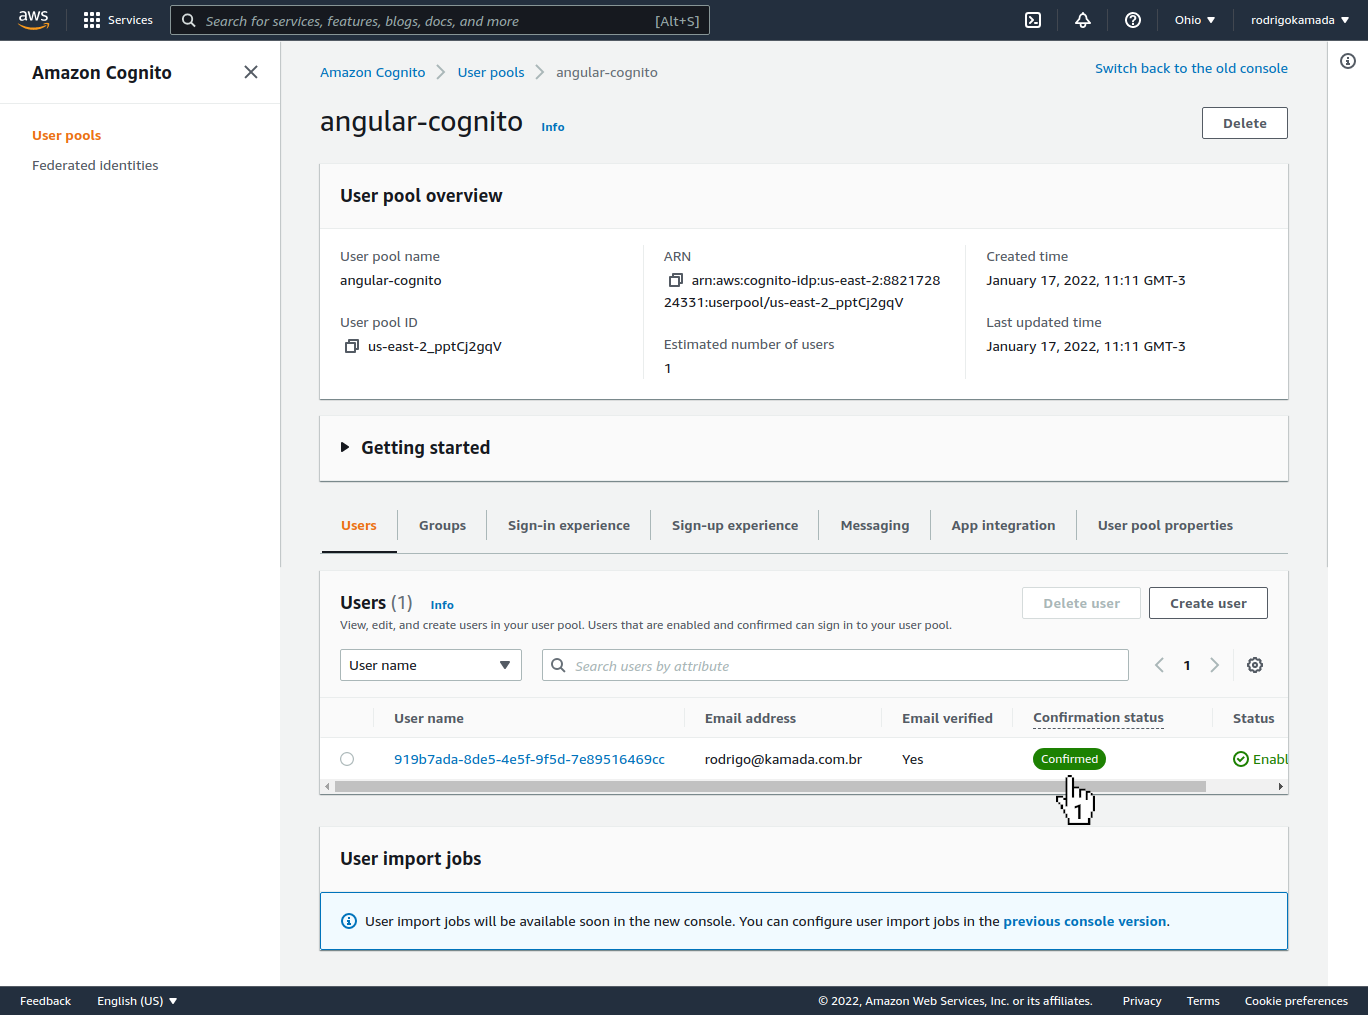
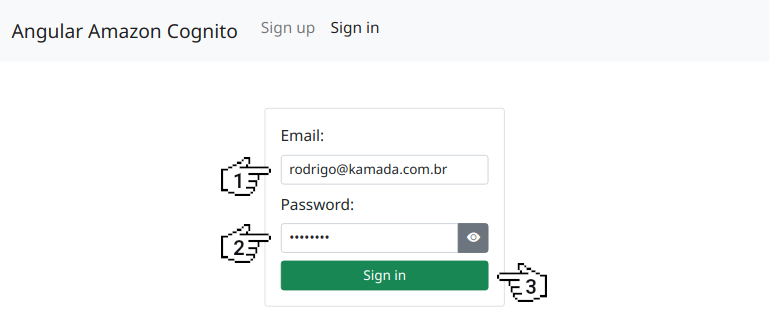
**6.** Fill in the field *Email*, *Password* and click on the button *Sign in*.
**7.** Fill in the field *Name* and click on the button *Update*.
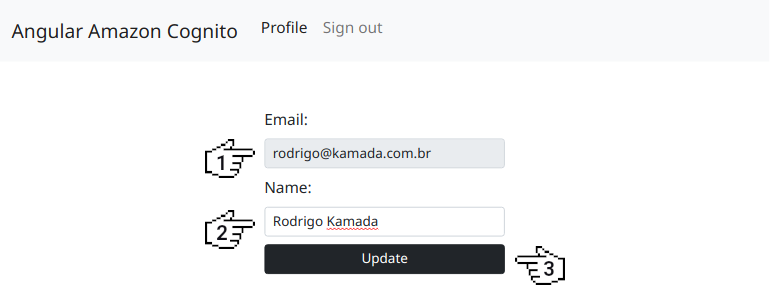
**8.** Click on the user link created in Amazon Cognito.
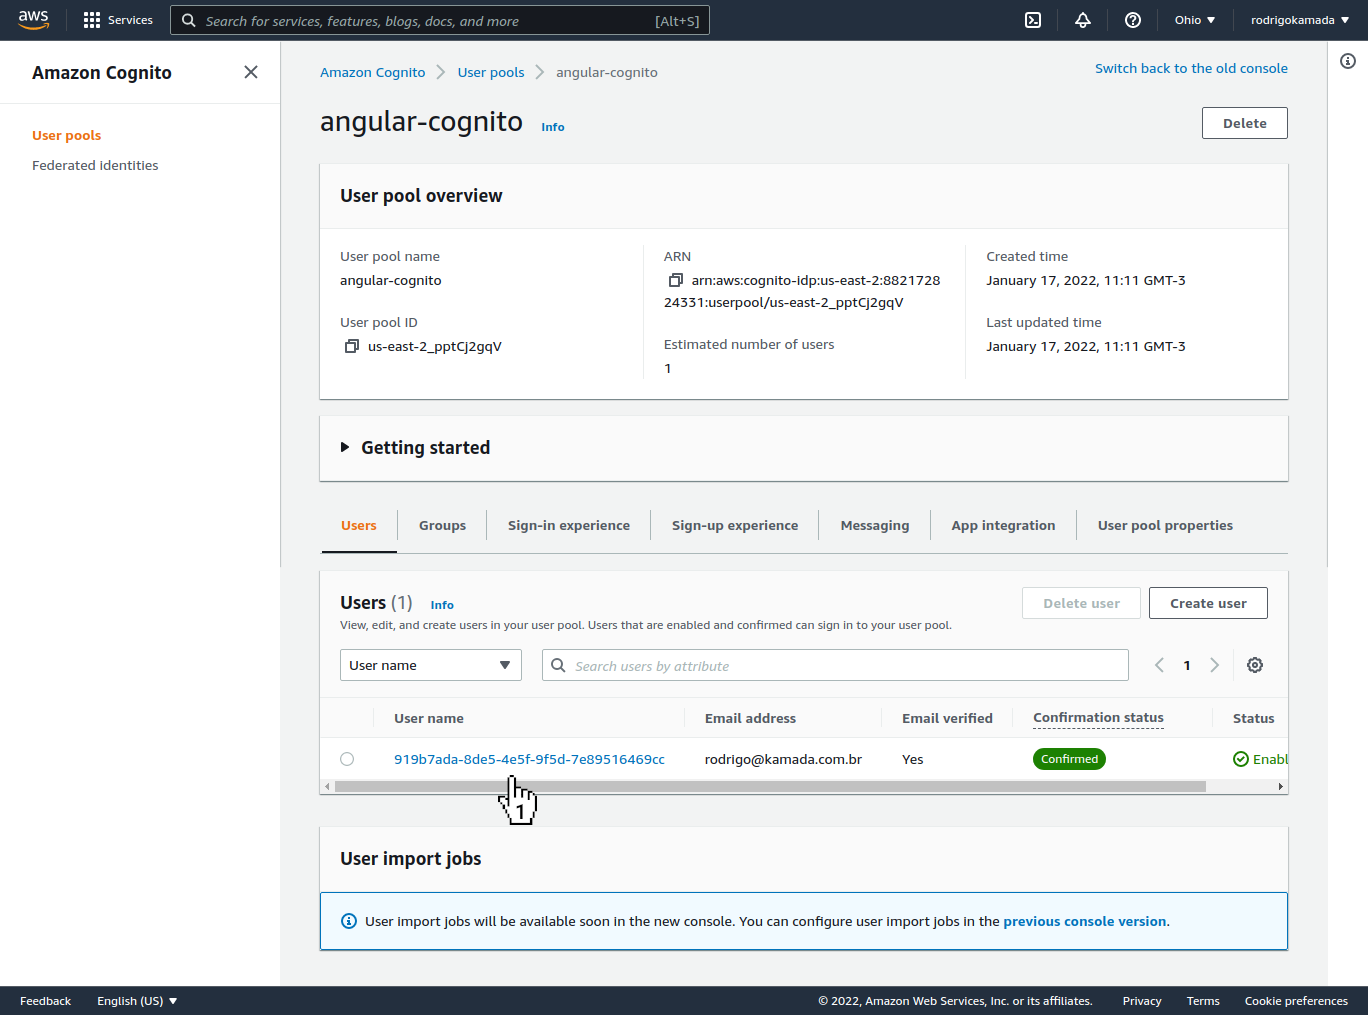
**9.** Check that the user name was updated in Amazon Cognito.
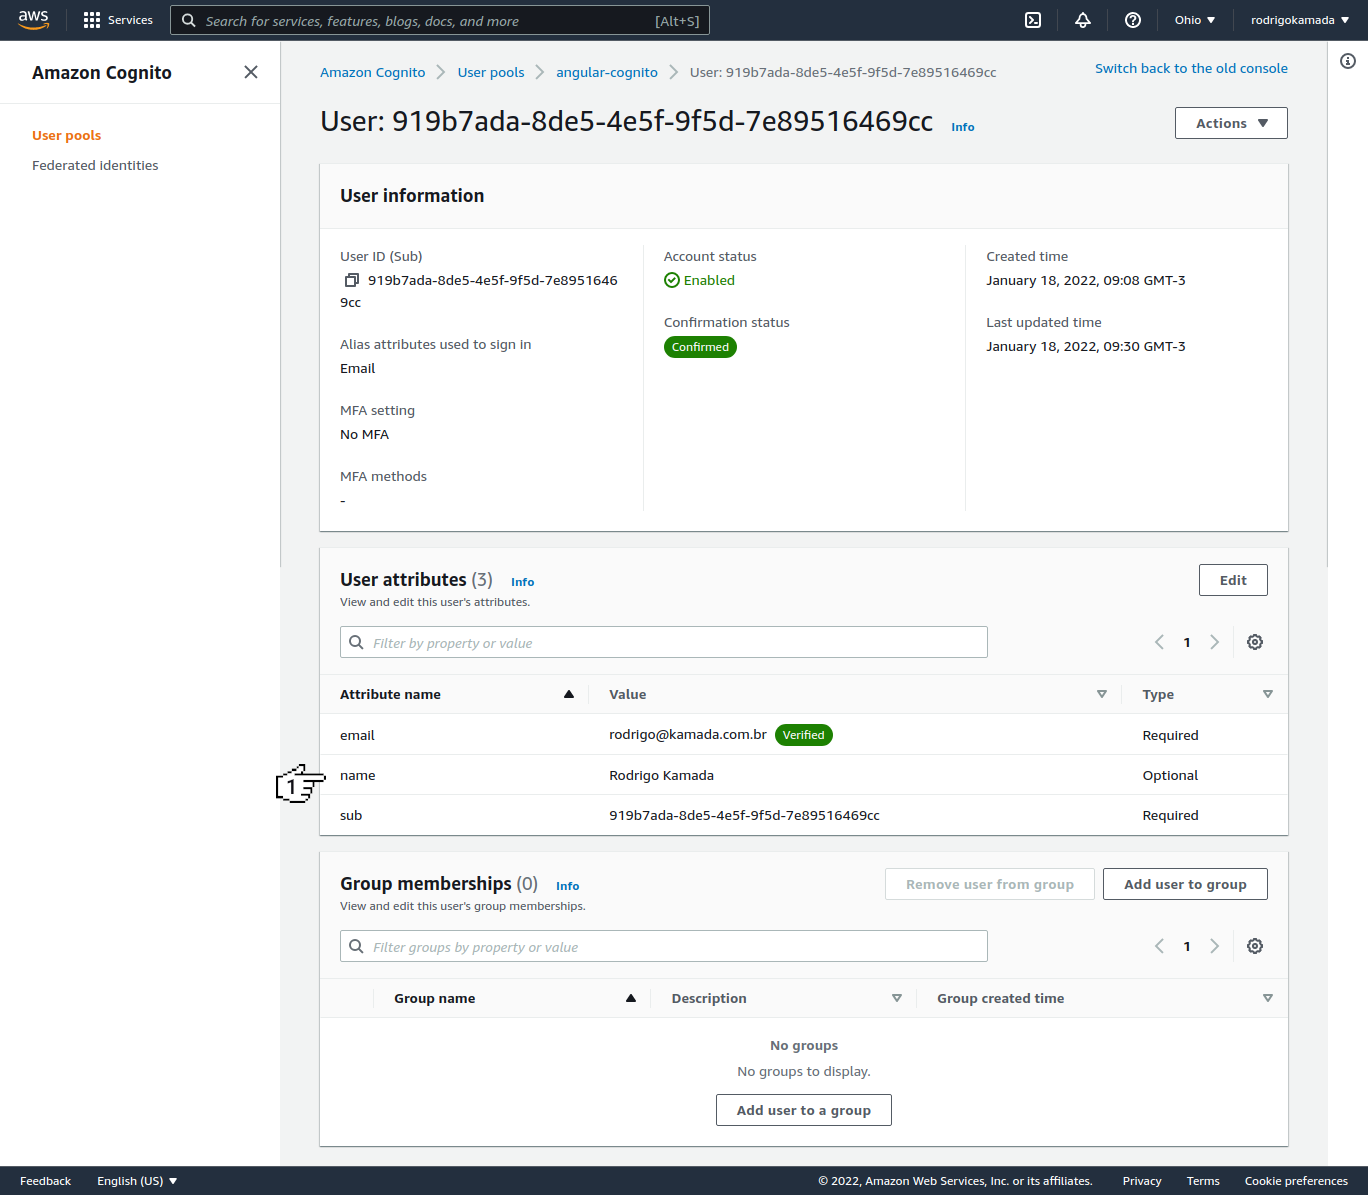
**10.** Ready! We test the user sign in, sign up and update.
## Cloning the application
**1.** Clone the repository.
```powershell
git clone git@github.com:rodrigokamada/angular-amazon-cognito.git
```
**2.** Install the dependencies.
```powershell
npm ci
```
**3.** Run the application.
```powershell
npm start
```