https://github.com/rodrigokamada/angular-aws-map
Application example built with Angular 14 and adding the map MapLibre component using the Amazon Amplify Geo and Amazon Location Service services.
https://github.com/rodrigokamada/angular-aws-map
amazon amplify angular article aws devcommunity frontend geo geolocation ghactions ghpages hacktoberfest location map maplibre stackblitz tutorial typescript webdev webdevelopment
Last synced: about 2 months ago
JSON representation
Application example built with Angular 14 and adding the map MapLibre component using the Amazon Amplify Geo and Amazon Location Service services.
- Host: GitHub
- URL: https://github.com/rodrigokamada/angular-aws-map
- Owner: rodrigokamada
- License: mit
- Created: 2022-04-15T11:58:58.000Z (almost 4 years ago)
- Default Branch: main
- Last Pushed: 2022-08-13T14:01:50.000Z (over 3 years ago)
- Last Synced: 2025-09-29T12:59:54.582Z (5 months ago)
- Topics: amazon, amplify, angular, article, aws, devcommunity, frontend, geo, geolocation, ghactions, ghpages, hacktoberfest, location, map, maplibre, stackblitz, tutorial, typescript, webdev, webdevelopment
- Language: TypeScript
- Homepage: https://rodrigokamada.github.io/angular-aws-map/
- Size: 6.57 MB
- Stars: 2
- Watchers: 2
- Forks: 0
- Open Issues: 0
-
Metadata Files:
- Readme: README.md
- Funding: .github/FUNDING.yml
- License: LICENSE.md
Awesome Lists containing this project
README
# Angular AWS Map
Application example built with [Angular](https://angular.io/) 14 and adding the map [MapLibre](https://maplibre.org/) component using the [Amazon Amplify Geo](https://docs.amplify.aws/lib/geo/getting-started/q/platform/js/) and [Amazon Location Service](https://aws.amazon.com/location/) services.
This tutorial was posted on my [blog](https://rodrigo.kamada.com.br/blog/adicionando-o-componente-de-mapa-usando-os-servicos-da-amazon-em-uma-aplicacao-angular) in portuguese and on the [DEV Community](https://dev.to/rodrigokamada/adding-the-map-component-using-the-aws-services-to-an-angular-application-3a4a) in english.
[](https://rodrigo.kamada.com.br)
[](https://www.linkedin.com/in/rodrigokamada)
[](https://twitter.com/rodrigokamada)
[](https://www.instagram.com/rodrigokamada/)
## Prerequisites
Before you start, you need to install and configure the tools:
* [git](https://git-scm.com/)
* [Node.js and npm](https://nodejs.org/)
* [Angular CLI](https://angular.io/cli)
* IDE (e.g. [Visual Studio Code](https://code.visualstudio.com/) or [WebStorm](https://www.jetbrains.com/webstorm/))
## Getting started
### Create and configure the account on the Amazon Location Service
[Amazon Location Service](https://aws.amazon.com/location/) provides location functionality to applications without compromising data security and user privacy.
**1.** Let's create and configure the account. Access the site [https://aws.amazon.com/location/](https://aws.amazon.com/location/) and click on the button *Get Started with Amazon Location Service*.

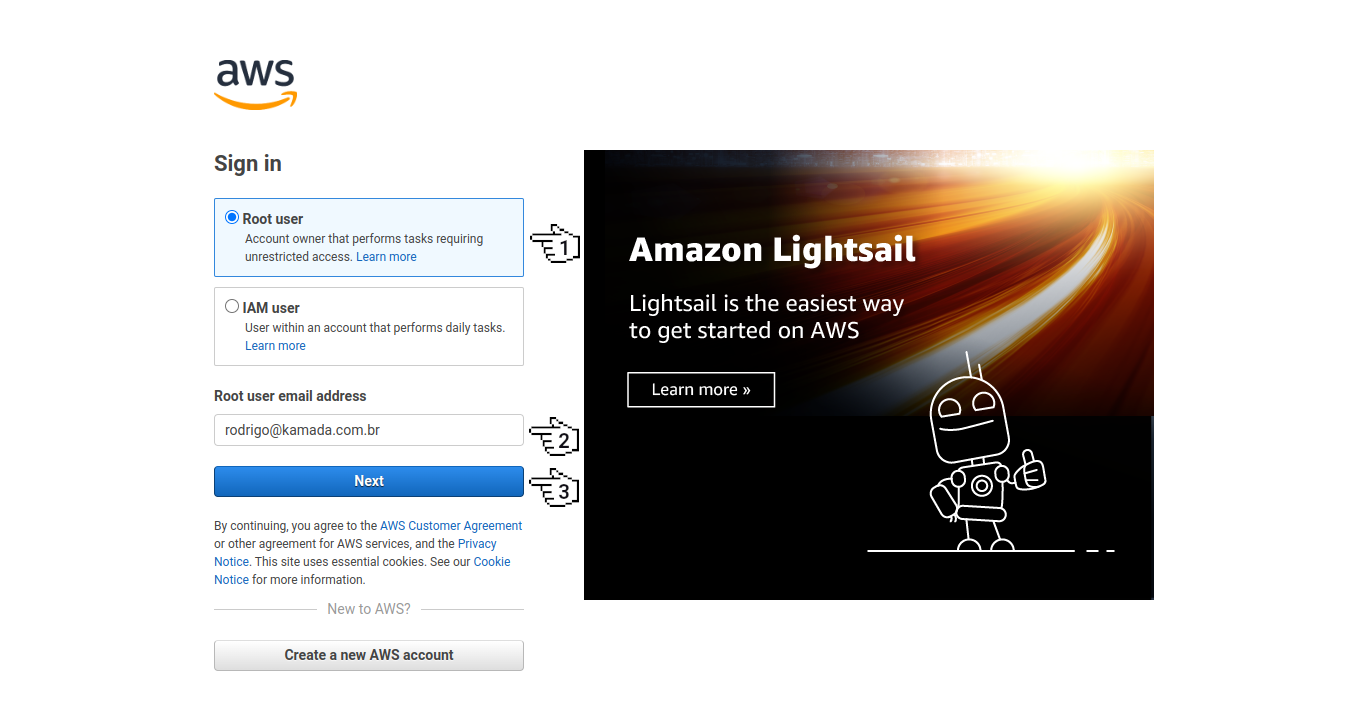
**2.** Click on the option *Root user*, fill in the field *Root user email address* and click on the button *Next*.
**Note:**
* If you don't have an Amazon account, do steps 1 to 9 of the post *[Authentication using the Amazon Cognito to an Angular application](https://dev.to/rodrigokamada/authentication-using-the-amazon-cognito-to-an-angular-application-ilh)* in the session *Create and configure the account on the Amazon Cognito*.
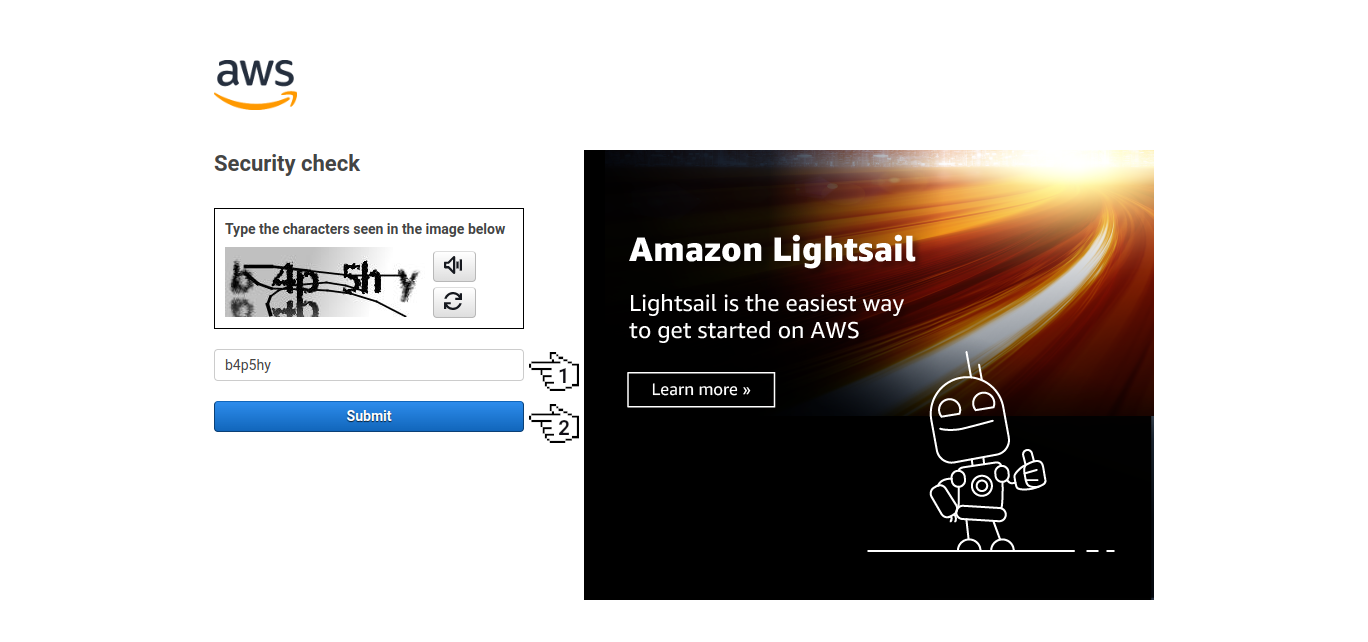
**3.** Fill in the field *Security check* and click on the button *Submit*.
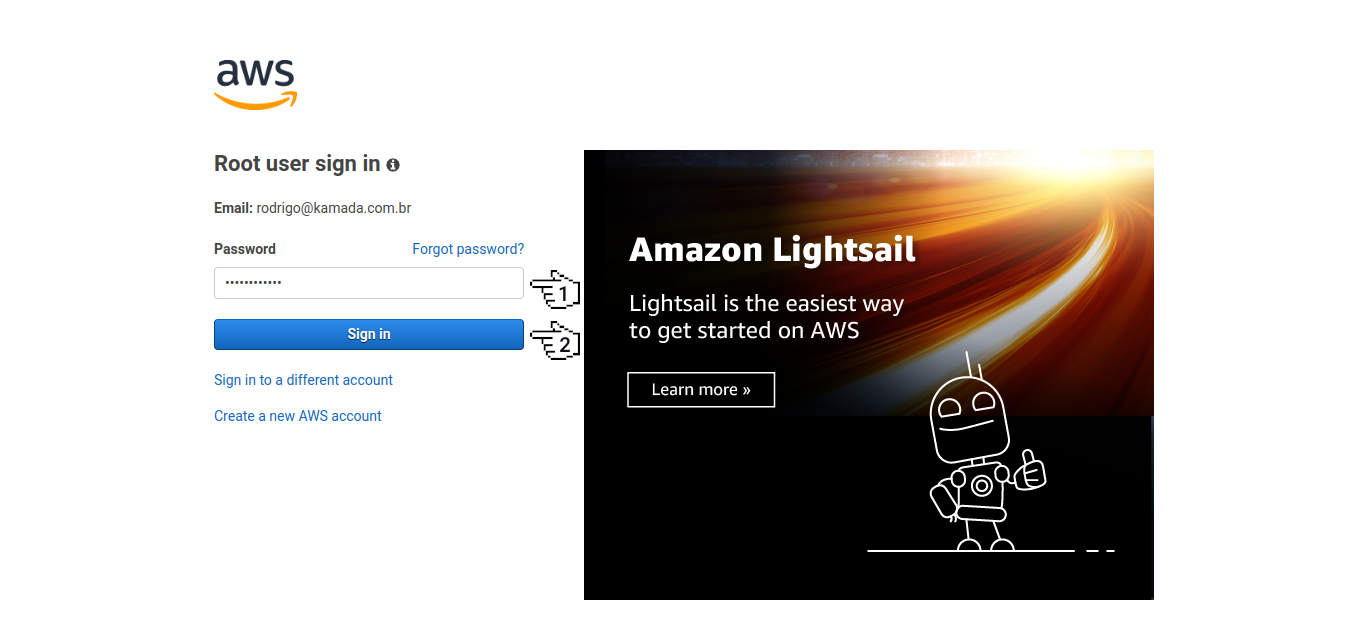
**4.** Fill in the field *Password* and click on the button *Sign in*.
**5.** Click on the menu *Services*.

**6.** Click on the menu *Maps*.

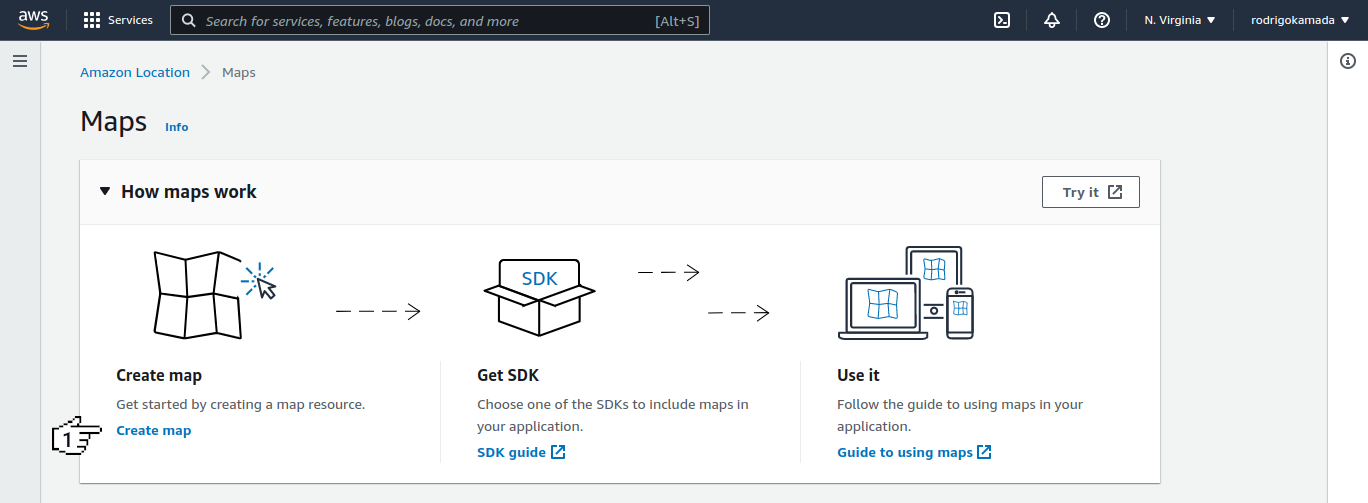
**7.** Click on the link *Create map*.
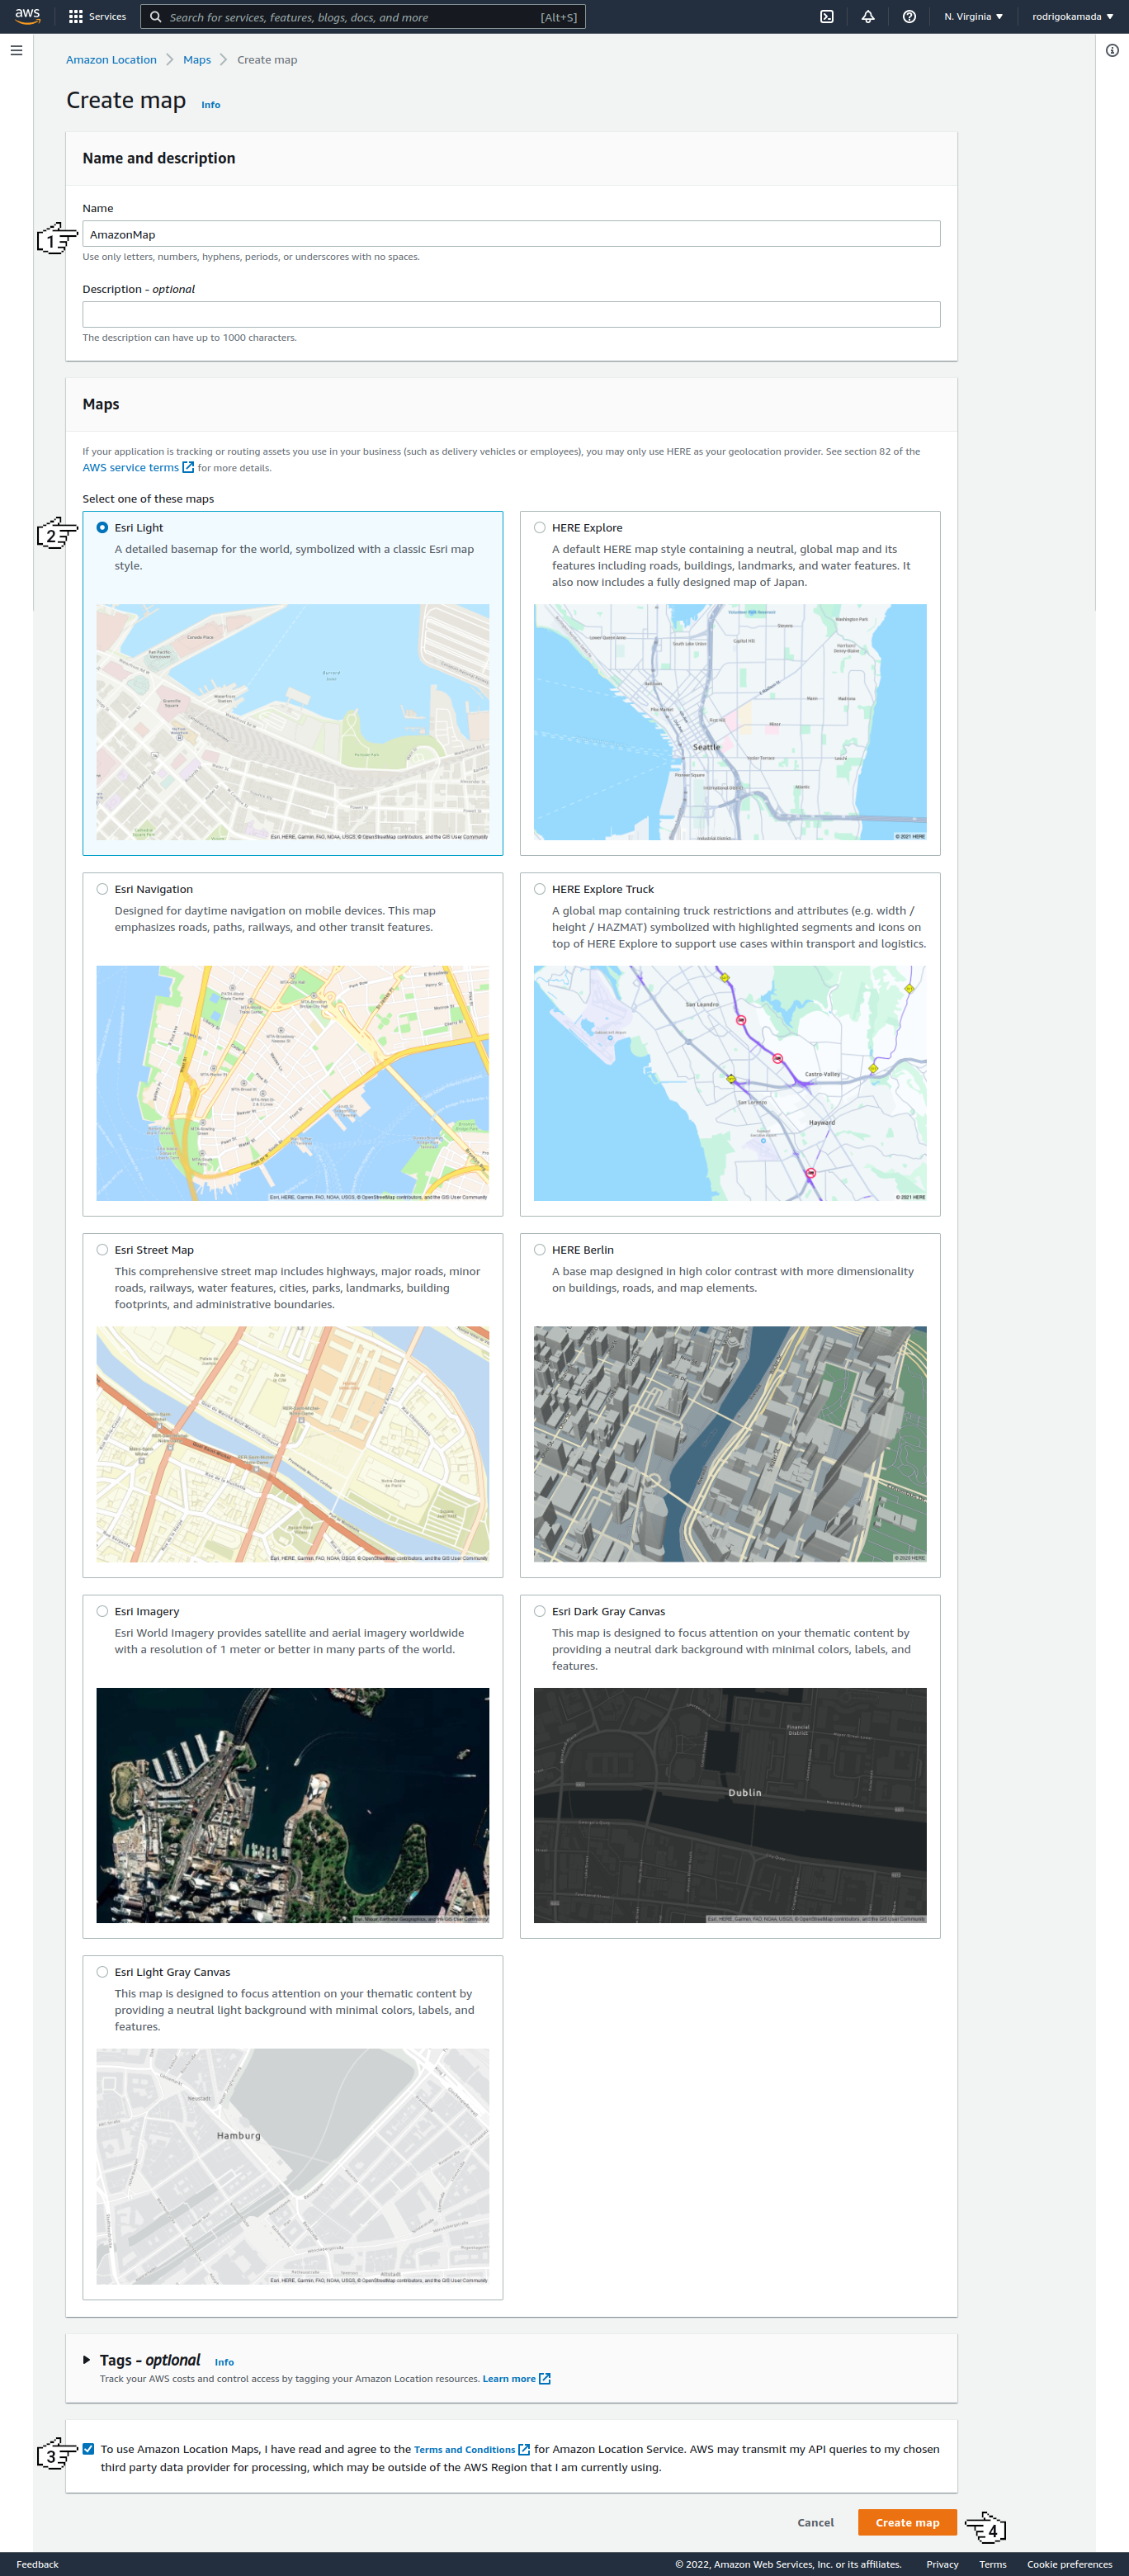
**8.** Fill in the field *Name*, click on the options *Esri Light* and *To use Amazon Location Maps...* and click on the button *Create map*.
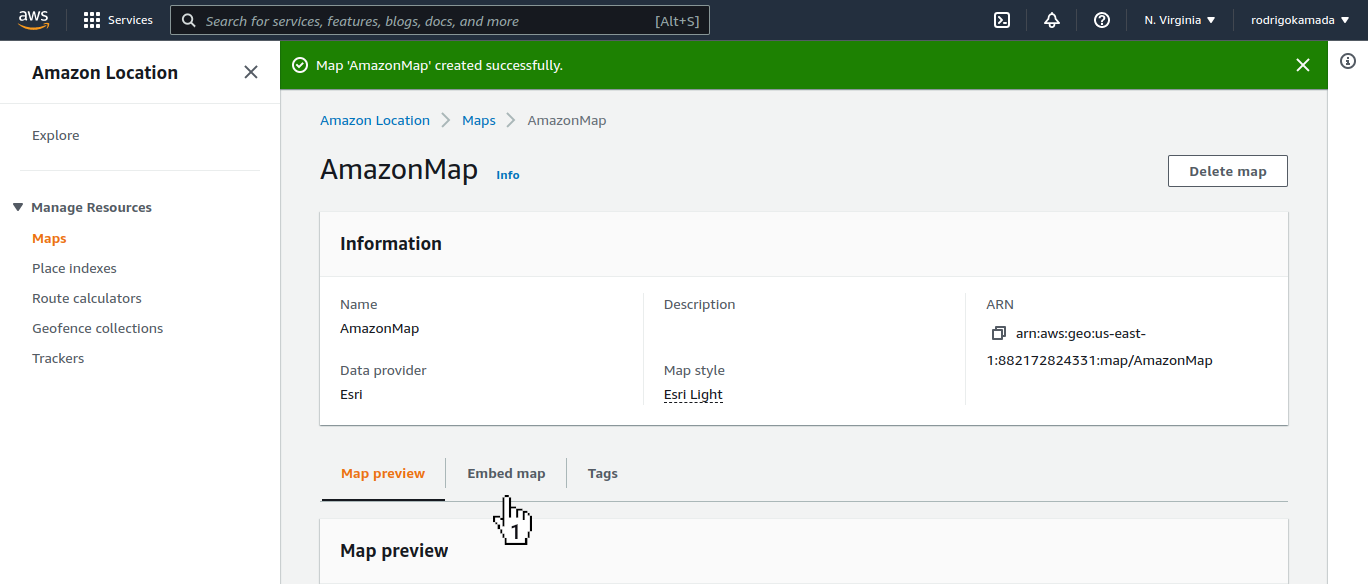
**9.** Click on the tab *Embed map*.
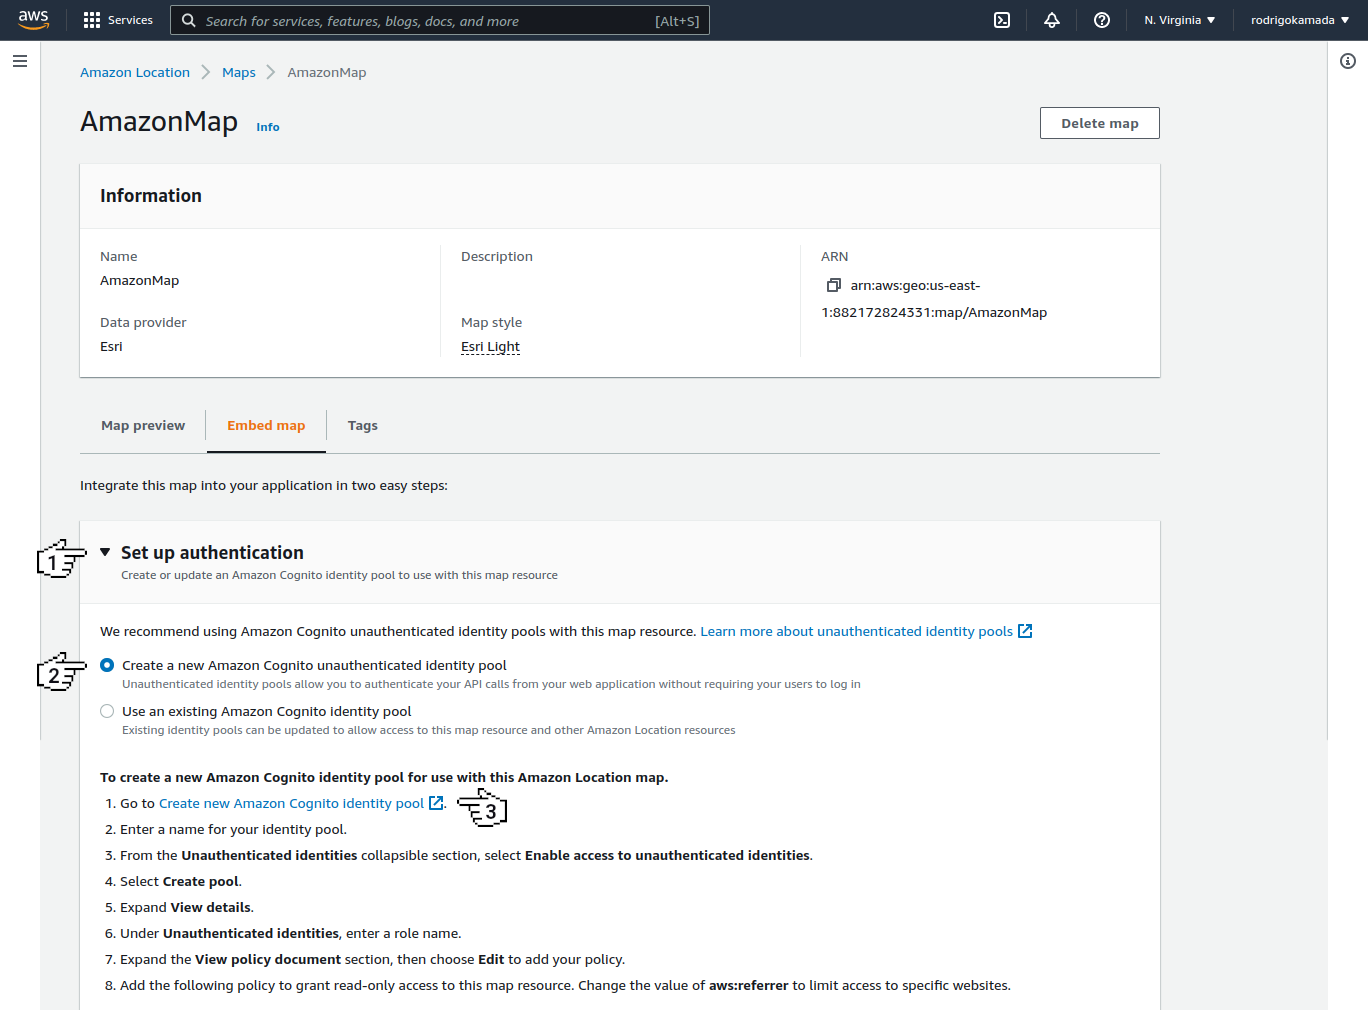
**10.** Click on the link *Set up authentication*, click on the option *Create a new Amazon Cognito unauthenticated Identity pool* and click on the link *Create new Amazon Cognito Identity pool*.
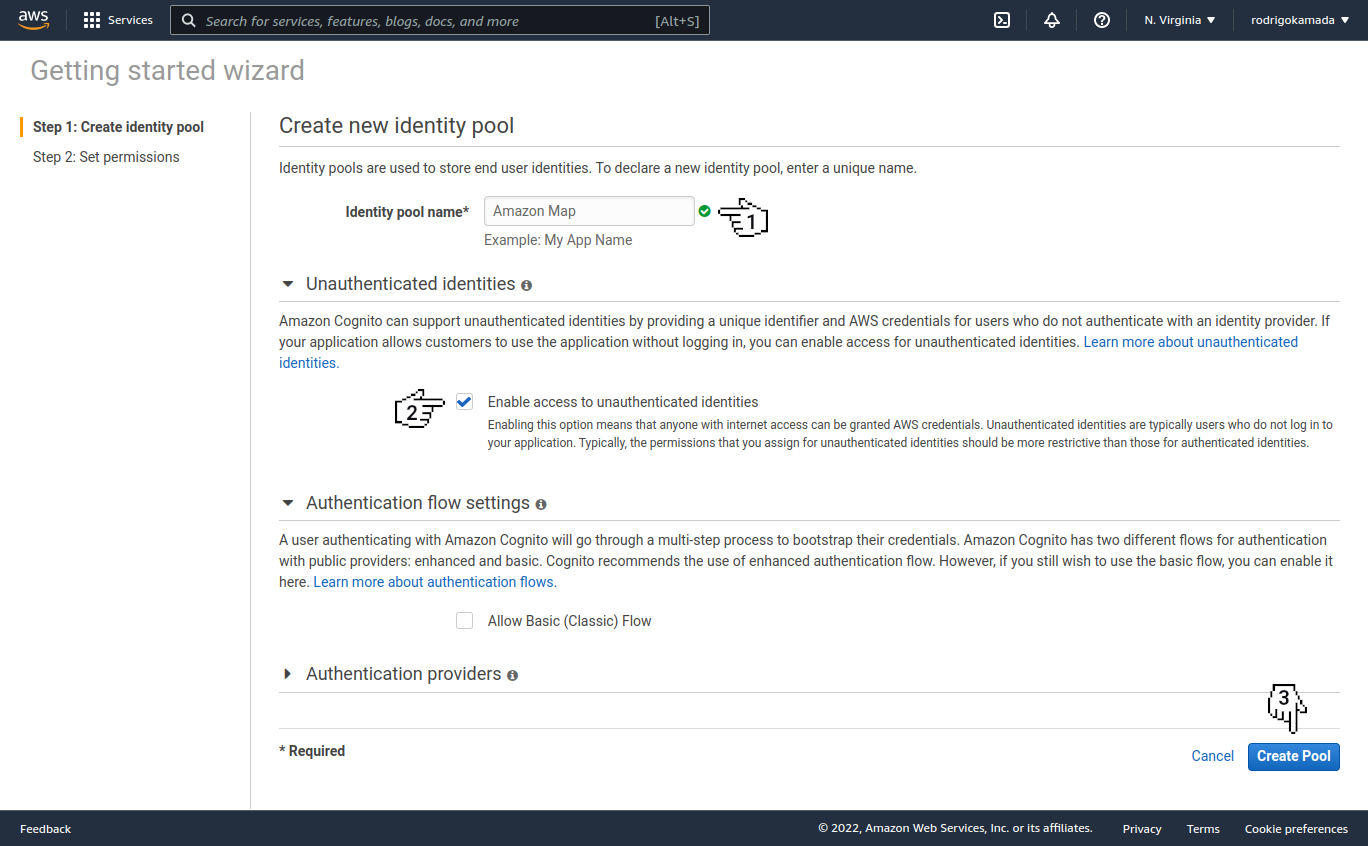
**11.** Fill in the field *Identity pool name*, click on the option *Enable access to unauthenticated identities* and click on the button *Create Pool*.
**12.** Click on the link *Edit*, fill in the field with the *JSON* below and click on the link *Allow*.
```json
{
"Version": "2012-10-17",
"Statement": [
{
"Effect": "Allow",
"Action": [
"mobileanalytics:PutEvents",
"cognito-sync:*",
"geo:GetMap*"
],
"Resource": [
"*"
],
"Condition": {
"StringLike": {
"aws:referer": [
"*"
]
}
}
}
]
}
```
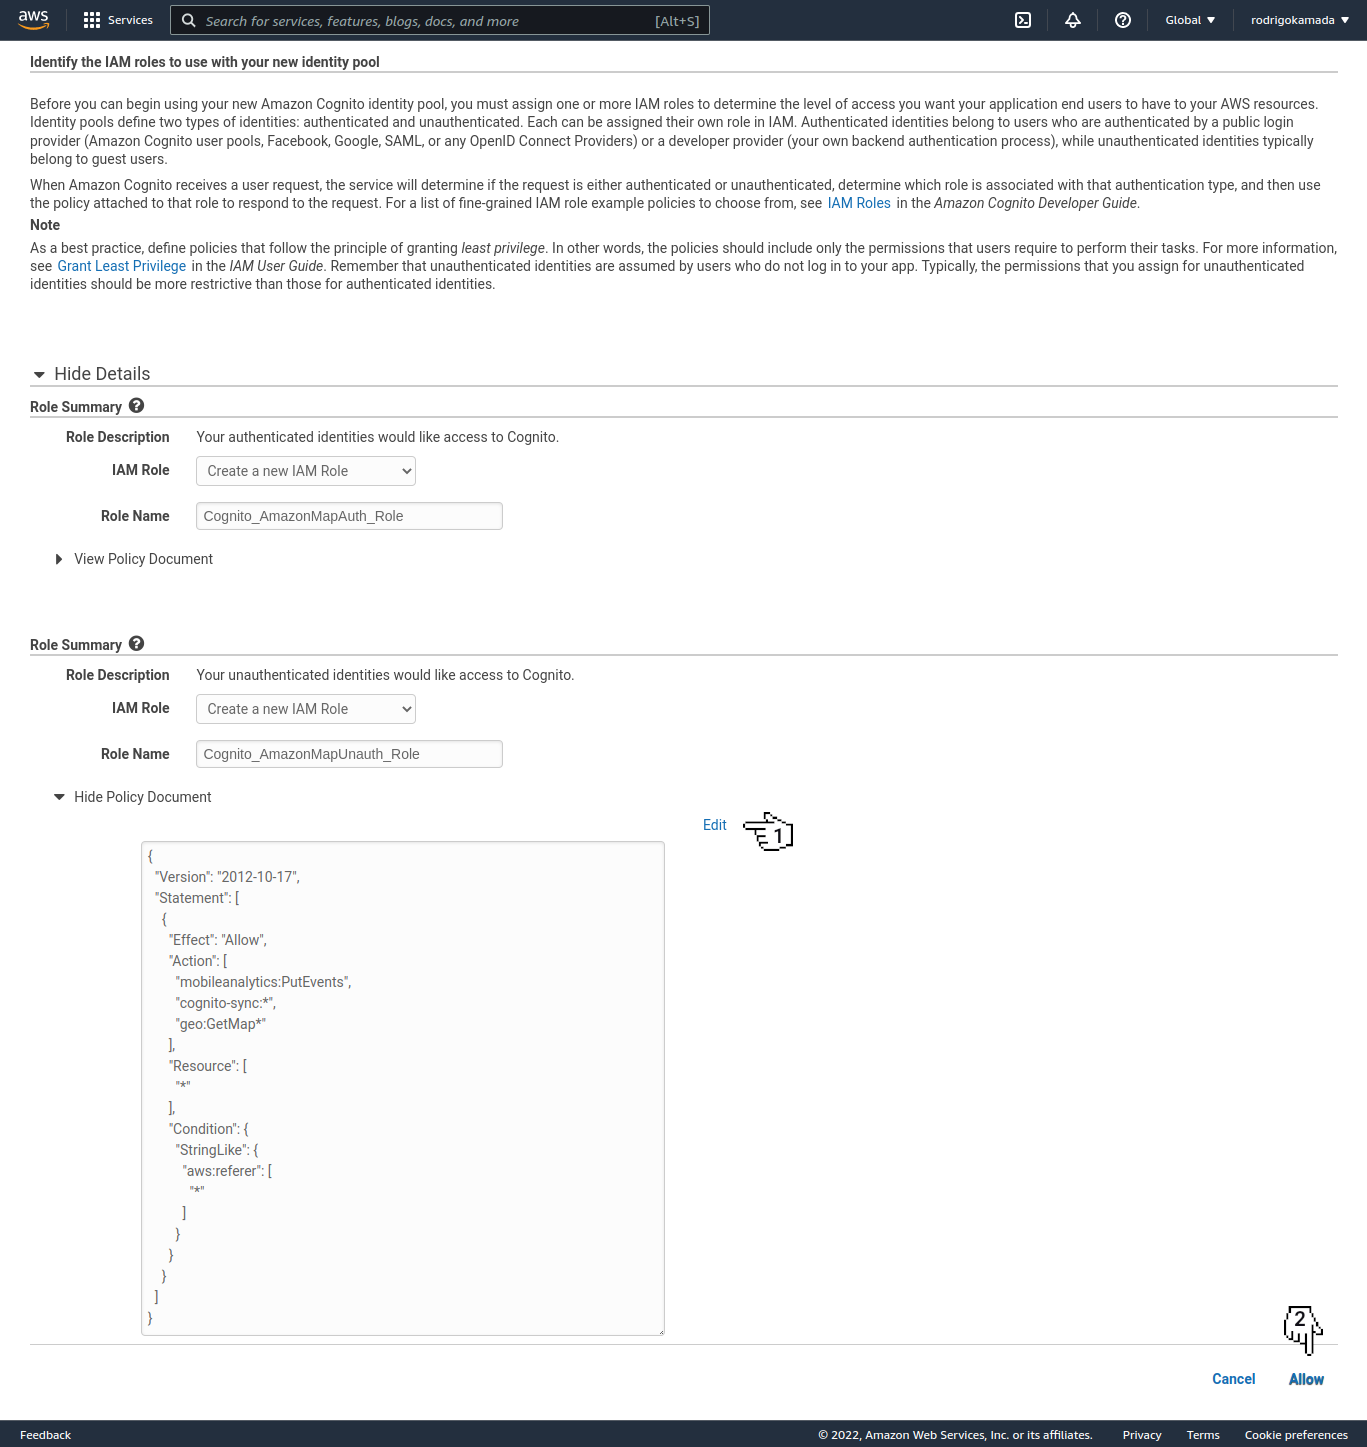
**13.** Copy the authentication pool ID displayed and, in my case, the value `us-east-1:57a33aaf-0026-44e3-908c-7fb9d5730b9f` was displayed because this value will be configured in the Angular application.
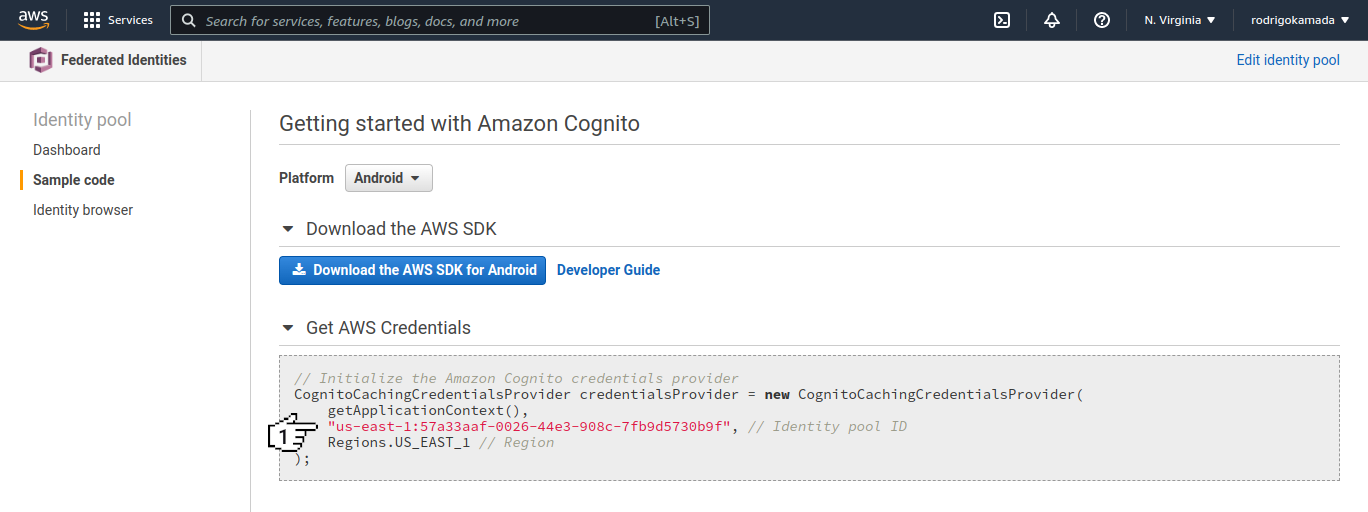
**14.** Ready! Map and authentication pool created.
### Create the Angular application
[Angular](https://angular.io/) is a development platform for building WEB, mobile and desktop applications using HTML, CSS and TypeScript (JavaScript). Currently, Angular is at version 13 and Google is the main maintainer of the project.
**1.** Let's create the application with the Angular base structure using the `@angular/cli` with the route file and the SCSS style format.
```powershell
ng new angular-aws-map --routing true --style scss
CREATE angular-aws-map/README.md (1077 bytes)
CREATE angular-aws-map/.editorconfig (274 bytes)
CREATE angular-aws-map/.gitignore (548 bytes)
CREATE angular-aws-map/angular.json (3327 bytes)
CREATE angular-aws-map/package.json (1089 bytes)
CREATE angular-aws-map/tsconfig.json (863 bytes)
CREATE angular-aws-map/.browserslistrc (600 bytes)
CREATE angular-aws-map/karma.conf.js (1443 bytes)
CREATE angular-aws-map/tsconfig.app.json (287 bytes)
CREATE angular-aws-map/tsconfig.spec.json (333 bytes)
CREATE angular-aws-map/.vscode/extensions.json (130 bytes)
CREATE angular-aws-map/.vscode/launch.json (474 bytes)
CREATE angular-aws-map/.vscode/tasks.json (938 bytes)
CREATE angular-aws-map/src/favicon.ico (948 bytes)
CREATE angular-aws-map/src/index.html (309 bytes)
CREATE angular-aws-map/src/main.ts (372 bytes)
CREATE angular-aws-map/src/polyfills.ts (2338 bytes)
CREATE angular-aws-map/src/styles.scss (80 bytes)
CREATE angular-aws-map/src/test.ts (745 bytes)
CREATE angular-aws-map/src/assets/.gitkeep (0 bytes)
CREATE angular-aws-map/src/environments/environment.prod.ts (51 bytes)
CREATE angular-aws-map/src/environments/environment.ts (658 bytes)
CREATE angular-aws-map/src/app/app-routing.module.ts (245 bytes)
CREATE angular-aws-map/src/app/app.module.ts (393 bytes)
CREATE angular-aws-map/src/app/app.component.scss (0 bytes)
CREATE angular-aws-map/src/app/app.component.html (23364 bytes)
CREATE angular-aws-map/src/app/app.component.spec.ts (1133 bytes)
CREATE angular-aws-map/src/app/app.component.ts (231 bytes)
✔ Packages installed successfully.
Successfully initialized git.
```
**2.** Install and configure the Bootstrap CSS framework. Do steps 2 and 3 of the post *[Adding the Bootstrap CSS framework to an Angular application](https://github.com/rodrigokamada/angular-bootstrap)*.
**3.** Configure the variable `amplify.Auth.identityPoolId` with the authentication pool ID, the variables `amplify.Auth.region` and `amplify.geo.AmazonLocationService.region` with the region and the variables `amplify.geo.AmazonLocationService.maps.items[MAP_NAME]` and `amplify.geo.AmazonLocationService.maps.default` wit the map name created in the Amazon Location Service in the `src/environments/environment.ts` and `src/environments/environment.prod.ts` files as below.
```typescript
amplify: {
Auth: {
identityPoolId: 'us-east-1:57a33aaf-0026-44e3-908c-7fb9d5730b9f',
region: 'us-east-1',
},
geo: {
AmazonLocationService: {
maps: {
items: {
AmazonMap: {
style: 'Default style',
}
},
default: 'AmazonMap',
},
region: 'us-east-1',
},
},
},
```
**4.** Install the `aws-amplify`, `maplibre-gl-js-amplify` and `@types/geojson` libraries.
```powershell
npm install aws-amplify maplibre-gl-js-amplify
npm install @types/geojson --save-dev
```
**5.** Configure the `maplibre-gl` library. Change the `angular.json` file and add the `maplibre-gl.css` file as below.
```json
"styles": [
"node_modules/bootstrap/scss/bootstrap.scss",
"node_modules/bootstrap-icons/font/bootstrap-icons.css",
"node_modules/maplibre-gl/dist/maplibre-gl.css",
"src/styles.scss"
],
```
**6.** Change the `src/polyfills.ts` file. Add the global declaration as below. This configuration is required starting with Angular version 6.
```typescript
(window as any).global = window;
```
**7.** Remove the content of the `AppComponent` class from the `src/app/app.component.ts` file. Import the `maplibre-gl-js-amplify` service and create the `getCurrentPosition` and `loadMap` methods as below.
```typescript
import { AfterViewInit, Component } from '@angular/core';
import { Observable, Subscriber } from 'rxjs';
import Amplify from 'aws-amplify';
import { createMap } from 'maplibre-gl-js-amplify';
import * as maplibregl from 'maplibre-gl';
import { environment } from '../environments/environment';
@Component({
selector: 'app-root',
templateUrl: './app.component.html',
styleUrls: ['./app.component.scss'],
})
export class AppComponent implements AfterViewInit {
map: any;
constructor() {
Amplify.configure(environment.amplify);
}
public ngAfterViewInit(): void {
this.loadMap();
}
private getCurrentPosition(): any {
return new Observable((observer: Subscriber) => {
if (navigator.geolocation) {
navigator.geolocation.getCurrentPosition((position: any) => {
observer.next({
latitude: position.coords.latitude,
longitude: position.coords.longitude,
});
observer.complete();
});
} else {
observer.error();
}
});
}
private loadMap(): void {
createMap({
container: 'map',
center: [0, 0],
zoom: 0,
})
.then((map: any) => {
this.map = map;
this.map.addControl(new maplibregl.NavigationControl());
this.map.addControl(new maplibregl.GeolocateControl());
this.getCurrentPosition()
.subscribe((position: any) => {
this.map.flyTo({ center: [position.longitude, position.latitude], zoom: 13 });
const marker = new maplibregl.Marker();
marker.setLngLat([position.longitude, position.latitude]);
marker.setPopup(new maplibregl.Popup().setHTML('Angular AWS Map'));
marker.addTo(this.map);
});
});
}
}
```
**8.** Remove the contents of the `src/app/app.component.html` file. Add the map `div` tag as below.
```html
Angular AWS Map
```
**9.** Add the style in the `src/app/app.component.scss` file as below.
```css
#map {
height: 400px;
width: 100%;
max-width: 600px;
}
```
**10.** Run the application with the command below.
```powershell
npm start
> angular-aws-map@1.0.0 start
> ng serve
✔ Browser application bundle generation complete.
Initial Chunk Files | Names | Raw Size
vendor.js | vendor | 11.02 MB |
styles.css, styles.js | styles | 522.10 kB |
polyfills.js | polyfills | 294.90 kB |
scripts.js | scripts | 76.33 kB |
main.js | main | 11.18 kB |
runtime.js | runtime | 6.88 kB |
| Initial Total | 11.91 MB
Build at: 2022-04-26T10:47:33.505Z - Hash: 44780bc6612489fe - Time: 30672ms
** Angular Live Development Server is listening on localhost:4200, open your browser on http://localhost:4200/ **
✔ Compiled successfully.
```
**11.** Ready! Access the URL `http://localhost:4200/` and check if the application is working. See the application working on [GitHub Pages](https://rodrigokamada.github.io/angular-aws-map/) and [Stackblitz](https://stackblitz.com/edit/angular14-aws-map).
![Angular AWS Map]()
## Cloning the application
**1.** Clone the repository.
```powershell
git clone git@github.com:rodrigokamada/angular-aws-map.git
```
**2.** Install the dependencies.
```powershell
npm ci
```
**3.** Run the application.
```powershell
npm start
```