https://github.com/rolling-scopes/rs-site
The Rolling Scopes
https://github.com/rolling-scopes/rs-site
Last synced: about 2 months ago
JSON representation
The Rolling Scopes
- Host: GitHub
- URL: https://github.com/rolling-scopes/rs-site
- Owner: rolling-scopes
- License: mpl-2.0
- Created: 2022-09-23T08:53:02.000Z (over 3 years ago)
- Default Branch: develop
- Last Pushed: 2023-05-05T16:25:43.000Z (about 3 years ago)
- Last Synced: 2025-01-12T07:21:59.146Z (over 1 year ago)
- Language: TypeScript
- Homepage: https://rs-site.vercel.app/
- Size: 3.1 MB
- Stars: 1
- Watchers: 6
- Forks: 1
- Open Issues: 23
-
Metadata Files:
- Readme: README.md
- Funding: .github/FUNDING.yml
- License: LICENSE
Awesome Lists containing this project
README
# Rolling Scopes Site
## Setting up Next app
1. Make sure you have the latest [node](https://nodejs.org/en)
1. Install dependencies:
```bash
pnpm install
```
1.
DRAFT: setup sanity env variables
> Copy [`.env.local.example`] to `.env.local`:
>
> ```bash
> cp .env.local.example .env.local
> ```
>
> Then set these variables in `.env.local`:
>
> - `NEXT_PUBLIC_SANITY_PROJECT_ID` should be the "Project ID" from Sanity project dashboard .
> - `NEXT_PUBLIC_SANITY_DATASET` should be the desired dataset from Sanity project (**`develop`**).
> - `SANITY_API_READ_TOKEN` create an API token with `read-only` permissions on https://manage.sanity.io/:
> - Go to **API** and the **Tokens** section at the bottom, launch its **Add API token** button.
> - Name it `SANITY_API_READ_TOKEN`, set **Permissions** to `Viewer`.
> - Hit **Save** and you can copy/paste the token.
### Running locally
**Running website:**
```bash
pnpm dev
```
Site should be up and running on [http://localhost:3000](http://localhost:3000)
### Deployment
TODO.
## Setting up Sanity Studio
[Sanity Studio](https://github.com/sanity-io/sanity) is customizable UI for sanity CMS.
Using it requires editor access to the rs-site content.
```bash
cd studio
pnpm install
pnpm dev
```
Studio should be up and running on [http://localhost:3333](http://localhost:3333)
### Deployment
Sanity studio is deployed separately from the main website.
TODO.
## Contributing
See [CONTRIBUTING](https://github.com/rolling-scopes/rsschool-app/blob/master/CONTRIBUTING.md) guide
## License
[Mozilla Public License 2.0](https://github.com/rolling-scopes/rsschool-app/blob/master/LICENSE)
---
Old next.js cms-sanity example README.md
https://github.com/vercel/next.js/blob/v13.2.0/examples/cms-sanity/README.md
# A statically generated blog example using Next.js and Sanity
This example showcases Next.js's [Static Generation](https://nextjs.org/docs/basic-features/pages) feature using [Sanity](https://www.sanity.io/) as the data source.
You'll get:
- Next.js deployed with the [Sanity Vercel Integration][integration].
- Sanity Studio running on localhost and deployed in the [cloud](https://www.sanity.io/docs/deployment).
- Sub-second as-you-type previews in Next.js
- [On-demand revalidation of pages](https://nextjs.org/blog/next-12-1#on-demand-incremental-static-regeneration-beta) with [GROQ powered webhooks](https://www.sanity.io/docs/webhooks)
## Step 1. Set up the environment
[Clone the repository](https://docs.github.com/en/repositories/creating-and-managing-repositories/cloning-a-repository) that Vercel created for you and from the root directory of your local checkout.
Then link your clone to Vercel:
```bash
npx vercel link
```
Download the environment variables needed to connect Next.js and Studio to your Sanity project:
```bash
npx vercel env pull
```
You can also set up manually
- [Bootstrap the example](#bootstrap-the-example)
- [Connect to a Sanity project](#connect-to-a-sanity-project)
- [Set up environment variables](#set-up-environment-variables)
If using the [integration] isn't an option. Or maybe you want to work locally first and deploy to Vercel later. Whatever the reason this guide shows you how to setup manually.
### Bootstrap the example
Execute [`create-next-app`](https://github.com/vercel/next.js/tree/canary/packages/create-next-app) with [npm](https://docs.npmjs.com/cli/init), [Yarn](https://yarnpkg.com/lang/en/docs/cli/create/), or [pnpm](https://pnpm.io):
```bash
npx create-next-app --example cms-sanity cms-sanity-app
```
```bash
yarn create next-app --example cms-sanity cms-sanity-app
```
```bash
pnpm create next-app --example cms-sanity cms-sanity-app
```
### Connect to a Sanity project
Run this to select from your existing Sanity projects, or create a new one:
```bash
(cd studio && npx @sanity/cli init)
```
The CLI will update [`sanity.json`] with the project ID and dataset name.
### Set up environment variables
Copy the [`.env.local.example`] file in this directory to `.env.local` (which will be ignored by Git):
```bash
cp .env.local .env.local
```
Then set these variables in `.env.local`:
- `NEXT_PUBLIC_SANITY_PROJECT_ID` should be the `projectId` value from [`sanity.json`].
- `NEXT_PUBLIC_SANITY_DATASET` should be the `dataset` value from [`sanity.json`].
- `SANITY_API_READ_TOKEN` create an API token with `read-only` permissions:
- Run this to open your project settings or go to https://manage.sanity.io/ and open your project:
```bash
(cd studio && npx @sanity/cli manage)
```
- Go to **API** and the **Tokens** section at the bottom, launch its **Add API token** button.
- Name it `SANITY_API_READ_TOKEN`, set **Permissions** to `Viewer`.
- Hit **Save** and you can copy/paste the token.
Your `.env.local` file should look like this:
```bash
NEXT_PUBLIC_SANITY_PROJECT_ID=...
NEXT_PUBLIC_SANITY_DATASET=...
SANITY_API_READ_TOKEN=...
```
## Step 2. Configure CORS for localhost
Needed for live previewing unpublished/draft content.
```bash
npm --prefix studio run cors:add -- http://localhost:3000 --credentials
```
## Step 3. Run Next.js locally in development mode
```bash
npm install && npm run dev
```
```bash
yarn install && yarn dev
```
Your blog should be up and running on [http://localhost:3000](http://localhost:3000)! If it doesn't work, post on [GitHub discussions](https://github.com/vercel/next.js/discussions).
## Step 4. Populate content
In another terminal start up the studio:
```bash
npm run studio:dev
```
Your studio should be up and running on [http://localhost:3333](http://localhost:3333)!
Create content in Sanity Studio and live preview it in Next.js, side-by-side, by opening these URLs:
- [`http://localhost:3333`](http://localhost:3333)
- [`http://localhost:3000/api/preview`](http://localhost:3000/api/preview)
View screenshot ✨
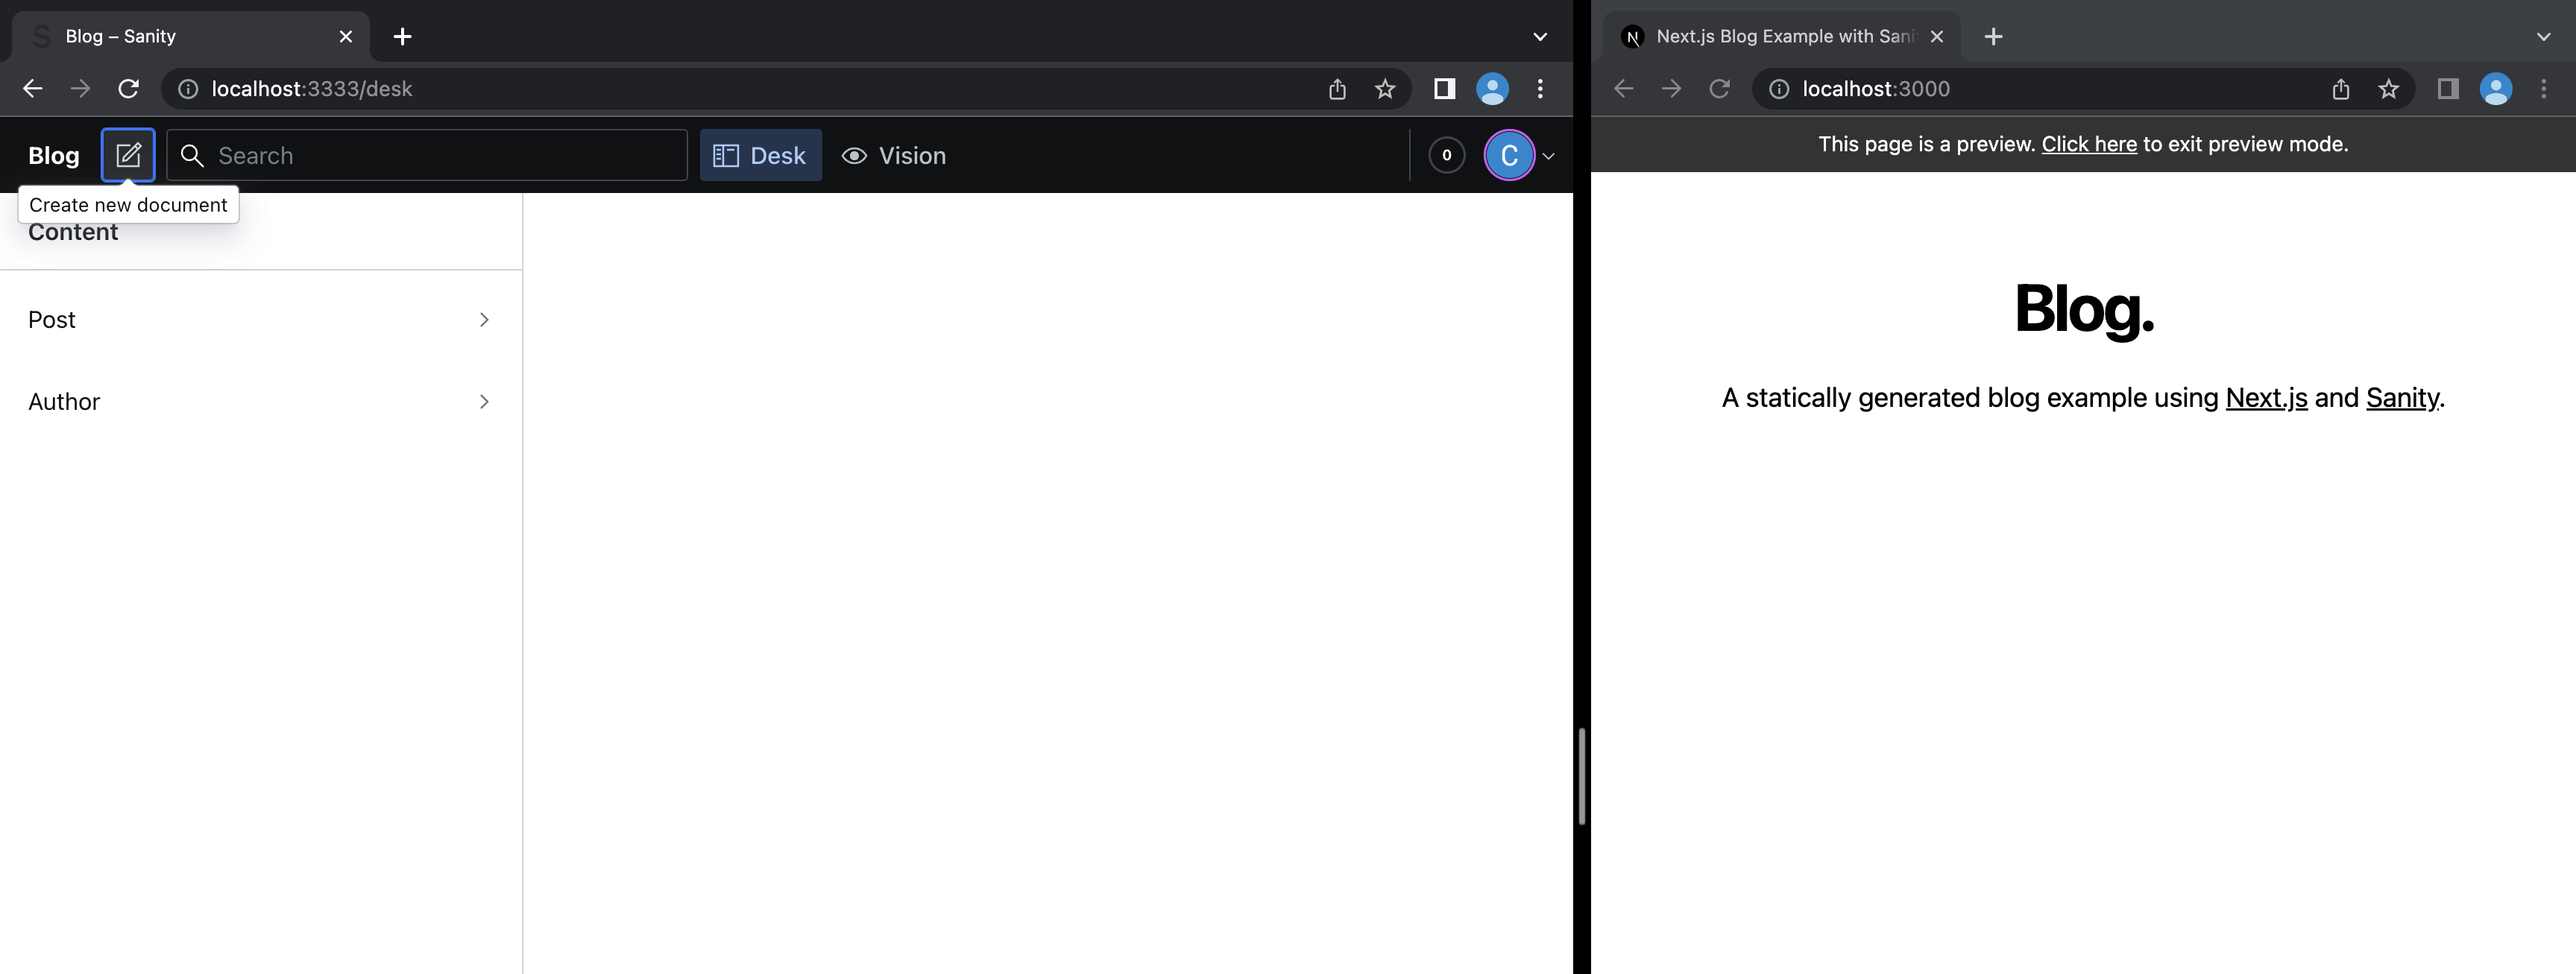
We're all set to do some content creation!
- Click on the **"Create new document"** button top left and select **Post**
- Type some dummy data for the **Title**
- **Generate** a **Slug**
View screenshot ✨
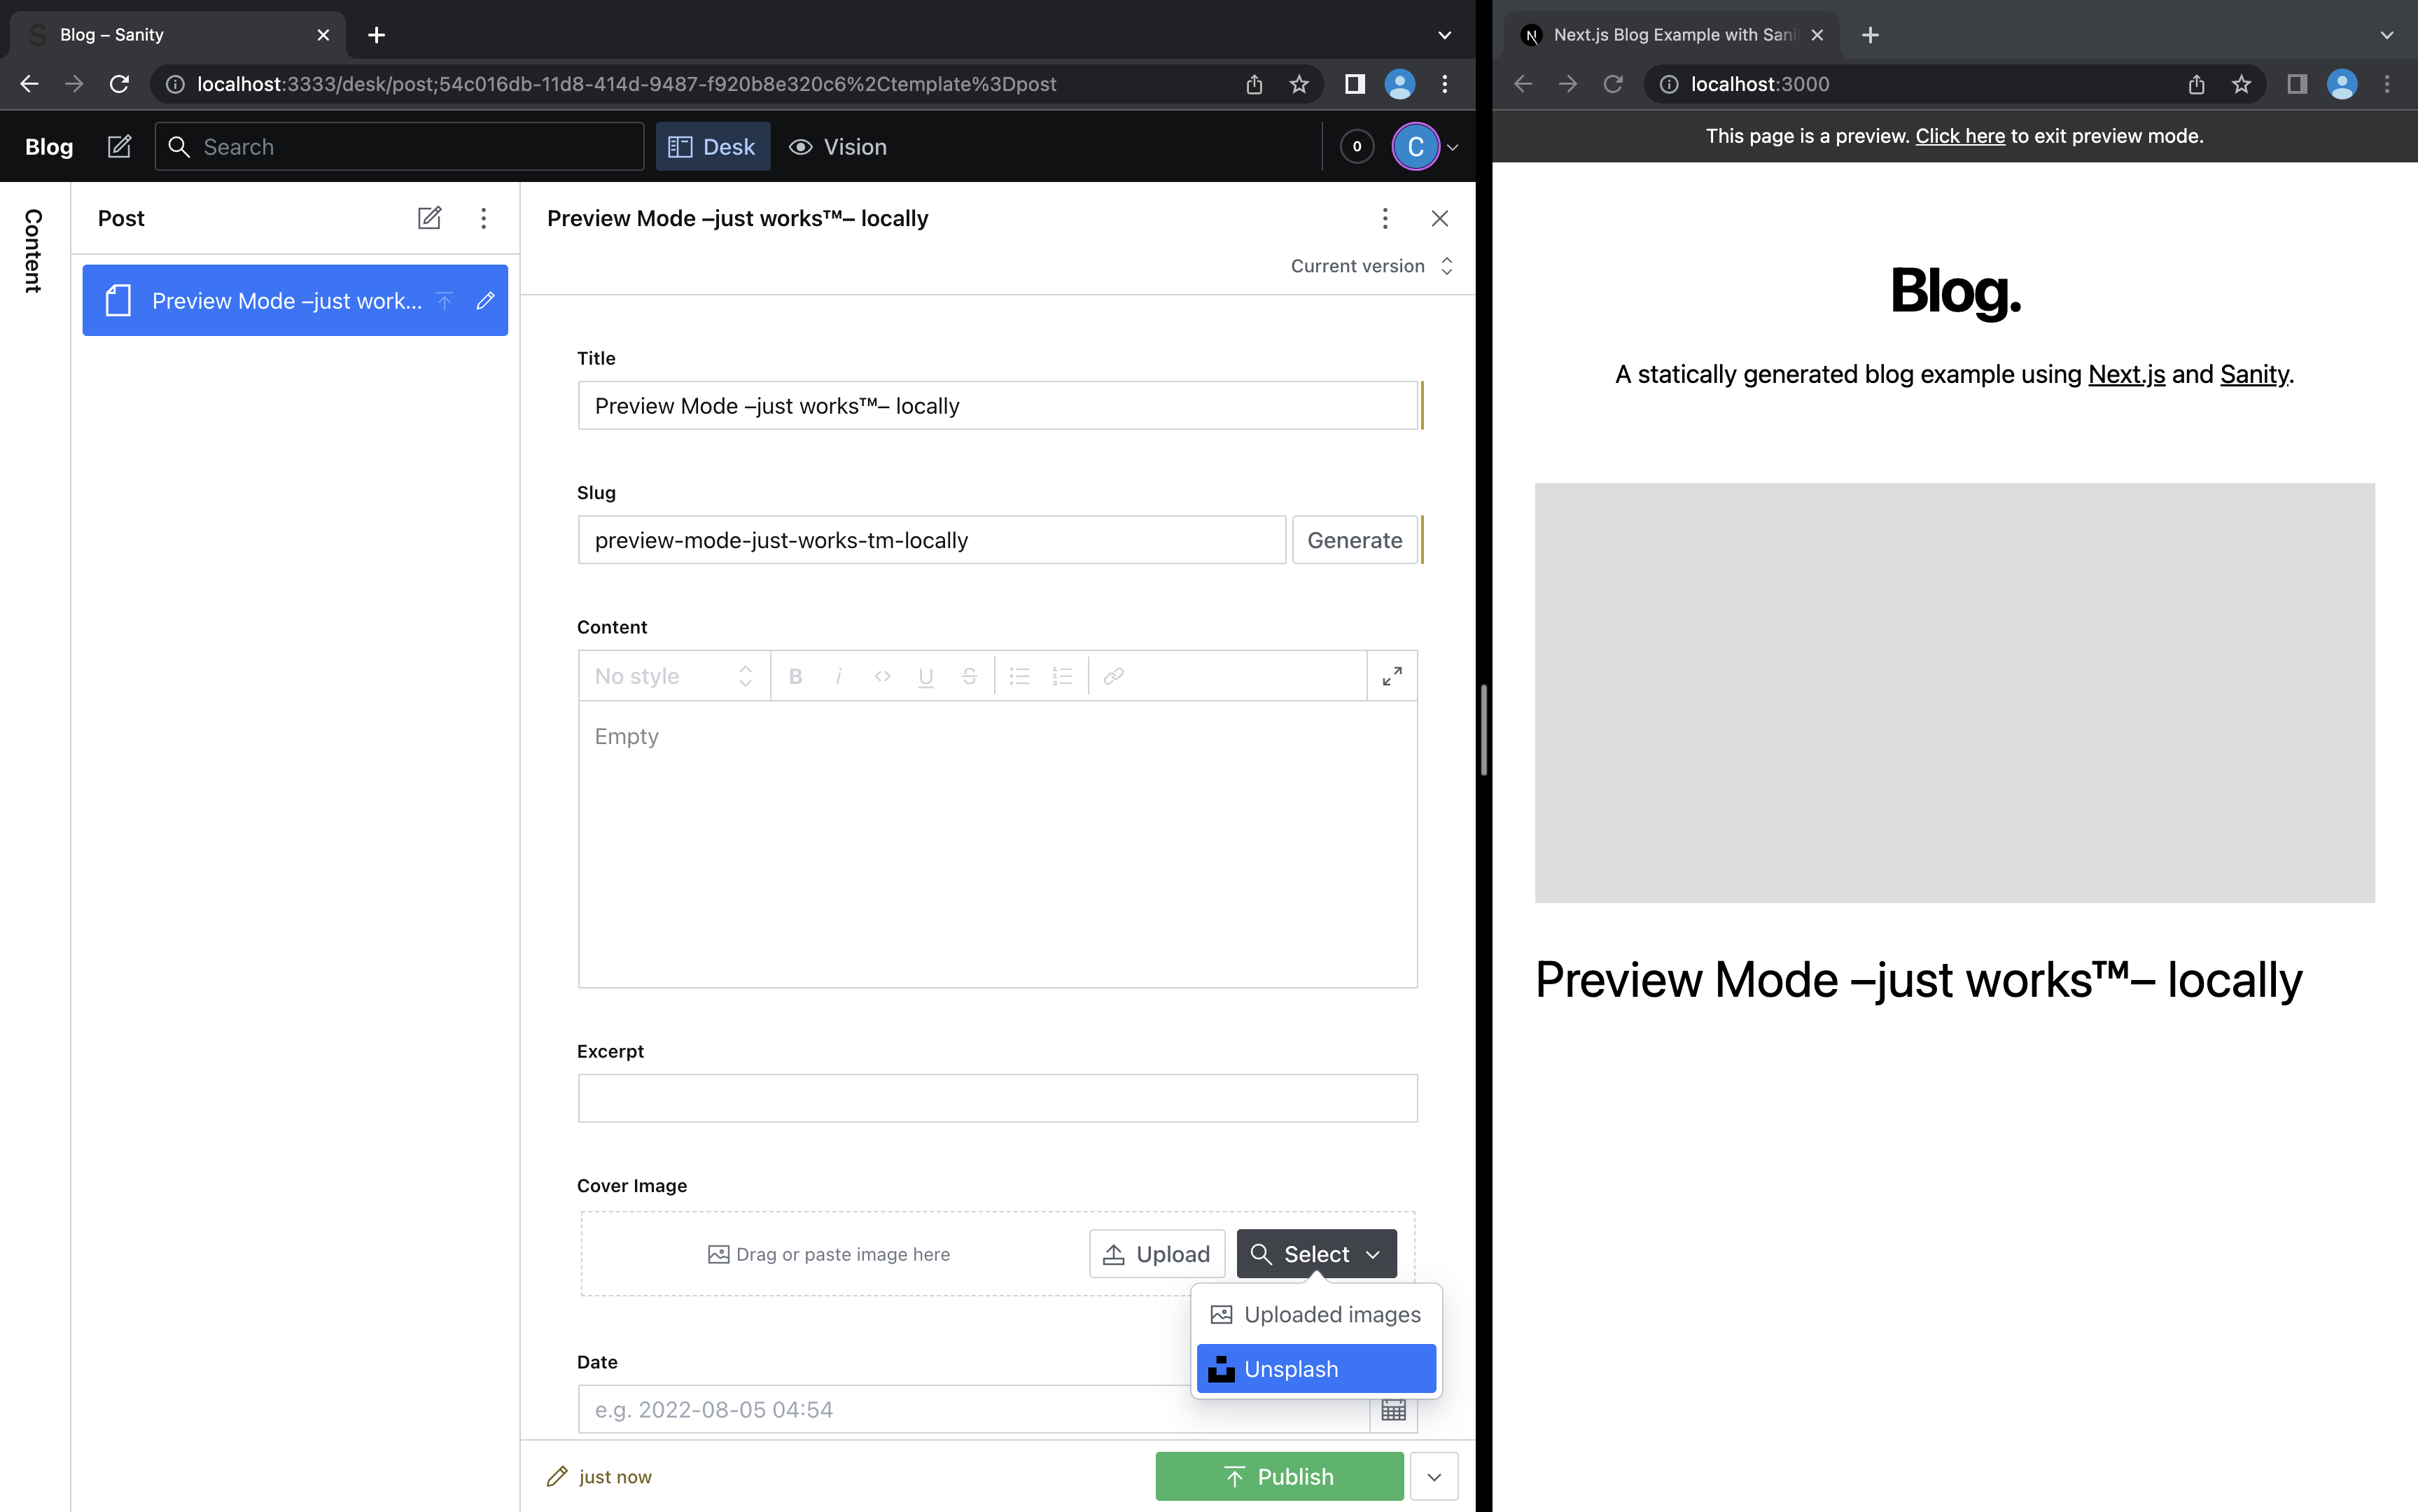
- Set the **Date**
- Select a **Cover Image** from [Unsplash].
View screenshot ✨
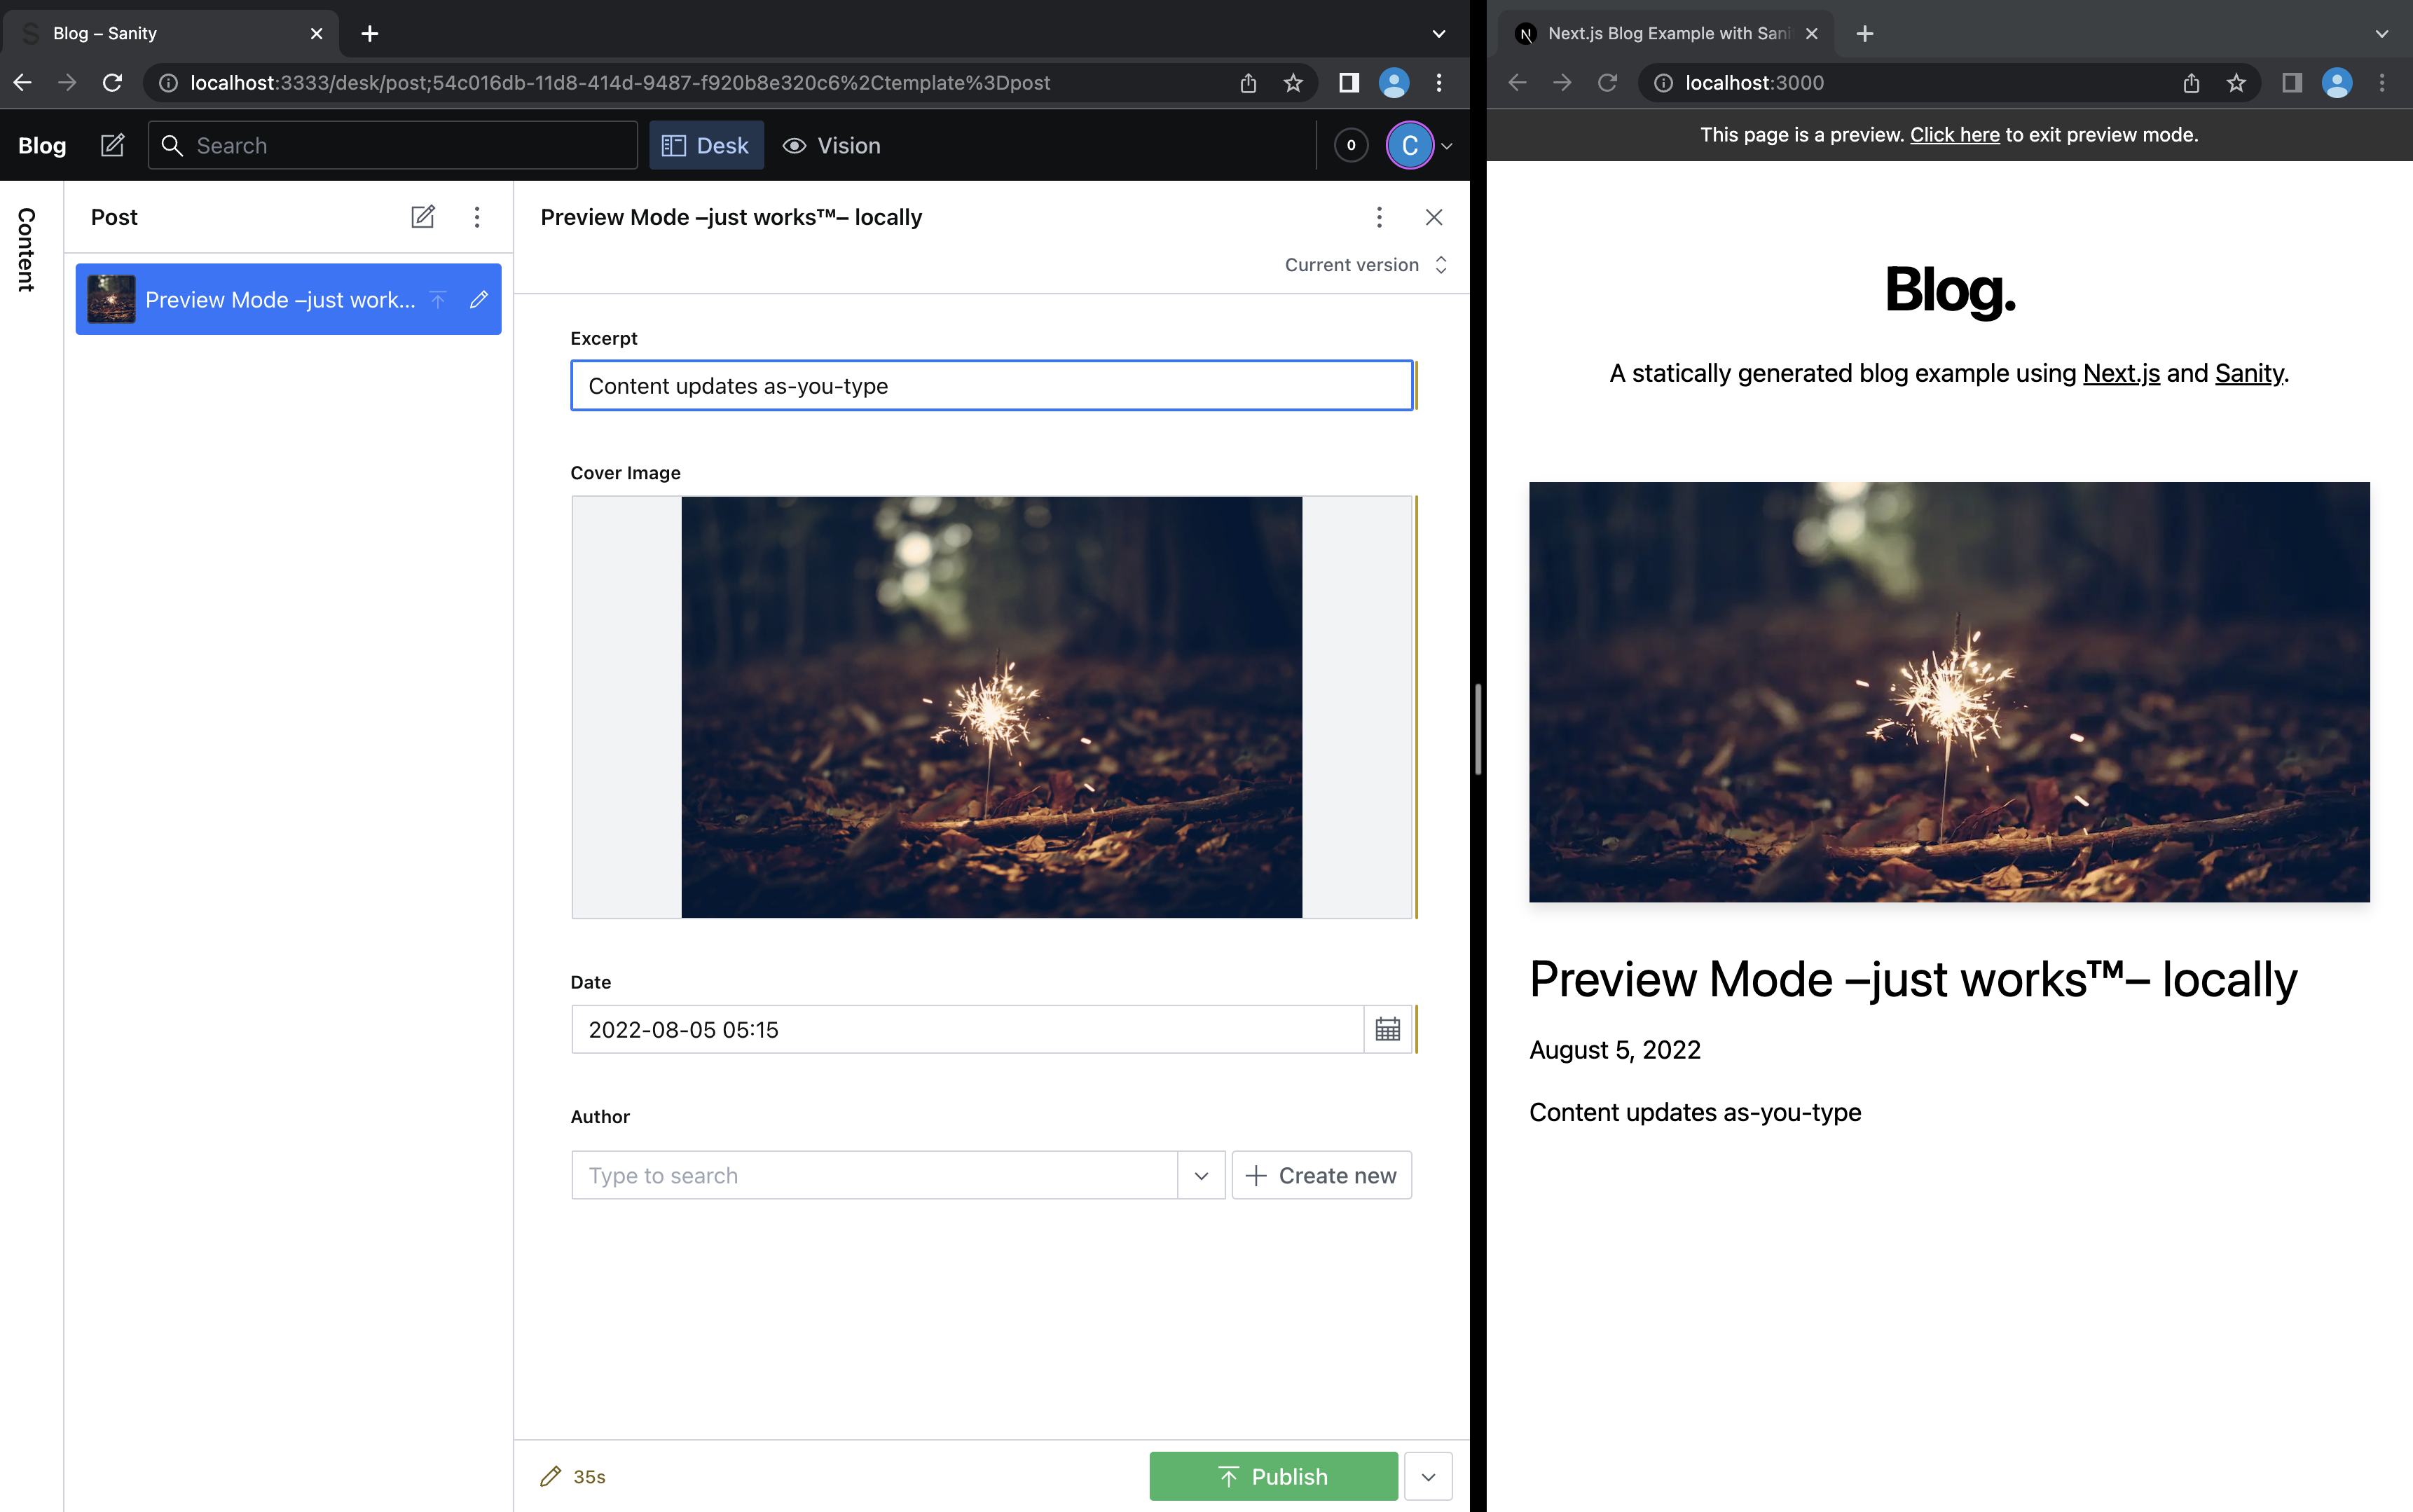
- Let's create an **Author** inline, click **Create new**.
- Give the **Author** a **Name**.
- After selecting a **Picture** of a **face** from [Unsplash], set a hotspot to ensure pixel-perfect cropping.
View screenshot ✨
- Create a couple more **Posts** and watch how the layout adapt to more content.
**Important:** For each post record, you need to click **Publish** after saving for it to be visible outside Preview Mode.
To exit Preview Mode, you can click on _"Click here to exit preview mode"_ at the top.
## Step 5. Deploy to production & use Preview Mode from anywhere
### If you didn't [Deploy with Vercel earlier](#step-1-set-up-the-environment) do so now
To deploy your local project to Vercel, push it to [GitHub](https://docs.github.com/en/get-started/importing-your-projects-to-github/importing-source-code-to-github/adding-locally-hosted-code-to-github)/GitLab/Bitbucket and [import to Vercel](https://vercel.com/new?utm_source=github&utm_medium=readme&utm_campaign=next-example).
**Important**: When you import your project on Vercel, make sure to click on **Environment Variables** and set them to match your `.env.local` file.
After it's deployed link your local code to the Vercel project:
```bash
npx vercel link
```
### Configure CORS for production
Add your `production url` to the list over CORS origins.
Don't remember the production url? 🤔
No worries, it's easy to find out. Go to your [Vercel Dashboard](https://vercel.com/) and click on your project:
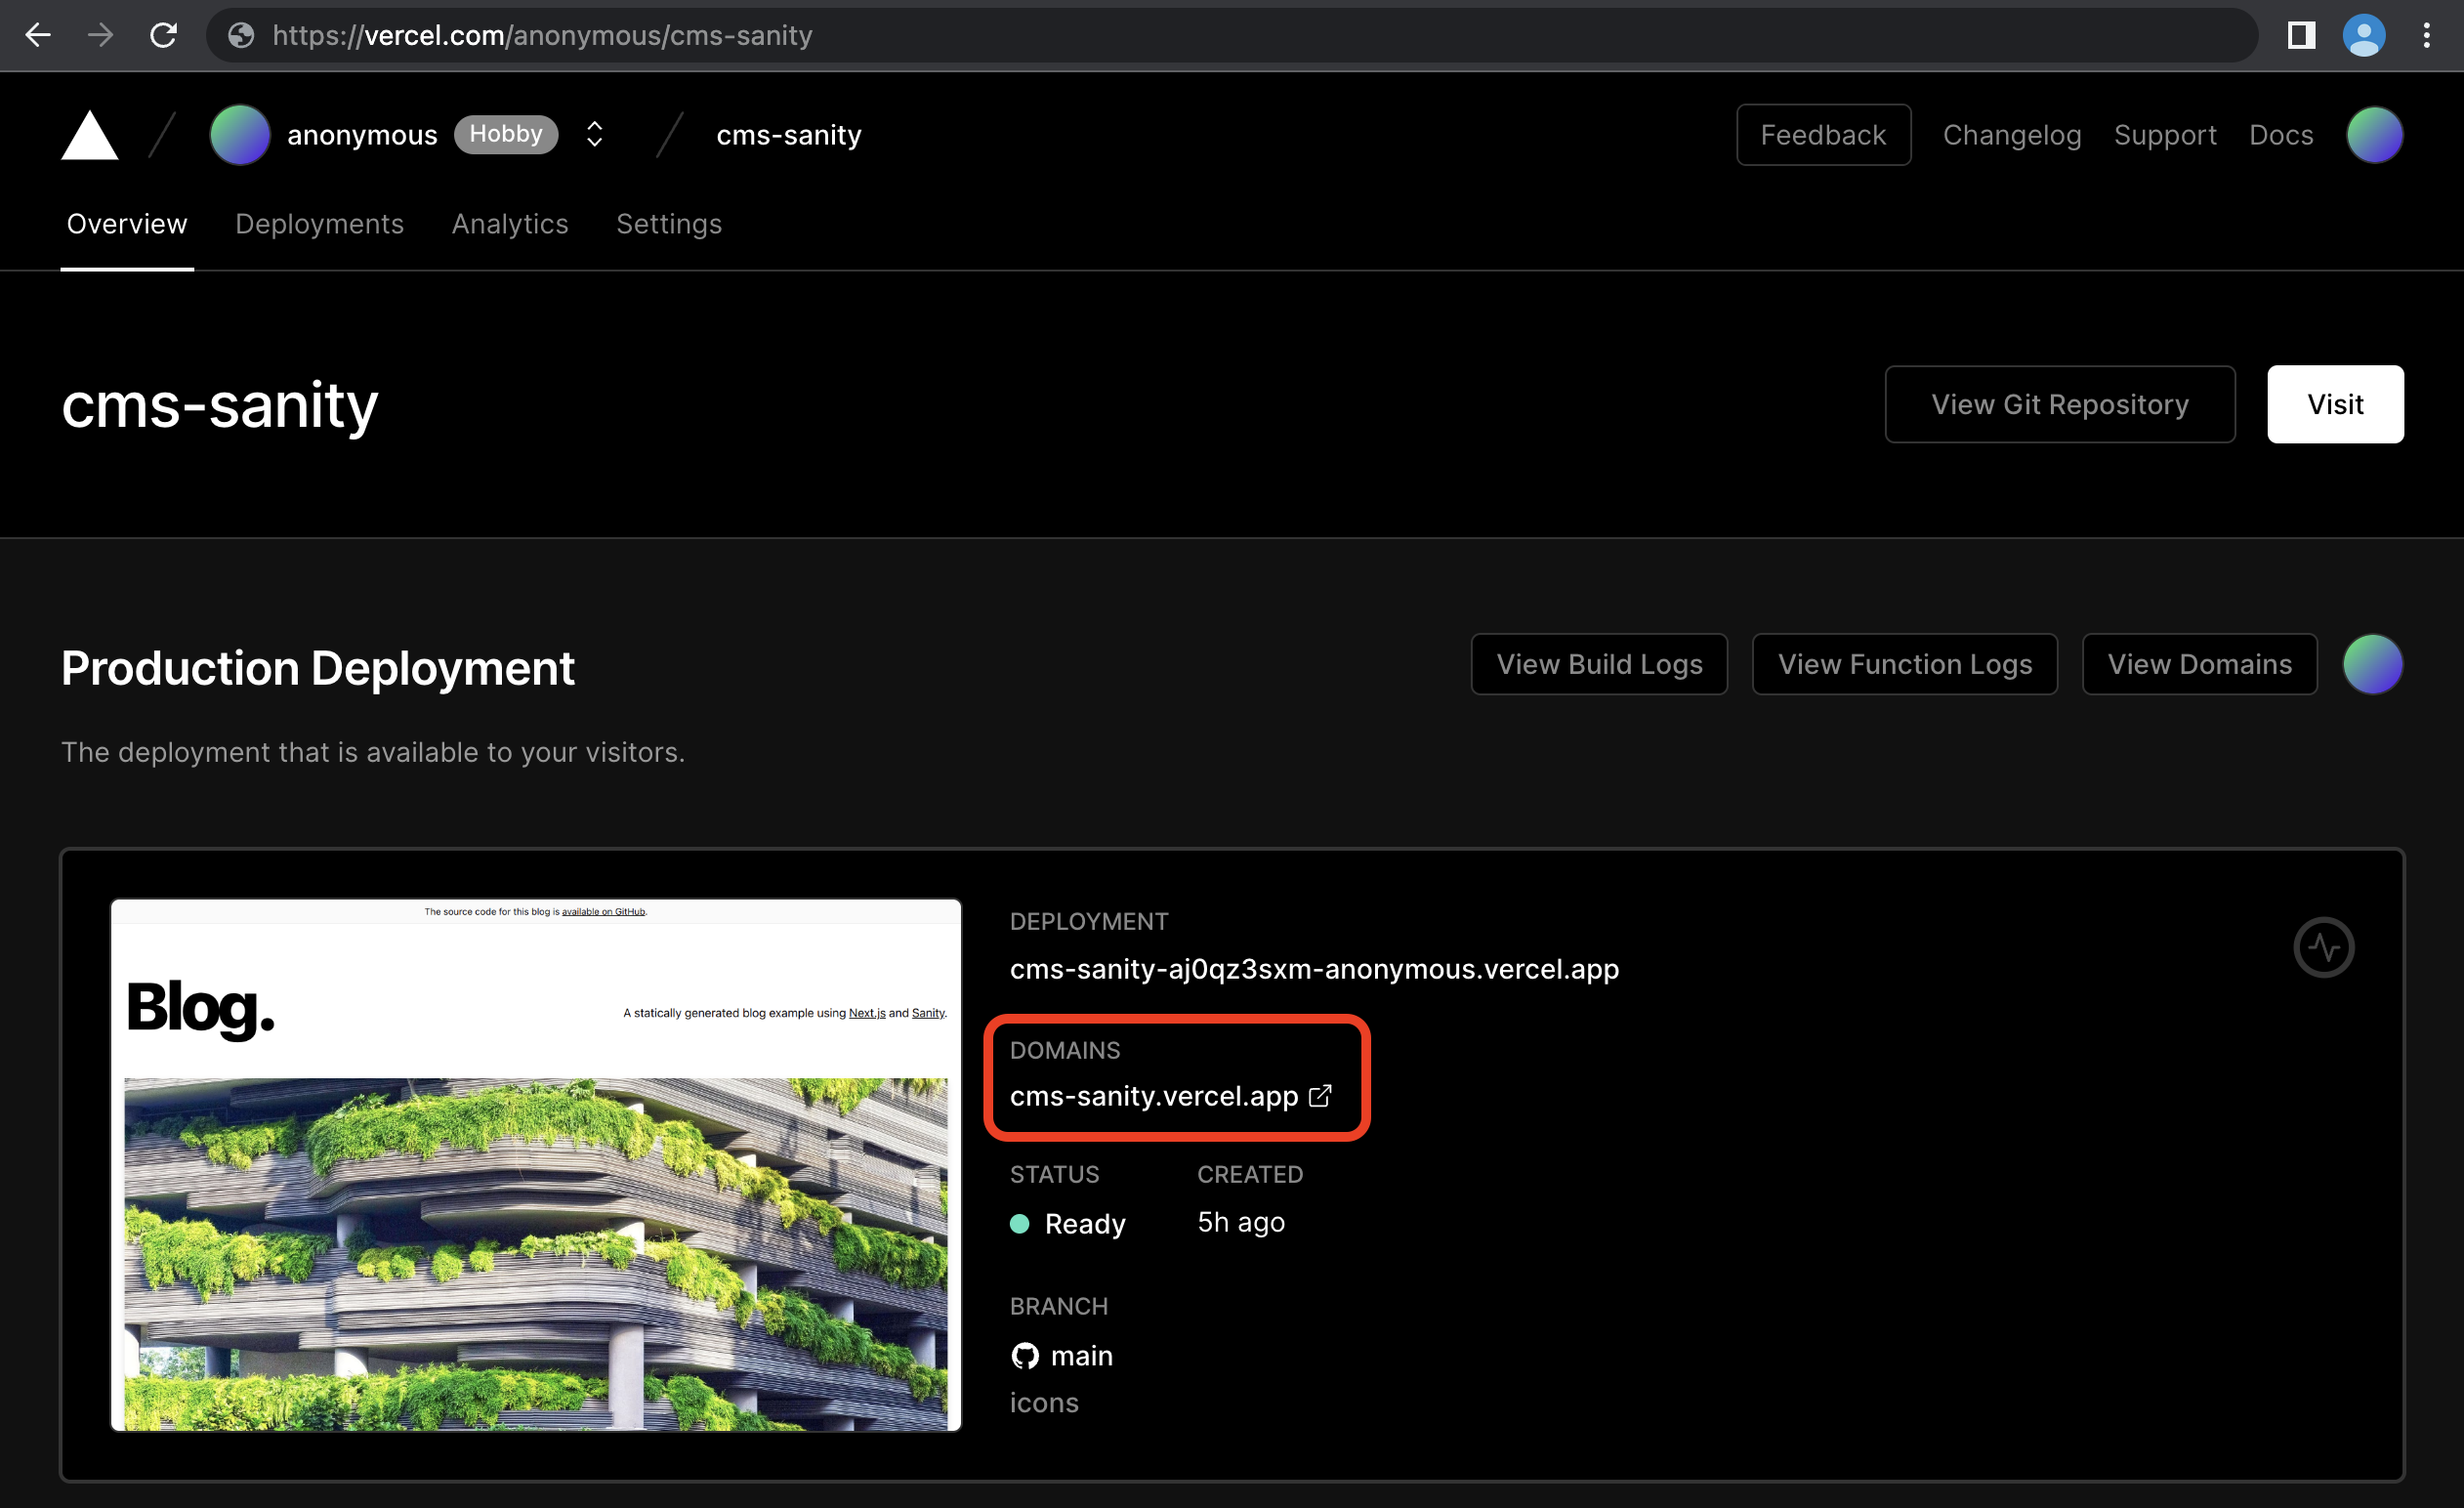
In the screenshot above the `production url` is `https://cms-sanity.vercel.app`.
```bash
npm --prefix studio run cors:add -- [your production url] --credentials
```
### Add the preview secret environment variable
It's required to set a secret that makes Preview Mode activation links unique. Otherwise anyone could see your unpublished content by just opening `[your production url]/api/preview`.
Run this and it'll prompt you for a value:
```bash
npx vercel env add SANITY_STUDIO_PREVIEW_SECRET
```
The secret can be any combination of random words and letters as long as it's URL safe.
You can generate one in your DevTools console using `copy(Math.random().toString(36).substr(2, 10))` if you don't feel like inventing one.
You should see something like this in your terminal afterwards:
```bash
$ npx vercel env add SANITY_STUDIO_PREVIEW_SECRET
Vercel CLI 27.3.7
? What’s the value of SANITY_STUDIO_PREVIEW_SECRET? 2whpu1jefs
? Add SANITY_STUDIO_PREVIEW_SECRET to which Environments (select multiple)? Production, Preview, Development
✅ Added Environment Variable SANITY_STUDIO_PREVIEW_SECRET to Project cms-sanity [1s]
```
Redeploy production to apply the secret to the preview api:
```bash
npx vercel --prod
```
After it deploys it should now start preview mode if you launch `[your production url]/api/preview?secret=[your preview secret]`. You can send that preview url to people you want to show the content you're working on before you publish it.
### How to test locally that the secret is setup correctly
In order to test that the secret will prevent unauthorized people from activating preview mode, start by updating the local `.env` with the secret you just made:
```bash
npx vercel env pull
```
Restart your Next.js and Studio processes so the secret is applied:
```bash
npm run dev
```
```bash
npm run studio:dev
```
And now you'll get an error if `[secret]` is incorrect when you try to open `https://localhost:3000/api/preview?secret=[secret]`.
### How to start Preview Mode for Next.js in production from a local Studio
Run this to make the Studio open previews at `[your production url]/api/preview` instead of `http://localhost:3000/api/preview`
```bash
SANITY_STUDIO_PREVIEW_URL=[your production url] npm run studio:dev
```
### If you regret sending a preview link to someone
Revoke their access by creating a new secret:
```bash
npx vercel env rm SANITY_STUDIO_PREVIEW_SECRET
npx vercel env add SANITY_STUDIO_PREVIEW_SECRET
npx vercel --prod
```
## Step 6. Deploy your Studio and publish from anywhere
Live previewing content is fun, but collaborating on content in real-time is next-level:
```bash
SANITY_STUDIO_PREVIEW_URL=[your production url] npm run studio:deploy
```
If it's successful you should see something like this in your terminal:
```bash
SANITY_STUDIO_PREVIEW_URL="https://cms-sanity.vercel.app" npm run studio:deploy
? Studio hostname (.sanity.studio): cms-sanity
Including the following environment variables as part of the JavaScript bundle:
- SANITY_STUDIO_PREVIEW_URL
- SANITY_STUDIO_PREVIEW_SECRET
- SANITY_STUDIO_API_PROJECT_ID
- SANITY_STUDIO_API_DATASET
✔ Deploying to Sanity.Studio
Success! Studio deployed to https://cms-sanity.sanity.studio/
```
This snippet is stripped from verbose information, you'll see a lot of extra stuff in your terminal.
## Step 7. Setup Revalidation Webhook
Using GROQ Webhooks Next.js can rebuild pages that have changed content. It rebuilds so fast it can almost compete with Preview Mode.
Create a secret and give it a value the same way you did for `SANITY_STUDIO_PREVIEW_SECRET` in [Step 4](#add-the-preview-secret-environment-variable). It's used to verify that webhook payloads came from Sanity infra, and set it as the value for `SANITY_REVALIDATE_SECRET`:
```bash
npx vercel env add SANITY_REVALIDATE_SECRET
```
You should see something like this in your terminal afterwards:
```bash
$ npx vercel env add SANITY_REVALIDATE_SECRET
Vercel CLI 27.3.7
? What’s the value of SANITY_REVALIDATE_SECRET? jwh3nr85ft
? Add SANITY_REVALIDATE_SECRET to which Environments (select multiple)? Production, Preview, Development
✅ Added Environment Variable SANITY_REVALIDATE_SECRET to Project cms-sanity [1s]
```
Apply the secret to production:
```bash
npx vercel --prod
```
Wormhole into the [manager](https://manage.sanity.io/) by running:
```bash
(cd studio && npx @sanity/cli hook create)
```
- **Name** it "On-demand Revalidation".
- Set the **URL** to`[your production url]/api/revalidate`, for example: `https://cms-sanity.vercel.app/api/revalidate`
- Set the **Trigger on** field to Create Update Delete
- Set the **Filter** to `_type == "post" || _type == "author"`
- Set the **Secret** to the same value you gave `SANITY_REVALIDATE_SECRET` earlier.
- Hit **Save**!
### Testing the Webhook
- Open the Deployment function log. (**Vercel Dashboard > Deployment > Functions** and filter by `api/revalidate`)
- Edit a Post in your Sanity Studio and publish.
- The log should start showing calls.
- And the published changes show up on the site after you reload.
[integration]: https://www.sanity.io/docs/vercel-integration
[`sanity.json`]: studio/sanity.json
[`.env.local.example`]: .env.local.example
[unsplash]: https://unsplash.com