https://github.com/rootcircle/zoom-autorecorder
Records zoom meeting when you are sleeping.
https://github.com/rootcircle/zoom-autorecorder
auto automation autorecord gui linux obs python record recorder studio supports-rejoin tkinter-gui windows zoom zoom-meetings zoom-scheduler
Last synced: 4 months ago
JSON representation
Records zoom meeting when you are sleeping.
- Host: GitHub
- URL: https://github.com/rootcircle/zoom-autorecorder
- Owner: rootCircle
- License: agpl-3.0
- Created: 2022-07-16T09:39:28.000Z (almost 4 years ago)
- Default Branch: main
- Last Pushed: 2024-08-05T13:42:54.000Z (almost 2 years ago)
- Last Synced: 2025-10-12T01:32:39.463Z (9 months ago)
- Topics: auto, automation, autorecord, gui, linux, obs, python, record, recorder, studio, supports-rejoin, tkinter-gui, windows, zoom, zoom-meetings, zoom-scheduler
- Language: Python
- Homepage: https://rootCircle.github.io/Zoom-AutoRecorder/
- Size: 1.07 MB
- Stars: 16
- Watchers: 2
- Forks: 0
- Open Issues: 1
-
Metadata Files:
- Readme: README.md
- License: LICENSE
- Code of conduct: CODE_OF_CONDUCT.md
Awesome Lists containing this project
README
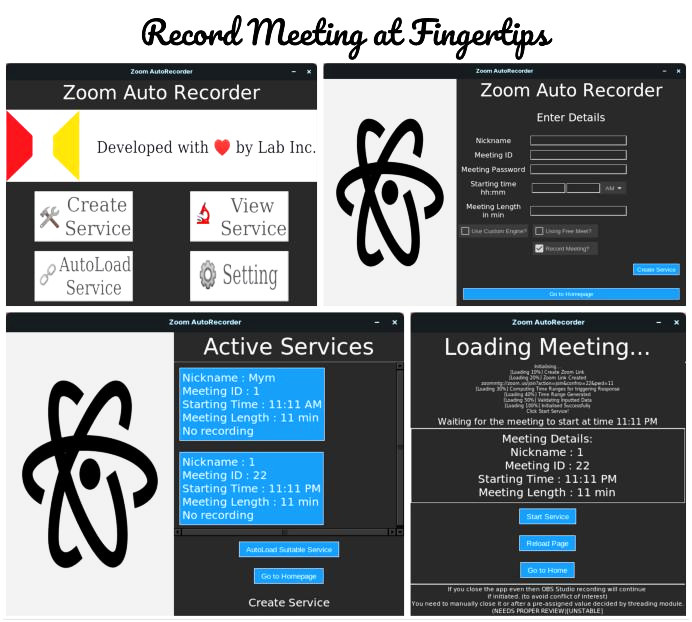
## [Zoom AutoRecorder](https://rootCircle.github.io/Zoom-AutoRecorder/)


### Introduction
Zoom Recorder is a free and open-source Python-based GUI-operated screen recorder and scheduler for Zoom meetings.
It is a complete rewrite of [AutoRecorder](https://github.com/rootCircle/AutoRecorder) with an added GUI and fewer bugs, aimed at simplicity and ease of use while requiring minimal user details and program configuration across all platforms.
### How to Use
1. Download the binary/code from [here](https://github.com/rootCircle/Zoom-AutoRecorder/releases).
2. Run the executable or the main.py file, as the case may be.
- [Optional] You can make an executable from the steps given [here](#build-an-executable) if you are not using binary builds. Then revert to step 2.
- You can even run it from the script main.py, provided that the requirements in [this section](#build-an-executable) are fulfilled. [Only Python and the libraries]
3. Create a service by entering the details in the app's Create Service Page.
- If in doubt, you can watch the [walkthrough video](#video).
4. Make sure that all the [requirements](#requirements) are fulfilled.
5. On the App GUI's homepage, click on "Autoload Service" and then click "Start Service".
- The Autoload Service automatically loads the most suitable meeting for the user to join.
- Alternatively, you may use 'View Service' to open alternate meetings manually.
> It is always recommended to test against a [test meeting](https://zoom.us/test) before attending a real one.
BOOM! You are ready to use this software like a champ!
### Download
[ ](https://github.com/rootCircle/Zoom-AutoRecorder/releases)
### Requirements
1. [OBS Studio](https://obsproject.com/) is installed at the default installation location.
- A scene in OBS Studio named "Zoom Meet" must be created with a recording set to the Zoom Meeting screen with an audio source and mic (if required). It is required only for the initial run, not regularly. Users just don't have to interfere with the "Zoom Meet" profile afterwards.
- You can do a simple Google search to find out how to create a scene in OBS Studio.
2. The [Zoom Meeting](https://zoom.us/) App has been installed.
- Log in if your meeting host requires it before you join the meeting.
- Ensure that "join call with audio automatically" is set to be enabled.
- Also, ensure that joining the meeting in full screen is set to automatically enabled for better recording.
- Make sure that on joining the meeting, your microphone and webcam are disabled or turned off.
### Notes
- The recording is supported right now only on Linux and Windows.
- The app hasn't been tested on the Windows OS. Possible errors may exist.
- It might be possible that bashCommand in LoadService.launchRecordingbyOBS may cause an error in the terminal. Users may need to manually modify it from [here](https://github.com/rootCircle/Zoom-AutoRecorder/blob/514c95635e8b22a5f08f8dc1da51645916b2f6f2/main.py#L1011).
- Since recording through Linux is through Software Encoding, users may notice high CPU usage of OBS Studio. To fix it, the user may follow the steps given in the [comments](https://github.com/rootCircle/Zoom-AutoRecorder/blob/514c95635e8b22a5f08f8dc1da51645916b2f6f2/main.py#L4) of the main.py file [here](https://github.com/rootCircle/Zoom-AutoRecorder/blob/514c95635e8b22a5f08f8dc1da51645916b2f6f2/main.py#L1011).
### Build an executable
- Make sure you have fulfilled the following requirements:
1. [Python v3](https://www.python.org/) is installed.
2. Python libraries: datetime, os, errno, sys, tkinter, PIL, time, sqlite3, subprocess, math, platform, webbrowser
- (All libraries except PIL and ttkthemes are installed by default in Python).
- PIL can be installed by using the given commands in Terminal/CMD.
```markdown
pip install pillow ttkthemes
OR
pip3 install pillow ttkthemes
```
- You can build your executable by using pyinstaller, Nuitka, or any other [compiler](https://pyoxidizer.readthedocs.io/en/stable/pyoxidizer_comparisons.html) that you like.
- Then install your favourite compiler using their documentation.
- For pyinstaller, run ```pip3 install pyinstaller``` or ```pip install pyinstaller```
- For Nuitka, run ```pip3 install nuitka``` or ```pip install nuitka```, and then you'll need a [C compiler](https://nuitka.net/doc/user-manual.html#requirements), which will be automatically downloaded on the first run, if absent.
- Open the Code directory in the File Explorer and open the Windows PowerShell or terminal at that location and run the given commands.
- UNIX-based Systems (Linux, macOS, etc.)
```markdown
pyinstaller --noconsole --windowed --add-data "data:data" -i"data/icon.ico" --collect-submodules PIL main.py
```
- Windows
```markdown
pyinstaller --noconsole --windowed --add-data "data;data" -i"data/icon.ico" --collect-submodules PIL main.py
```
- [Not Recommended for Novice Users] Any operating system(s).Unstable; contains bugs
```markdown
python3 -m nuitka --standalone --nofollow-imports --remove-output --no-pyi-file --include-package=PIL --include-module=ttkthemes --output-dir=app_build --enable-plugin=tk-inter --onefile --include-data-dir=data=data --windows-icon-from-ico=data/icon.ico main.py
```
- The build will be created in the dist directory if using pyinstaller and app_build/main.dist if Nuitka is used.
- Run
- Nuitka on Windows or pyinstaller: Run main.exe or main
- On Linux-based OS, Nuitka creates a shared-library file named 'main' which can be run by opening the terminal in main.dist and typing ```./main```
- Also, see [Workaround for Nuitka Build](#workaround-for-nuitka-builds) for fixing the errors in Nuitka builds.
### Workaround for Nuitka Builds
After building the binary, copy the 'ttkthemes' folder from the site-packages folder (in the lib directory) in your standard Python installation location to main.dist directory, to remove import errors.
- To run the binary, open a terminal in the /app_build/main.dist directory, then type and run main.exe or ./main, depending on your OS.
- Running may cause an error after the app window is closed. (Any suggestions/workarounds for this are welcome.)
```
............/zoomRecorder/app_build/main.dist/tkinter/__init__.py", line 4025, in __del__
TypeError: catching classes that do not inherit from BaseException is not allowed
)
```
- Novice users are warned against using the Nuitka build because of its comparatively more complex installation than pyinstaller, increased build size, and present bugs in compiling the script on it. (Nuitka builds are faster performance-wise, btw.)
### ⚠ Warning
- Since the app is in the early development phase, it might be possible that it may not work at all. Feel free to report any bugs if they exist.
- The UI for the loadService screen is a bit messy on starting the service, which may be resolved in later updates.
### Roadmap
1. Check if the rejoin feature works.
2. Debug the app.
3. Make the app feel more responsive.
4. Add a properties section to set up the recording service, key functions, etc.
5. Support for the integrated screencast, as well as third-party recorders such as OBS and VLC (assistance needed!).
6. Improved usability.
7. Removal of the persistent loading screen bug.
8. Add support for modification and deletion of meeting services with repeatation flexibility in meetings.
### Preview
[ ](https://github.com/rootCircle/Zoom-AutoRecorder/tree/main/docs)
### Video
[ ](https://www.youtube.com/watch?v=Tu31bdrZyW0)
### Future Scope
The future of this app includes several key features aimed at enhancing user experience and efficiency.
- **Meeting Link Sharing:** Users will be able to share meeting links easily across platforms, making it straightforward to access and distribute meeting invites.
- **Consensus Voting System:** The app will incorporate a voting mechanism to allow users to assess and verify the credibility of meeting links, ensuring that only relevant and high-quality meetings are included.
- **Automatic Removal of Links:** Meetings with negative votes will be automatically removed from the list, maintaining a curated selection of valuable and verified meetings.
- **Institution and Batch Filtering:** The app will categorize and filter meeting links based on users' institutions and academic batches, ensuring that only pertinent meetings are displayed.
- **Student-Specific Aggregation:** A personalized list of meetings will be generated for each student, tailored to their specific needs and schedule.
### Alternatives
- Warning: User discretion is required! I don't take any responsibility for any issues faced while using these alternatives.
They are just for informational purposes only. I have not tested either of these, except for [AutoRecorder](https://github.com/SMazeikis/AutoRecorder).
- I also need to inform users that a few of the below-mentioned scripts may require sensitive info, including but not limited to, your zoom passwords, etc. So proceed solely at your own risk!
- It is worth mentioning that some of these alternatives work without using any 3rd party recording software, which is a great feature to look at!
- Well-documented Repos
- [OZ-Automatic-Recorder](https://github.com/tsamouridis/OZ-Automatic-Recorder)
- [zoom-cli](https://github.com/tmonfre/zoom-cli)
- [AutoZoomRecorder](https://github.com/Edward11235/AutoZoomRecorder)
- [classRecorder](https://github.com/empobla/classRecorder)
- [AutoRecorder](https://github.com/SMazeikis/AutoRecorder)
- [zoom_recorder](https://github.com/nys99/zoom_recorder)
- [Zoom-Meeting-and-Recording](https://github.com/cowsaysfoo/Zoom-Meeting-and-Recording)
- [autozoom](https://github.com/rebekahchin/autozoom)
- [zoom-OBS-Automation](https://github.com/mehedihasan1165/zoom-OBS-Automation)
- [zoomrec](https://github.com/kastldratza/zoomrec)
- [autozoom](https://github.com/Owl-dy/autozoom)
- Other Repos
- [automaticZoomRecorder](https://github.com/NKPmedia/automaticZoomRecorder)
- [zoom-recorder](https://github.com/rabimba/zoom-recorder)
- [zoom-recorder](https://github.com/aykborstelmann/zoom-recorder)
- [zoom-recorder](https://github.com/v1nc/zoom-recorder)
- [ZoomRecorder](https://github.com/pantherman594/ZoomRecorder)
- [zoom-meeting-recorder](https://github.com/cty012/zoom-meeting-recorder)
- [automaticZoomRecorder](https://github.com/royjan/automaticZoomRecorder)
- [Zoom-Meeting-Recorder](https://github.com/MJovanovic40/Zoom-Meeting-Recorder)
- Closed sourced and Non Free Software (Not Recommended)
- [RecMaster](https://www.recmaster.net/)
### Thanks!