https://github.com/sakaki-/raspbian-nspawn-64
Bootable RPi4 / RPi3 image with 64-bit kernel, 32-bit Raspbian Buster host OS, 64-bit Debian Buster guest OS in nspawn container
https://github.com/sakaki-/raspbian-nspawn-64
64-bit buster rpi3 rpi4 systemd-nspawn
Last synced: about 1 year ago
JSON representation
Bootable RPi4 / RPi3 image with 64-bit kernel, 32-bit Raspbian Buster host OS, 64-bit Debian Buster guest OS in nspawn container
- Host: GitHub
- URL: https://github.com/sakaki-/raspbian-nspawn-64
- Owner: sakaki-
- License: gpl-3.0
- Created: 2019-01-28T16:04:37.000Z (over 7 years ago)
- Default Branch: master
- Last Pushed: 2020-10-31T12:51:46.000Z (over 5 years ago)
- Last Synced: 2025-04-14T07:08:00.808Z (about 1 year ago)
- Topics: 64-bit, buster, rpi3, rpi4, systemd-nspawn
- Language: Shell
- Homepage:
- Size: 391 KB
- Stars: 155
- Watchers: 15
- Forks: 25
- Open Issues: 12
-
Metadata Files:
- Readme: README.md
- License: COPYING
Awesome Lists containing this project
README
# raspbian-nspawn-64
Bootable RPi4 B and RPi3 B/B+ image with 64-bit kernel, 32-bit Raspbian Buster 'Desktop' host OS, 64-bit Debian Buster guest OS in lightweight, autostarted `systemd-nspawn` container.
> Note: thanks to ShiftPlusOne, as of 2 March 2020 **`raspbian-nspawn-64` can be installed from the official Raspbian repo, just like any other regular package, using `apt`** - so no need for a custom bootable image! For more details, please see [this post](https://www.raspberrypi.org/forums/viewtopic.php?p=1621085#p1621085), but to install, simply issue:
```console
pi@raspberrypi:~ $ sudo apt-get update && sudo apt-get install -y raspbian-nspawn-64
```
> 31 Oct 2020: sadly, due to legal obligations arising from a recent change in my 'real world' job, I must announce I am **standing down as maintainer of this project with immediate effect**. For the meantime, I will leave the repo up (for historical interest, and since the Debian package is still in the official Raspbian repos); however, there will be no further updates to the underlying OS images etc., nor will I be accepting / actioning further pull requests or bug reports from this point. Email requests for support will also have to be politely declined, so, **please treat this as an effective EOL notice**.
For further details, please see my post [here](https://www.raspberrypi.org/forums/viewtopic.php?p=1750206#p1750206).
With sincere apologies, sakaki ><
## Description
![[Raspberry Pi 4B, 3B and B+]](https://raw.githubusercontent.com/sakaki-/resources/master/raspberrypi/pi4/Raspberry_Pi_3_B_and_B_plus_and_4_B.jpg)
This project is a bootable, microSD card **64-bit kernel, 32-bit Raspbian Buster 'Desktop' host OS + 64-bit Debian Buster guest OS image for the Raspberry Pi 4 model B, and Pi 3 model B/B+** single board computers (SBC). It is intended for users who would like to retain their familiar Raspbian tools, desktop and repos, but who also need to run one or more 64-bit only software components on their Pi.
The guest 64-bit Debian OS is automatically started each boot inside a [`systemd-nspawn`](https://www.freedesktop.org/software/systemd/man/systemd-nspawn.html) container. Using a provided `System Tools` menu item, you can easily open a 64-bit shell inside this container (to install new 64-bit packages, for example). Another menu item allows you to easily *run* 64-bit applications in the container, correctly set up so they display on the Raspbian desktop, can play audio, and have access to the current user's home directory. Due to the containerization, such apps are however prevented from performing many harmful actions on the host (this is *not* just a [`chroot`](https://en.wikipedia.org/wiki/Chroot)). Package management in the guest uses the familiar `apt-get`, with the full Debian aarch64 repository available, and day-to-day *Raspbian* operation (with the exception of anything needing e.g. [MMAL or OpenMAX IL](https://github.com/raspberrypi/firmware/issues/550#issuecomment-190803961)) is pretty much per the stock image. WiFi, Bluetooth, I2C etc. all work, and 32-bit Raspbian apps can be installed and used just as on a regular RPi system.
As of version 1.1.0, launchers for 64-bit apps are *automatically* added to the 32-bit host's menu upon installation in the guest, and changes to 'regular' users (existence, password and primary group) are automatically reflected through from host to guest, for convenience. As of version 1.2.0, changes to timezone or locale in the host are automatically propagated to the guest too. And, as of version 1.3.0, **the RPi4 is supported**, a Raspbian Buster host OS is employed, and an [official 64-bit kernel](https://www.raspberrypi.org/forums/viewtopic.php?f=29&t=250730) is used (in place of the prior, custom-built one).
Basically, you get 64-bit capability as and when you need it, without the headache ^-^
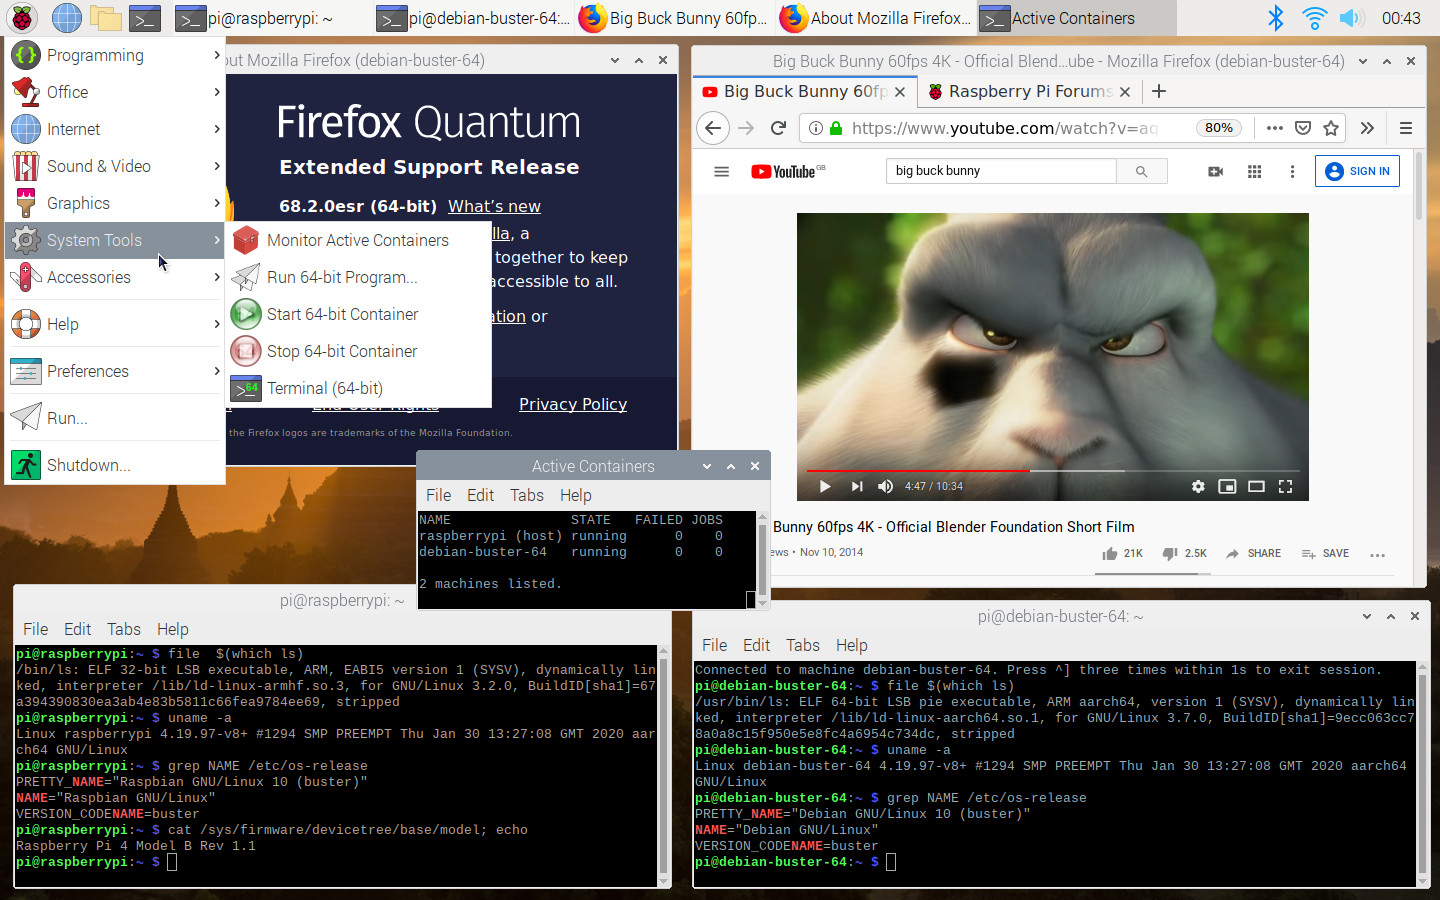
Here's a screenshot of the image running on an RPi 4B:
The image may be downloaded from the link below (or via `wget`, per the instructions which follow).
Variant | Version | Image | Digital Signature
:--- | ---: | ---: | ---:
Raspberry Pi 4B, 3B/B+ 64-bit| v1.4.8 | [raspbian-nspawn-64.img.xz](https://github.com/sakaki-/raspbian-nspawn-64/releases/download/v1.4.8/raspbian-nspawn-64.img.xz) | [raspbian-nspawn-64.img.xz.asc](https://github.com/sakaki-/raspbian-nspawn-64/releases/download/v1.4.8/raspbian-nspawn-64.img.xz.asc)
Please read the instructions below before proceeding. Also please note that all images are provided 'as is' and without warranty. You should also be comfortable with the free and non-free licenses required by firmware, boot software and OS packages supplied on the image before proceeding: these may be reviewed [here](https://github.com/sakaki-/raspbian-nspawn-64/tree/master/licenses).
Also, please note that **this is an unofficial, user-driven respin of Raspbian**, and as such is not endorsed or supported by the Raspberry Pi foundation. That being said, no fundamental changes have been made to either the host Raspbian OS or guest Debian OS. You can review the steps required to create an image such as this, on the Raspberry Pi forums, [here](https://www.raspberrypi.org/forums/viewtopic.php?p=1422775#p1422775).
> It is sensible to install this image to a **separate** microSD card from that used by your default Raspbian system; that way, when you are finished trying it out, you can simply power off, swap back to your old card, reboot, and your original system will be just as it was.
## Prerequisites
To try this out, you will need:
* A [microSD](https://en.wikipedia.org/wiki/Secure_Digital) card of _at least_ 8GB capacity (the image is 1,196MiB compressed, 5.25GiB == 5.64GB uncompressed, so it should fit on any card marked as >= 8GB). [Class A1 cards](https://www.raspberrypi.org/forums/viewtopic.php?p=1517864#p1517864) are particularly recommended, but not required.
> I have found most SanDisk cards work fine; if you are having trouble, a good sanity check is to try writing the [standard Raspbian 32-bit image](https://www.raspberrypi.org/downloads/raspbian/) to your card, to verify that your Pi3 will boot with it, before proceeding.
* A Raspberry Pi 4 Model B, or Pi 3 Model B or B+ (obviously!).
For simplicity, I am going to assume that you will be logging into the image (at least initially) via an (HDMI) screen and (USB) keyboard connected directly to your Pi, rather than e.g. via `ssh`. A [decent power supply](https://www.raspberrypi.org/forums/viewtopic.php?f=63&t=138636) is recommended.
* A PC to decompress the image and write it to the microSD card. This is most easily done on a Linux machine of some sort, but it is straightforward on a Windows or Mac box too (for example, by using [Etcher](https://etcher.io), which is a nice, all-in-one cross-platform graphical tool for exactly this purpose; it's free and open-source). In the instructions below I'm going to assume you're using Linux.
> It is possible to use your Raspberry Pi for this task too, if you have an external card reader attached, or if you have your root on e.g. USB (and take care to unmount your existing /boot directory before removing the original microSD card), or are booted directly from USB. Most users will find it simplest to write the image on a PC, however.
## Downloading and Writing the Image
> If you are using a Windows or Mac box, or prefer to use a GUI tool in Linux, I recommend you download your preferred image via your web browser using the [link](#downloadlinks) above, and then check out the free, open-source, cross-platform tool [Etcher](https://etcher.io) to write it to microSD card. Then, once you've done that, continue reading at ["Booting!"](#booting) below.
> Alternatively, for those who prefer the Raspberry Pi [NOOBS](https://www.raspberrypi.org/documentation/installation/noobs.md) installer GUI, the image is also available for installation using [PINN](https://github.com/procount/pinn) (called `nspawn64` there). PINN is a fork of NOOBS and includes a number of additional advanced features.
On your Linux box, issue (you may need to be `root`, or use `sudo`, for the following, hence the '#' prompt):
```console
# wget -c https://github.com/sakaki-/raspbian-nspawn-64/releases/download/v1.4.8/raspbian-nspawn-64.img.xz
# wget -c https://github.com/sakaki-/raspbian-nspawn-64/releases/download/v1.4.8/raspbian-nspawn-64.img.xz.asc
```
to fetch the compressed disk image file (~1,196MiB) and its signature.
Next, if you like, verify the image using gpg (this step is optional):
```console
# gpg --keyserver pool.sks-keyservers.net --recv-key DDE76CEA
# gpg --verify raspbian-nspawn-64.img.xz.asc raspbian-nspawn-64.img.xz
```
Assuming that reports 'Good signature', you can proceed. (Warnings that the key is "not certified with a trusted signature" are normal and [may be ignored](http://security.stackexchange.com/questions/6841/ways-to-sign-gpg-public-key-so-it-is-trusted).)
Next, insert (into your Linux box) the microSD card on which you want to install the image, and determine its device path (this will be something like `/dev/sdb`, `/dev/sdc` etc. (if you have a [USB microSD card reader](http://linux-sunxi.org/Bootable_SD_card#Introduction)), or perhaps something like `/dev/mmcblk0` (if you have e.g. a PCI-based reader); in any case, the actual path will depend on your system - you can use the `lsblk` tool to help you). Unmount any existing partitions of the card that may have automounted (using `umount`). Then issue:
> **Warning** - this will *destroy* all existing data on the target drive, so please double-check that you have the path correct! As mentioned, it is wise to use a spare microSD card as your target, keeping your existing Raspbian microSD card in a safe place; that way, you can easily reboot back into your existing Raspbian system, simply by swapping back to your old card.
```console
# xzcat raspbian-nspawn-64.img.xz > /dev/sdX && sync
```
Substitute the actual microSD card device path, for example `/dev/sdc`, for `/dev/sdX` in the above command. Make sure to reference the device, **not** a partition within it (so e.g., `/dev/sdc` and not `/dev/sdc1`; `/dev/sdd` and not `/dev/sdd1` etc.)
> If, on your system, the microSD card showed up with a path of form `/dev/mmcblk0` instead, then use this as the target, in place of `/dev/sdX`. For this naming format, the trailing digit *is* part of the drive name (partitions are labelled as e.g. `/dev/mmcblk0p1`, `/dev/mmcblk0p2` etc.). So, for example, you might need to use `xzcat raspbian-nspawn-64.img.xz > /dev/mmcblk0 && sync`.
The above `xzcat` to the microSD card will take some time, due to the decompression (it takes between 5 and 25 minutes on my machine, depending on the microSD card used). It should exit cleanly when done - if you get a message saying 'No space left on device', then your card is too small for the image, and you should try again with a larger capacity one.
> Note that on first boot, the image will _automatically_ attempt to resize its root partition (which, in this image, includes `/home`) to fill all remaining free space on the microSD card.
Begin with your RPi4 (or RPi3) powered off. Remove the current (vanilla Raspbian or other) microSD card from the board (if fitted), and store it somewhere safe.
Next, insert the `raspbian-nspawn-64` microSD card you just wrote the image to into the Pi. Apply power.
You should see the RPi's standard 'rainbow square' on-screen for about 2 seconds, then the display will go blank, and the system will perform its first-time boot actions (including resizing the root partition and filesystem to fill the available free space on your card). Due to the [`vc4-fkms-v3d`](https://www.raspberrypi.org/forums/viewtopic.php?p=1037662#p1037662) graphics driver in use, **the screen may be blank for much of the initial boot** (although there will also be intermittent console output), so please be patient.
**Within two minutes** of applying power (subsequent boots will be much faster) you should be presented with the standard Raspbian first-time setup wizard:
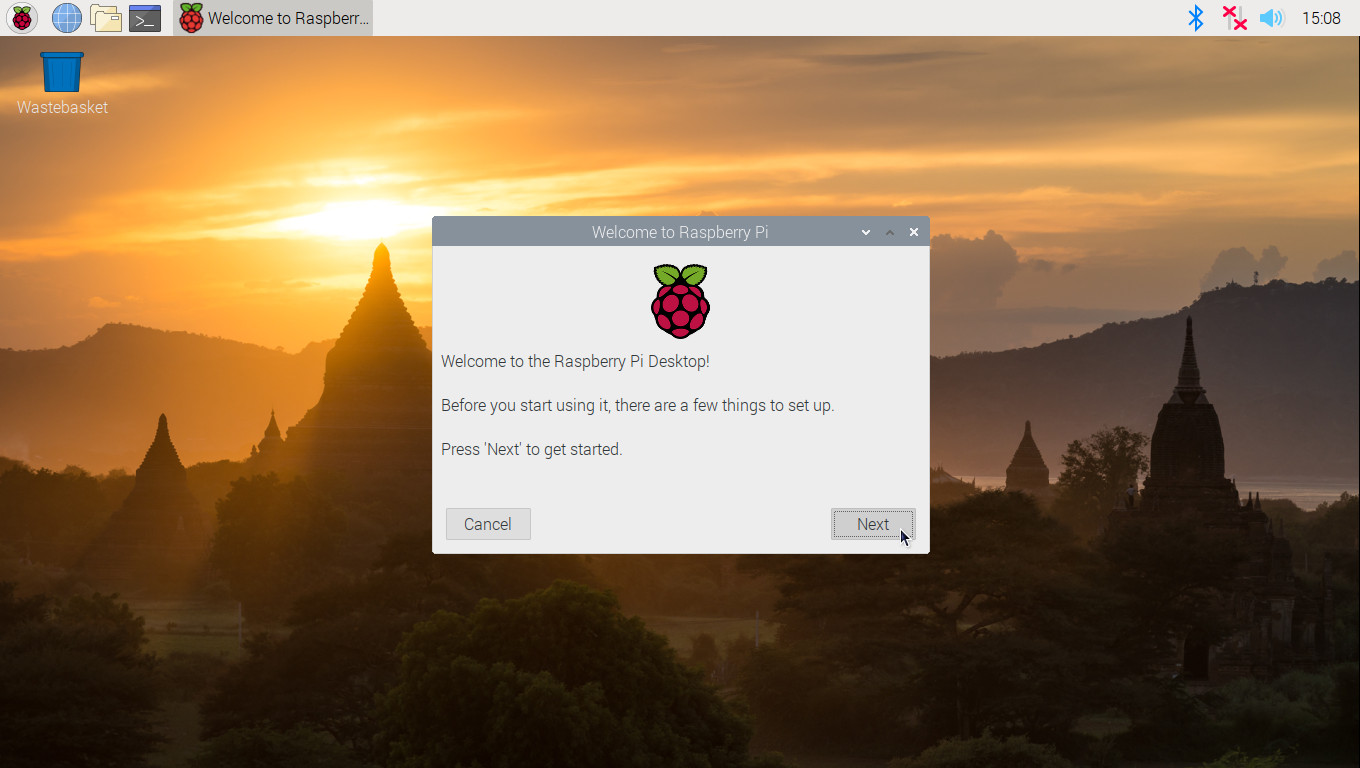
Follow though this dialog (overview [here](https://www.raspberrypi.org/blog/raspbian-update-june-2018/)); you will be prompted to reboot once complete. Do so, and wait for your system to come back up.
> **NB:** if you are using _only_ WiFi networking, please _wait_ for your clock to sync after setting up the WiFi access password (which you'll be prompted to fill out as you work through the wizard), otherwise the subsequent "Update Software" step may fail, due to incorrect timestamps. The sync may take up to a minute to complete. You'll see the clock at the top right of the screen 'jump' to the correct time once the sync has happened.
Please **do not** omit the reboot step at the end of the setup wizard - your `nspawn` system will not be properly prepared until you do.
> Note that as of version 1.1.0 of the image, the password you set via the wizard for the `pi` account in the 32-bit Raspbian host **will also** be automatically reflected for the 'shadow' `pi` user inside the 64-bit Debian guest OS (and this will hold true for any subsequent password or user changes made while the container is running). Also, as of version 1.2.0 of the image, changes to locale and timezone in the host will also be automatically propagated into the guest.
> NB - if your connected computer monitor or TV output appears **flickering or distorted**, you may need to change the settings in the file `config.txt`, located in the microSD card's first partition (this partition is formatted `vfat` so you should be able to edit it on any PC; alternatively, when booted into the image, it is available at `/boot/config.txt`). Any changes made take effect on the next restart. For an explanation of the various options available in `config.txt`, please see [these notes](https://www.raspberrypi.org/documentation/configuration/config-txt/README.md) (the shipped defaults should work fine for most users, however). You can also use the bundled GUI tool to modify (some of) these settings: it is is available under Preferences→Raspberry Pi Configuration.
In particular, if the display appears to be inset by a black border, so it is not using the full screen real estate (this mostly happens when using monitors, and newer HDMI TVs), turn off "Underscan" (via the Raspberry Pi Configuration tool just mentioned), and reboot.
You can install and use 32-bit apps exactly as you would on a stock Raspbian system; this should need no introduction ^-^
But, since your new `raspian-nspawn-64` image uses the [official](https://www.raspberrypi.org/forums/viewtopic.php?f=29&t=250730) RPi4/3-aware 64-bit `4.19.y` kernel, *and* has a full Debian Buster 64-bit (aarch64) guest OS started inside a [`systemd-nspawn`](https://www.freedesktop.org/software/systemd/man/systemd-nspawn.html) namespace container *automatically* at boot, installing and using 64-bit packages is now just as straightforward!
> `systemd-nspawn --boot` is similar in some ways to a [`chroot`](https://en.wikipedia.org/wiki/Chroot), but more powerful. Under it, the guest OS is **fully booted** as an independent entity - it has its own `systemd` init, running as PID 1 in an isolated process namespace, so e.g. scheduled tasks and programs requiring `dbus` interaction can be run, but processes in the container's *host's* OS are invisible inside it, enhancing protection. The full file system hierarchy is virtualized, as are the IPC subsystems and the host and domain name. As we have it set up here, networking is *not* virtualized (for simplicity), so guest OS processes may directly use the host OS' network adaptors, making it straighforward to run e.g. a web browser inside the container (and indeed the image ships with a 64-bit version of Firefox-ESR).
Additionally, `systemd-nspawn` limits access to various kernel interfaces in the container to read-only (such as `/sys`, `/proc/sys`, etc.), and prevents the creation of device nodes and loading of kernel modules. The host system also cannot be rebooted from within the container.
For further background on the main underlying Linux container technologies (*viz*.: namespacing, seccomp-bpf and capabilities) leveraged by "concessionaire" apps like `systemd-nspawn`, `firejail` and `docker`, see e.g. my notes [here](https://wiki.gentoo.org/wiki/Sakaki's_EFI_Install_Guide/Sandboxing_the_Firefox_Browser_with_Firejail#Resource_Isolation_via_Linux_Namespaces), [here](https://wiki.gentoo.org/wiki/Sakaki's_EFI_Install_Guide/Sandboxing_the_Firefox_Browser_with_Firejail#Permitted_Syscall_Management_via_Seccomp-BPF) and [here](https://wiki.gentoo.org/wiki/Sakaki's_EFI_Install_Guide/Sandboxing_the_Firefox_Browser_with_Firejail#Privilege_Management_via_Capabilities) (of course, other facilities such as [cgroups](https://en.wikipedia.org/wiki/Cgroups) are also used).
Note that containerization, while stronger than `chroot`-ing, is *not* [KVM](https://github.com/sakaki-/gentoo-on-rpi3-64bit/wiki/Run-Another-OS-on-your-RPi3-as-a-Virtualized-QEMU-Guest-under-KVM): the host and guest OSes share a common (64-bit, [of necessity](https://github.com/raspberrypi/firmware/issues/550#issuecomment-191145590)) kernel. However, on the upside, it *is* extremely lightweight (while still providing strong isolation): in quicesent state, the booted Debian Buster system takes less than 10MiB of system memory, for example, and consumes almost no CPU. Also, for avoidance of doubt, under this approach both 32-bit host and 64-bit guest OSes will run natively, without emulation.
So, let's now review how to carry out some key tasks on your new system.
> NB: unlike prior releases, as of v1.1.0, the default `pi` user is no longer 'special': if you add a *new* user to your system (with 1000<=`uid`<1100), the same menu options and home filesystem access within the container *will* be available for them (you *must* ensure your new user belongs to the `sudo` group, as `pi` does, to avail yourself of this however).
### Checking the Status of the Guest OS Container
We'll begin by verifying that the 64-bit guest OS container *is*, in fact, running. To do so, select System Tools→Monitor Active Containers, and a monitor console window should open:
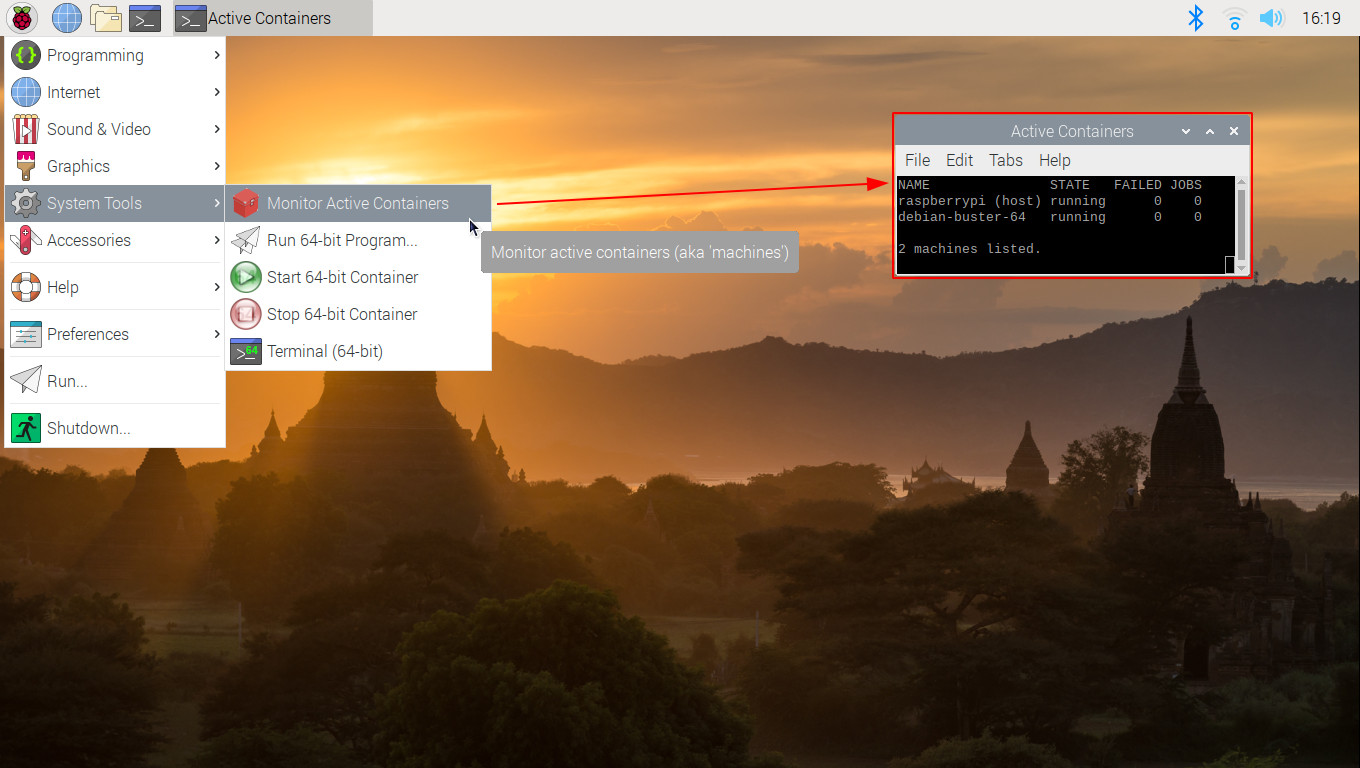
Provided you see two containers (aka 'machines') listed as shown above (i.e., `raspberrypi (host)` and `debian-buster-64`), with both showing state `running` (rather than `degraded`, which implies there are failed units), all is well.
> There is no need to keep this monitor window open to use the guest OS, although of course you can if you wish.
### Running a 64-bit Application
Now you know the guest container is up, you can run a 64-bit application inside it! As shipped, the 64-bit Debian OS includes the [`x11-apps`](https://packages.debian.org/stretch/x11-apps) package bundle, so you can try running (e.g.) the `xclock` application. Click System Tools→Run 64-bit Program..., and a dialog should open; type `xclock -geometry 350x350` in there and press OK. As shown, a (large) `xclock` should then open *on your host desktop*:
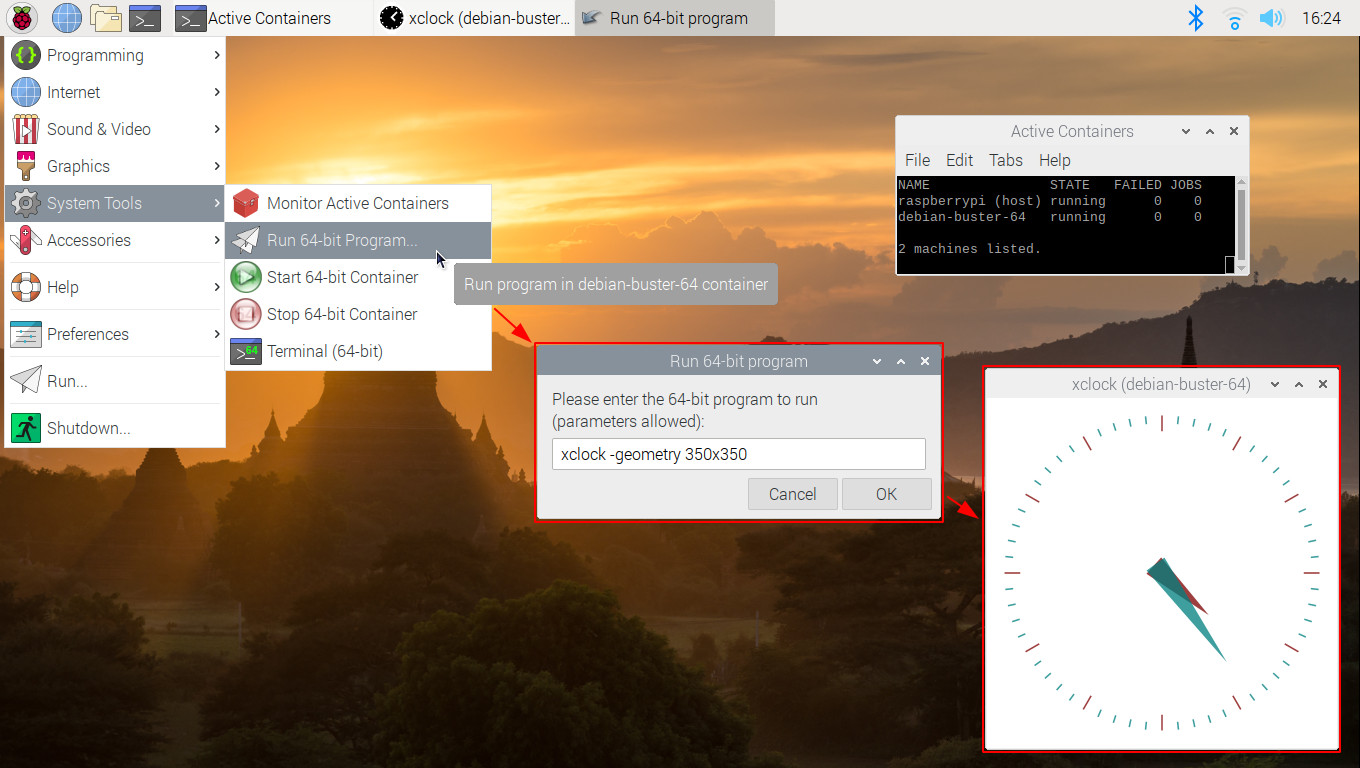
> This works because the `pi` user's home directory, which includes the necessary `.Xauthority`, is bind-mounted into the guest container (which has an identical `uid`/`gid` `pi` account), and because the host OS's X11 [Unix abstract domain socket](https://wiki.gentoo.org/wiki/Sakaki's_EFI_Install_Guide/Sandboxing_the_Firefox_Browser_with_Firejail#Graphical_Isolation_via_Xephyr) is still visible (since network namespacing is *not* in use). As of v1.1.0 of the image, this will also work for any other 'regular' user you create. And, as of v1.3.0 of the image, you can use `sudo ` in the Run 64-bit Program... dialog, should you need this facility.
If you like, you can use the [`ds64-runner`](https://github.com/sakaki-/raspbian-nspawn-64/blob/master/host-image/usr/bin/ds64-runner) program to achieve the same effect, from a (32-bit) Raspbian shell prompt. To see this, just click Accessories→Terminal, and issue:
```console
pi@raspberrypi:~ $ ds64-runner xclock -geometry 350x350 -bg orange
```
and another, similarly sized clock should appear (but this time with an orange face); the app will keep running even if the Raspbian shell is closed.
### Shell Access into the 64-bit Container (Installing 64-bit Apps)
If you want to do any maintenance on your 64-bit guest OS (or just run CLI programs within it), you'll need to open a 64-bit shell. To do so, click System Tools→Terminal (64-bit), and a 64-bit console will open:
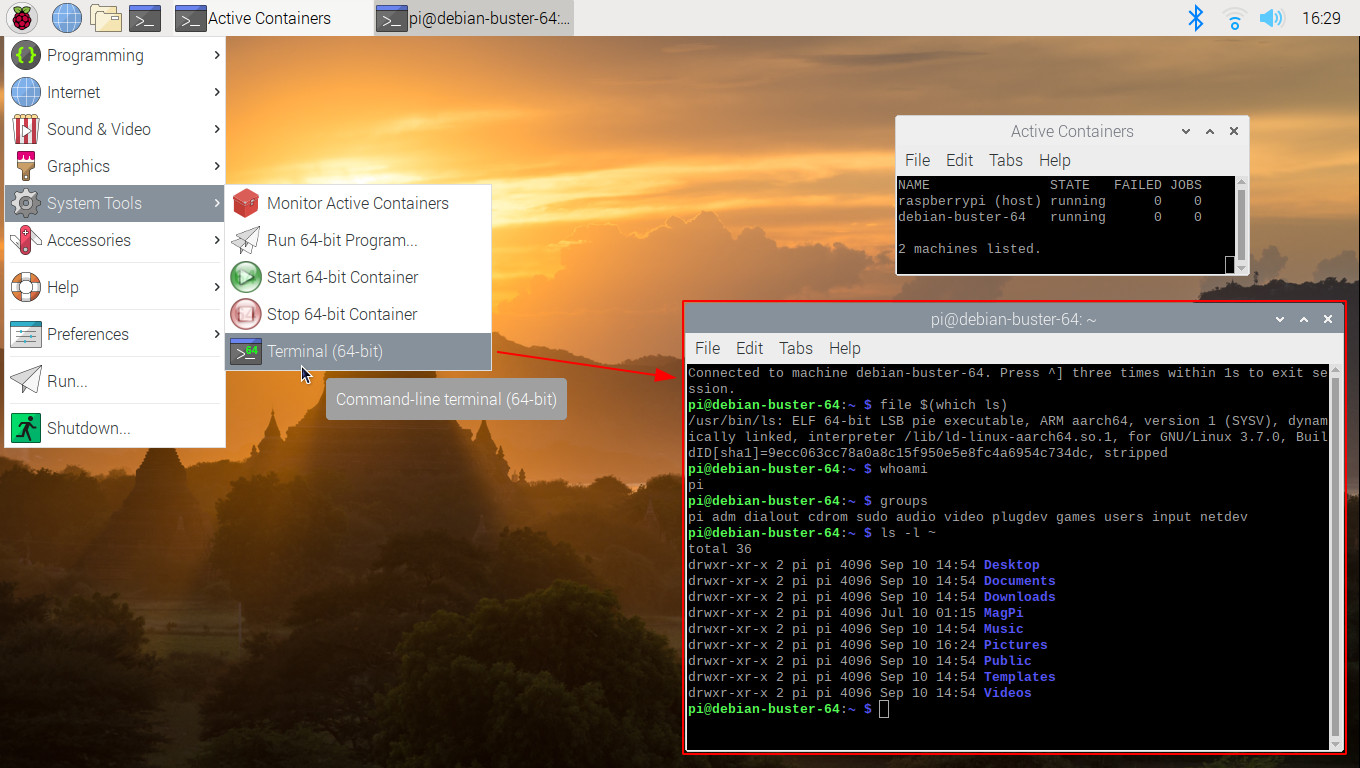
> Notice how user `pi`'s home directory *is* visible (and writeable) by the `pi` user inside the guest OS, as the [container startup configuration bind-mounted `/home`](https://github.com/sakaki-/raspbian-nspawn-64/blob/master/host-image/etc/systemd/nspawn/debian-buster-64.nspawn). Most other directories on the host are either inaccessible or read-only from within the guest.
From here, you can do anything you like, this is a full, booted aarch64 Debian instance. So, for example, you could install a package from the extensive Debian Buster aarch64 repository, using `apt-get`.
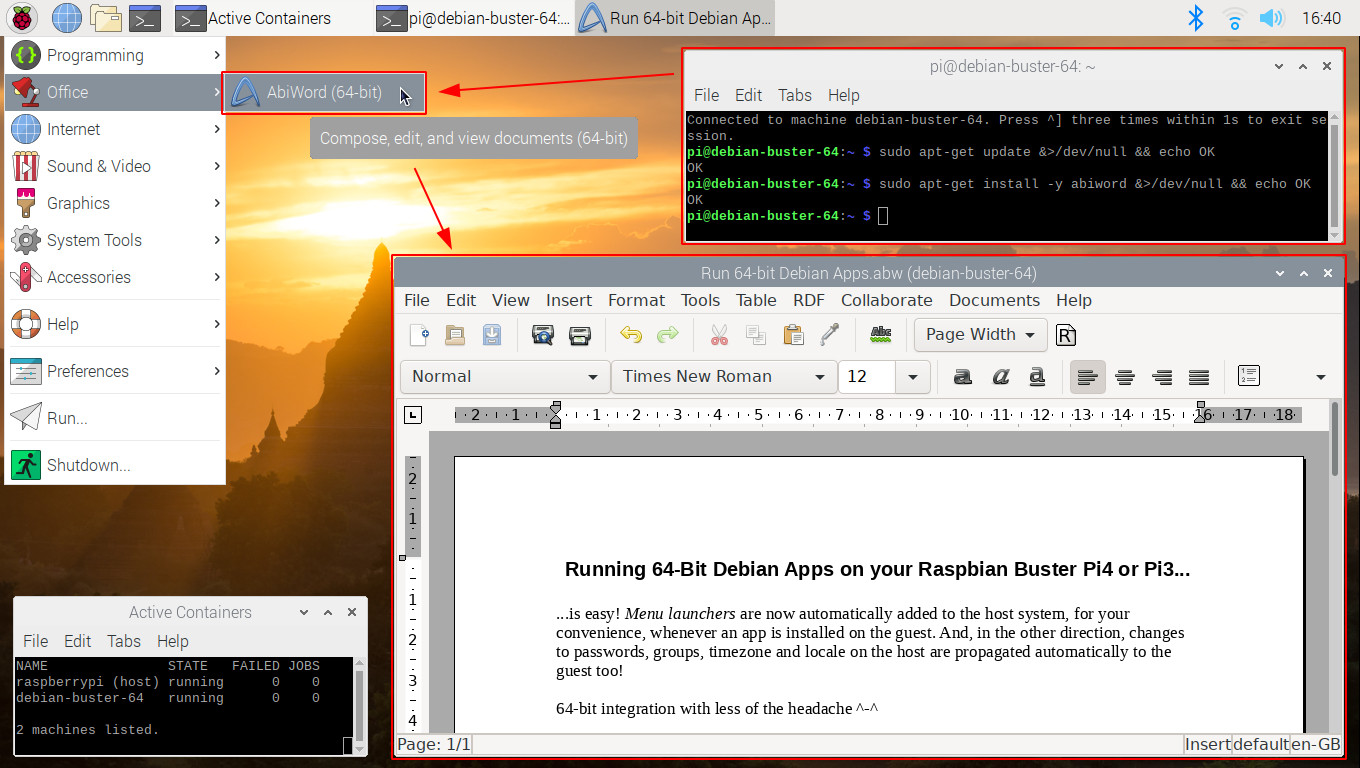
Note that as a convenience, from v1.1.0 of the image, **whenever you install a 64-bit package in this way, a menu item for it (complete with icon) will *automatically* be added to the (32-bit) host's desktop menu**; and you can simply select this to run it, just as you would a 32-bit app.
> Incidentally, this works for 'terminal-based' apps (like `htop`) too. For avoidance of doubt, you can have 32-bit and 64-bit versions of the same package installed at the same time (their menu items are distinct). Also, should you later *uninstall* a 64-application, its corresponding menu item will automatically be *deleted*. The trick is worked by having a [`systemd` path unit](https://github.com/sakaki-/raspbian-nspawn-64/blob/master/host-image/lib/systemd/system/reflect-apps%40.path) watch for new `.desktop` files being added to the guest filesystem, then invoking a script ([`/usr/sbin/reflect-apps`](https://github.com/sakaki-/raspbian-nspawn-64/blob/master/host-image/usr/sbin/reflect-apps)) to create matching `.desktop` entries on the host (which in turn call `ds64-runner` or `ds64-shell -c` internally, as appropriate).
Here's an example of installing and then using a 64-bit instance of the word processor `abiword`, via the auto-created menu item:
> You could of course also use System Tools→Run 64-bit Program... to launch `abiword`, or call [`ds64-runner`](https://github.com/sakaki-/raspbian-nspawn-64/blob/master/host-image/usr/bin/ds64-runner) (or the slighly less user-friendly [`ds64-run`](https://github.com/sakaki-/raspbian-nspawn-64/blob/master/host-image/usr/bin/ds64-run)) from a *Raspbian* shell. Alternatively, you could also start the target 64-bit program directly from the 64-bit shell as well of course, and that will work too, but the launched program will close whenever the shell is exited should you do so (`nohup` notwithstanding). So the above approach is generally to be preferred. If you have a 64-bit *server* process you want to run (that doesn't need graphical desktop access), you can just set up a new `systemd` unit on the guest (64-bit) OS directly, of course.
> As of v1.3.0 of the image, you can use `sudo ` from within the 64-bit shell (and the Run 64-bit Program... dialog too), should you require this facility.
To close a container shell, either:
* press Ctrld;
* type `exit` (and press Enter);
* press Ctrl] three times in quick succession; or
* just click the close box on the terminal window.
You can have as many guest OS terminals open at one time as you like.
> Yes, the `ds-` prefix in these commands used to refer to **D**ebian **S**tretch, but is now a backronym for **D**ebian **s**idekick (OS) instead ^-^
Note that you can also drop into a container shell *directly* from within a Raspbian shell too, using the [`ds64-shell`](https://github.com/sakaki-/raspbian-nspawn-64/tree/master/usr-local-bin#ds64-shell) command. Here's the same `abiword` example, done slightly differently:
```console
pi@raspberrypi:~ $ ds64-shell
Connected to machine debian-buster-64. Press ^] three times within 1s to exit session.
pi@debian-buster-64:~ $ sudo apt-get update && sudo apt-get install -y abiword && echo OK
OK
pi@debian-buster-64:~ $ exit
pi@raspberrypi:~ $ ds64-runner abiword
```
As the guest OS is a fully-booted real system, you can even e.g. set up `cron` jobs when logged in to a container shell in this way.
### Running Full-Scale Applications in the 64-bit Debian Guest OS
Since the Debian instance has `dbus` running, and applications can access the host's `pulseaudio` server to play audio (and the X11 server for graphical interaction), it is possible to run even full-scale applications on the 64-bit guest OS. To illustrate this, **the image ships with the 64-bit `firefox-esr` package installed**. To run it, click on Internet→Firefox ESR (64-bit), and after a short startup a browser window will open on your desktop:

If you then open a site like youtube.com, you can test out playing video. You should find that audio playback etc. works acceptably, and, as the full `/home` directory is bind-mounted, you can download etc. successfully.
> As noted [earlier](#automagic), from v1.1.0 of the image, 64-bit applications *automatically* have an appropriate launcher added upon installation to the 32-bit host's desktop menu (complete with icon!), so you *won't* generally have to set up any `.desktop` files manually (as you did in v1.0.0). Just open a 64-bit container shell, `apt-get install` your target 64-bit application, and you should be good to go!
### Manually Stopping or Starting the 64-bit Debian Guest OS Container
As the container is automatically started at boot, and consumes less than 10MiB of system memory, and almost no CPU, when not actively executing invoked 64-bit applications, you will not generally need to manually start or stop it.
However, it is sometimes useful to take down the container, in order to e.g. backup its filesystem (which lives at `/var/lib/machines/debian-buster-64`).
> Bear in mind that doing this will stop any applications (web browser etc.) you may have launched from it.
To stop the container, just click System Tools→Stop 64-bit Container:
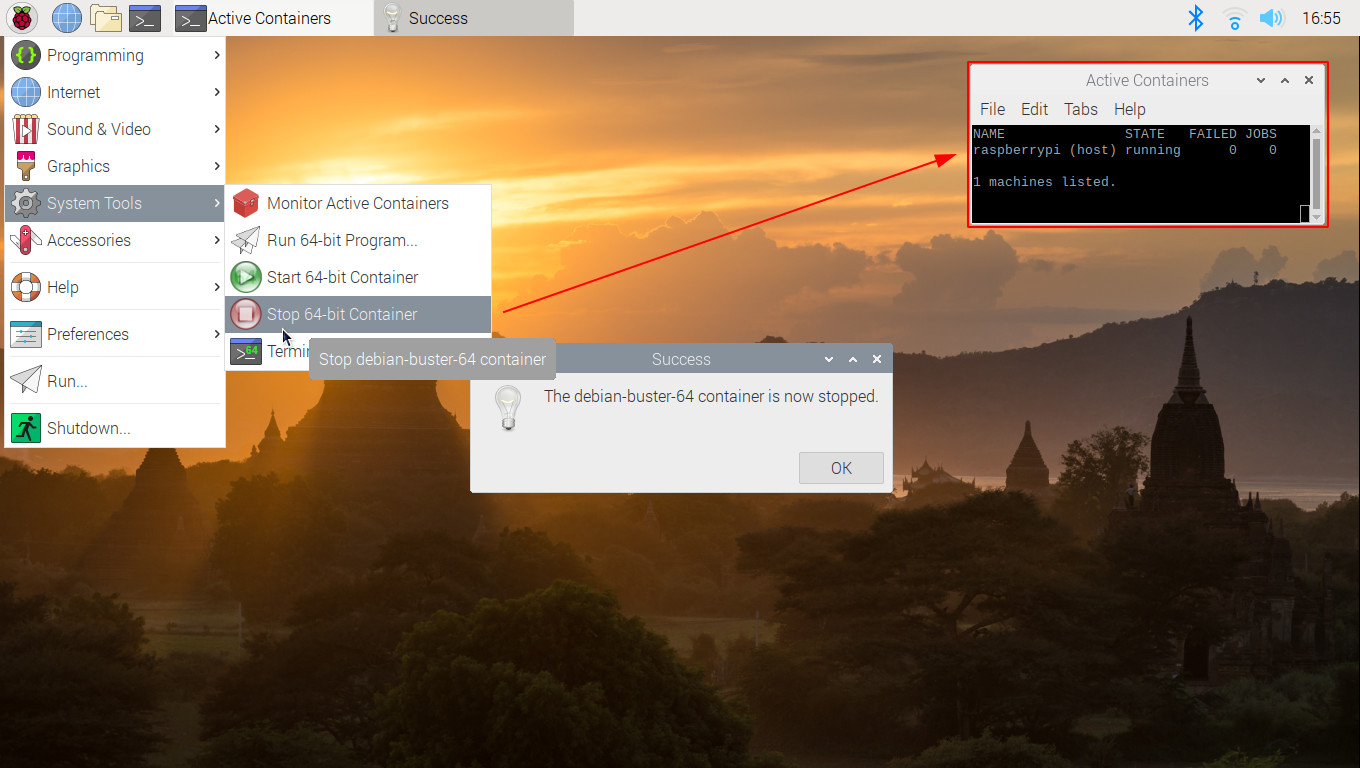
A few seconds later, a dialog should pop up (as above) informing you that the container has stopped. If you have a [container monitor window](#checking_container_is_up) open, the `debian-buster-64` line should disappear from it, as the guest OS shuts down.
Note that you can also achieve the same effect directly at the command line, thus:
```console
pi@raspberrypi:~ $ sudo machinectl stop debian-buster-64
```
Once stopped, you can perform operations on the container's tree, for example, take a backup:
```console
pi@raspberrypi:~ $ sudo cp -ax /var/lib/machines/debian-buster-64{,.bak}
```
Note that stopping the container does *not* prevent it being auto-restarted next boot (to do *that*, you'd need to disable the `systemd-nspawn@debian-buster-64.service`).
When you are ready, you can then manually restart (reboot) the guest OS again, by clicking System Tools→Start 64-bit Container:
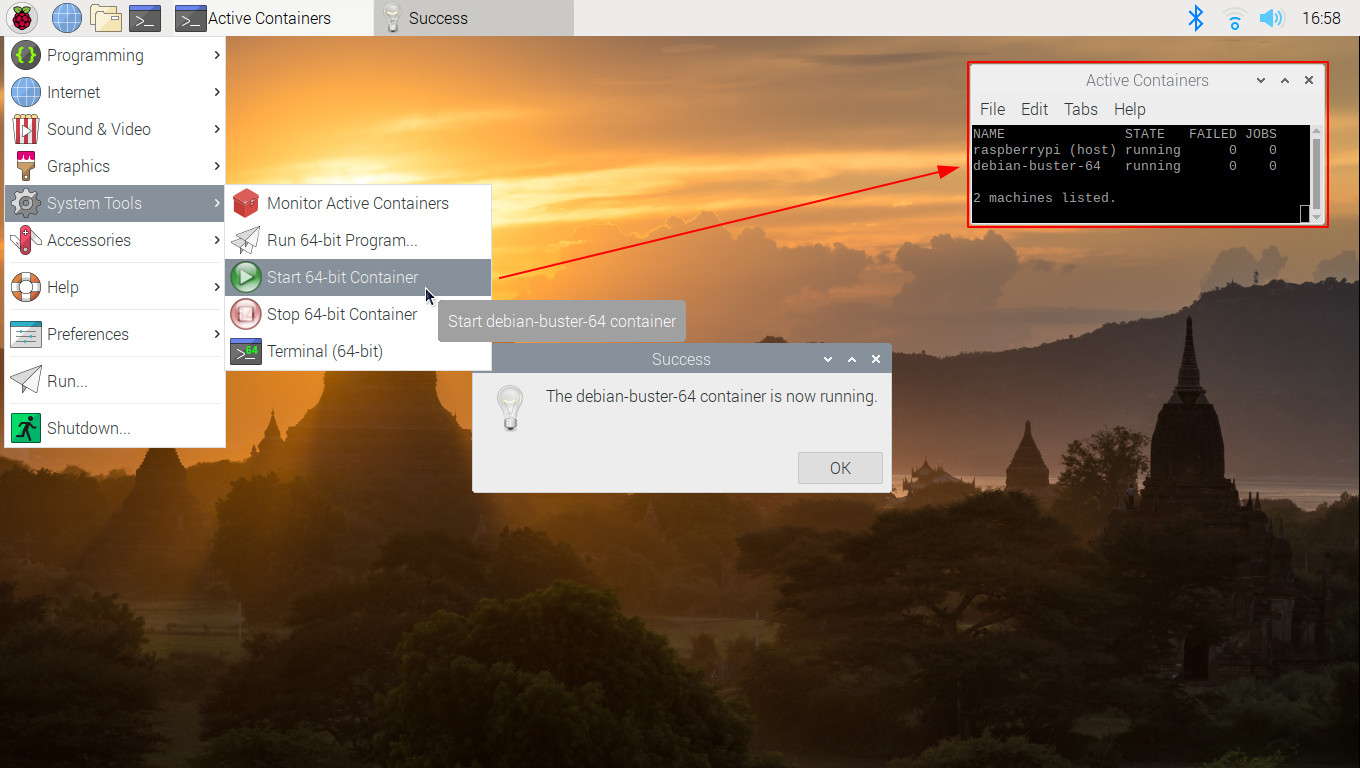
A few seconds later, a dialog should pop up (as above) informing you that the container has started. If you have a [container monitor window](#checking_container_is_up) open, the `debian-buster-64` line should appear again in it, as the guest OS comes up.
Note that you can also achieve the same effect directly at the command line, thus:
```console
pi@raspberrypi:~ $ sudo machinectl start debian-buster-64
```
Once up, you can run 64-bit applications, and open 64-bit shells again, just as before.
> Incidentally, if you try either of the above actions when the guest OS container is *stopped*, they will fail gracefully, with an error message shown in a pop-up dialog box.
This section contains some useful command line incantations for working with the `raspbian-buster-64` container; a number of these have already been demonstrated in the main text above, but are gathered here in one place for convenience. There's a lot more you can do of course, think of these just as a necessary minimum set.
> **NB: *all* the below commands are issued from a terminal in the *host* (32-bit Raspbian) OS**.
Check the status of all containers:
```console
pi@raspberrypi:~ $ sudo systemctl list-machines
```
Other `systemd` tools play surprisingly nicely with containers booted using `systemd-nspawn`. For example, to see the journal, since last boot, of your 64-bit container (assuming it is running):
```console
pi@raspberrypi:~ $ sudo journalctl --machine=debian-buster-64 --boot
```
And check the service status on your 64-bit container:
```console
pi@raspberrypi:~ $ sudo systemctl --machine=debian-buster-64
```
> Add `--failed` to see only units that haven't started correctly. Of course, when logged into the container, you can issue commands like `journalctl`, `systemctl` etc. directly, but it is still nice that you can use them 'from the outside'.
Get a (regular user) shell inside your 64-bit container (see [here](https://github.com/sakaki-/raspbian-nspawn-64/blob/master/host-image/usr/bin/ds64-shell) for the definition of this shorthand command):
```console
pi@raspberrypi:~ $ ds64-shell
Connected to machine debian-buster-64. Press ^] three times within 1s to exit session.
pi@debian-buster-64:~ $
```
You can then run `sudo su -` to get a root shell, if you need, or just elevate privileges as required for individual commands, using `sudo`.
You can open as many concurrent container shells as you like. To exit such a shell, just type `exit`Enter, press ctrld, or press ctrl] three times within a second. Operations like `poweroff` issued inside the container only affect the container - *not* your RPi4/RPi3 itself. Note that issuing `reboot` will *not* work properly when the container is managed by `systemd-nspawn@.service`, as here; better to use `machinectl` (or equivalenly, System Tools→Stop 64-bit Container and System Tools→Start 64-bit Container) to stop and then start the container again. Networking identical to the host system *is* available (provided your host Raspbian OS has it configured), so you can `ping`, `wget`, `apt-get`, run web browsers etc. all from withing the container. By default, the full `/home` directory (only) is mapped inside the container for access.
Stop (poweroff) the 64-bit container (will stop any apps running from within it):
```console
pi@raspberrypi:~ $ sudo machinectl stop debian-buster-64
```
> You can also issue `sudo poweroff` when logged into a container shell.
And start (boot) it again:
```console
pi@raspberrypi:~ $ sudo machinectl start debian-buster-64
````
Remember, the way we have things set up, the `debian-buster-64` container will be *auto-started at boot*, so you will only need to explicitly start the container if it has crashed, or you have manually taken it down for some reason (to take a backup, for example).
Run a 64-bit application in the container, displaying on the host's X11 desktop, and using the host's `pulseaudio` server (see [here](https://github.com/sakaki-/raspbian-nspawn-64/blob/master/host-image/usr/bin/ds64-runner) for the definition of this shorthand command):
```console
pi@raspberrypi:~ $ ds64-runner firefox "https://www.raspberrypi.org/forums"
```
As of v1.3.0, you can also use `sudo` with `ds64-runner` should you require; for example:
```console
pi@raspberrypi:~ $ ds64-runner sudo xedit /etc/motd
```
Prevent the container from starting at boot:
```console
pi@raspberrypi:~ $ sudo machinectl disable debian-buster-64
```
Enable auto-start on boot again (shipped default):
```console
pi@raspberrypi:~ $ sudo machinectl enable debian-buster-64
```
To access files in the container from the host, remember that user `/home` directory is already mapped inside the guest, so you can copy files via that. Otherwise, the container's root directory prefix is `/var/lib/machines/debian-buster-64`.
There are many other options available of course. Please take the time to read the [`machinectl`](https://www.freedesktop.org/software/systemd/man/machinectl.html), [`systemctl`](https://www.freedesktop.org/software/systemd/man/systemctl.html) and [`systemd-run`](https://www.freedesktop.org/software/systemd/man/systemd-run.html) manpages.
> Note: if you need to change the default container hostname (from `debian-buster-64`), you need to edit the file `/etc/given-hostname` *within* the container, and then restart it.
In addition to the notes in this README, this project also has an associated open wiki, containing a number of short tutorial articles you may find helpful when using `raspbian-nspawn-64`.
You can view the wiki homepage [here](https://github.com/sakaki-/raspbian-nspawn-64/wiki). Feel free to add your own material!
Current articles include:
* [Accessing Devices (e.g. I2C) from Inside the Container](https://github.com/sakaki-/raspbian-nspawn-64/wiki/Accessing-Devices-%28e.g.-I2C%29-from-Inside-the-Container)
* [Using Docker Inside the Container](https://github.com/sakaki-/raspbian-nspawn-64/wiki/Using-Docker-Inside-the-Container)
Don't forget you can still carry out all the normal `apt-get update && apt-get -y upgrade`, `apt-get install -y ` etc. operations that you normally would on your **32-bit** Raspbian host OS! Only install and run packages from the 64-bit container when you really need to (for example, because modern versions aren't available in the repos in 32-bit form, as is the case with e.g., `mongodb`), or for fun of course ^-^
Remember also that the package sets installed on the 32-bit and 64-bit (Raspbian host and Debian guest) OSes are *distinct*, and the two OSes must be kept up-to-date (via `apt-get update` / `apt-get upgrade`) separately.
As of v1.3.0 of the image, you can update the (now official) 64-bit kernel (and boot firmware) by issuing:
```console
pi@raspberrypi:~ $ sudo rpi-update
```
Note that as of v1.3.0 of the image, `LIBGL_ALWAYS_SOFTWARE=1` is set for apps invoked from the guest image. This is because the versions of Mesa / libgl shipped with the current Debian Buster don't appear to be able to interoperate properly with the RPi 4/3's vc* GPU (even if `/dev/dri` is bind-mounted), so we force software rendering to ensure that apps such as `chromium` will display correctly (and not black-screen). You can easily turn this off via the `GUEST_LIBGL_ALWAYS_SOFTWARE` setting in `/etc/ds64.conf` on the host.
To reiterate: this is an *unofficial* image and is supplied in the hope it will be useful, but without warranty.
However, of the three main enabling functional elements within it, viz:
1. the 64-bit kernel;
1. the 64-bit Debian Buster guest image; and
1. the Raspbian userland support components
the first is now an official build (obtained via `rpi-config`), and ShiftPlusOne will hopefully be adding the other two as debs to the official repos at some point in the future.
Lastly, **feedback** is welcomed! So if you have any problems, questions or comments regarding `raspbian-nspawn-64`, feel free to drop me a line! (sakaki@deciban.com)
The idea of this came from Crazyhead90's [Raspbian-desktop-64bitkernel-pi3bplus](https://github.com/Crazyhead90/pi64/releases/tag/2018-04-17) image (64-bit kernel + 32-bit userland OS), and [this post](https://www.raspberrypi.org/forums/viewtopic.php?p=1406832#p1406832) by jdonald (which suggests a chroot into a 64-bit guest from such a setup). I've just extended jdonald's idea to use the Linux containers support provided by `systemd-nspawn`, and tied it all together in what I hope is a reasonably user-friendly way ^-^