Ecosyste.ms: Awesome
An open API service indexing awesome lists of open source software.
https://github.com/savchenko/windows10
MS Windows 10 cheat-sheet
https://github.com/savchenko/windows10
microsoft windows-10 windows10
Last synced: 2 months ago
JSON representation
MS Windows 10 cheat-sheet
- Host: GitHub
- URL: https://github.com/savchenko/windows10
- Owner: savchenko
- License: mit
- Created: 2019-07-14T01:33:47.000Z (over 5 years ago)
- Default Branch: develop
- Last Pushed: 2020-12-23T03:12:31.000Z (about 4 years ago)
- Last Synced: 2023-06-01T15:15:25.700Z (over 1 year ago)
- Topics: microsoft, windows-10, windows10
- Language: HTML
- Size: 14.3 MB
- Stars: 16
- Watchers: 4
- Forks: 1
- Open Issues: 2
-
Metadata Files:
- Readme: README.md
- License: LICENSE
Awesome Lists containing this project
README
# Current status
Project is looking for new maintainers, please see the [Issue #22](https://github.com/stoptracking/windows10/issues/22).
# About
This was a cheat-sheet for a single-user installation of Windows 10 build 1909, also known as "19H2".
Level 3 baseline with additional customizations: less network noise, focus on single-user workstation, etc.

If you are looking for something more of a \*nix flavour, check-out the [Playbook](https://github.com/stoptracking/playbook).
## Purpose of the project
Allow Windows users to control the operating system they ~~own~~ have licensed for a limited usage from Microsoft.
## Project goals
1. Educate users about Windows security capabilites and allow them to enable those in a controlled manner.
1. Reduce Microsoft telemetry to the bare minimum. Remove advertising and tracking whenever possible.
1. Defer the "feature" updates to counter the [appalling quality](https://www.howtogeek.com/658194/windows-10s-new-update-is-deleting-peoples-files-again/) of what it [traditionally](https://www.cleverfiles.com/howto/recover-files-windows10-update.html) shoveled upon the home users.
## Project scope
Microsoft Windows 10 on x86-64.
# Foreword
Great care should be taken when using commercial operating system with "post-sale monetisation" as a part of its business model. Make no mistake as to what is a product and [where profits are coming from](https://www.microsoft.com/investor/reports/ar19/index.html).
## Rationale
One might ask, — _"Why to bother with MS product while there are better \*nix-based operating systems?"_
At present, main considerations are:
* Ability to use [well-tested FDE](https://docs.microsoft.com/en-us/windows/security/information-protection/bitlocker/bitlocker-countermeasures) that it tied to TPM _and_ user-supplied secret. While it is possible to implement something similar via `keyscript` in `/etc/crypttab`, this is not a default modus operandi of LUKS.
Linux users can use `clevis`, however _"TPM in conjunction with user password"_ with automatic roll-over is not supported by any major Linux distribution as in Q1 2020.
That being said, there is [some](https://github.com/Foxboron/sbctl) [hope](https://github.com/osresearch/safeboot).
* Commercial-grade Type-1 hypervisor.
* Application firewall with the [WFP layer](https://docs.microsoft.com/en-us/windows/win32/fwp/windows-filtering-platform-start-page) that allows building additional rules on top of the same engine.
Usable GUIs to manage WFP and CLI for the Windows Firewall itself.
* Handy software that is not available under Linux or \*BSD.
* Good hardware support.
## Mode of operation
Main Windows installation has whitelisted access only to the practically necessary services:
- OSCP
- Updates
- NTP
- SSH/sFTP
- Intranet SMB
## Changing the system
Number of changes are made using MS-provided "Traffic restriction policy". Multiple settings are applied via direct registry injection instead of a GPO import.
I can only quote Microsoft, here:
> To turn off Messaging cloud sync:
> There is no Group Policy corresponding to this registry key.
and here:
> Note: There is no Group Policy to turn off the Malicious Software Reporting Tool diagnostic data.
Even then, registry "tweaks" are taken from Microsoft documentation for the specific build version.
## Known limitations
- Cortana is limited to the Start menu search.
- No access to the microphone, camera and Bluetooth by default
- Ability to log-in via "Microsoft account" is disabled.
- Windows search is not allowed to send queries back to MS/Bing.
- Disabled "Network Connectivity Probe" (NCSI).
- AppX packages are severely limited in what they can access.
- "Activity feed" is disabled.
- ipv6 is disabled by default.
- "Microsoft store" is disabled.
- "Application Compatibility" is disabled.
- "Game DVR" and "XBox" are disabled.
# Before installation
1. Recognize that you are dealing with the closed-source, SaaS-like operating system.
To give an idea about the "Microsoft world", these are enabled by default:
> Automatic learning enables the collection and storage of text and ink written by the user in order to help adapt handwriting recognition to the vocabulary and handwriting style of the user.
>
> Text that is collected includes all outgoing messages in Windows Mail, and MAPI enabled email clients, as well as URLs from the Internet Explorer browser history. The information that is stored includes word frequency and new words not already known to the handwriting recognition engines (for example, proper names and acronyms).
>
> Deleting email content or the browser history does not delete the stored personalization data. Ink entered through Input Panel is collected and stored.
> "When you interact with your Windows device by speaking or typing, Microsoft collects speech, inking, and typing information – including information about your Calendar and People"
Windows "Defender":
> Information collected includes file data (such as file names, sizes, and hashes), process data (running processes, hashes), registry data, network connection data (host IPs and ports), and device details (such as device identifiers, names, and the operating system version).
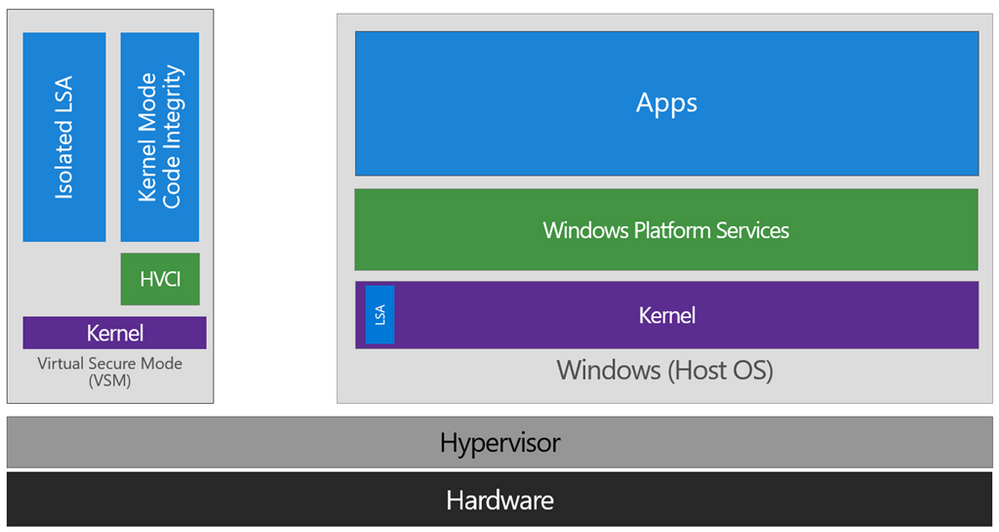
1. Be aware that you will be enabling [Hypervisor-protected code integrity (HVCI)](https://docs.microsoft.com/en-us/windows/security/threat-protection/device-guard/enable-virtualization-based-protection-of-code-integrity) which imposes _significant_ performance penalty on all Intel CPUs released before "7th generation" and AMD processors prior to ["Ryzen 2"](https://github.com/MicrosoftDocs/windows-itpro-docs/issues/3997). To quote Mark Russinovich and Alex Ionescu:
> "The Secure Kernel relies on the Mode-Based Execution Control (MBEC) feature, if present in hardware, which enhances the SLAT with a user/kernel executable bit, or the hypervisor’s software emulation of this feature, called Restricted User Mode (RUM)."
After we are done, your environment will look like this:

...plus some more VMs on the side.
2. Remember about performance hit from countermeasures against [2019 side-channel attacks](https://www.intel.com/content/www/us/en/architecture-and-technology/engineering-new-protections-into-hardware.html). Down the track, you can obtain CPU stepping by running `wmic cpu get caption` in PowerShell and, if using Intel, comparing against [this list](https://www.intel.com/content/www/us/en/architecture-and-technology/engineering-new-protections-into-hardware.html). Now, the hardware upgrade might be a wise choice.
1. Un-plug ethernet if present, disable WiFi.
1. Install latest BIOS/FWs from a vendor.
1. Consider stripping Intel ME using [metool](https://github.com/corna/me_cleaner) or be ready to assess/update/patch using CSME, link above.
1. Enable UEFI-native boot, "Secure boot", DEP, VTx/VT-d (or AMD-V).
1. In case you are using Intel™, depending on the CPU generation you might consider disabling HyperThreading®.
1. On certain SMB platforms IntelTXT® is enabled and not exposed in BIOS which may prevent from disabling HT.
1. Sometimes this can be circumvented by using vendor's mass-provisioning tool. For example, HP:
```powershell
.\BiosConfigUtility64.exe /setvalue:"Trusted Execution Technology (TXT)","Disable" /cpwdfile:"pwd.bin" /verbose
```
Stdout:
```xml
```
3. Afterwards, you should be able to disable HT:
```powershell
.\BiosConfigUtility64.exe /setvalue:"Intel (R) HT Technology","Disable" /cpwdfile:"pwd.bin" /l /verbose
```
1. Reader is encouraged to [check](https://nvd.nist.gov/vuln/detail/CVE-2020-0551) [the](https://nvd.nist.gov/vuln/detail/CVE-2017-5754) [numerous](https://nvd.nist.gov/vuln/detail/CVE-2017-5715) [vulnerabilities](https://nvd.nist.gov/vuln/detail/CVE-2017-5753) [affecting](https://nvd.nist.gov/vuln/detail/CVE-2018-3646) [Intel](https://nvd.nist.gov/vuln/detail/CVE-2018-3620) [CPUs](https://nvd.nist.gov/vuln/detail/CVE-2020-0549). [With](https://nvd.nist.gov/vuln/detail/CVE-2018-12130) [no](https://nvd.nist.gov/vuln/detail/CVE-2018-12127) [end](https://nvd.nist.gov/vuln/detail/CVE-2019-11091) [in](https://nvd.nist.gov/vuln/detail/CVE-2019-11135) [sight](https://nvd.nist.gov/vuln/detail/CVE-2018-12126) [for](https://nvd.nist.gov/vuln/detail/CVE-2018-3615) [this](https://nvd.nist.gov/vuln/detail/CVE-2020-0549) [maddness](https://nvd.nist.gov/vuln/detail/CVE-2020-0548). Vote with your wallet.
# During installation
1. Keep machine disconnected from the Internet
2. Opt-out from all personal data collection when asked. This means answering "no" to every single question.
# After installation
1. Copy to the target machine via local means:
1. This repository
1. pfSense installation ISO
1. Copy `LGPO.exe` from `./Tools` to `C:\Windows\system32\`.
## Enable HVCI and Credential Guard
1. From `./Tools/dgreadiness_v3.6`, launch [DG readiness tool](https://www.microsoft.com/en-us/download/details.aspx?id=53337).
1. Temporarily change execution policy for PowerShell scripts:
`Set-ExecutionPolicy -ExecutionPolicy AllSigned`
1. Check current status:
`.\DG_Readiness_tool_v3.6.ps1 -Ready`
1. Enable:
`.\DG_Readiness_tool_v3.6.ps1 -Enable`
1. Looks like this?

1. Good. Don't forget to switch the policy back:
`Set-ExecutionPolicy -ExecutionPolicy Restricted`
1. Reboot
1. If curious (as you should be), check the status and compare against [documentation](https://docs.microsoft.com/en-us/windows/security/threat-protection/device-guard/enable-virtualization-based-protection-of-code-integrity):
```powershell
Get-CimInstance -Namespace ROOT\Microsoft\Windows\DeviceGuard -ClassName Win32_DeviceGuard
```
In general, output should look like this:
```powershell
AvailableSecurityProperties : {1, 2, 3, 4, 5, 7} # Depends on the hardware support
CodeIntegrityPolicyEnforcementStatus : 0
InstanceIdentifier : long-id-here
RequiredSecurityProperties : {0} #
SecurityServicesConfigured : {0} # Depends on the hardware support
SecurityServicesRunning : {0} #
UsermodeCodeIntegrityPolicyEnforcementStatus : 0
Version : 1.0
VirtualizationBasedSecurityStatus : 0
PSComputerName : COMPUTERNAME
```
## Apply baseline policies
### Security
1. Navigate to `./Tools/baseline_security/Scripts` and:
```powershell
Set-ExecutionPolicy -ExecutionPolicy Unrestricted
.\Baseline-LocalInstall.ps1 -Win10NonDomainJoined
```
1. Add [attack surface reduction rules](https://docs.microsoft.com/en-us/windows/security/threat-protection/windows-defender-exploit-guard/attack-surface-reduction-exploit-guard#attack-surface-reduction-rules).
```powershell
$asrs = @("BE9BA2D9-53EA-4CDC-84E5-9B1EEEE46550", # Block executable content from email client and webmail
"D4F940AB-401B-4EFC-AADC-AD5F3C50688A", # Block all Office applications from creating child processes
"3B576869-A4EC-4529-8536-B80A7769E899", # Block Office applications from creating executable content
"75668C1F-73B5-4CF0-BB93-3ECF5CB7CC84", # Block Office applications from injecting code into other processes
"D3E037E1-3EB8-44C8-A917-57927947596D", # Block JavaScript or VBScript from launching downloaded executable content
"5BEB7EFE-FD9A-4556-801D-275E5FFC04CC", # Block execution of potentially obfuscated scripts
"92E97FA1-2EDF-4476-BDD6-9DD0B4DDDC7B", # Block Win32 API calls from Office macro
"01443614-cd74-433a-b99e-2ecdc07bfc25", # Block executable files from running unless they meet a prevalence, age, or trusted list criterion
"c1db55ab-c21a-4637-bb3f-a12568109d35", # Use advanced protection against ransomware
"9e6c4e1f-7d60-472f-ba1a-a39ef669e4b2", # Block credential stealing from the Windows local security authority subsystem (lsass.exe)
"d1e49aac-8f56-4280-b9ba-993a6d77406c", # Block process creations originating from PSExec and WMI commands
"b2b3f03d-6a65-4f7b-a9c7-1c7ef74a9ba4", # Block untrusted and unsigned processes that run from USB
"26190899-1602-49e8-8b27-eb1d0a1ce869", # Block Office communication application from creating child processes
"7674ba52-37eb-4a4f-a9a1-f0f9a1619a2c", # Block Adobe Reader from creating child processes
"e6db77e5-3df2-4cf1-b95a-636979351e5b") # Block persistence through WMI event subscription
foreach ($rule in $asrs) {
Add-MpPreference -AttackSurfaceReductionRules_Ids $rule -AttackSurfaceReductionRules_Actions Enabled
}
```
1. Check that rules are applied correctly:
```powershell
(Get-MpPreference | Select-Object -ExpandProperty AttackSurfaceReductionRules_Ids).Count -eq 15
```
1. Check antimalware:
```powershell
Get-MpComputerStatus | Select-Object -Property "*enabled*"
AMServiceEnabled : True
AntispywareEnabled : True
AntivirusEnabled : True
BehaviorMonitorEnabled : True
IoavProtectionEnabled : True
NISEnabled : True
OnAccessProtectionEnabled : True
RealTimeProtectionEnabled : True
```
1. Set Windows Defender to run its child process(es) from within AppContainer:
```batch
setx /M MP_FORCE_USE_SANDBOX 1
```
1. Reboot
Optional, but convenient:
1. Open "Group Policy editor", navigate to `Computer Configuration\Windows Settings\Security Settings\Local Policies\Security Options`
1. Change "User Account Control: Behavior of the elevation prompt for standard users" to "Prompt for credentials on the secure desktop"
1. Navigate to: `Computer Configuration\Policies\Administrative Templates\Windows Components\File Explorer`
1. Enable "Show hibernate in the power options menu"
### Traffic restriction
1. Navigate to `./Tools/baseline_traffic` and:
```powershell
cp ..\LGPO\LGPO.exe .\Tools\
.\RestrictedTraffic_ClientEnt_Install.cmd
```
1. Accept the terms.
1. Open "Local group policy editor"
1. Navigate to "Administrative templates --> Windows components --> Windows update"
1. Ensure all policies are set to "Not configured"
1. Reboot
### Remove pre-installed AppX packages
1. Navigate to `./Tools/Scripts`.
1. In elevated PowerShell:
- `apps.ps1`
### Clean-up profiles
1. Create at least one new user profile
1. Log in as the newly created administrator
1. Remove the old account, choose "delete files"
1. Reboot
### Install stoptracking changes
As some of the changes are applied to HKCU hive, for _each_ user, run:
1. In elevated `cmd.exe`:
- `windows.bat`
- `edge.bat`
1. In elevated PowerShell:
- `interfaces.ps1`
- `gpupdate /force`
1. Reboot
### Speculative execution attacks
1. Use `tools/mdstools` to [assess the damage](https://mdsattacks.com/).
1. From `tools/SpeControl`:
```powershell
Import-Module -name .\SpeculationControl.psm1
Get-SpeculationControlSettings -Verbose
```
If output is unsatisfactory...
1. Enable [CVE-2018-3639](https://cve.mitre.org/cgi-bin/cvename.cgi?name=CVE-2018-3639) mitigations, as per [MS](https://support.microsoft.com/en-us/help/4073119/protect-against-speculative-execution-side-channel-vulnerabilities-in) article,
```powershell
reg add "HKEY_LOCAL_MACHINE\SYSTEM\CurrentControlSet\Control\Session Manager\Memory Management" /v FeatureSettingsOverride /t REG_DWORD /d 72 /f
reg add "HKEY_LOCAL_MACHINE\SYSTEM\CurrentControlSet\Control\Session Manager\Memory Management" /v FeatureSettingsOverrideMask /t REG_DWORD /d 3 /f
reg add "HKEY_LOCAL_MACHINE\SOFTWARE\Microsoft\Windows NT\CurrentVersion\Virtualization" /v MinVmVersionForCpuBasedMitigations /t REG_SZ /d "1.0" /f
```
1. Reboot and compare output of `Get-SpeculationControlSettings` against the [documentation](https://support.microsoft.com/en-au/help/4074629/understanding-the-output-of-get-speculationcontrolsettings-powershell).
### Misc
1. Set execution policy back:
```powershell
Set-ExecutionPolicy -ExecutionPolicy Restricted
```
1. Enable controlled folder access:
```powershell
Set-MpPreference -EnableControlledFolderAccess Enabled
```
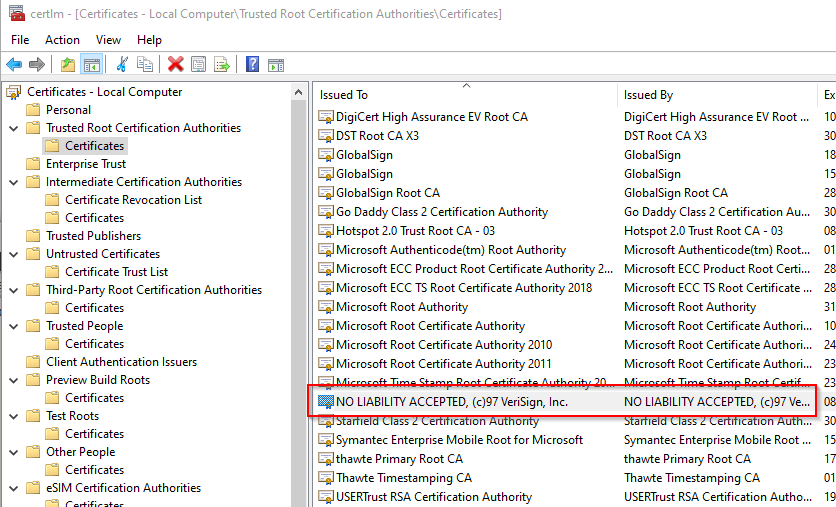
### System CA
Adjust content as necessary:

### Enable Bitlocker
1. Open policy editor and filter for: _"Configure TPM platform validation for native UEFI firmware configurations"_.
1. Enable PCR banks according to your hardware, here is the [comprehensive list with explanations](https://docs.microsoft.com/en-us/windows/win32/secprov/getkeyprotectorplatformvalidationprofile-win32-encryptablevolume).
Good start on a relatively modern device with TPM 2.0 would be `0,1,.......` TODO
1. Use `manage-bde` to set-up BitLocker and add/remove recovery agents.
1. Double-check that Bitlocker is disabled for the system drive:
```powershell
.\manage-bde.exe -protectors -get C:
```
1. If result is negative, add TPM and PIN:
```powershell
.\manage-bde.exe -protectors -add -tp C:
```
1. Until the above is confirmed working, add temporary recovery key:
```powershell
.\manage-bde.exe -protectors -add -rp C:
```
Write-down the numerical password, you will need it if machine refuses to boot with the chosen set of PCR banks.
1. If computer has started successfully and `Manage-BDE -protectors -get C:` returns data set at step #1...
1. Add file protectors instead of the pre-generated numerical sequence:
```powershell
.\manage-bde.exe -protectors -delete -t RecoveryPassword C:
.\manage-bde.exe -protectors -add -rk X:\WHERE_TO_STORE_KEY C:
```
*N.B.* Don't forget to securely wipe device "X" after the key is transferred to a proper location.
### GPOs
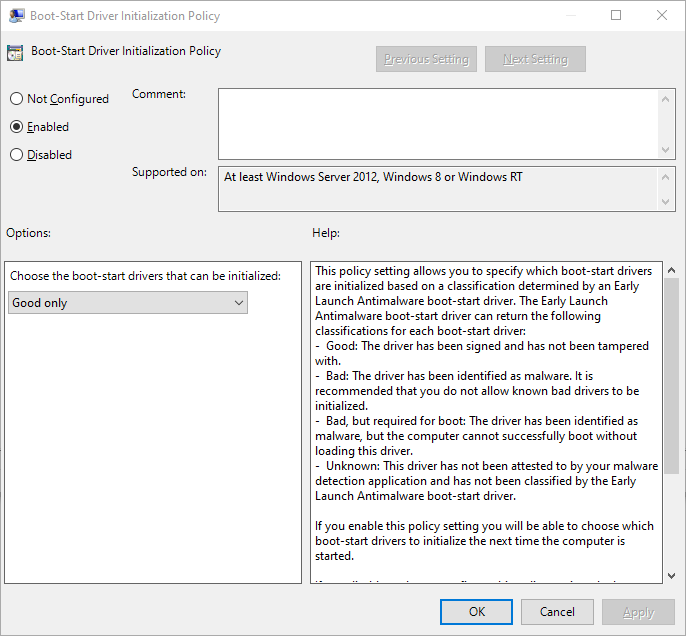
1. Enable "Early Launch Antimalware" GPO:

# Virtual Machines
As you remember, "commercial-grade hypervisor" was listed as one of the advantages. Time to use it.
## V-Switch setup
1. In Hyper-V Manager, open "Virtual Switch Manager".
1. Create a new switch:
1. Type: external
1. Map to the physical interface
1. Un-tick "Allow management operating system to share this network adapter"
## Router
We will be using [pfSense](https://www.pfsense.org/) to setup a router that filters traffic, acts as a VPN client and transparent proxy.
### pfSense Installation
1. Download [ISO for AMD64](https://www.pfsense.org/download/).
1. Create new VM, allocate 2 **or** 4 CPU cores, 2Gb of RAM and 8Gb disk.
1. Disable "dynamic memory" function.
1. Setup networking:
1. Add second network adapter.
1. Connect it to the "external" switch.
1. Setup distinct MAC addresses on both adapters.
1. Proceed with installation, reboot.
### Initial setup
1. Connect to the VM from Hyper-V Manager.
1. Select "1" from the on-screen menu.
1. Choose WAN interface, this corresponds to the "external" switch.
1. Assign IPs to both adapters.
1. Open GUI via web-browser and proceed with the guided setup.
1. Under "System / Advanced / Networking":
1. Disable "Allow ipv6"
1. You _might_ need to disable hardware checksum offloading
Please refer to [this note](TODO) for details.
1. Under "System / Advanced / Miscellaneous":
1. Un-tick "Installation Feedback"
1. Enable AES-NI acceleration
1. Power-off and create VM snapshot.
### Transparent proxy
1. Enable DNS resolver at "Services / DNS Resolver / General Settings".
1. Navigate to "SystemPackage / ManagerPackage / Installer".
1. Install `squid` and `squidGuard`.
1. Create CA at "Sytem / Cert. Manager"
1. Open "Squid proxy server" from Services menu.
1. "General" tab:
1. Tick "Enable Squid proxy"
1. Enable "Transparent HTTP Proxy" and "Bypass Proxy for Private Address Destination".
1. Set "SSL/MITM Mode" to "Splice All"
1. Set "X-Forwarded Header Mode" to "transparent".
1. Save
1. "Local cache" tab:
1. Set memory cache size to 512mb
1. Set maximum object size to keep in memory to 512
1. Set hard disk cache size to 0
1. Save
1. Open "SquidGuard proxy filter" from Services menu.
1. "General settngs" tab:
1. Tick "Enable"
1. Enable logging and log rotation
1. Save
1. "Target categories" tab:
1. Create new category
1. Add the following domains:
```
ctldl.windowsupdate.com
sls.microsoft.com
mp.microsoft.com
wustat.windows.com
windowsupdate.com
```
1. Create target categories
1. TODO
1. Go back to the "General" tab and click green "Apply" button
--------------------------------------------------------------------
# After the machine is online
1. After the Windows is activated, execute from elevated `cmd.exe`:
```bat
reg add "HKEY_LOCAL_MACHINE\Software\Policies\Microsoft\Windows NT\CurrentVersion\Software Protection Platform" /t REG_DWORD /v NoGenTicket /d 1 /f
sc config sppsvc start=disabled
```
--------------------------------------------------------------------
# Documentation
## Papers
* [Windows 10 docs](https://docs.microsoft.com/en-us/windows/windows-10/)
* [MS privacy statement](https://privacy.microsoft.com/en-us/privacystatement)
* [MS service agreement](https://www.microsoft.com/en-us/servicesagreement/)
* [Windows Server pages](https://docs.microsoft.com/en-us/windows-server/security/security-and-assurance)
* [Connection endpoints](https://docs.microsoft.com/en-us/windows/privacy/manage-connections-from-windows-operating-system-components-to-microsoft-services)
* [Endpoint management](https://docs.microsoft.com/en-us/windows/privacy/manage-connections-from-windows-operating-system-components-to-microsoft-services)
* [Bitlocker countermeasures](https://docs.microsoft.com/en-us/windows/security/information-protection/bitlocker/bitlocker-countermeasures)
* [Deprecated Windows 10 features](https://docs.microsoft.com/en-us/windows/deployment/planning/windows-10-deprecated-features)
* [GP Search](https://gpsearch.azurewebsites.net/Default_legacy.aspx)
## Tools
This guide accepts no closed-source utilities that promise to "fix Windows privacy". Author has rather dim view on such tools and prefers to rely on empirical evidence and collected data rather than a promise. When possible, instruments provided by Microsoft are used instead of a 3rd-party application.
* [MS Security Compliance Toolkit](https://docs.microsoft.com/en-us/windows/security/threat-protection/security-compliance-toolkit-10)
* [GPO and Policy Analyzer](https://www.microsoft.com/en-us/download/details.aspx?id=55319)
* [Wireshark](https://wireshark.org) and [MS Network Monitor](https://www.microsoft.com/en-au/download/details.aspx?id=4865)
* [Sysinternals](https://docs.microsoft.com/en-us/sysinternals/)
* [Intel CSME](https://downloadcenter.intel.com/download/28632/Intel-CSME-Detection-Tool)
## Questions
1. Why not DISM?
- This framework is oriented towards the wide audience. Some of them might not have an access to a known clean computer with Windows 10 installation, others could lack knowledge of assembling the base image and are at risk of ending-up with botched installation.
1. Why internet access from the "main" Windows installation is so restricted?
- Vastly reduces an impact of [coersive telemtry](https://www.ghacks.net/2016/11/07/nvidia-telemetry-tracking/) across the whole software stack.
- Makes operating reverse shell a little bit trickier.
1. Why Windows version 2004 aka "20H1" is not supported?
- 1909 is a mature and stable release supported by Microsoft until May 2021 for Home/Pro/WS/IoT and until May 2022 for Enterprise/Education.
- At the time of wiriting, relevant policies for 20H1 were not published or tested.
- Microsoft is known to introduce updates that go as far as [deleting user files](https://www.forbes.com/sites/gordonkelly/2020/02/19/new-windows-10-update-starts-causing-serious-problems/)
- https://answers.microsoft.com/en-us/windows/forum/all/cumulative-updates-may-12th-2020/3a51c803-1114-4551-bca2-e5a610900f52?LastReply=true#LastReply&page=1