https://github.com/seeed-studio/lorawan-e5-node
Applications on LoRa-E5 mini/ LoRa-E5 Development Kit with v1.1.0 STM32Cube MCU Package for STM32WL series(SDK)
https://github.com/seeed-studio/lorawan-e5-node
Last synced: 8 months ago
JSON representation
Applications on LoRa-E5 mini/ LoRa-E5 Development Kit with v1.1.0 STM32Cube MCU Package for STM32WL series(SDK)
- Host: GitHub
- URL: https://github.com/seeed-studio/lorawan-e5-node
- Owner: Seeed-Studio
- Created: 2021-12-06T08:39:50.000Z (over 4 years ago)
- Default Branch: main
- Last Pushed: 2025-01-08T09:13:44.000Z (over 1 year ago)
- Last Synced: 2025-03-30T07:09:17.177Z (about 1 year ago)
- Language: C
- Homepage:
- Size: 4.44 MB
- Stars: 67
- Watchers: 14
- Forks: 32
- Open Issues: 0
-
Metadata Files:
- Readme: readme.md
Awesome Lists containing this project
README
# LoRa-E5-LoRaWAN-End-Node
This guide is for LoRa-E5 mini/ LoRa-E5 Development Kit aiming at building several applications with STM32Cube MCU Package for STM32WL series(SDK).
**Note:** We have now updated the library to support v1.1.0 which is the latest version of STM32Cube MCU Package for STM32WL series.
## Before starting
- Please read [Erase Factory AT Firmware](https://wiki.seeedstudio.com/LoRa_E5_mini/#21-erase-factory-at-firmware) section first, as if we need to erase the Factory AT Firmware before we program with SDK
- Install [STM32CubeIDE(to compilation and debug)](https://my.st.com/content/my_st_com/en/products/development-tools/software-development-tools/stm32-software-development-tools/stm32-ides/stm32cubeide.html) and [STM32CubeProgrammer(to program STM32 devices)](https://my.st.com/content/my_st_com/en/products/development-tools/software-development-tools/stm32-software-development-tools/stm32-programmers/stm32cubeprog.license=1614563305396.product=STM32CubePrg-W64.version=2.6.0.html), also download and extract [STM32Cube MCU Package for STM32WL series(SDK)](https://my.st.com/content/my_st_com/en/products/embedded-software/mcu-mpu-embedded-software/stm32-embedded-software/stm32cube-mcu-mpu-packages/stm32cubewl.license=1608693595598.product=STM32CubeWL.version=1.0.0.html#overview)
- LoRaWAN Gateway connected to LoRaWAN Network Server(e.g. TTN)
- Prepare an USB TypeC cable and a ST-LINK. Connect the TypeC cable to the TypeC port for power and serial communication, connect the ST-LINK to the SWD pins like this:

## GPIO Configuration Overview
- As the hardware design of LoRa-E5 series is a bit different with NUCLEO-WL55JC, the official STM32WL55JC development board from ST, developers need to reconfigure some gpios, to adapt the SDK example to LoRa-E5 series. We have already reconfigured gpios in this example, but we think it is nessary to point out the difference.
|SDK Example Label|GPIO of NUCLEO-WL55JC|GPIO of LoRa-E5 Mini and LoRa-E5 Dev Board|
|---------|---------------------|------------------------------------------|
|RF_CTRL1|PC4|PA4|
|RF_CTRL2|PC5|PA5|
|RF_CTRL3|PC3|None|
|BUT1|PA0|PB13 (Boot Button)|
|BUT2|PA1|None|
|BUT3|PC6|None|
|LED1|PB15|None|
|LED2|PB9|PB5|
|LED3|PB11|None|
|DBG1|PB12|PA0 (D0 Button)|
|DBG2|PB13|PB10|
|DBG3|PB14|PB3|
|DBG4|PB10|PB4|
|Usart|Usart2(PA2/PA3)|Usart1(PB6/PB7)|
## Getting Started
### 1. Build the LoRaWAN End Node Example
- **Step 1.** Click [here](https://github.com/Seeed-Studio/LoRaWan-E5-Node/tree/qian) to visit **Seeed-Studio/LoRaWan-E5-Node** repository and download it as a ZIP file

- **Step 2.** Extract the ZIP file and navigate to `LoRaWan-E5-Node > Projects > Applications > LoRaWAN > LoRaWAN_End_Node > STM32CubeIDE`
- **Step 3.** Double click the **.project** file
- **Step 4.** Right click on the project and click **Properties**

- **Step 5.** Navigate to `C/C++ Build > Settings > MCU Post build outputs`, tick **Convert to Intel Hex file (-O ihex)** and click **Apply and Close**

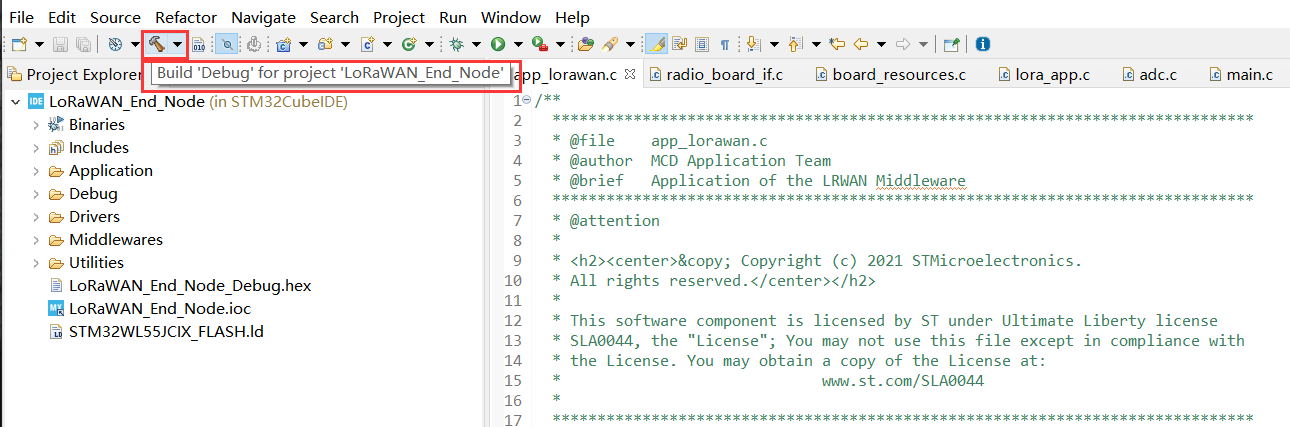
- **Step 6.** Click **Build 'Debug'**, and it should compile without any errors

Now we will modify our **Device EUI**, **Application EUI**, **Application KEY** and **LoRawan Region**
- **Step 7.** Please follow the [guide](https://wiki.seeedstudio.com/LoRa_E5_mini/#13-connect-and-send-data-to-the-things-network) here to setup your TTN application, get your **Application EUI** and copy it to the macro definition `LORAWAN_JOIN_EUI` in `LoRaWAN/App/se-identity.h` , for example, the Application EUI here is `80 00 00 00 00 00 00 0x07` :
```C
// LoRaWAN/App/se-identity.h
/*!
* App/Join server IEEE EUI (big endian)
*/
#define LORAWAN_JOIN_EUI { 0x80, 0x00, 0x00, 0x00, 0x00, 0x00, 0x00, 0x07 }
```
- **Step 8.** Also, you can modify your **Device EUI** and **Application Key**, by setting the macro definition `LORAWAN_DEVICE_EUI` and `LORAWAN_NWK_KEY` in `LoRaWAN/App/se-identity.h`. Make sure `LORAWAN_DEVICE_EUI` and `LORAWAN_NWK_KEY` are the same as the `Device EUI` and `App Key` in TTN console.
```C
// LoRaWAN/App/se-identity.h
/*!
* end-device IEEE EUI (big endian)
*/
#define LORAWAN_DEVICE_EUI { 0x2C, 0xF7, 0xF1, 0x20, 0x24, 0x90, 0x03, 0x63 }
/*!
* Network root key
*/
#define LORAWAN_NWK_KEY 2B,7E,15,16,28,AE,D2,A6,AB,F7,15,88,09,CF,4F,3C
```

- **Step 9.** The default LoRaWAN Region is `EU868`, you can modify it, by setting the macro definition `ACTIVE_REGION` in `LoRaWAN/App/lora_app.h`
```c
// LoRaWAN/App/lora_app.h
/* LoraWAN application configuration (Mw is configured by lorawan_conf.h) */
/* Available: LORAMAC_REGION_AS923, LORAMAC_REGION_AU915, LORAMAC_REGION_EU868, LORAMAC_REGION_KR920, LORAMAC_REGION_IN865, LORAMAC_REGION_US915, LORAMAC_REGION_RU864 */
#define ACTIVE_REGION LORAMAC_REGION_US915
```

- **Step 10.** After the above modifications, **rebuild** the example and program to your LoRa-E5. Open `STM32CubeProgrammer`, connect ST-LINK to your PC, hold `RESET Button` of your Device, then click `Connect` and release `RESET Button`:
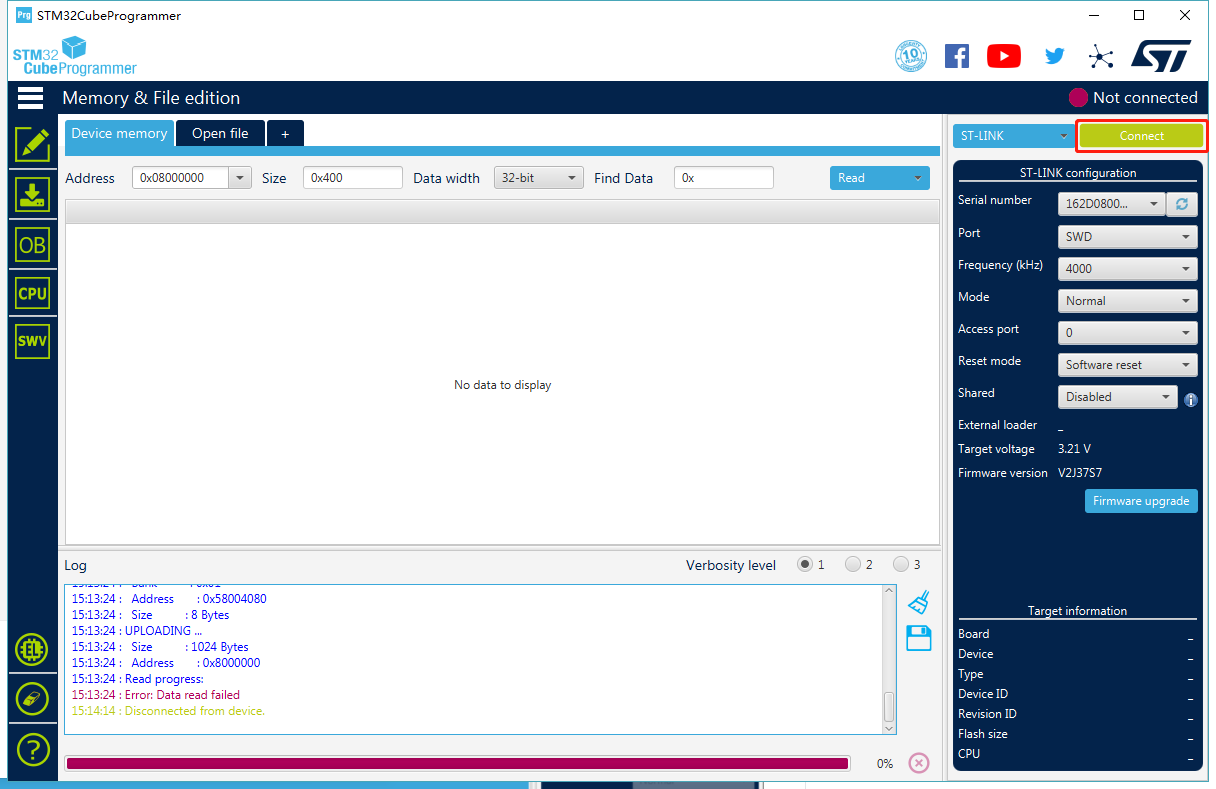
- **Step 11.** Make sure the Read Out Protection is `AA`, if it is shown as `BB`, select `AA` and click `Apply`:

- **Step 12.** Now, go to the `Erasing & Programming` page, select your hex file path(for example: `C:\Users\user\Downloads\LoRaWan-E5-Node\Projects\Applications\LoRaWAN\LoRaWAN_End_Node\STM32CubeIDE\Debug\LoRaWAN_End_Node.hex` ), select the programming options as the following picture, then click `Start Programming`!
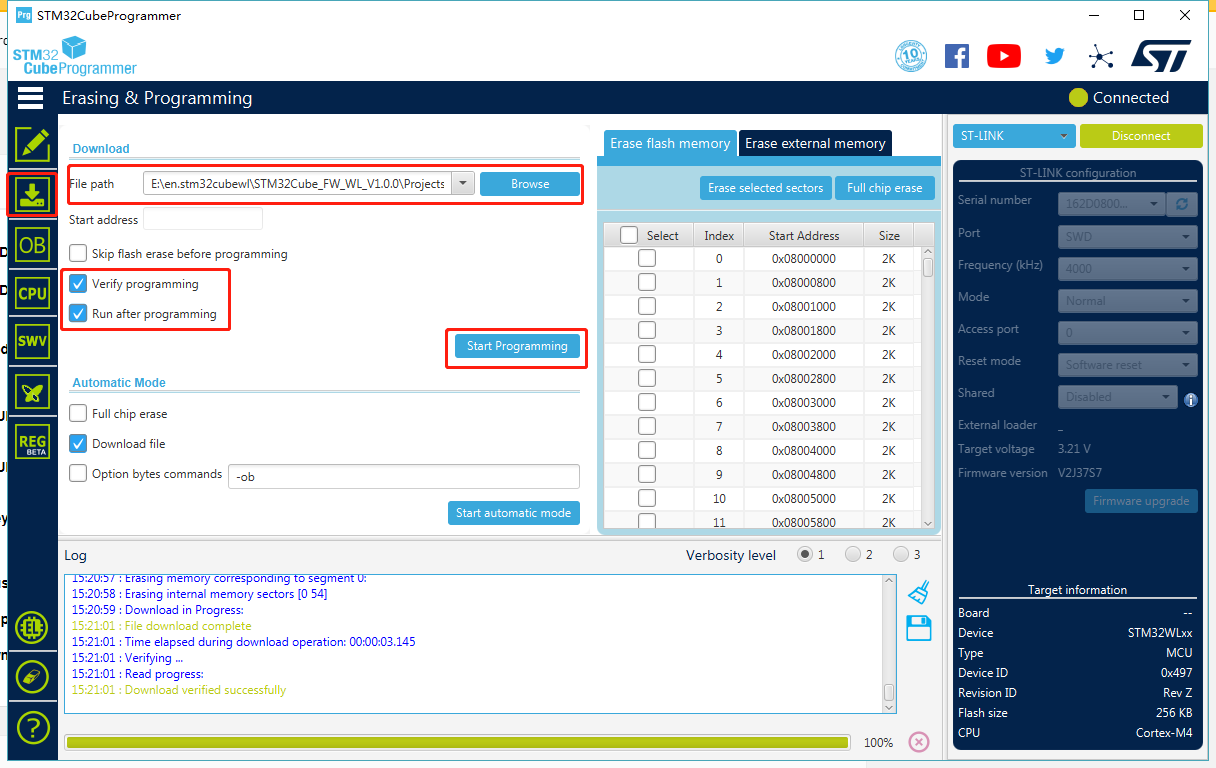
You will see the message **Download verified successfully**, once programming is finished.
- **Step 13.** If your LoRaWAN Gateway and TTN are setup, LoRa-E5 will join successfully after reset! A confirm LoRaWAN package will be sent to TTN every 30 seconds. The following log will be printed on the serial monitor (Arduino Serial Monitor is used here) if the join is successful:

- Cheers! Now you have connected LoRa-E5 to LoRaWAN Network! You can now proceed to develop more exciting LoRaWAN End Node applications!
**Note:** LoRa-E5 only supports high power output mode, so you can't use these macro definitions in `radio_board_if.h` :
```
#define RBI_CONF_RFO RBI_CONF_RFO_LP_HP
// or
#define RBI_CONF_RFO RBI_CONF_RFO_LP
```
Eventhough **RBI_CONF_RFO** is defined as **RBI_CONF_RFO_LP_HP** in `radio_board_if.h`, it will not be used because **USE_BSP_DRIVER** is defined and **BSP_RADIO_GetTxConfig()** function returns **RADIO_CONF_RFO_HP**