Ecosyste.ms: Awesome
An open API service indexing awesome lists of open source software.
https://github.com/sensetecnic/wotkit-example-arduino-sensor
A simple example to post sensor's value from an Arduino (Ethernet Shield) to WoTKit
https://github.com/sensetecnic/wotkit-example-arduino-sensor
Last synced: 13 days ago
JSON representation
A simple example to post sensor's value from an Arduino (Ethernet Shield) to WoTKit
- Host: GitHub
- URL: https://github.com/sensetecnic/wotkit-example-arduino-sensor
- Owner: SenseTecnic
- Created: 2015-05-21T18:58:03.000Z (over 9 years ago)
- Default Branch: master
- Last Pushed: 2015-05-21T19:05:47.000Z (over 9 years ago)
- Last Synced: 2024-03-26T17:19:28.727Z (10 months ago)
- Language: Arduino
- Size: 398 KB
- Stars: 1
- Watchers: 7
- Forks: 0
- Open Issues: 0
-
Metadata Files:
- Readme: README.md
Awesome Lists containing this project
README
This application demonstrates how to publish data from an analog sensor with an Arduino Ethernet Shield to Sense Tecnic's IoT Platform community version (WoTKit).
## Getting Started
Download and install the latest Arduino software (http://www.arduino.cc/en/Main/Software). This guide assumes you have an Arduino board (http://www.arduino.cc/en/Main/ArduinoBoardUno) and an Ethernet shield (http://www.arduino.cc/en/Main/ArduinoEthernetShield).
## Create a WoTKit account
WoTKit is a community version of the STS IoT Platform, it allows you to manage, visualize and analyze data from sensors easily. Create an account at: http://wotkit.sensetecnic.com, its FREE!
### Wire everything up
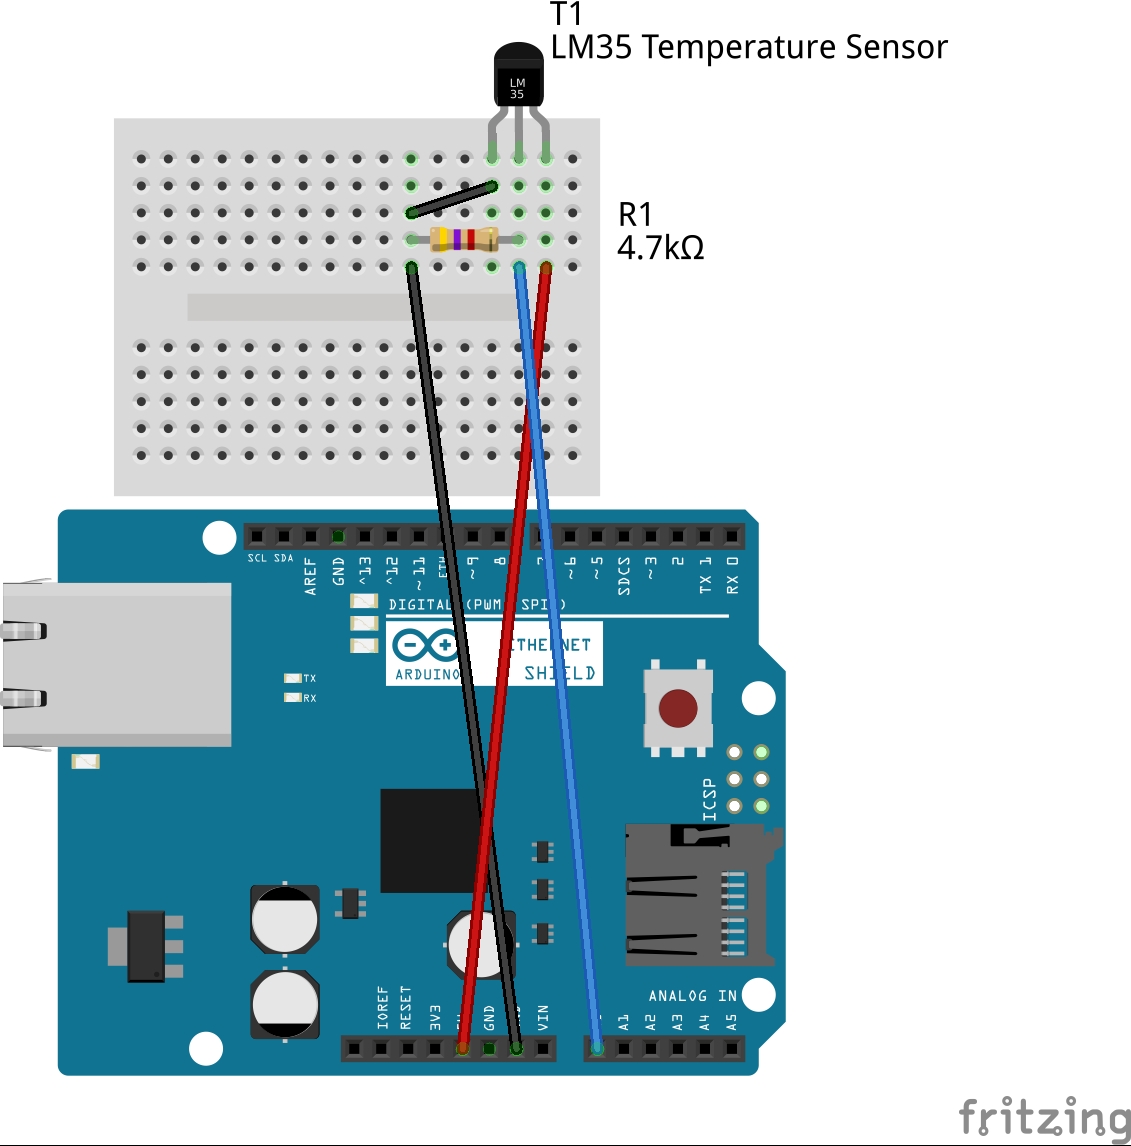
Our setup will be quite simple. We will be using a temperature sensor (LM35) connected to the A0 pin:

## Running the example.
You will need to set up your credentials in the Arduino sketch. This example uses Basic Authentication to make a REST request (POST) to the WoTKit to publish data. You can use a service like https://www.base64encode.org/ to create this string using your WoTKit credentials.
For example, using https://www.base64encode.org/ you can encode the following string: "yourusername:yourpassword" which will yield the string "eW91cnVzZXJuYW1lOnlvdXJwYXNzd29yZA==". Note this as it will be useful in the following line (remember to use your own username and password):
```
client.println("Authorization: Basic eW91cnVzZXJuYW1lOnlvdXJwYXNzd29yZA==");
```
Compile and upload the sketch to your Arduino Ethernet shield and plug it in. You're done.