https://github.com/sergeypedan/bitbar-uptime-robot-dashboard
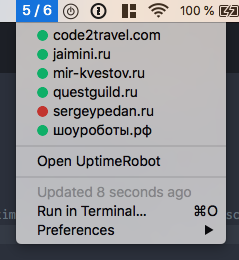
An UptimeRobot plugin for BitBar. Lists your UptimeRobot monitors with their statuses to help you instantly check uptime of your websites.
https://github.com/sergeypedan/bitbar-uptime-robot-dashboard
bitbar bitbar-plugin ruby
Last synced: 3 months ago
JSON representation
An UptimeRobot plugin for BitBar. Lists your UptimeRobot monitors with their statuses to help you instantly check uptime of your websites.
- Host: GitHub
- URL: https://github.com/sergeypedan/bitbar-uptime-robot-dashboard
- Owner: sergeypedan
- Created: 2019-08-10T08:52:51.000Z (almost 6 years ago)
- Default Branch: master
- Last Pushed: 2019-08-10T10:00:04.000Z (almost 6 years ago)
- Last Synced: 2025-01-12T16:13:37.390Z (5 months ago)
- Topics: bitbar, bitbar-plugin, ruby
- Language: Ruby
- Homepage:
- Size: 54.7 KB
- Stars: 0
- Watchers: 2
- Forks: 0
- Open Issues: 0
-
Metadata Files:
- Readme: Readme.md
Awesome Lists containing this project
README
# An UptimeRobot plugin for BitBar
BitBar is a handy tool for MacOS status bar, whose functionality is based on plugins.
This repo has the source code for a plugin that integrates UptimeRobot into BitBar.
## Install
This assumes you have BitBar already installed. Otherwise you can install it from the website or as Brew cask (better):
```sh
brew cask install bitbar
```
### Manually
1. Add a monitor to UptimeRobot.
1. Get a *read-only* API key from your UptimeRobot Settings page.
1. Put that API key into file `~/.config/bitbar.conf`. You can do it from Terminal as follows:
```sh
echo 'UPTIME_ROBOT_API_KEY = "12345-asdf-7890"' > ~/.config/bitbar.conf
```
1. Find your BitBar plugin folder location from BitBar menu.
1. Save the plugin source code as a text file in your BitBar plugin folder. Any file name will work, but better name it `uptime_robot.rb` for clarity.
1. Assign file permissions for that file:
```sh
cd
chmod +x "uptime_robot.rb"
```
1. Refresh BitBar from menu — the new plugin should be up and running
### From BitBar site
Not submitted yet
## Requirements
1. Ruby 2.0+ must be installed. Usually MacOS comes with Ruby 2.3 pre-installed. Otherwise you can install it with ruby-install.
1. Ruby must be available to `/usr/bin/env`. Usually it is.