https://github.com/sergeyzwezdin/hexo-images
Toolset to opimize images for Hexo static site generator
https://github.com/sergeyzwezdin/hexo-images
hexo hexo-plugin
Last synced: about 1 year ago
JSON representation
Toolset to opimize images for Hexo static site generator
- Host: GitHub
- URL: https://github.com/sergeyzwezdin/hexo-images
- Owner: sergeyzwezdin
- License: mit
- Created: 2020-04-25T10:56:43.000Z (about 6 years ago)
- Default Branch: master
- Last Pushed: 2023-07-11T03:00:53.000Z (almost 3 years ago)
- Last Synced: 2025-03-30T13:03:33.344Z (about 1 year ago)
- Topics: hexo, hexo-plugin
- Language: JavaScript
- Homepage: https://hexo.io/
- Size: 412 KB
- Stars: 6
- Watchers: 3
- Forks: 5
- Open Issues: 9
-
Metadata Files:
- Readme: README.md
- License: LICENSE
Awesome Lists containing this project
README
# hexo-images  
`hexo-images` is a plugin for Hexo static site generator that optimizes images for better website performance.
* **Resizes** images up to sizes that are convenient for web browsing. You don't need to share 36-megapixel photos on the web 🙃
* **Compresses** images to make sure it loads as fast as possible. It uses the most efficient algorithms to compress the image.
* Creates **responsive images** to display the most important part of the image for mobile users. While resizing it detects the most important part of the photo to crop (thank you to [`smartcrop-sharp`](https://github.com/jwagner/smartcrop-sharp)).
* Creates **special-sized** images if needed. Special sizes for special cases 👌
* Provides **tag helper** to generate a responsive-oriented picture tag.
* Generates `webp` files in addition to the original image type.
* Converts old good GIFs to `mp4` and `webm`.
## How it works
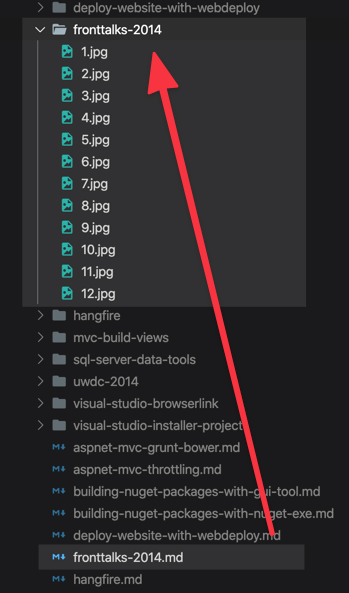
1. Near to your `.md` file create folder with the same name as the `.md` file. Copy all required images there.
2. Run [`hexo generate`](https://hexo.io/docs/commands#generate) or [`hexo server`](https://hexo.io/docs/commands#server). The images will be processed and cached. Second run will not cause processing this image again. If image changes, the cache will be cleared and the image re-processed. This step could take a time, so be patient 😉

3. Once processing is done, the result files will be stored in special folder (`/.images/`) and included into the cache manifest (`/.images/images.json`). You should not care about the folder structure in this folder, but if you're curious it looks like this.

4. The processed files will be included into output build while running `hexo generate` or `hexo server`. To include it into the post use `{% picture %}` tag helper in the following way:
```md
Some text
{% picture 1.jpg %}
{% endpicture %}
Some other text
```
5. Responsive-oriented `` tag will be generated in the final output:
```html

```
## Requirements
- Hexo: 4.x
- Node 12+
## Usage
1. Install the plugin using npm:
```bash
$ npm install hexo-images --save-dev
```
2. For every post (or page) create the folder that has the same name as your `.md` file. For instance, for `fronttalks-2014.md` file you need to create `fronttalks-2014/` folder near to `.md` file.
3. Put all required images into the created folder.
4. Reference image from the post by using special `{% picture %}` tag helper. Specify file name without folder like this:
```md
{% picture 1.jpg %}
{% endpicture %}
```
5. Run website building (via `hexo generate` or `hexo server`).
6. Ensure that `.images` folder added to your repo. If it's ignored, image processing will start each time, which is time-consuming.
7. Check the output page and ensure that `` tag is generated 🎉
## Configuration
To configure the plugin add `images` key to the Hexo config file. For example:
```yaml
images:
enable: true
base_dir: ".images"
manifestFileName: "images.json"
excludeSourceImages: true
templates:
image: themes/theme1/layout/_tag/image.ejs
video: themes/theme1/layout/_tag/video.ejs
specialImages:
- name: list_image
frontmatter: list_image
suffix: list
width: 590
height: 200
```
| Key | Required | Default value | Description |
| --- | --- | --- | --- |
| `enable` | `false` | `true` | Flag to disable plugin execution. |
| `base_dir` | `false` | `.images` | Directory name to store image cache. |
| `manifestFileName` | `false` | `images.json` | File name to store image cache manifest (for more info see below). |
| `excludeSourceImages` | `false` | `true` | Whether to include initial (uncompressed) image into final output. To include it ensure that [`post_asset_folder`](https://hexo.io/docs/asset-folders.html#Post-Asset-Folder) option is enabled as well. |
| `templates.image` | `false` | | Path to the template that will be generated for `{% picture %}` tag helper for all images (for more info see below). |
| `templates.video` | `false` | | Path to the template that will be generated for `{% picture %}` tag helper for all videos (for more info see below). |
| `specialImages` | `false` | `Empty array` | Array of definitions for "special images" (for more info see below). |
| `specialImages[].name` | `true` | | Name of special image. |
| `specialImages[].frontmatter` | `true` | | Frontmatter key that defines image name for this special image. |
| `specialImages[].suffix` | `true` | | Image name suffix that be appened to output file. |
| `specialImages[].width` | `true` | | Image width in pixels. |
| `specialImages[].height` | `true` | | Image height in pixels. |
## Prevent resizing
By default, if the image is wider than `640px`, `hexo-images` generates two versions of the image either for desktop and mobile page. If you don't want to crop the image and skip generating its mobile version, you can add `.noresize.` suffix to the initial file name (e.g. `1.noresize.jpg` instead of `1.jpg`). At the same time you should reference the image by `1.jpg` name via `{% picture %}` tag, not `1.noresize.jpg`.
## Special images
Special images work when you need some special size of the image for a particular purpose. For example, if you want to display some small image near to the post on the list, special images could help.
To define special image you need to add `specialImages` key into the Hexo config. This key contains an array of special images, so you can define more than one item.
Example:
```yaml
images:
specialImages:
- name: list_image
frontmatter: list_image
suffix: list
width: 590
height: 200
```
In this example we define a special image called `list_image` which is sized as `590px`×`200px`. Now, during the build `hexo-images` will check `list_image` key in the post's frontmatter to determine which file should be processed as a special image. So we need to define it in the post's file:
```md
---
title: Test post
list_image: 1.jpg
---
Post text
```
Since it's defined, an additional `1.list.jpg` file will be generated. To access it, you can use `resolve_image` tag helper to access the image (for more info see below):
```js
const imageMetadata = resolve_image(item.list_image, item)
```
## Picture tag plugin (and its customization)
Picture tag plugin allows you to insert an image in the post without a headache.
```md
Some text
{% picture 1.jpg %}
{% endpicture %}
Some other text
```
It will generate HTML in the output file:
```html

```
Optionally, you can add some caption for the image:
```md
{% picture 1.jpg %}
My awesome image
{% endpicture %}
```
Which will be transformed into:
```html
My awesome image
```
If you are not happy with HTML layout that generated by the `{% picture %}` tag you can customize it with a template.
To do that specify `templates` key in the configuration file:
```yaml
images:
templates:
image: themes/theme1/layout/_tag/image.ejs
video: themes/theme1/layout/_tag/video.ejs
```
You can use [default templates](/lib/templates) as a reference to create your own markup.
## Tag helpers
### resolve_image
`resolve_image` tag helper allows you to get information about the image from the Hexo template.
```js
resolve_image(, )
```
* `` is a file name of the image that you want to display.
* `` is an optional parameter to define the post or page which owns the image. It's useful when you try to display the image in the list or on the main page. In this case you should pass the post as a second parameter.
## Manifest
Normally, you shouldn't care about the manifest structure. But if you're curious, the manifest is a JSON file that contains key-value collection of processed files. The key is a relative path to the image. The value is information about the processed file.
Here is an example:
```json
{
"_posts/2014/fronttalks-2014/1.jpg": {
"size": 193539,
"hash": "d5ea43732c6e51e6d1e0d1666b23ac96",
"relatedPath": "_posts/2014/fronttalks-2014.md",
"dimensions": {
"1x": {
"w": 640,
"h": 683,
"media": "(max-width: 39.99em)"
},
"2x": {
"w": 1024,
"h": 683,
"media": "(min-width: 40em)"
}
},
"originalType": "jpg",
"files": {
"webp": {
"1x": "d5ea4373/1@1x.webp",
"2x": "d5ea4373/1@2x.webp"
},
"default": "d5ea4373/1@2x.jpg",
"jpg": {
"1x": "d5ea4373/1@1x.jpg",
"2x": "d5ea4373/1@2x.jpg"
}
}
}
}
```
In page template you can also access `images` property that will contain the part of the manifest that related to the current page.