Ecosyste.ms: Awesome
An open API service indexing awesome lists of open source software.
https://github.com/shaikahmadnawaz/js-dom
Exploring the DOM in JavaScript
https://github.com/shaikahmadnawaz/js-dom
css dom hashnode html javascript
Last synced: about 1 month ago
JSON representation
Exploring the DOM in JavaScript
- Host: GitHub
- URL: https://github.com/shaikahmadnawaz/js-dom
- Owner: shaikahmadnawaz
- Created: 2023-08-27T08:58:18.000Z (over 1 year ago)
- Default Branch: master
- Last Pushed: 2023-08-27T09:03:22.000Z (over 1 year ago)
- Last Synced: 2024-11-06T19:54:02.253Z (3 months ago)
- Topics: css, dom, hashnode, html, javascript
- Language: HTML
- Homepage: https://shaikahmadnawaz.hashnode.dev/exploring-the-dom-in-javascript
- Size: 12.7 KB
- Stars: 2
- Watchers: 2
- Forks: 1
- Open Issues: 0
-
Metadata Files:
- Readme: README.md
Awesome Lists containing this project
README
# Exploring the DOM in JavaScript
Have you ever wondered how websites can change and update without you hitting that refresh button? Or how a button can trigger cool animations and interactive features? Well, the secret behind these web wonders is the Document Object Model, often called the DOM. Don't worry if this sounds a bit technical – we're here to break it down for you!
### **What is the DOM?**
The Document Object Model (DOM) is a programming interface for web documents. In simpler terms, it's like an organized map that represents the structure and content of a webpage. Think of it as a tree-like structure where each part of a webpage – like headings, paragraphs, images, buttons, and more – is a node. This tree of nodes is what allows JavaScript to access, modify, and manipulate the content of a webpage.
Let's take a look at this HTML code to better understand the DOM tree structure.
```xml
Exploring the DOM in JavaScript
Hello, World!
This is a simple HTML example.
```
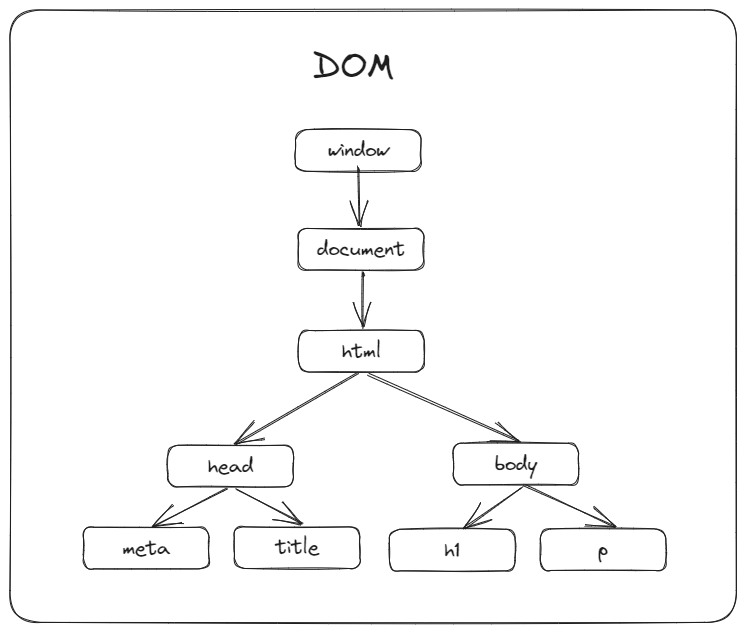
From a DOM perspective, each HTML element becomes a node in the DOM tree:
* `html` is the root node.
* `head` and `body` are child nodes of `html`.
* `meta` and `title` are child nodes of `head`.
* `h1` and `p` are child nodes of `body`.
Here's an alternative approach to visually represent this hierarchy of nodes.
### **Understanding** `window` and `document`
Before we dive into the practical examples, let's meet two important players: `window` and `document`.
* `window`: This is like the boss of the browser window. It represents the entire browser window and has control over things like opening new tabs, resizing the window, and more.
* `document`: This is like the page itself. It's an object that holds all the HTML elements on your page. When we say "DOM," we often mean the `document` object.
### **Why Should You Care About the DOM?**
Ever seen a website where information magically appears as if by magic? Or a form that immediately tells you if you entered something wrong? Thank the DOM for that! It's like the magic wand that makes web pages dynamic, letting them change and respond to what you do.
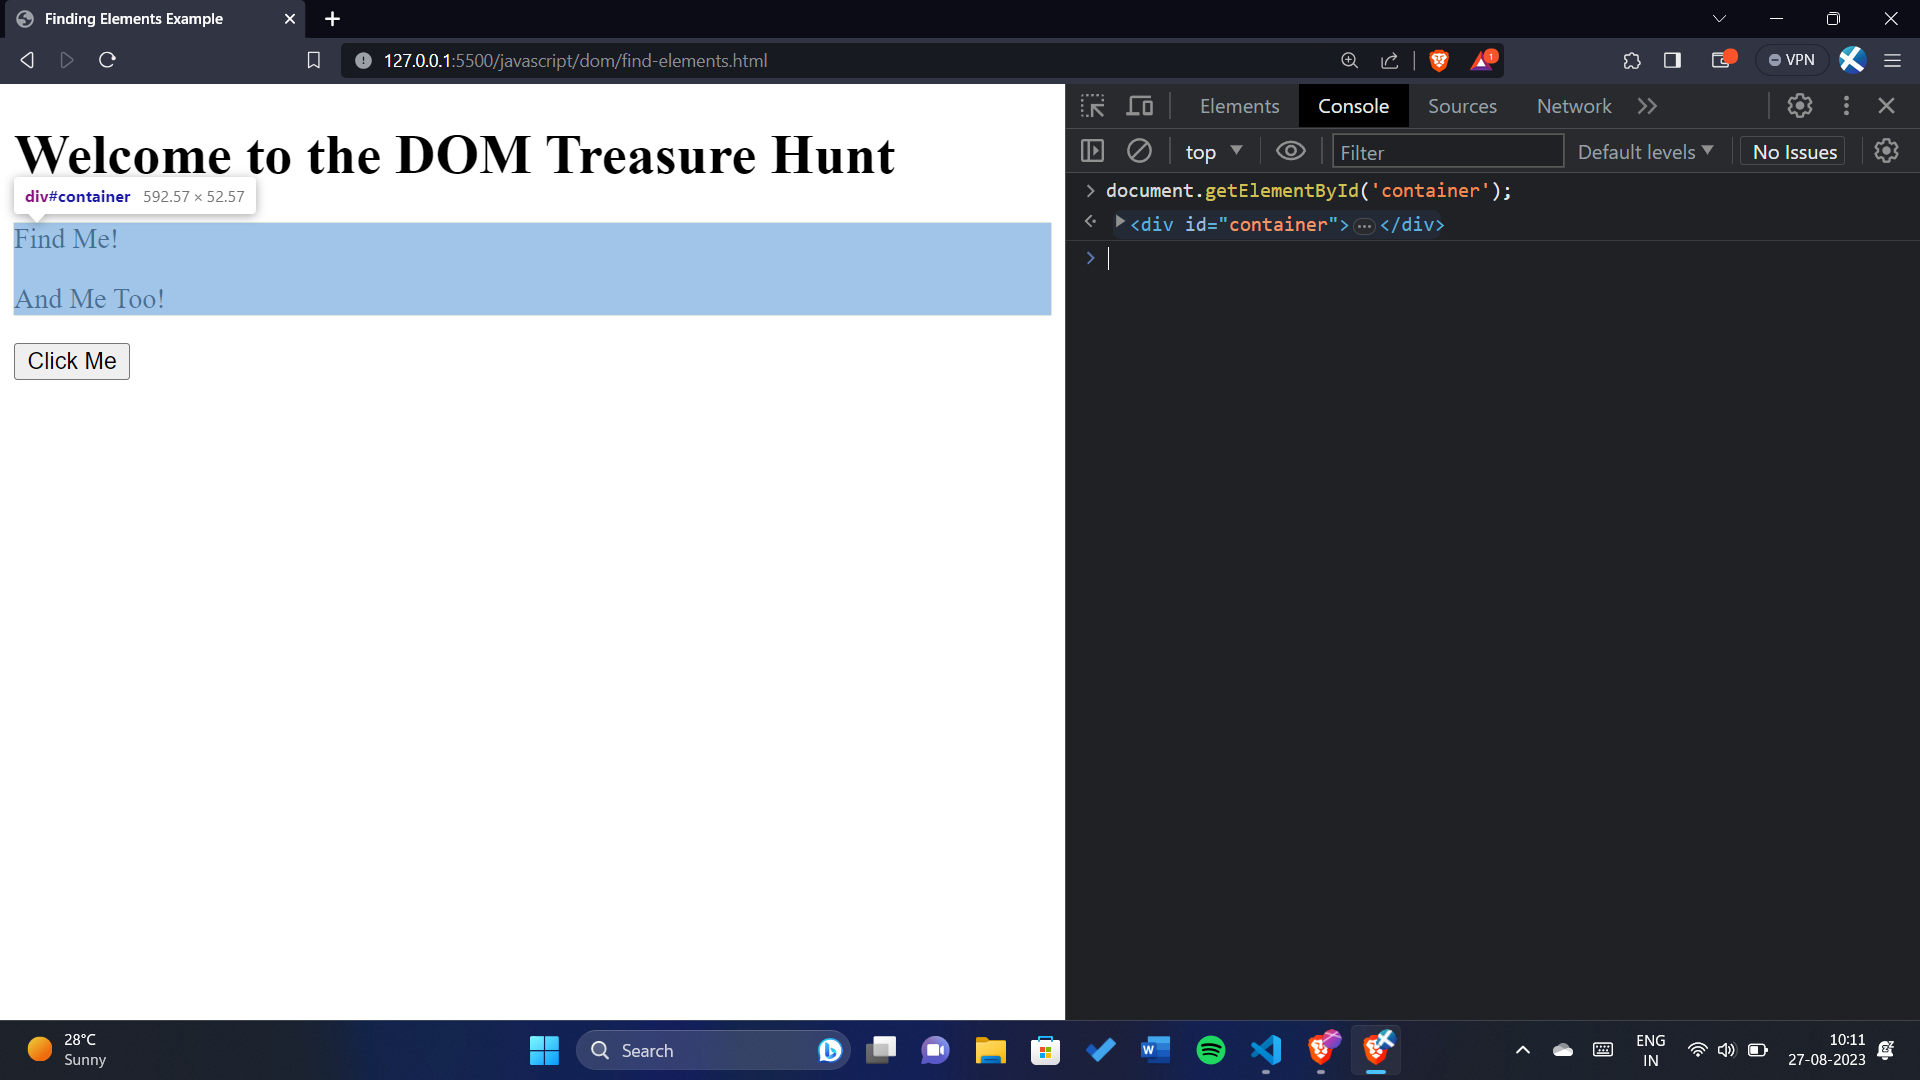
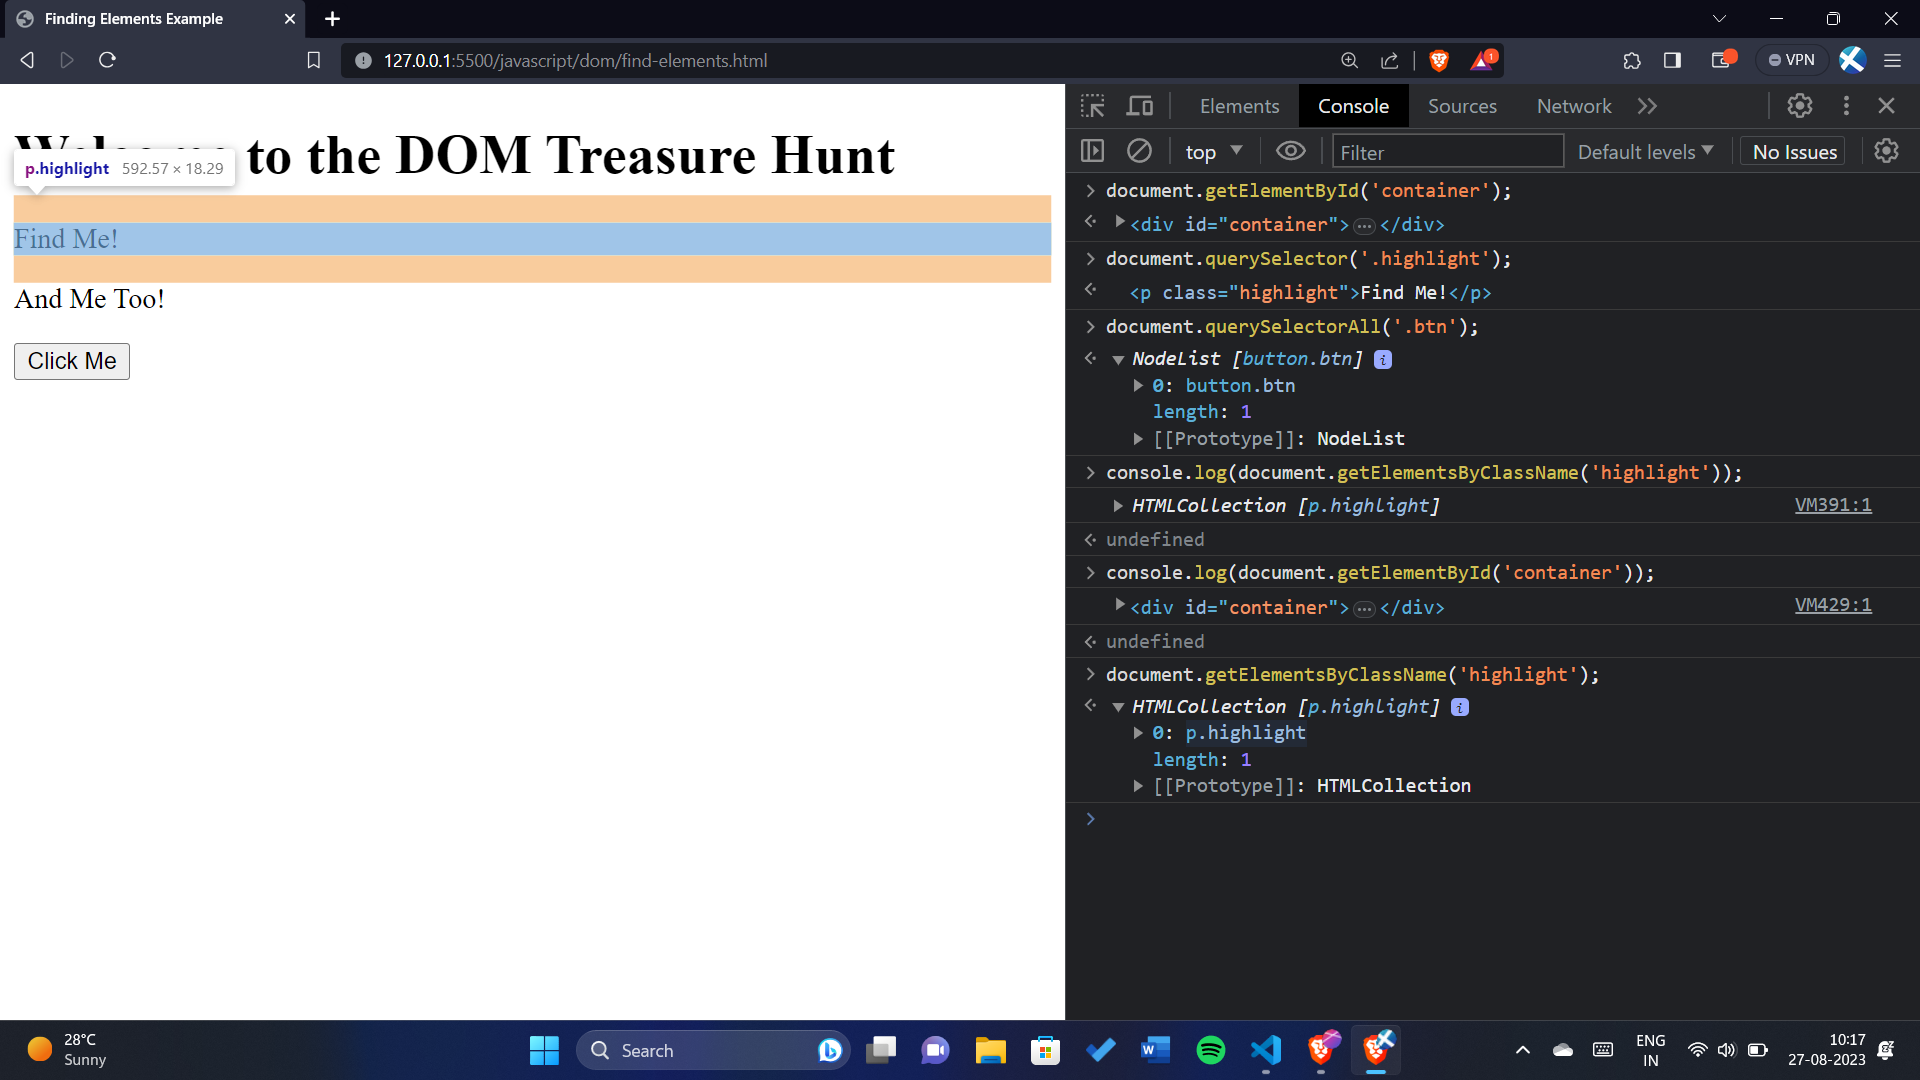
### **Finding Elements: Your Webpage's Treasure Hunt**
To truly grasp the magic of the DOM, let's start with a hands-on example. Imagine you have the following HTML structure:
```xml
Finding Elements Example
Welcome to the DOM Treasure Hunt
Find Me!
And Me Too!
Click Me
```
Now, let's dive into the various methods the DOM provides to help you find elements like a seasoned treasure hunter.
**1.** `getElementById()`**: The One with the ID**
Each element can have a unique ID. To locate an element by its ID, use the `getElementById()` method:
```javascript
document.getElementById('container');
```
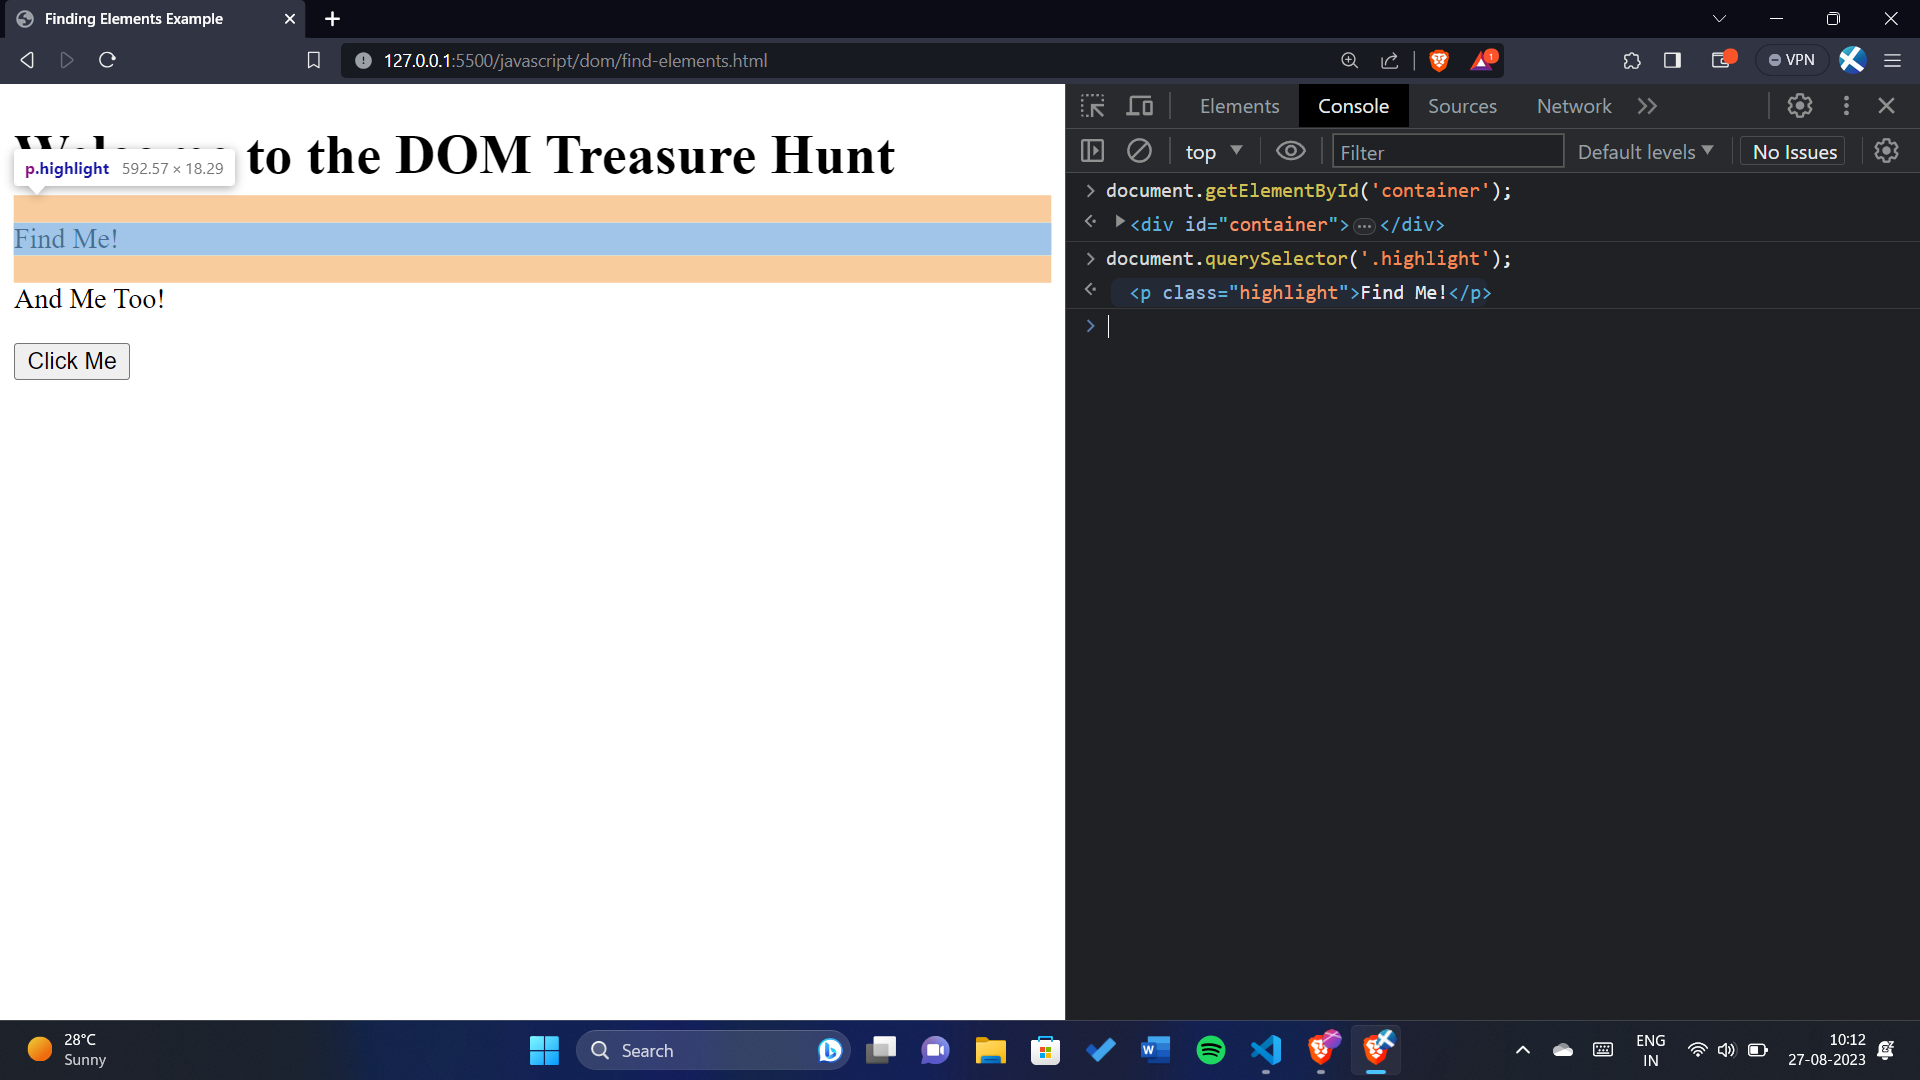
**2.** `querySelector()`**: The Versatile Searcher**
For a broader search, the `querySelector()` method lets you use CSS selectors:
```javascript
document.querySelector('.highlight');
```
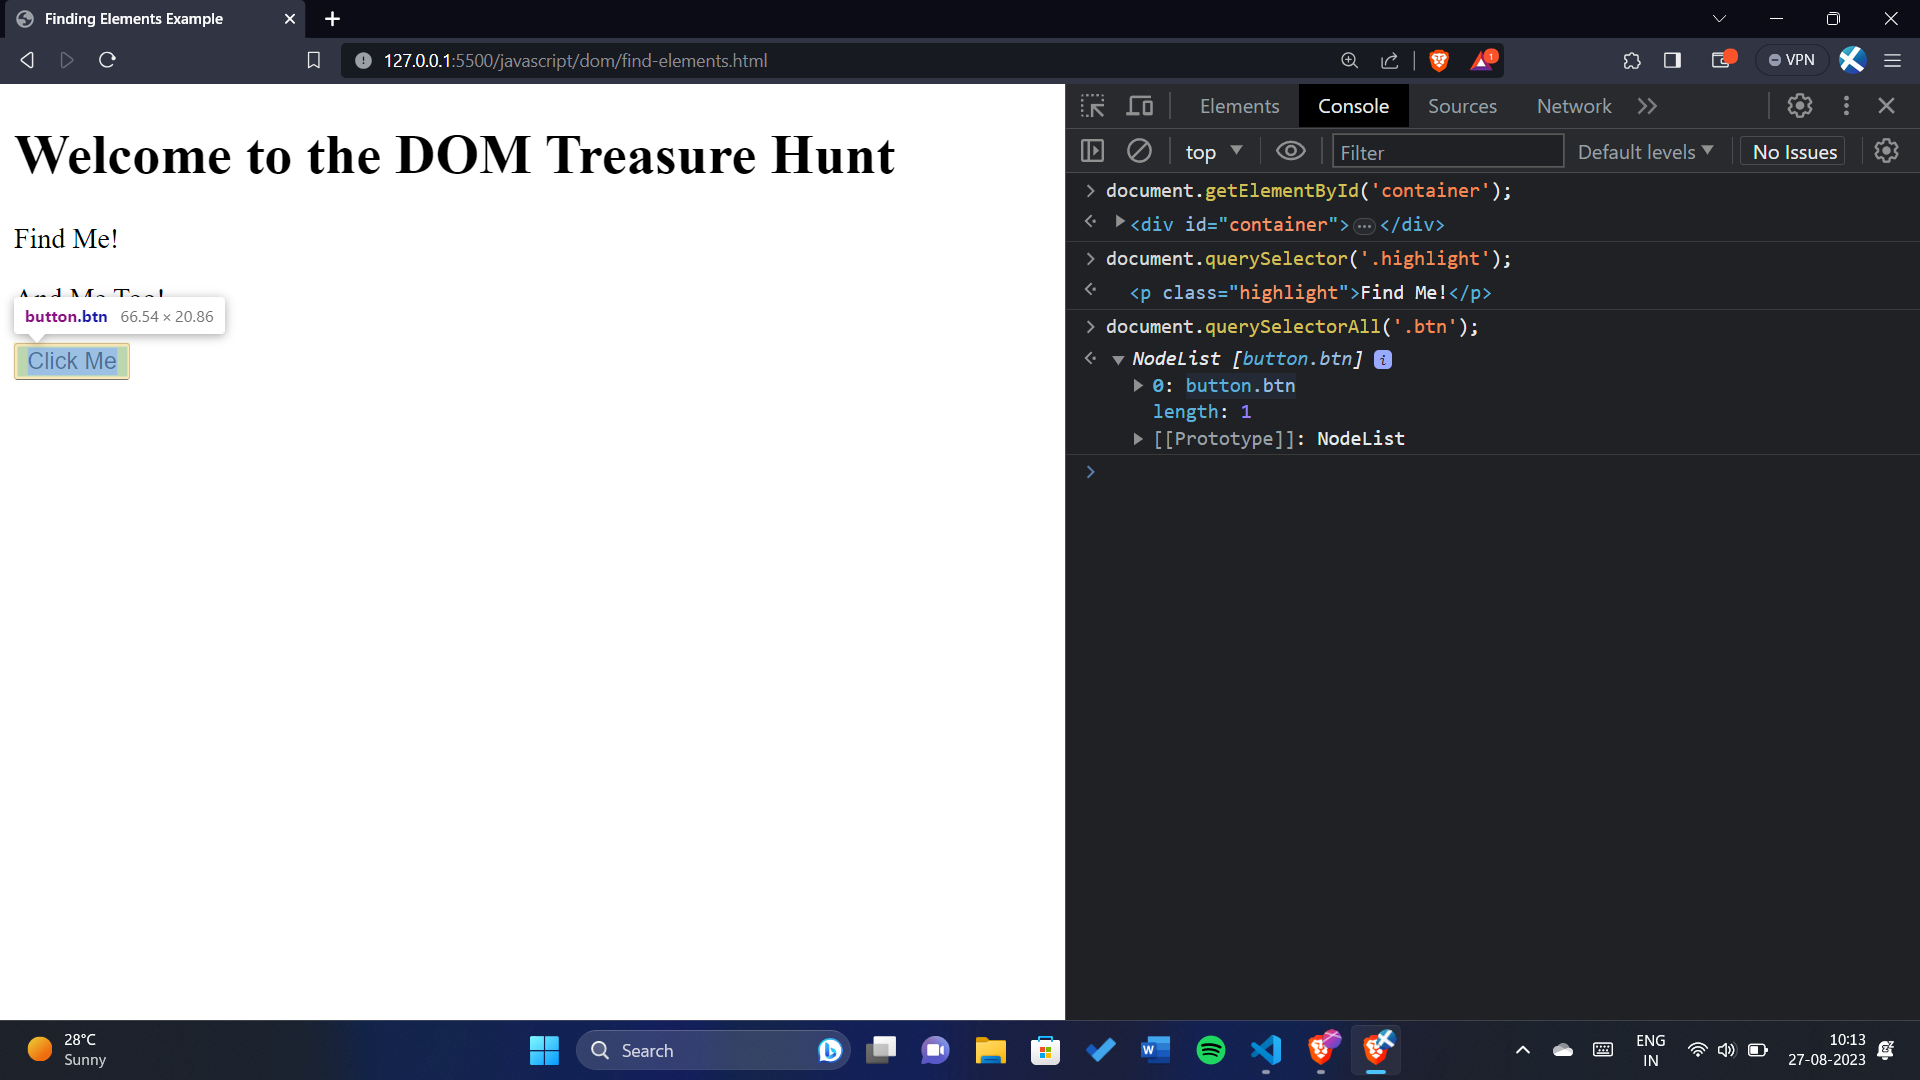
**3.** `querySelectorAll()`**: Gathering a Crowd**
Need to target multiple elements? The `querySelectorAll()` method is your friend:
```javascript
document.querySelectorAll('.btn');
```
**4.** `getElementsByClassName()`**: Grouping by Class**
When elements share a class, use `getElementsByClassName()`:
```javascript
document.getElementsByClassName('highlight');
```
### **Changing Element Styles with the DOM**
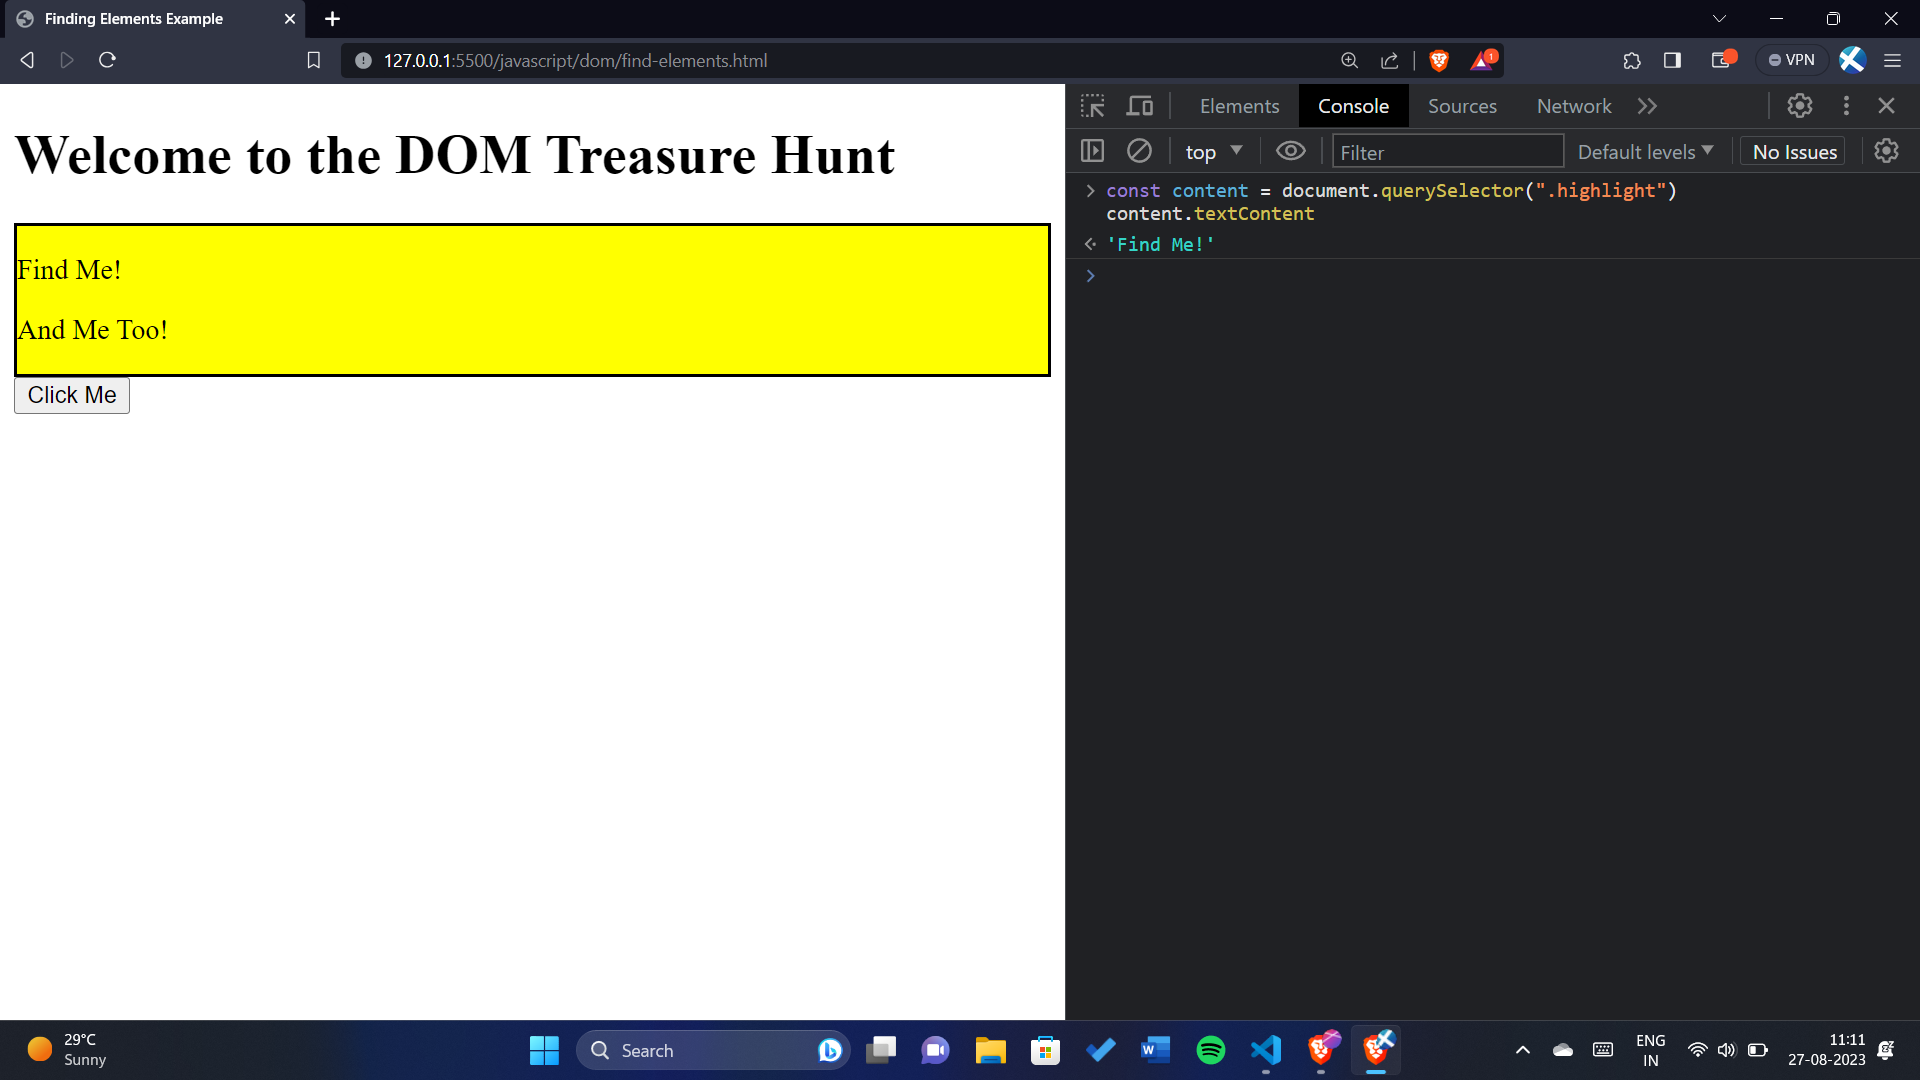
One of the fascinating capabilities of the Document Object Model (DOM) is its ability to manipulate the appearance of elements on a webpage dynamically. In this section, we'll explore a straightforward example of how to change the background color of an HTML element using the DOM.
```javascript
container.style.backgroundColor = 'yellow';
```
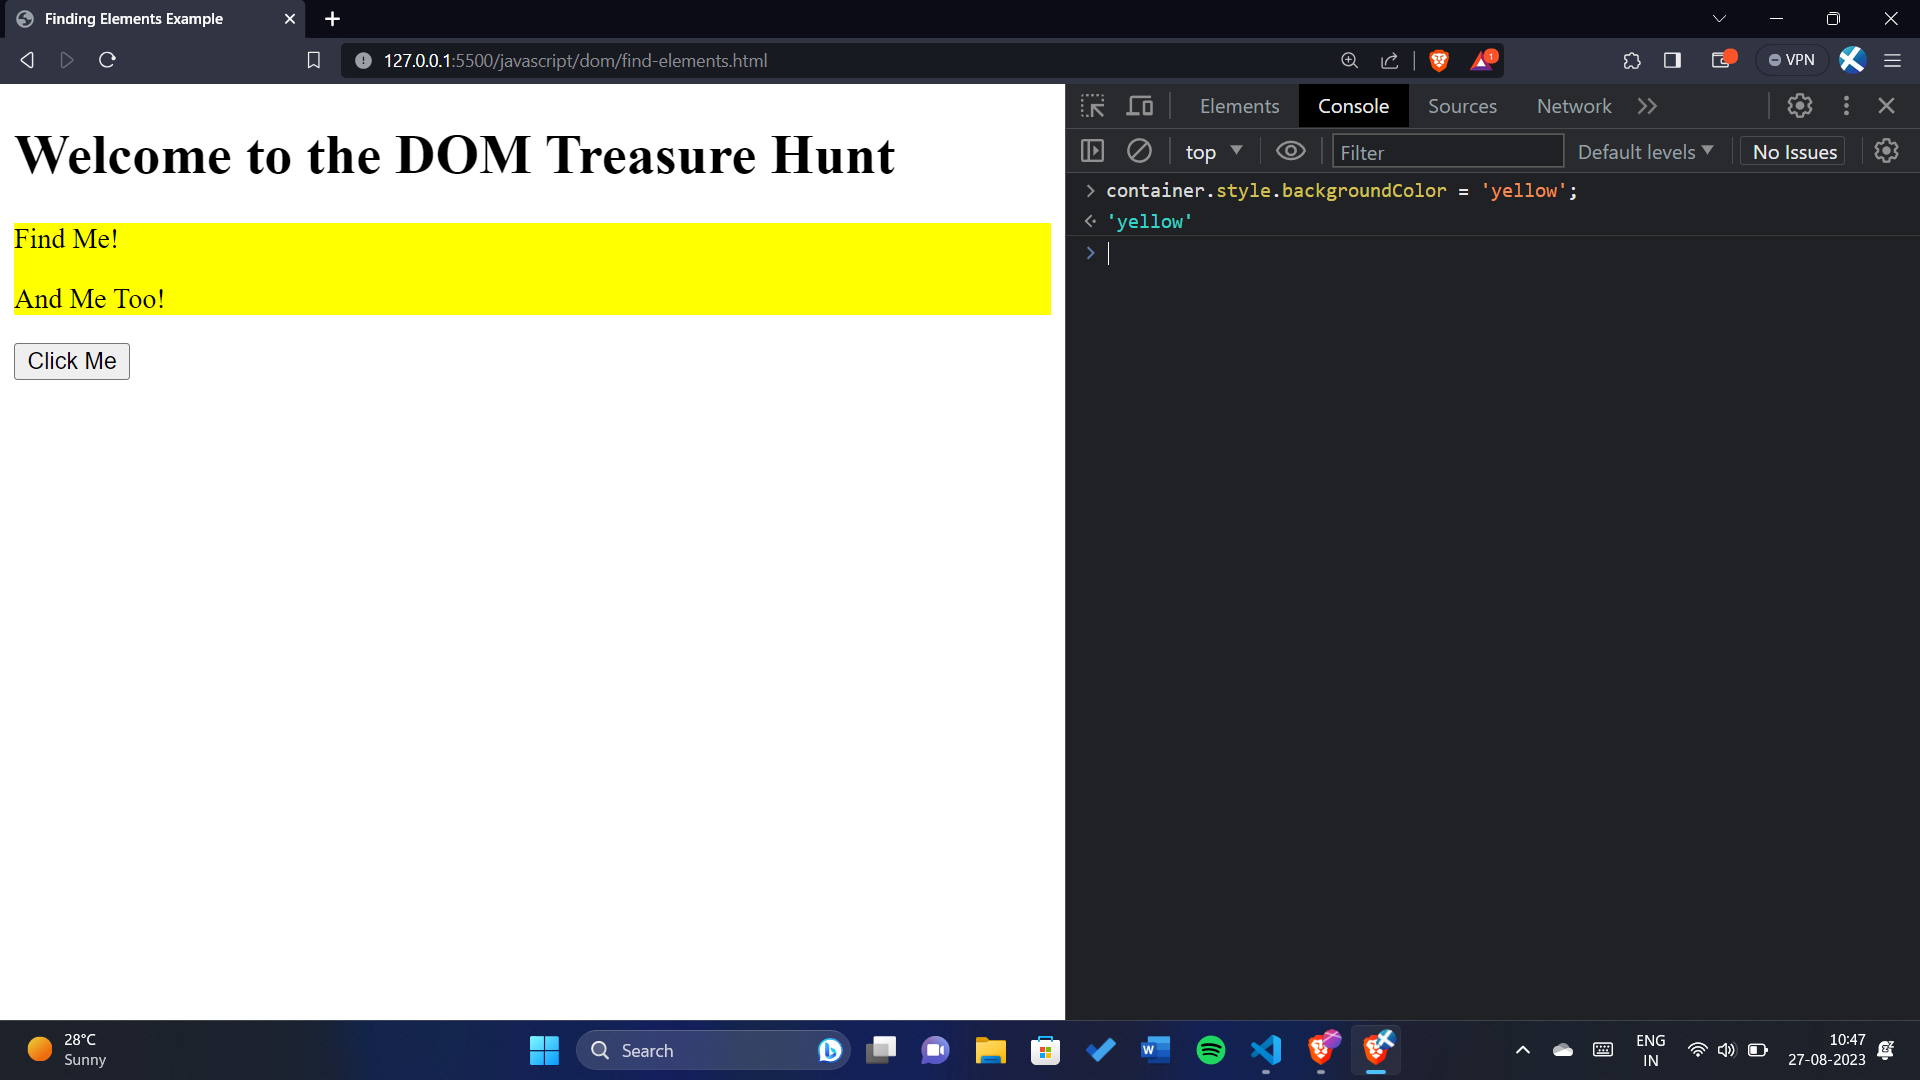
To add a border to an element using the DOM, you can use the `style` property to set the `border` property of the element.
```javascript
container.style.border = "2px solid black";
```

### **Retrieving Element Content with DOM**
retrieve and display the textual content of HTML elements using the DOM.
```javascript
const content = document.querySelector(".highlight")
content.textContent
```
## Navigating Lists and Understanding NodeLists vs HTMLCollections
In the vast landscape of web development, lists are a common way to organize content. HTML provides us with the `
- ` (unordered list) and `
- ` (list item) elements for this purpose. But how do we navigate and manipulate these lists using the DOM? Moreover, what are NodeLists and HTMLCollections, and how can we work with them efficiently? Let's embark on a journey to uncover the answers.
**Exploring List Elements: An Example Setup**
Imagine we have the following HTML structure containing an unordered list with list items:
```xml
List Navigation Example
Exploring the World of Lists
- Item 1
- Item 2
- Item 3
- Item 4
```
This setup forms the basis for our exploration. We'll traverse this list, understand NodeLists and HTMLCollections, and master iteration techniques.
**Unveiling NodeLists and HTMLCollections**
When we select elements using DOM methods like `querySelectorAll` or properties like `children`, we often encounter two types of collections: NodeLists and HTMLCollections.
* **NodeList**: It's a collection of nodes (elements) returned by methods like `querySelectorAll`. NodeLists are dynamic, meaning they automatically update if the DOM changes.
* **HTMLCollection**: It's a live collection of elements returned by properties like `children`. Like NodeLists, HTMLCollections are also live and reflect real-time changes to the DOM.
**Iterating Through NodeLists**
NodeLists support various iteration techniques, with `forEach` being a common choice. Let's say we want to modify each list item's content:
```javascript
const listItems = document.querySelectorAll('#myList li');listItems.forEach(function (item) {
item.textContent = `Modified: ${item.textContent}`;
});
```In this example, the `forEach` loop iterates through each `
- ` element and updates its content.
**Accessing Individual Items**
You can access individual items within a NodeList or HTMLCollection using array-like indexing. For example, if you want to access the first list item:
```javascript
listItems[0];
```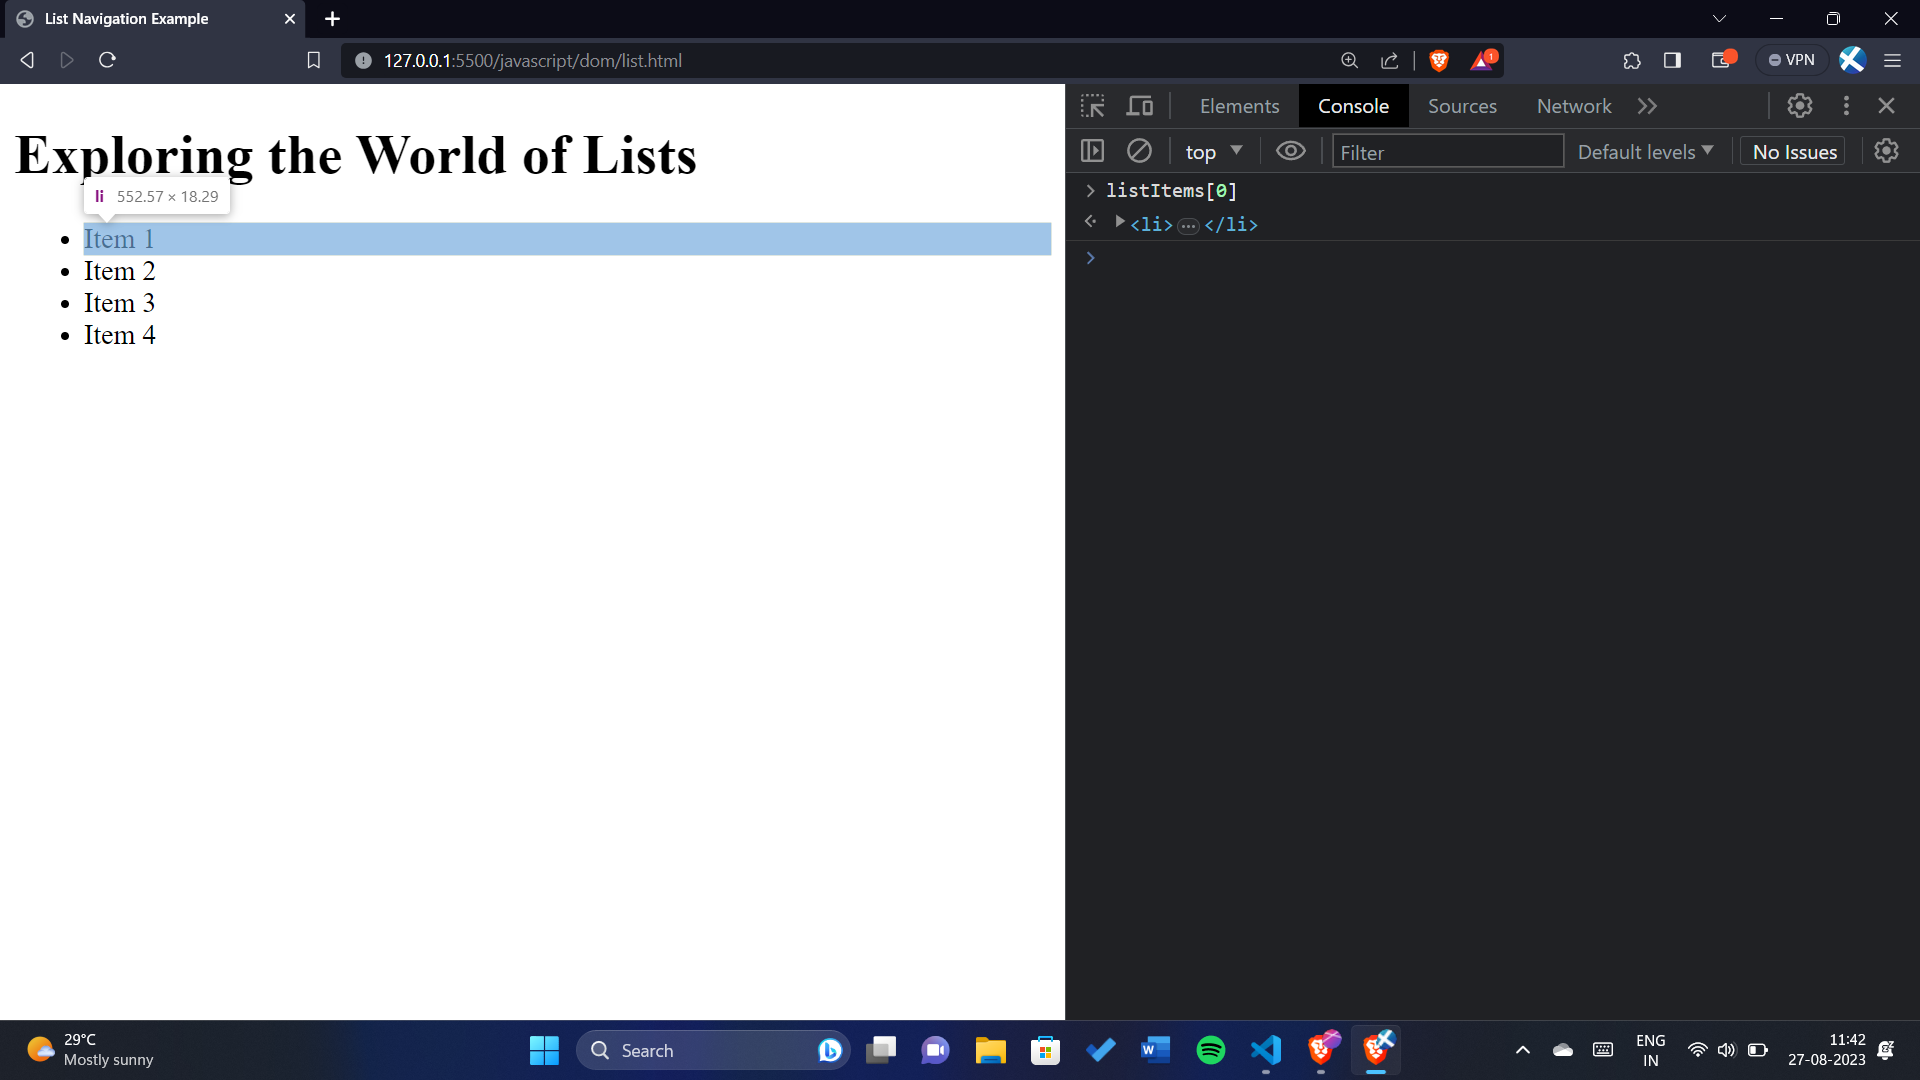
Remember that the index is zero-based, so `listItems[0]` refers to the first item, `listItems[1]` to the second, and so on.
**Converting HTMLCollections to Arrays**
HTMLCollections lack the `forEach` method, but we can convert them into arrays for enhanced manipulation:
```javascript
const listItems = document.getElementById('myList').children;
const itemListArray = Array.from(listItems);itemListArray.forEach(function (item) {
item.textContent = `Array: ${item.textContent}`;
});
```By converting the HTMLCollection to an array using `Array.from`, we enable the use of array methods like `forEach`.
**Why Use** `forEach` **and Convert to Arrays?**
**Simplicity and Clarity**: The `forEach` method provides a clean and straightforward way to iterate over elements. It enhances code readability and reduces the complexity of manual iteration.
1. **Functional Approach**: The use of `forEach` aligns with a functional programming approach, where each element's transformation is a separate step.
2. **Array Methods**: Converting HTMLCollections to arrays using `Array.from` enables us to use a wide range of array methods like `forEach`, `map`, `filter`, and more. This flexibility enhances our ability to manipulate elements.
3. **Consistency**: Using `forEach` consistently for both NodeLists and arrays simplifies your codebase. This way, you don't need to remember different iteration methods for different collection types.
4. **Future-Proofing**: As JavaScript evolves, array methods are likely to receive performance optimizations. By converting HTMLCollections to arrays, you ensure your code benefits from these improvements.
### **Creating and Adding Elements to the DOM**
Creating and adding elements to the Document Object Model (DOM) is a fundamental aspect of web development that allows you to dynamically modify the content and structure of a web page. In this section, we will explore how to create new elements and insert them into the DOM using JavaScript.
**Creating Elements**
To create a new element in the DOM, you can use the `document.createElement()` method. This method takes the tag name of the element you want to create as an argument and returns a new element node. For example:
```javascript
const newDiv = document.createElement('div');
```In this example, a new `
` element is created and stored in the `newDiv` variable.**Modifying Element Properties**
You can modify various properties of the newly created element before adding it to the DOM. This includes setting attributes, adding classes, and applying styles.
```javascript
newDiv.className = 'box';
newDiv.id = 'myBox';
newDiv.setAttribute('title', 'A Box Element');
newDiv.style.backgroundColor = 'blue';
newDiv.textContent = 'This is a blue box.';
```**Appending Elements**
Once you've created and configured the new element, you can append it to an existing element in the DOM using methods like `appendChild()` or `insertBefore()`.
```javascript
const parentElement = document.getElementById('container');
parentElement.appendChild(newDiv);
```In this example, the `newDiv` element is appended as a child of the element with the ID `container`.
**Example: Creating a Dynamic List**
Let's create a simple example where we generate an unordered list (UL) and populate it with list items (LI) based on an array of data.
```xml
Dynamic List Example
const data = ['Apple', 'Banana', 'Cherry', 'Date'];const myList = document.getElementById('myList');
data.forEach(item => {
const listItem = document.createElement('li');
listItem.textContent = item;
myList.appendChild(listItem);
});
```
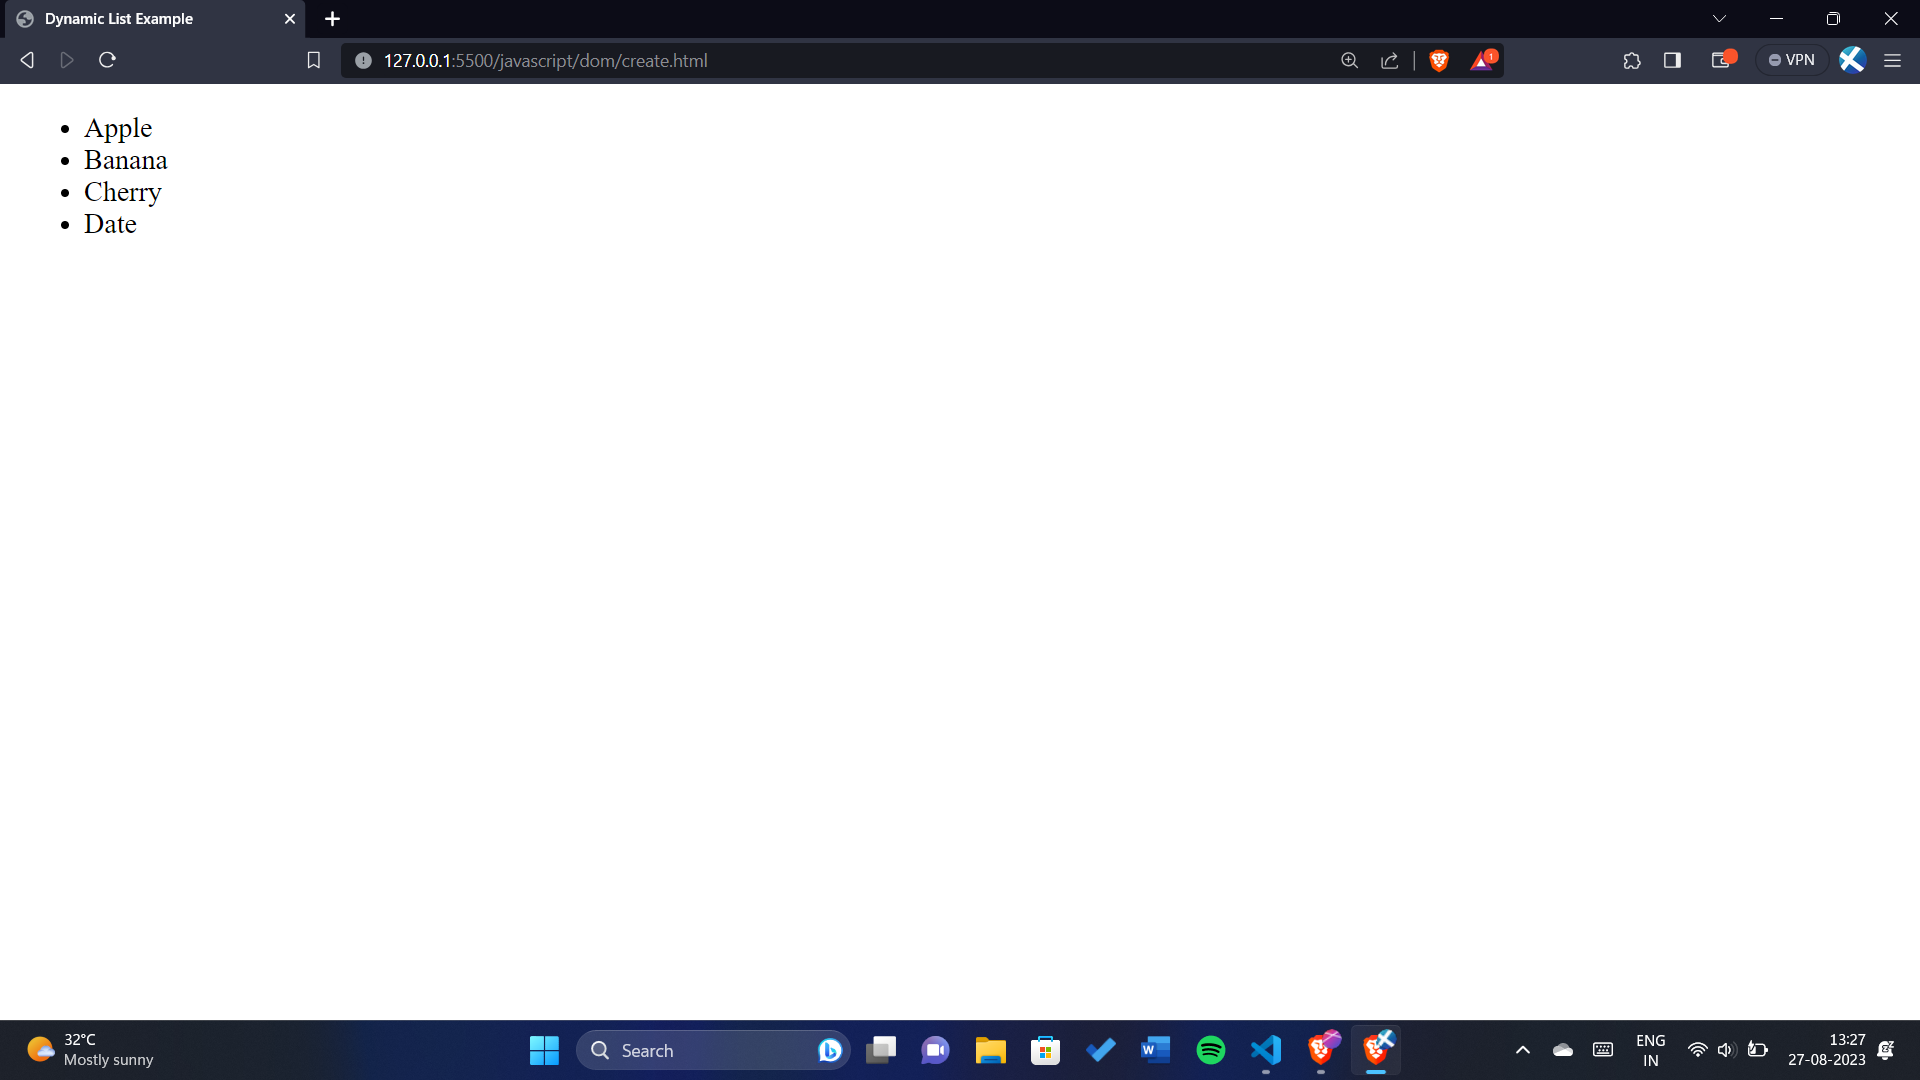
In this example, we first create an empty `
- ` element with the ID `myList`. Then, using JavaScript, we iterate through the `data` array, create a new `
- ` element for each item, set the text content of the list item, and append it to the `
- ` element. This demonstrates how to dynamically generate and add elements to the DOM based on data.
- Javascript
- `) with the text content "Go." We use the `replaceWith` method to replace the existing list item with the new one.
### Removing Elements
Now, let's see how to remove an element from the DOM. We'll use JavaScript to remove the last list item from our initial list of programming languages.
```javascript
// Removing the last language
const lastLang = document.querySelector('li:last-child');
lastLang.remove();
```
Here, we use `document.querySelector` to select the last list item and then call the `remove` method on it to completely remove it from the DOM.
### **Events in JavaScript: Reacting to User Actions**
Events play a crucial role in web development, allowing websites to respond to user interactions. In this article, we'll delve into the world of events in JavaScript and learn how to harness their power to create interactive and dynamic web applications.
**What Are Events?**
Events are actions or occurrences that happen in the browser, such as a user clicking a button, pressing a key, moving the mouse, or resizing the window. JavaScript enables developers to "listen" for these events and execute specific code in response.
**Adding Event Listeners**
To capture and react to events, we use event listeners. An event listener is a JavaScript function that "listens" for a specific event on a particular element and responds when that event occurs. Here's the basic syntax:
```javascript
const element = document.getElementById("myElement");element.addEventListener("eventType", function(event) {
// Code to execute when the event occurs
});
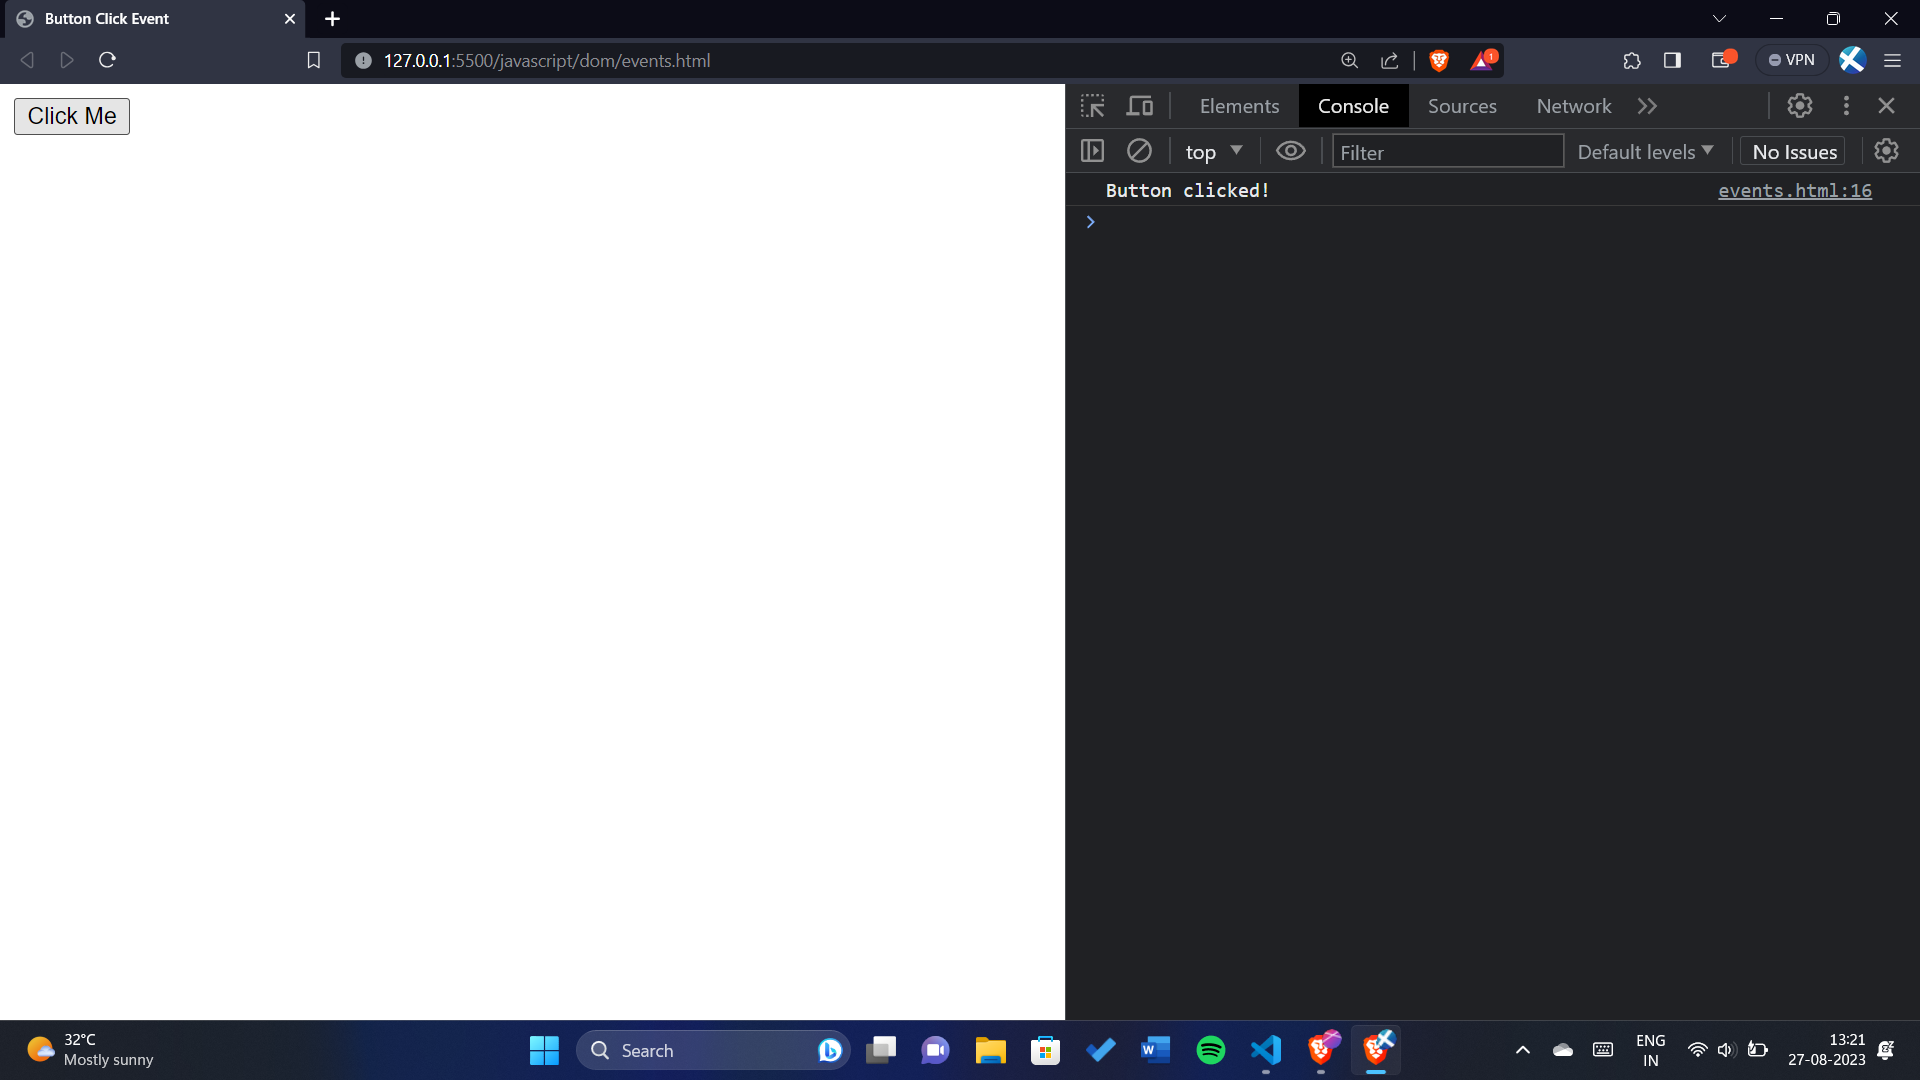
```For instance, let's explore the `click` event:
```xml
Button Click EventClick Me
const button = document.getElementById("myButton");button.addEventListener("click", function(event) {
console.log("Button clicked!");
});
```
**Common Event Types**
Here are some common event types you'll encounter:
* **click**: Triggered when an element is clicked.
* **keydown**: Fired when a key is pressed down.
* **keyup**: Fired when a key is released.
* **mouseover**: Occurs when the mouse pointer enters an element.
* **mouseout**: Occurs when the mouse pointer leaves an element.
* **submit**: Fired when a form is submitted.
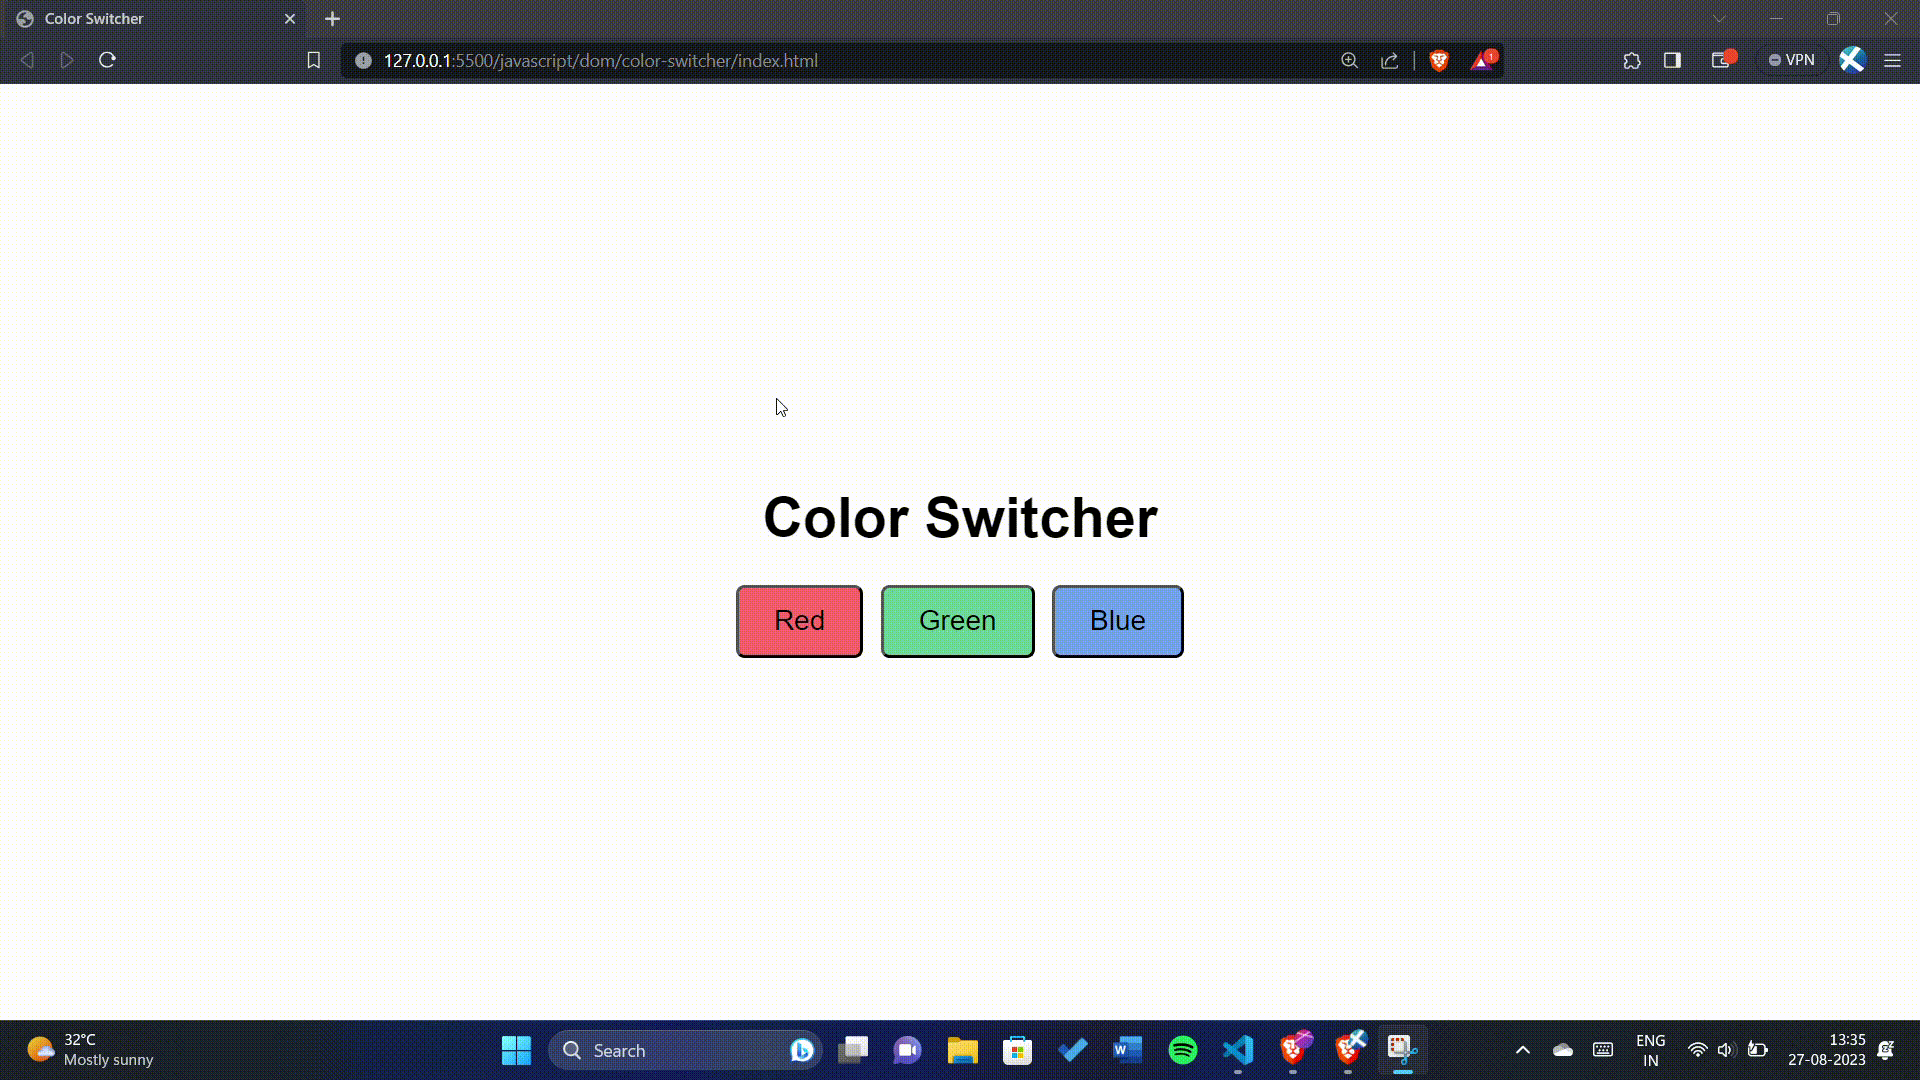
### **Project: Building a Color Switcher**
Now, let's take our newfound knowledge and create something interactive. Imagine you're a magician, changing the colors of your digital canvas with a wave of your wand. We'll use JavaScript to create a color switcher that changes the background color of the page.
```xml
Color Switcher
body {
font-family: Arial, sans-serif;
display: flex;
flex-direction: column;
align-items: center;
justify-content: center;
height: 100vh;
margin: 0;
transition: background-color 0.5s;
}
h1 {
margin-bottom: 20px;
}
.button-container {
display: flex;
gap: 10px;
}
.button {
cursor: pointer;
padding: 10px 20px;
background-color: #ddd;
border: none;
border-radius: 5px;
font-size: 16px;
}
#red {
background-color: #ff6b6b;
}
#green {
background-color: #66cc99;
}
#blue {
background-color: #6fa3ef;
}
Color Switcher
const buttons = document.querySelectorAll(".button");
const body = document.querySelector("body");buttons.forEach(function (button) {
button.addEventListener("click", function (e) {
body.style.backgroundColor = e.target.id;
});
});
```
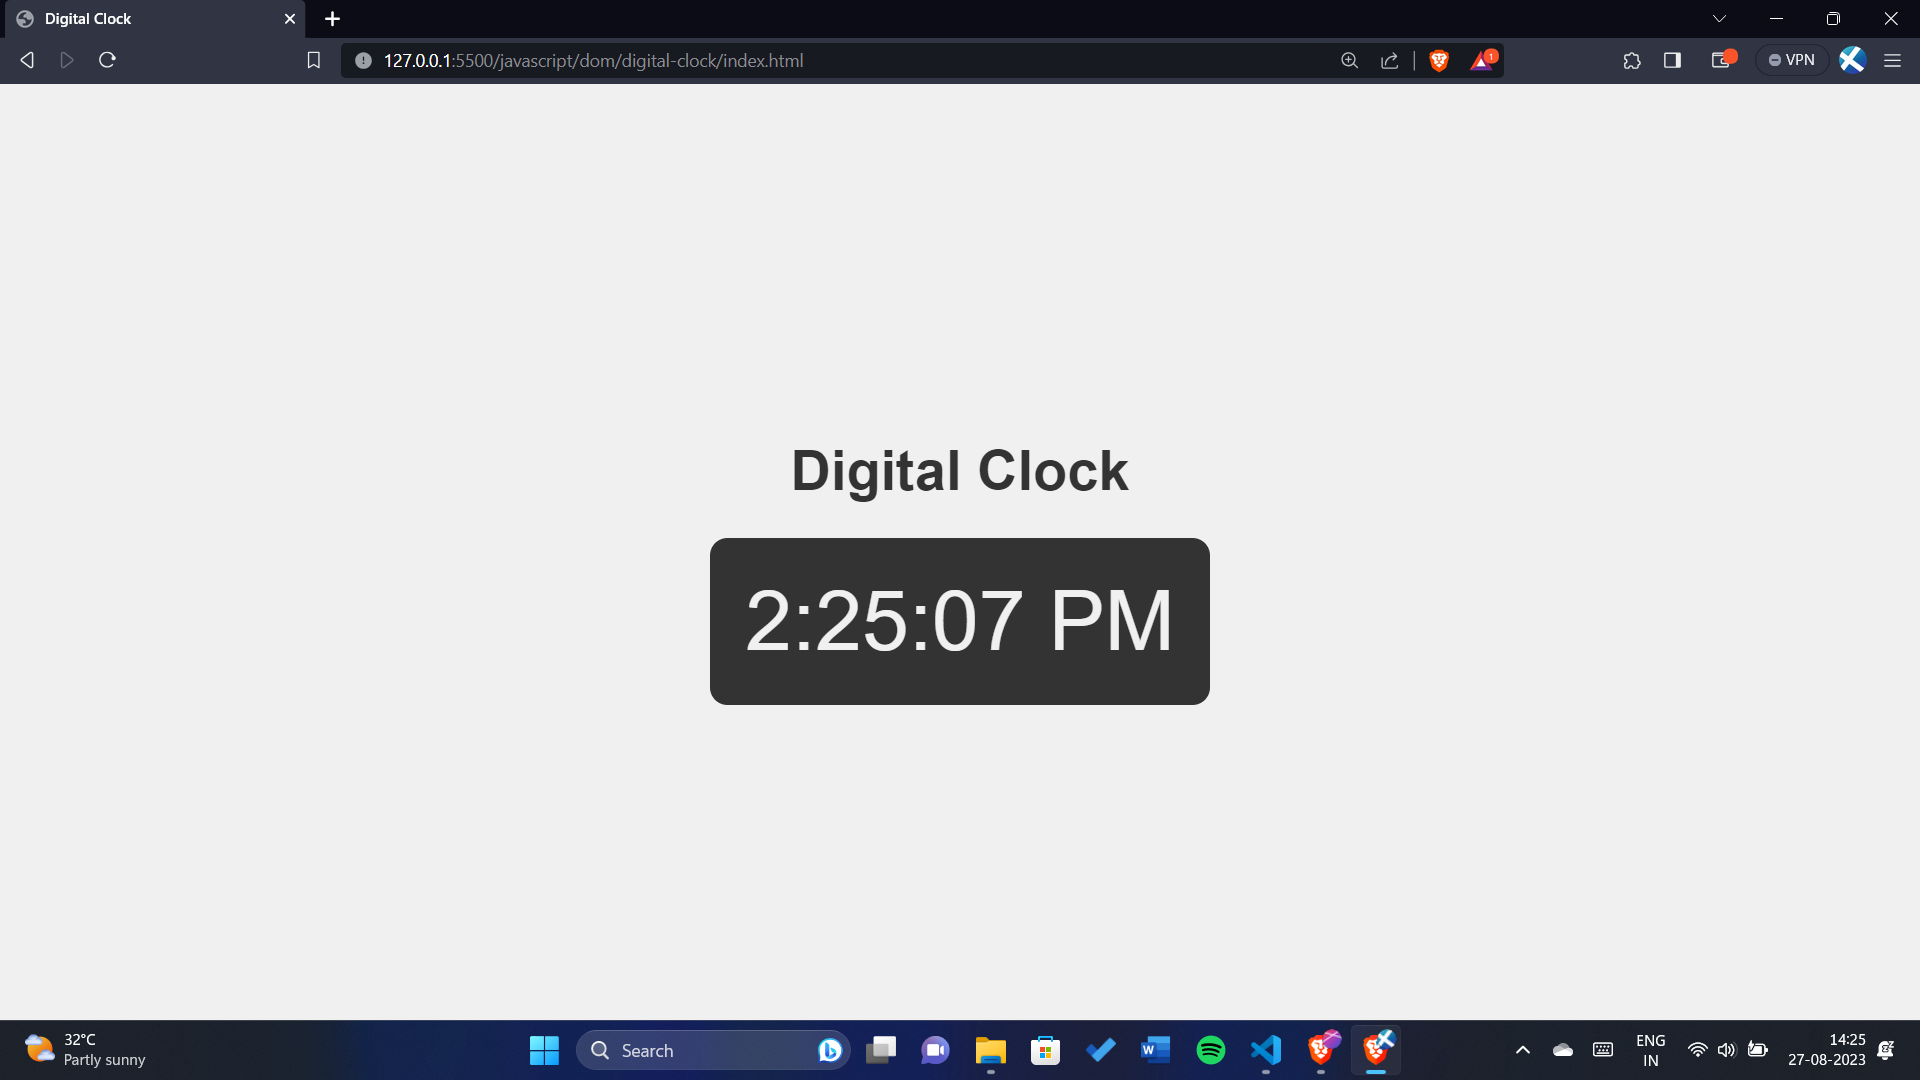
### **Project: Digital Clock**
The Digital Clock project showcases how to create a real-time digital clock using HTML, CSS, and JavaScript. The goal of the project is to display the current time in a visually appealing format on a web page. The clock updates in real-time, providing an accurate representation of the current time.
```xml
Digital Clock
body {
font-family: Arial, sans-serif;
display: flex;
flex-direction: column;
align-items: center;
justify-content: center;
height: 100vh;
margin: 0;
background-color: #f0f0f0;
}
h1 {
color: #333;
margin-bottom: 20px;
}
#clock {
font-size: 48px;
color: #f0f0f0;
background-color: #333;
border-radius: 10px;
padding: 20px;
}
Digital Clock
Loading...
const clock = document.getElementById("clock");setInterval(function () {
let date = new Date();
clock.innerHTML = date.toLocaleTimeString();
}, 1000);
```
### **Conclusion**
In the realm of web development, the Document Object Model (DOM) and events are your magic keys to unlocking interactive and dynamic web experiences. The DOM acts as a bridge between your static HTML and the dynamic world of JavaScript, letting you manipulate web page content effortlessly.
As you embark on your web development adventure, remember that the DOM and events are your tools of enchantment. They're the essence of creating captivating websites that react to user actions, inviting them into an immersive digital world.
Your journey in web development has just begun, and armed with your newfound understanding of the DOM and events, you're ready to work your magic. With each line of code you write, you're transforming static pages into interactive experiences that captivate users.
To truly master the art of the DOM, dive into projects. Create interactive forms, dynamic content loaders, or even mini-games that respond to user input. The more you experiment, the more your skills will flourish. So, all the best on your coding adventures, and may your projects shine as brilliantly as the spells you cast with the DOM and events!
---
And don't forget to connect with me on social media to stay updated with the latest tips, tutorials, and guides:
* Connect with me on LinkedIn: [shaikahmadnawaz](https://www.linkedin.com/in/shaikahmadnawaz)
* Follow me on Twitter: [shaikahmadnawaz](https://twitter.com/shaikahmadnawaz)
### **Edit and Remove Elements in the DOM**
In this section, we'll delve into the process of editing and removing elements within the Document Object Model (DOM) using JavaScript. These actions allow us to dynamically update the content of a web page without requiring a page refresh.
**Adding Initial Content**
Before we dive into editing and removing elements, let's set up a basic example by adding a list of programming languages to an unordered list (`
- `) in the DOM.
```html
Edit & Delete | DOM
Manipulating the DOM with JavaScript
In this example, we'll explore how to dynamically add, edit, and remove
elements from the DOM using JavaScript.
function addLanguage(langName) {
const li = document.createElement("li");
li.appendChild(document.createTextNode(langName));
document.querySelector(".language").appendChild(li);
}
addLanguage("TypeScript");// Editing the second language
const secondLang = document.querySelector("li:nth-child(2)");
const newLi = document.createElement("li");
newLi.textContent = "Go";
secondLang.replaceWith(newLi);// Deleting the last language
const lastLang = document.querySelector("li:last-child");
lastLang.remove();
```
### Editing Elements
Let's focus on editing elements in the DOM. We'll use JavaScript to replace the content of a specific list item.
```javascript
// Editing the second language
const secondLang = document.querySelector("li:nth-child(2)");
const newLi = document.createElement('li');
newLi.textContent = "Go";
secondLang.replaceWith(newLi);
```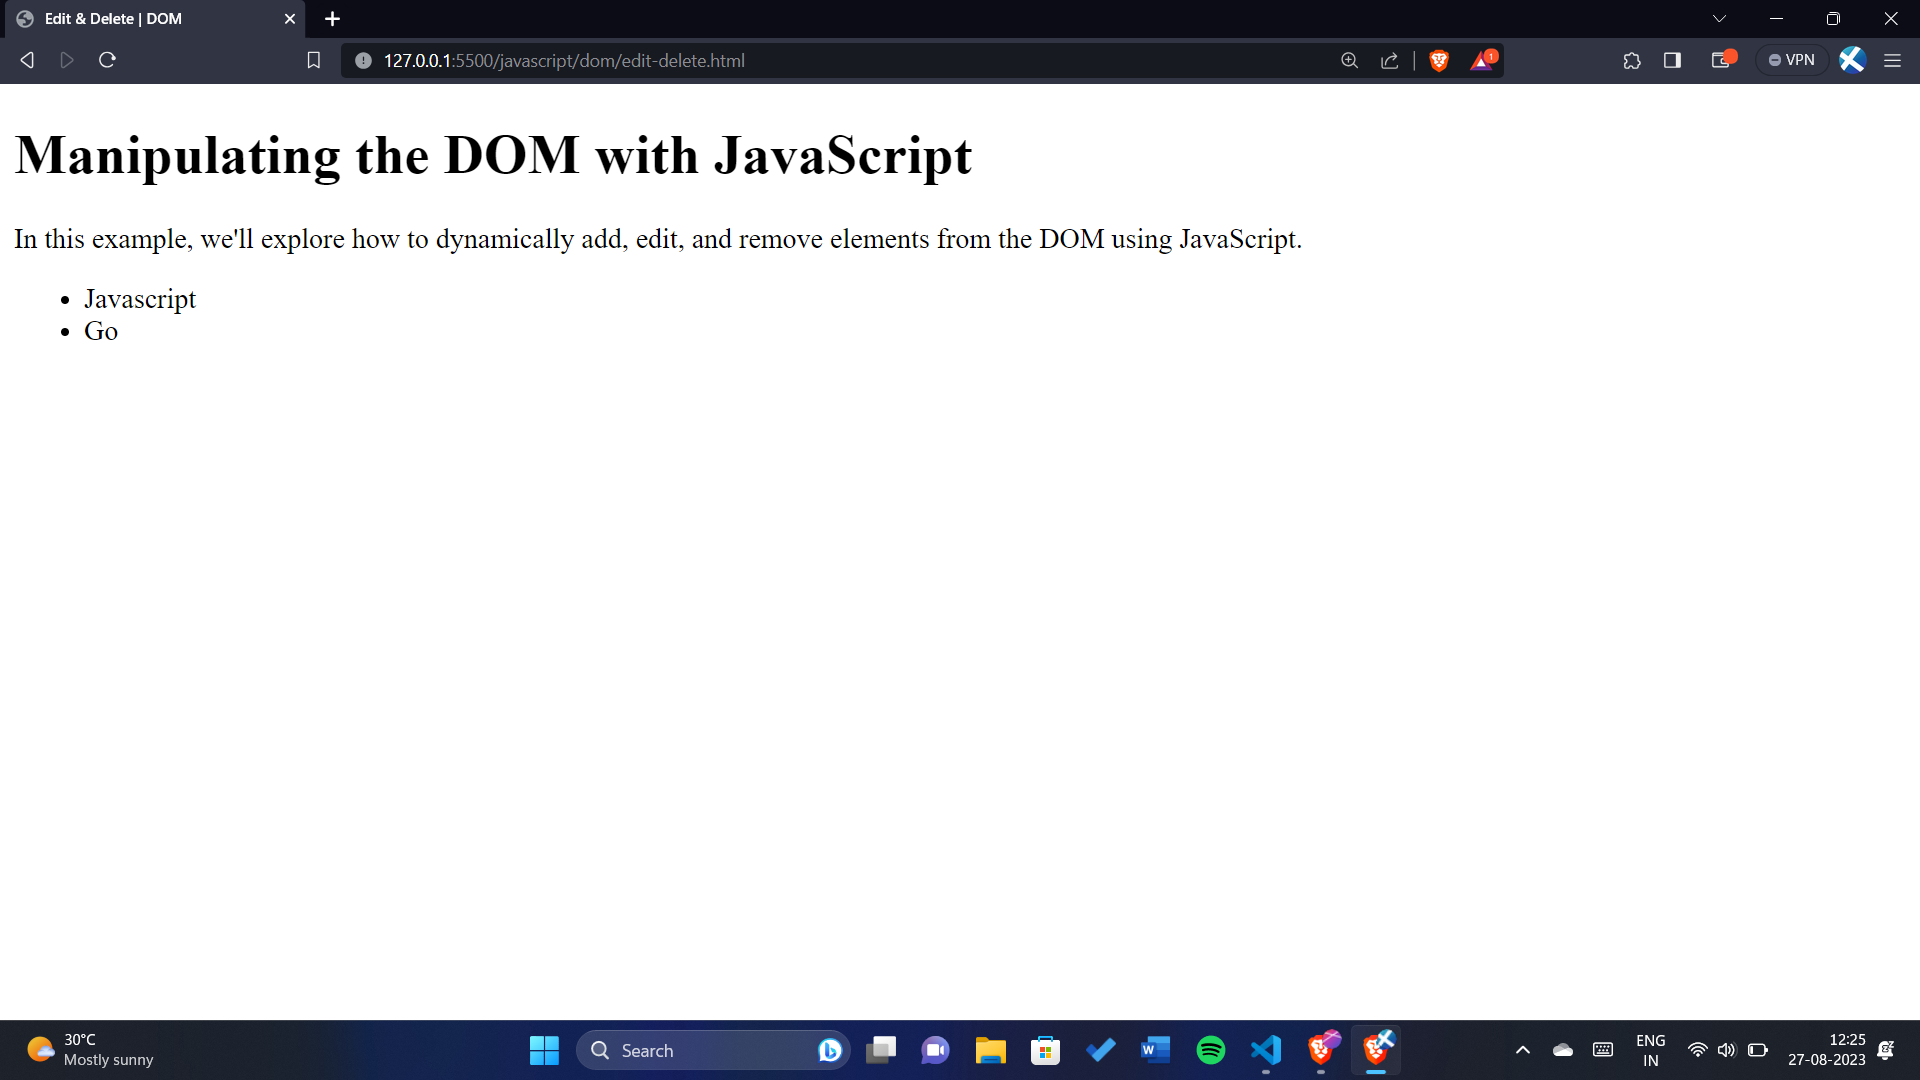
In this example, we select the second list item using `document.querySelector` and then create a new list item element (`
- ` element for each item, set the text content of the list item, and append it to the `