https://github.com/shinzlet/oildrop
A tiny (~600 sloc) userscript manager that you can self-audit and fully trust.
https://github.com/shinzlet/oildrop
audit javascript userscripts
Last synced: 11 months ago
JSON representation
A tiny (~600 sloc) userscript manager that you can self-audit and fully trust.
- Host: GitHub
- URL: https://github.com/shinzlet/oildrop
- Owner: shinzlet
- License: gpl-3.0
- Created: 2021-02-28T01:01:59.000Z (over 5 years ago)
- Default Branch: main
- Last Pushed: 2021-08-10T23:27:46.000Z (almost 5 years ago)
- Last Synced: 2025-01-18T03:31:33.406Z (over 1 year ago)
- Topics: audit, javascript, userscripts
- Language: JavaScript
- Homepage: https://addons.mozilla.org/en-CA/firefox/addon/oildrop/
- Size: 42.8 MB
- Stars: 8
- Watchers: 4
- Forks: 3
- Open Issues: 4
-
Metadata Files:
- Readme: README.md
- License: LICENSE
Awesome Lists containing this project
README
# Oildrop
Oildrop is a userscript manager for Firefox. It was designed to be audited by anyone in less than
30 minutes, does not communicate with a server, and can be easily modified to suit your needs.
## Table of Contents
- [Features](#features)
- [Screenshots](#screenshots)
- [Installation Instructions](#installation)
- [Usage Instructions](#usage)
- [How to Audit Oildrop](#how-to-audit-oildrop)
- [Development Instructions](#development)
- [Limitations](#limitations)
- [Contributors](#contributors)
- [Licensing Info](#licensing)
## Features
- Sleek, modern interface
- Manage scripts and styles in one extension
- Dark and light theme
- Import / Export your scripts with JSON
- GPLv3 License
- Less than 600 lines of code (no golfing required)
- Easy to tweak to your needs
- Designed with accessibility in mind
## Screenshots
### Main UI
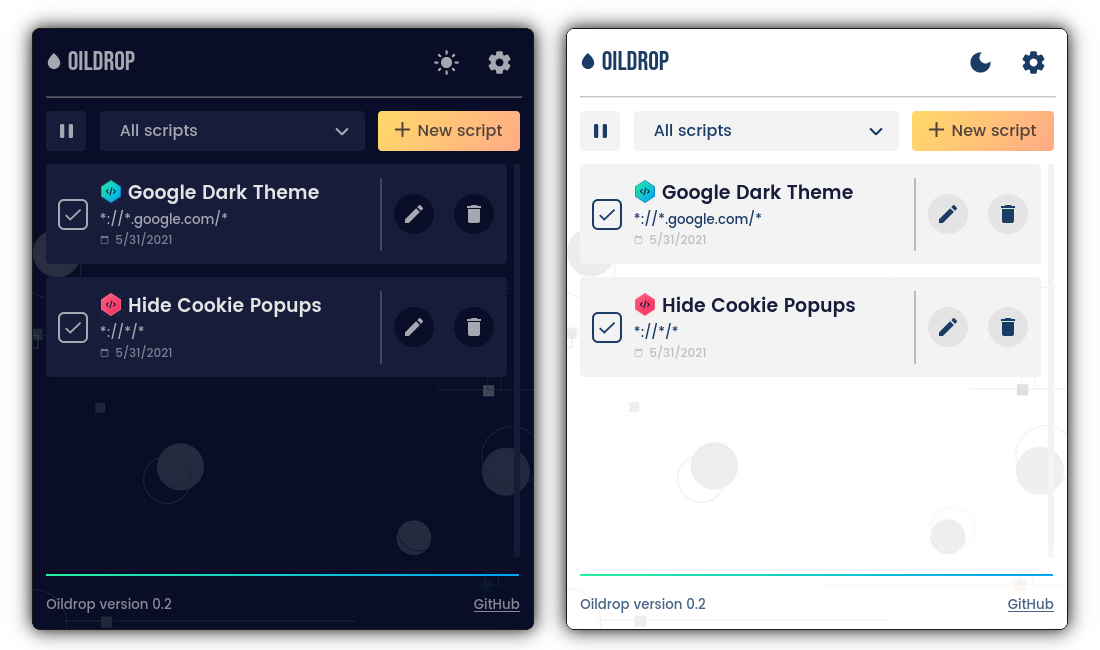
Oildrop is invoked via the browser icon by default. Shown here is the script overview in both light and dark mode, which can be toggled easily.
### Full-page View

Oildrop can be opened in a full page for ease-of-use if a popup is not desirable. Also shown is Oildrop's data management page, which allows you to import and export scripts.
### Editor and Settings Menu
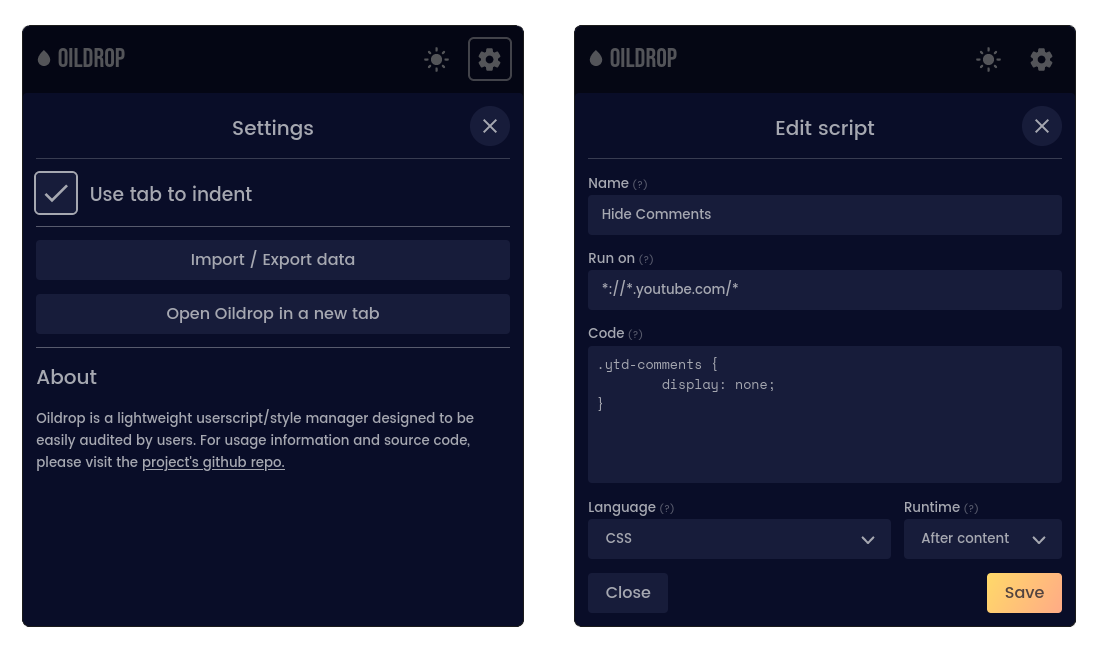
This preview shows a script being edited in Oildrop on the left, and the settings menu on the right.
## Installation
Oildrop can be installed via several means, the easiest of which is the
[Firefox Addon Store](https://addons.mozilla.org/en-CA/firefox/addon/oildrop/).
You can also [download the latest signed release from GitHub](https://github.com/shinzlet/oildrop/releases),
which is easier to audit. this is what I'd reccommend doing. Unlike the first
method, you will not receive automatic updates. If you go this route, see
["How to Audit Oildrop"](#how-to-audit-oildrop). Once you audit the release,
you can install it by typing `about:addons` in the address bar, clicking the
gear next to "Manage Your Extensions", and then selecting "Install Add-on From
File..." in the context menu. From there, navigate to the `.xpi` file you
downloaded, and click `Open`.
If you want to modify Oildrop for your needs, instructions are available below for
[development](#development), [building, and self-signing](#building-and-signing) the
extension.
## Usage
### Opening Oildrop
Once you have Oildrop installed, you will be able to access it via the icon in your
browser's toolbar. If you can't see it, you can drag it onto your toolbar by right
clicking on the toolbar, then selecting `Customize Toolbar`.
### Main UI Overview
Almost every UI element in Oildrop has an informative tooltip, which you can see
by holding your mouse cursor still atop it. A description of the user interface
is offered below, if you'd prefer.
When the popup opens, you'll see Oildrop's main interface. At the top right corner,
buttons are present which allow you to toggle between colorschemes and open settings,
left to right.
Just below is the main overview panel. Clicking the play/pause button to the left allows you
to control Oildrop's behaviour at a global level - by pausing Oildrop, all scripts
will be temporarily disabled. By re-enabling Oildrop, scripts with a checkmark to the
left of their name will be enabled. You can tell if Oildrop is enabled or disabled
by the bar at the bottom of the interface, which will be red if paused, and green
if enabled. Hovering over the bar with a mouse cursor will display a message with
that same information.
To the left of the play/pause button is the filter dropdown. By changing the setting
displayed, you'll be able to show or hide scripts depending on their current relevance.
Here is a key to what the options mean:
- "All Scripts": Every script that Oildrop has saved will be shown.
- "Active Scripts": Every script whose url matches the current page will be
shown. For example, if the current tab is open to `https://google.com`, a
script that matches `` will be displayed, but a script that matches
`*://*youtube.com/*` will not.
- "Inactive Scripts": This is the opposite of the "Active Scripts" option. Only
scripts that are not able to run on the current page will be shown.
Note that "activity" is not an indicator of wether a script actually *is* running. A
script will only run on a page if it has a checkmark next to its name, and if Oildrop
is globally enabled with the play/pause button described above.
To the right of the filter bar is the self-explanatory "new script" button, which will
open the script editor. By default, the script will match the current tab's URL.
Below the filter bar is the main overview, which shows all scripts matching the filter
rule. They can be enabled or disabled by checking the box to the left of their name.
Each script item will show some information about itself, like its name, the pages
it matches, wether it is CSS (has a blue badge to the left of the name) or JavaScript
(which has a red badge), and when it was made. Additionally, each script has a button
that allows you to edit or delete it.
### Editor Overview
The editor, which can be opened via the "new script" button or an edit button next
to an existing script, allows you to modify userscripts. Each field has a tooltip,
which can be displayed by mousing over the question mark to the right of the field
label. These fields are mostly unsurprising, so only a brief rundown is included here:
- Name: The name of the script. This is only used for display purposes, so you can put
whatever you'd like here.
- Run On: A comma-separated list of [match patterns](https://developer.mozilla.org/en-US/docs/Mozilla/Add-ons/WebExtensions/Match_patterns).
- Code: The code (be it JavaScript or CSS) that the userscript will run.
- Language: The langauge your code is written in.
- Runtime: When, during page load, your script should be injected. See the
`run_at` field [here](https://developer.mozilla.org/en-US/docs/Mozilla/Add-ons/WebExtensions/manifest.json/content_scripts) for more info.
Pressing the "Save" button will save your changes and close the editor. Pressing
"Close" will discard your changes and close the editor.
### Settings Overview
The settings menu has a few important things within. The first is a checkbox that
allows you to enable or disable tab-key indentation in the code editor. This may seem
trivial, but is important for accessibility purposes. If you rely on the tab key
for form navigation, I advise you to turn this checkbox off, which will allow you
to exit the code editor by pressing the tab key.
Next are two buttons that will open a new tab. The first one takes you to the
data management page, which allows you to import or export Oildrop's configuration
and scripts.
Secondly is a button that opens the Oildrop window itself in a new tab. This is useful
when you're developing a longer script, or just don't want the popup to go away when you
click outside of it (as is the default behaviour for browser extensions).
### Questions?
If you have a question about Oildrop, need usage help, or have a feature request,
feel free to open an [issue](https://github.com/shinzlet/oildrop/issues/new).
## How to Audit Oildrop
Understanding how a peice of software functions can be daunting, and this section aims
to help guide you through Oildrop's internals.
To start, a little exposition. The `.xpi` file you downloaded in the releases
section is a compressed archive of Oildrop's source code which was signed by Mozilla.
In order to audit the code within, we'll first have to decompress that archive. You can
do this either by renaming it from `oildrop-xxx.xpi` to `oildrop-xxx.zip` (where `xxx`
is a version number), or by running `unzip oildrop-xxx.xpi -d oildrop` at the command
line.
Once you've done this, you'll see a carbon copy of this repository. The one difference
is the addition of a `META-INF` folder, which is what Mozilla added.
Now that you've opened up Oildrop, you can feel free to inspect any files you'd like.
The only executable code that Oildrop includes is in the `js` folder. Here's a rundown
of what you'll find there:
- `oildrop.js`: Contains helper functions that are used everywhere throughout Oildrop.
- `background.js`: Interfaces with Firefox's `userScripts` api, which is what actually injects your userscripts into websites.
- `ui.js`: Connects Oildrop's main user interface to the background script, which allows you to create, edit, and view your scripts.
- `code_editor.js`: Allows indenting and un-indenting in Oildrop's code editor.
- `manage.js`: Implements data management functions and connects them to the `Import / Export Data` page (accessible via Oildrop's settings).
Additionally, feel free to make sure that the HTML and CSS do not reference any remote
files. As far as I'm aware, HTML and CSS cannot be used maliciously when only local
assets are used, which is the case in Oildrop.
This should be enough help to get started, but I hope to make a full walkthrough
of the source code soon. If you have any questions, feel free to open an issue!
## Development
Oildrop is written in plain HTML and JavaScript, but uses sass to accelerate styling.
If you're tweaking Oildrop for personal use, you can edit the compiled CSS and ignore
the build process. However, if you want to contribute to or fork Oildrop, you'll want
to use the Sass pipeline. To do so, [install dart-sass](https://sass-lang.com/install),
then run `make watch`. This will automatically watch and compile your scss into the `css` folder.
To test the extension, you will need to have [`web-ext`
installed](https://extensionworkshop.com/documentation/develop/getting-started-with-web-ext/).
Then, invoke `make run` to open a development browser with Oildrop loaded.
### Building and Signing
Oildrop can be built and signed using the `web-ext` CLI. For documentation about this process,
see https://extensionworkshop.com/documentation/develop/getting-started-with-web-ext/.
## Limitations
- Oildrop only works in Firefox. Adding the neccessary polyfills to make it cross-platform would have easily doubled the codebase. That being said, porting it would not be a monumental challenge, and forks are welcomed.
- Oildrop's editor is good enough for quick scripting, but is not intended to replace your editor of choice. For complicated scripts, you should write code elsewhere and import it into Oildrop.
- Because it isn't needed for most tasks, the GreaseMonkey `GM_` API is not implemented in Oildrop. Increasing compatibility with other userscript managers is something I'd like to look into, however.
## Contributors
- [Seth Hinz](https://github.com/shinzlet), [sethhinz@me.com](mailto:sethhinz@me.com)
+ Concept, programming
- [Chiara Colangelo](https://dribbble.com/ChiaraColangelo), [chiara.colangelo@ninjabit.com](mailto:chiara.colangelo@ninjabit.com)
+ UI Designer
## Licensing
All of Oildrop's source code is licensed under GPLv3. Some of the fonts and
icons used are under different licenses. Their respective licenses are stored
in the assets folder.