https://github.com/sidvishnoi/jekyll-comments
Static Comments for your Jekyll website
https://github.com/sidvishnoi/jekyll-comments
Last synced: 4 months ago
JSON representation
Static Comments for your Jekyll website
- Host: GitHub
- URL: https://github.com/sidvishnoi/jekyll-comments
- Owner: sidvishnoi
- License: mit
- Created: 2016-12-19T15:27:06.000Z (over 8 years ago)
- Default Branch: master
- Last Pushed: 2018-06-19T11:51:17.000Z (about 7 years ago)
- Last Synced: 2025-03-20T14:48:11.479Z (4 months ago)
- Language: JavaScript
- Homepage:
- Size: 42 KB
- Stars: 5
- Watchers: 1
- Forks: 2
- Open Issues: 0
-
Metadata Files:
- Readme: README.md
- License: LICENSE
Awesome Lists containing this project
README
> Jekyll Comments lets you have static user generated comments to your static Jekyll website, and features profanity filtering, keyword blacklisting and moderation of comments.
## Features
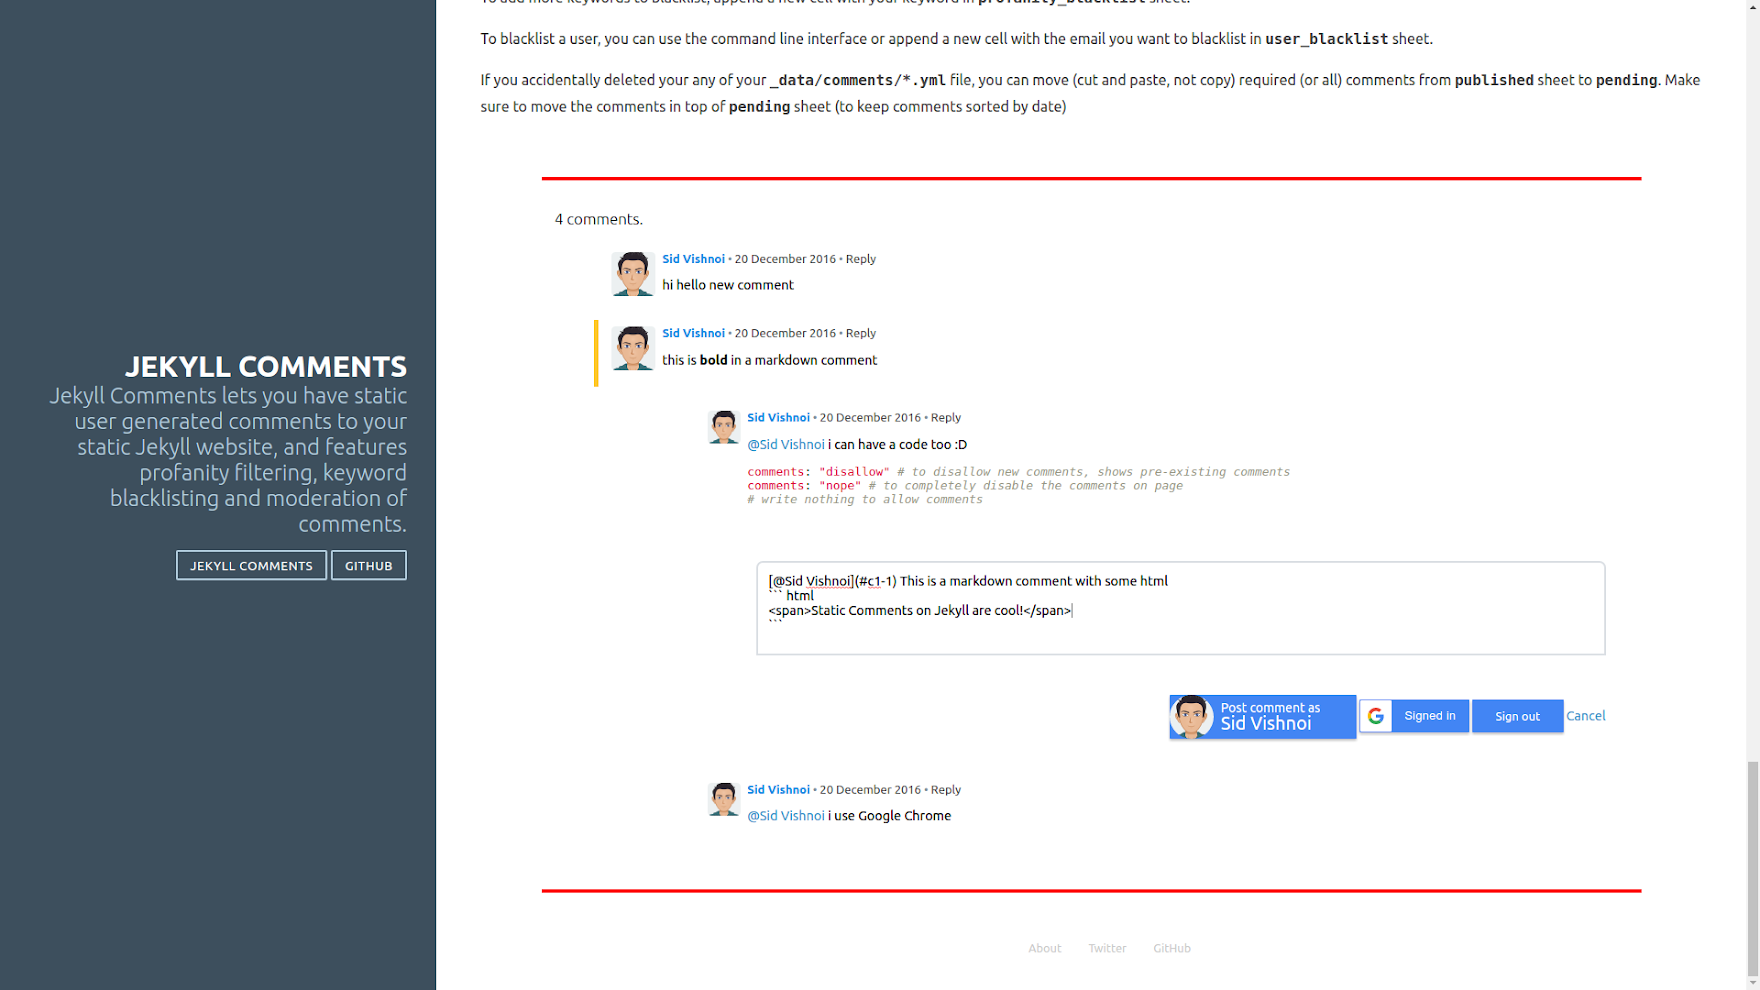
**Client Side**
* simple UI that allows you to post comments and replies
* Google Sign in to authenticate users
* write comments in markdown, allows html code blocks also
* comment + reply counter
* comment permalinks
* comments by post author are highlighted
**Server (Google Sheets)**
* profanity filter
* user blacklisting
* disallow comment content (keyword blacklisting)
**Admin**
* moderate comments right from your terminal (allow or delete or allow all)
* blacklist a user
* markdown preview on comment in terminal (powered by [https://github.com/axiros/terminal_markdown_viewer](https://github.com/axiros/terminal_markdown_viewer))
## Setup
#### [Video Tutorial - Static Comments for your Jekyll Website](https://www.youtube.com/watch?v=qdHL4h4Wvuk)
(*sorry for lag in video, will create new one and reupload soon*)
Install following python modules, if you don't have them
``` bash
# Terminal markdown viewer https://github.com/axiros/terminal_markdown_viewer
$ pip install mdv
# PyYaml
$ pip install pyyaml
```
**Obtain `apiUrl`** *Create a database on Google Sheets* ;)
1. Login to your Google Account.
2. Copy [this spreadsheet](https://docs.google.com/spreadsheets/d/1naZA_ytl7CBW8ytE5MPWIEi3L8hzJhH0y1EbnyZ1Dag/copy).
3. Configure `Code.gs`. Edit the `deletekey` (`string` *recommended that key should be long and random, like some md5 hash*). Choose whether you want the API profanity filter or not (`true/false`)
4. In Apps Script, `Publish > Deploy as web app` at following settings:
```
Project version: New
Execute the app as: Me
Who has access to the app: Anyone, even anonymous
```
Give the permissions when prompted and copy the URL given which looks like **apiUrl** = `https://script.google.com/macros/s/AKfycbyTwxtrSxu...g5Guoj5KiKsPMyh4aXQ6c_/exec`
**Obtain a Google Authentication client ID**
Refer to this article by Google : [https://developers.google.com/identity/sign-in/web/devconsole-project](https://developers.google.com/identity/sign-in/web/devconsole-project)
Now you have `YOUR_CLIENT_ID.apps.googleusercontent.com`
Create a new project using `git clone project_name`, configure files as defined below. Obtain API URL and ClientID as explained below. You're set.
Alternatively, follow these steps:
Copy `jekyll-comments/` and all its contents to your project folder. Add `jekyll-comments/` to exclusions in your Jekyll config and gitignore \
``` yml
# _config.yml
exclude: ['jekyll-comments/']
# .gitignore
jekyll-comments/
```
* Copy `jekyll-comments/comments.html` to your project's `_includes/comments.html` folder.
* Copy `jekyll-comments/comments.sass` to `assets/css/comments.sass`.
* Copy `jekyll-comments/comments.js` to `assets/js/comments.js`.
* Add following line between ` ... ` of each of your page:
``` liquid
```
Include `comments.html` in your posts as:
``` liquid
{% unless page.comments == "nope" %}
{% endunless %}
```
## Configure
Open your `_config.yml` and add the following in end:
``` yml
jekyll-comments:
apiUrl: ""
# [REQUIRED] the url you received from Google Apps Script step, e.g.
# "apiUrl": "https://script.google.com/macros/s/AKfycbyTwxtrSxu...g5Guoj5KiKsPMyh4aXQ6c_/exec"
commentsDir: ""
# this is where are comments are saved,
# default: "_data/comments/"
logFile: ""
# this file will keep a list of files in which comments are updated, useful in partial builds.
# default: "jekyll-comments/comments.log"
saveAsmd5: False
# if True, the email ids in _data/comments/*.yml are saved as md5 hashes, useful if you make your _data/comments/*.yml public
# otherwise emails are stored as it is
# default: False
client_id: ""
# client ID obtained from Google Sign In API
# YOUR_CLIENT_ID.apps.googleusercontent.com
sort: "newest_first"
# comment sorting: "newest_first" or "oldest_first"
```
In `jekyll-comments/comments.py`, edit the `deleteKey` in settings in `def main()`. This is the same deleteKey as in the GoogleAppsScript.
``` python
settings = {
"deleteKey": "",
# a key that is known only to you - this is the same key as in comments.gs file
# allows: comment deletion, get comments, user blacklisting
# keep it safe, don't add comments.gs and comments.py to your git repo
# default: "123456789"
...
}
```
If you want these settings as defaults, do not delete the keys, assign them `""`
## Usage
### Enabling comments in a post
In your post's frontmatter,
``` python
comments: "disallow" # to disallow new comments, shows pre-existing comments
comments: "nope" # to completely disable the comments on page
# write nothing to allow comments
```
### Posting a comment
Use the comment form on your built pages to post comments or replies.
### Moderating
``` bash
$ cd path/to/your/project_name/
$ python jekyll-comments/comments.py
# or, if you want to allow all comments without pressing [allow] each time
# $ python jekyll-comments/comments.py all
# now moderate comments as you wish, the comments allowed are put into respective _data/comments/*.yml files
$ bundle exec jekyll serve
# to view your comments locally
```
You can also moderate the comments from your Google spreadsheet.
To add more keywords to blacklist, append a new cell with your keyword in `profanity_blacklist` sheet.
To blacklist a user, you can use the command line interface or append a new cell with the email you want to blacklist in `user_blacklist` sheet.
If you accidentally deleted your any of your `_data/comments/*.yml` file, you can move (cut and paste, not copy) required (or all) comments from `published` sheet to `pending`. Make sure to move the comments in top of `pending` sheet (to keep comments sorted by date)
## Tips
Create an alias to update comments
```
alias jcomm='cd ~/path/to/sample-project; python jekyll-comments/comments.py'
```
{% include comments.html %}