https://github.com/situmtech/flutter-ar
Bring AR to Situm Wayfinding
https://github.com/situmtech/flutter-ar
augmented-reality indoor-navigation indoor-positioning situm
Last synced: 9 months ago
JSON representation
Bring AR to Situm Wayfinding
- Host: GitHub
- URL: https://github.com/situmtech/flutter-ar
- Owner: situmtech
- License: mit
- Created: 2024-01-16T11:39:27.000Z (over 2 years ago)
- Default Branch: main
- Last Pushed: 2025-01-08T08:14:31.000Z (over 1 year ago)
- Last Synced: 2025-05-20T13:14:50.967Z (about 1 year ago)
- Topics: augmented-reality, indoor-navigation, indoor-positioning, situm
- Language: Dart
- Homepage: https://situm.com/en/
- Size: 82.4 MB
- Stars: 4
- Watchers: 5
- Forks: 1
- Open Issues: 0
-
Metadata Files:
- Readme: README.md
- Changelog: CHANGELOG.md
- License: LICENSE
Awesome Lists containing this project
README
# Situm Flutter AR
> [!NOTE]
> This plugin is a work in progress.

@situm/flutter-ar
Bring AR to [Situm Wayfinding](https://situm.com/wayfinding).
[](https://opensource.org/licenses/MIT)
[](https://pub.dev/packages/situm_flutter)
[](https://flutter.dev/)
## Getting Started
By following this guide, you'll be able to integrate Situm AR plugin into your own application. Situm AR plugin is composed by:
1. Flutter Code: available in this repo.
2. AR binaries: available upon request through support@situm.com. You'll need them to compile. We have 2 AR binaries:
1. Android. We'll deliver a folder called **unityExport**
2. iOS. We'll deliver a **UnityFramework.xcframework**.
Additionally, we've created an [example app](./example) in case you want to take a look at a full application using both Situm SDK and Situm AR app.
### Common setup:
#### Setup Situm SDK Flutter plugin:
First of all, you'll need a Situm account and a venue configured with Situm positioning & maps. To do this, follow [this guide](https://situm.com/docs/first-steps-for-wayfinding/).
First, you'll need to setup Situm SDK Flutter plugin following the instructions contained on the following [link](https://github.com/situmtech/flutter?tab=readme-ov-file#set-up-your-situm-credentials).
#### Install Situm AR Flutter plugin
Then, you may install [situm_flutter_ar](https://pub.dev/packages/situm_flutter_ar) plugin:
```
flutter pub add situm_flutter_ar
```
### iOS specific steps:
1. Import the **UnityFramework.xcframework** into your **Runner** project in **XCode**.
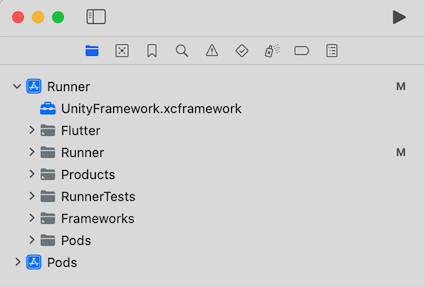
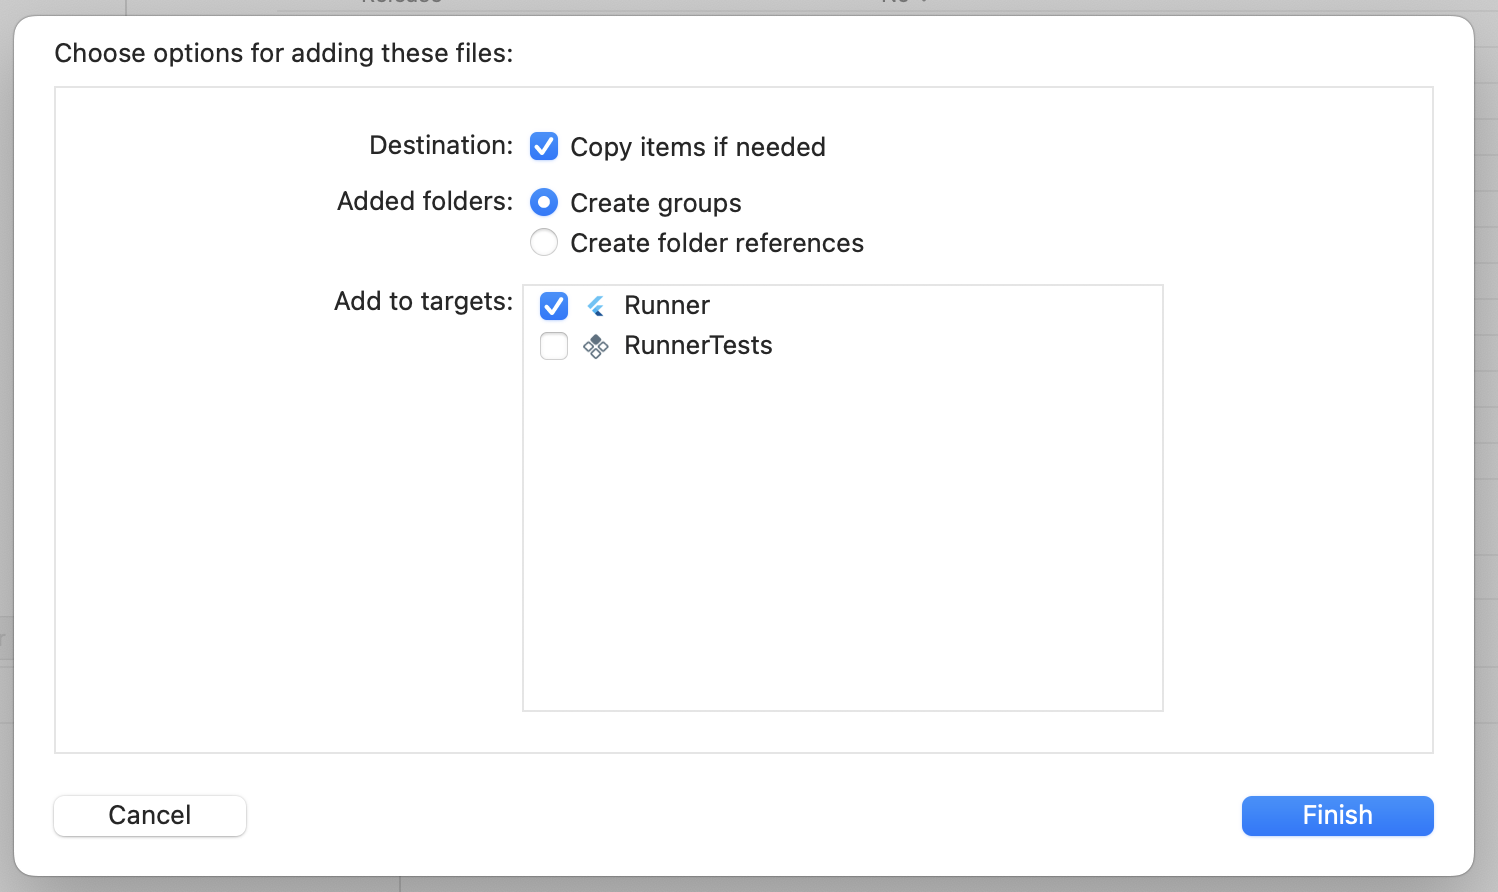
2. During the impoort, make sure you select the following options:
- Check "Copy items if needed".
- Select "Create groups" for "Added folders".
- Add to target "Runner".
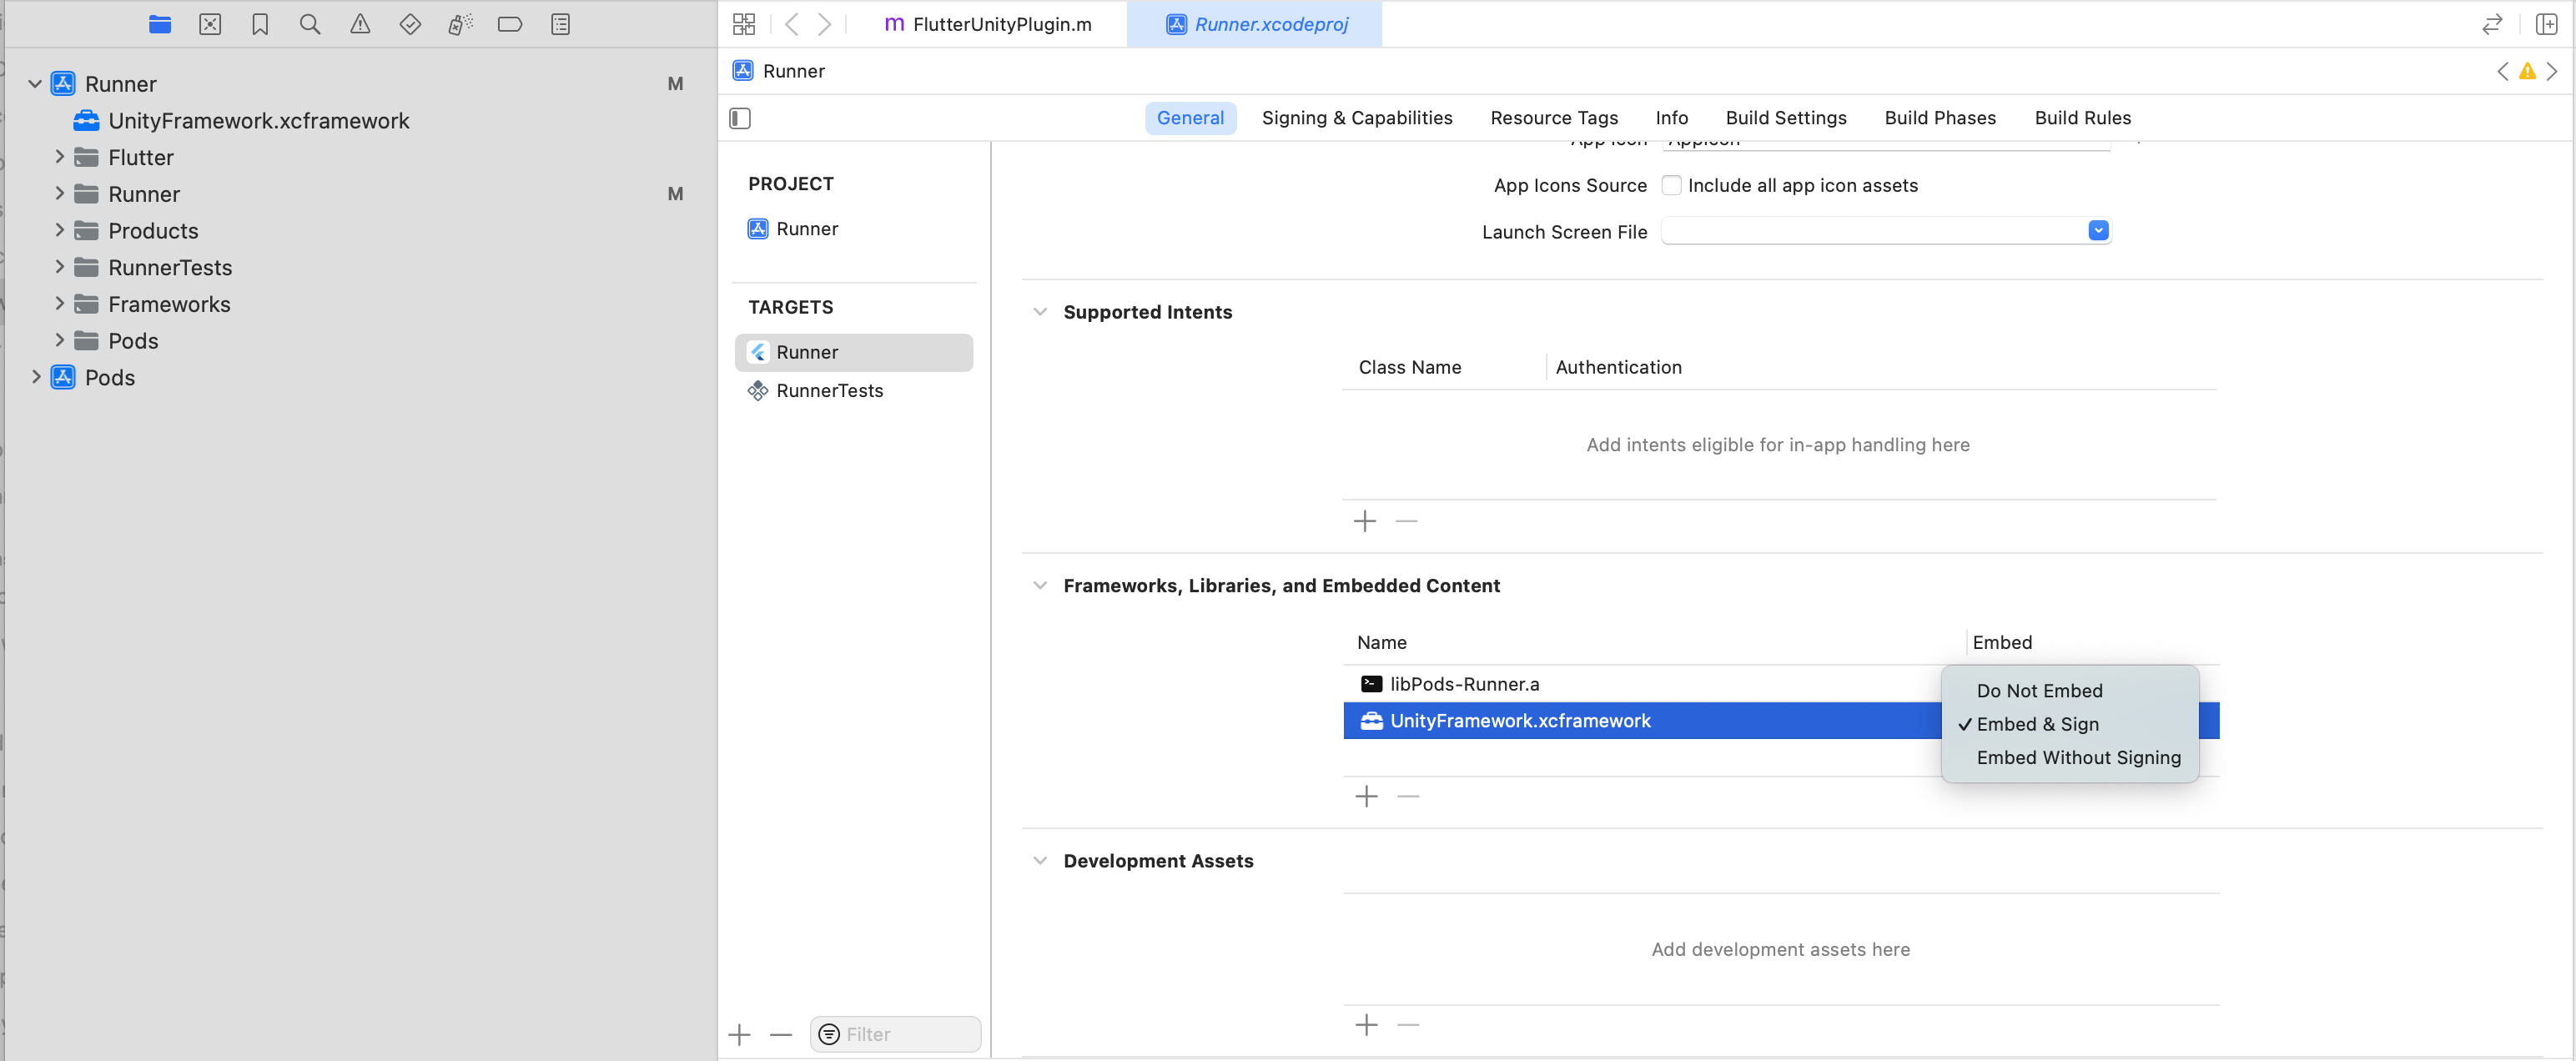
3. In the main Target of your app, under General > "Frameworks, Libraries and Embedded Content",
select "Embed & Sign" for the **UnityFramework.xcframework**.
4. In your `Info.plist` file, add the `UIViewControllerBasedStatusBarAppearance` key with a value of `false` to prevent
UnityFramework from modifying the visibility of the system's status bar:
```
UIViewControllerBasedStatusBarAppearance
```
5. Under `/ios`, run:
```
pod install
```
After this, you may compile & run your application:
```
flutter run
```
#### Android setup:
1. Copy the AR binaries (**unityExport** folder in Android) into the **android** folder of your Flutter project.
2. Add the following snippet to the end of the `/android/settings.gradle` file (surely you have similar includes in there!):
```
include ':unityExport'
include ':unityExport:xrmanifest.androidlib'
```
3. Complete your `/android/build.gradle` using the following indications:
```
//...
allprojects {
repositories {
// You may already have these three ones:
google()
mavenCentral()
maven { url "https://repo.situm.es/artifactory/libs-release-local" }
// Add this:
flatDir {
dirs "${project(':unityExport').projectDir}/libs"
}
}
```
4. Add the following permission to the `/android/app/src/main/AndroidManifest.xml` file:
```
```
5. Add this line to your `gradle.properties` file:
```
unityStreamingAssets=.unity3d, google-services-desktop.json, google-services.json, GoogleService-Info.plist
```
After this, you may compile your application:
```
flutter run
```
### Integrate the ARWidget in your app:
We assume that you already have an application that uses Situm SDK. You may build one by following our [Quickstart Guide for Flutter](https://situm.com/docs/05-a-basic-flutter-app/).
The [example app of this repository](./example/lib/main.dart) contains a complete example on how to integrate the AR plugin. Nonetheless the main steps are described below.
First of all, you'll need to wrap your **MapView** widget inside the **ARWidget**. This way, the user will be presented with the **MapView**, and upon clicking on an "AR button" (only visible on dynamic navigation), the **ARWidget** will appear on the screen.
```
@override
Widget build(BuildContext context) {
return Scaffold(
body: ARWidget(
buildingIdentifier: buildingIdentifier,
onCreated: onUnityViewCreated,
onPopulated: onUnityViewPopulated,
onDisposed: onUnityViewDisposed,
mapView: MapView(
key: const Key("situm_map"),
configuration: MapViewConfiguration(
// Your Situm credentials.
// Copy config.dart.example if you haven't already.
situmApiKey: situmApiKey,
// Set your building identifier:
buildingIdentifier: buildingIdentifier,
viewerDomain: "https://map-viewer.situm.com",
apiDomain: "https://dashboard.situm.com",
remoteIdentifier: remoteIdentifier,
persistUnderlyingWidget: true,
),
onLoad: onMapViewLoad,
),
),
);
}
```
Then, you'll also need to forward certain events from the Situm SDK to the AR Plugin:
```
@override
void initState() {
super.initState();
//Init Situm SDK
var sdk = SitumSdk();
sdk.init(null, situmApiKey);
// Location:
sdk.onLocationUpdate((location) {
//...
arController.setLocation(location);
});
// Navigation:
sdk.onNavigationCancellation(() {
//...
arController.setNavigationCancelled();
});
sdk.onNavigationDestinationReached(() {
//...
arController.setNavigationDestinationReached();
});
sdk.onNavigationOutOfRoute(() {
//...
arController.setNavigationOutOfRoute();
});
sdk.onNavigationProgress((progress) {
//...
arController.setNavigationProgress(progress);
});
sdk.onNavigationStart((route) {
//...
arController.setNavigationStart(route);
});
//...
startPositioning();
}
```
Also, you'll need to make sure that the AR Plugin can interact with the **MapView**:
```
void onMapViewLoad(MapViewController controller) {
//...
arController.onMapViewLoad(controller);
controller.onPoiSelected((poiSelectedResult) {
arController.setSelectedPoi(poiSelectedResult.poi);
});
}
```
Finally, you'll need to ask for the Camera permissions (additionally to the [ones needed by Situm Flutter SDK](https://situm.com/docs/05-a-basic-flutter-app/)). Here's an [example](https://github.com/situmtech/flutter-ar/blob/3e28e0e3968547ef5a63175c1255e0ca7ca86a09/example/lib/main.dart#L148) on how we do it.
## Versioning
Please refer to [CHANGELOG.md](./CHANGELOG.md) for a list of notable changes for each version of the
plugin.
You can also see the [tags on this repository](./tags).
---
## Submitting contributions
You will need to sign a Contributor License Agreement (CLA) before making a
submission. [Learn more here](https://situm.com/contributions/).
---
## License
This project is licensed under the MIT - see the [LICENSE](./LICENSE) file for further details.
---
## More information
More info is available at our [Developers Page](https://situm.com/docs/01-introduction/).
---
## Support information
For any question or bug report, please send an email
to [support@situm.com](mailto:support@situm.com)