https://github.com/slince/spike-go
:mega: A fast reverse proxy written in golang that helps to expose local services to the internet
https://github.com/slince/spike-go
http-proxy nat proxy tcp-proxy tunnel udp-proxy
Last synced: 6 months ago
JSON representation
:mega: A fast reverse proxy written in golang that helps to expose local services to the internet
- Host: GitHub
- URL: https://github.com/slince/spike-go
- Owner: slince
- Created: 2018-10-16T10:23:16.000Z (almost 7 years ago)
- Default Branch: master
- Last Pushed: 2022-03-15T05:47:47.000Z (over 3 years ago)
- Last Synced: 2025-03-30T00:31:26.002Z (7 months ago)
- Topics: http-proxy, nat, proxy, tcp-proxy, tunnel, udp-proxy
- Language: Go
- Homepage:
- Size: 1.59 MB
- Stars: 18
- Watchers: 2
- Forks: 6
- Open Issues: 2
-
Metadata Files:
- Readme: README-zh_CN.md
- Changelog: CHANGELOG.md
Awesome Lists containing this project
README

Spike是一个可以用来将你的内网服务暴露在公网的快速的反向代理。
## 安装
直接到 [Release](https://github.com/slince/spike-go/releases) 页面下载对应平台的可执行文件即可
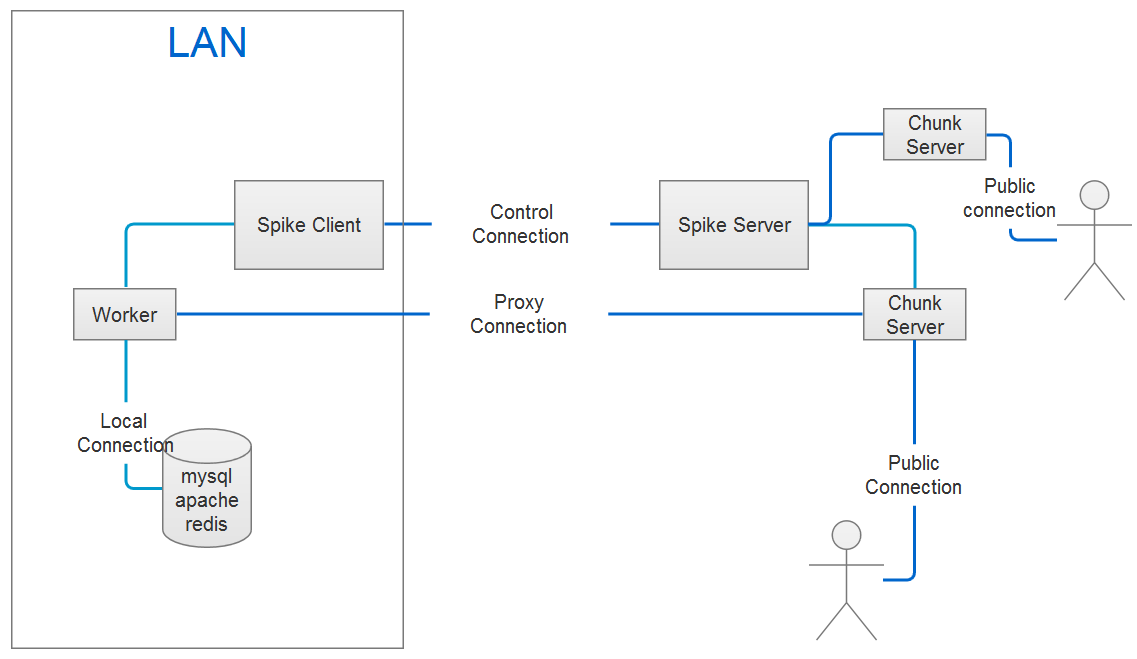
## 结构图
## 配置服务端
使用Spike的前提是你需要有一台公网可访问的机器,这里假设你已经有一台机器.你可以使用下面两种方式开启服务端。
### 基于默认参数
执行下面命令以开启服务
```bash
$ spiked -p 6200
```
上述命令可以创建一个基本服务,如果你需要定制更多信息可以基于配置文件服务;
### 基于配置文件
- 初始化一个配置文件
执行下面命令创建文件
```bash
$ spiked init
```
使用下面命令查看帮助
```bash
$ spiked init -h
```
- 打开配置文件,修改相关参数
- 基于配置文件开启服务
```bash
$ spiked --config=/home/conf/spiked.yaml
```
## 配置本地客户端
开启客户端需要先创建配置文件
- 初始化一个配置文件
执行下面命令创建文件
```bash
$ spike init
```
使用下面命令查看帮助
```bash
$ spike init -h
```
- 打开配置文件,修改相关参数
- 基于配置文件开启服务
```bash
$ spike --config=/home/conf/spike.yaml
```
## 定义隧道
隧道的定义只在客户端,服务端不需要做任何配置,从而达到最简化配置。
> 目前支持tcp,udp,http 三种隧道
打开本地配置文件"spike.yaml", 修改tunnel一项;
- 添加隧道
```yaml
tunnels:
- protocol: tcp
local_port: 3306
server_port: 6201
- protocol: udp
local_host: 8.8.8.8
local_port: 53
server_port: 6202
- protocol: http
local_port: 80
server_port: 6203
headers:
x-spike: yes
```
启动客户端,访问 "http://{SERVER_IP}:6203" , 服务将会被代理到本地"127.0.0.1:80";
- 添加tcp隧道
基于tcp协议的应用层协议都可使用本隧道代理,如:mysql,redis,ssh...等;下面是代理mysql服务的例子
```yaml
- protocol: tcp
local_port: 3306
server_port: 6201
```
执行下面命令访问本地mysql服务:
```bash
$ mysql -h {SERVER_IP} -P 6201
```
## 客户端身份认证
基于默认参数开启的服务端没有开启客户端身份认证服务,如果需要开启该服务则只能基于配置文件去启动服务端.
- 服务端启用认证服务
打开"spiked.yaml"文件,修改 `users` 选项信息,然后重启服务
```yaml
users:
- username: admin
password: admin
```
> 目前只支持简单的用户名密码认证方式,更多的认证方式后面会陆续加入.
- 修改客户端身份信息
打开本地"spike.yaml"文件,修改 `user` 信息,与服务端配置保持一致即可
```yaml
user:
username: admin
password: admin
```
## 日志配置
默认开启屏幕输出与文件两种形式的日志;前者会打印到控制台;后者会写入到指定文件;默认日志等级是 `trace`,此项信息可以通过
修改配置文件"log"一项调整;
```yaml
log:
console: true
level: info
file: "./spiked.log"
```
## 查看所有命令
```bash
$ spike -h
_____ _____ _ _ _ _____
/ ___/ | _ \ | | | | / / | ____|
| |___ | |_| | | | | |/ / | |__
\___ \ | ___/ | | | |\ \ | __|
___| | | | | | | | \ \ | |___
/_____/ |_| |_| |_| \_\ |_____|
Usage:
spike [flags]
spike [command]
Available Commands:
completion Generate the autocompletion script for the specified shell
help Help about any command
init Create a configuration file in the current directory
version Print spike version
view-proxy Show proxy of the server
Flags:
--config string Config file (default is Current dir/spike.yaml) (default "**/spike.yaml")
-h, --help help for spike
-H, --host string Server host (default "127.0.0.1")
-p, --password string Password for the given user (default "admin")
-P, --port int Server port (default 6200)
-u, --username string User for login (default "admin")
Use "spike [command] --help" for more information about a command.
```
## Changelog
查看 [CHANGELOG.md](./CHANGELOG.md)
## License
The MIT license. See [MIT](https://opensource.org/licenses/MIT)