https://github.com/slyautomation/osrs_yolov5
Yolov5 Object Detection In OSRS using Python code, Detecting Cows - Botting
https://github.com/slyautomation/osrs_yolov5
botting cuda machine-learning mlbot osrs pycharm python pytorch runescape yolov5
Last synced: 9 months ago
JSON representation
Yolov5 Object Detection In OSRS using Python code, Detecting Cows - Botting
- Host: GitHub
- URL: https://github.com/slyautomation/osrs_yolov5
- Owner: slyautomation
- Created: 2021-11-15T04:31:05.000Z (over 4 years ago)
- Default Branch: main
- Last Pushed: 2024-01-13T06:21:37.000Z (over 2 years ago)
- Last Synced: 2025-01-30T18:04:38.996Z (over 1 year ago)
- Topics: botting, cuda, machine-learning, mlbot, osrs, pycharm, python, pytorch, runescape, yolov5
- Language: Python
- Homepage:
- Size: 78.7 MB
- Stars: 33
- Watchers: 1
- Forks: 12
- Open Issues: 2
-
Metadata Files:
- Readme: README.md
Awesome Lists containing this project
- awesome-yolo-object-detection - slyautomation/osrs_yolov5 - Botting. (Object Detection Applications)
README
original work created by https://github.com/ultralytics/yolov5
YOLOv5 🚀 is the world's most loved vision AI, representing Ultralytics open-source research into future vision AI methods, incorporating lessons learned and best practices evolved over thousands of hours of research and development.
To request a commercial license please complete the form at Ultralytics Licensing.
# Yolov5 Object Detection In OSRS using Python code, Detecting Cows - Botting
name: GeForce GTX 1060 6GB (average fps 11 on monitor display using screenshots)
```diff
- note: There's issues as at July 2022 with newer gpus namely GeForce RTX 3090 & 2080 with the Pytorch Framework, hopefully in the future these issues can be resolved and a stable release can be made.
```
https://user-images.githubusercontent.com/81003470/148143834-97b237c1-205c-4e95-b2c7-fb16e9938184.mp4
For a video with commentary: https://youtu.be/rqk0kq4Vu3M
Full Video Tutorial: https://youtu.be/pjIEI27DImA
# Quick Start
### installing python
installing python programming language
Pytorch is only compatiable with versions of python 3.7 or earlier, to get a previous version:
https://www.python.org/downloads/windows/
https://www.python.org/downloads/macos/
https://www.python.org/ftp/python/3.7.9/python-3.7.9-amd64.exe

### installing pycharm
installing pycharm pycharm.
Step walkthrough Installation of pycharm: https://github.com/slyautomation/osrs_yolov5/wiki/How-to-Install-Pycharm
### Check your cuda version
type in terminal: ```nvidia-smi```
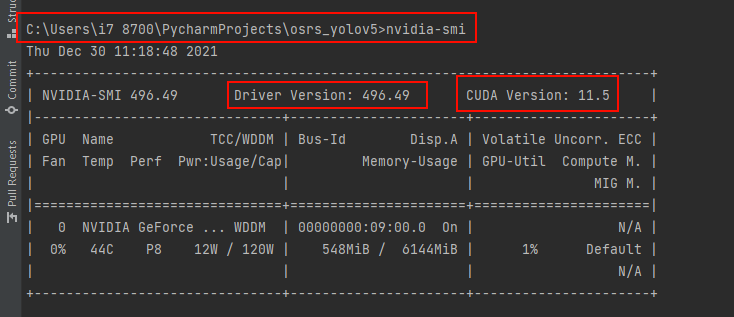
my version that i can use is up to: 11.5 but for simplicity i can use previous versions namely 10.2
Check if your gpu will work: https://developer.nvidia.com/cuda-gpus and use the cuda for your model and the latest cudnn for the cuda version.
full list of cuda versions: https://developer.nvidia.com/cuda-toolkit-archive
cuda 10.2 = https://developer.download.nvidia.com/compute/cuda/10.2/Prod/local_installers/cuda_10.2.89_441.22_win10.exe
### Install Cudnn
cuDNN = https://developer.nvidia.com/rdp/cudnn-archive#a-collapse765-10
Step walkthrough Installation of cuDNN: https://github.com/slyautomation/osrs_yolov5/wiki/How-to-install-CuDNN
### Download and Use LabelImg for creating annotated (object identified bounding boxes) image data
labelImg = https://github.com/heartexlabs/labelImg/releases
Step walkthrough capturing screen images, downloading and using LabelImg: https://github.com/slyautomation/osrs_yolov5/wiki/Downloading-and-using-LabelImg
### Install OCR-Tesseract
OCR-Tesseract:
tesseract-ocr-w32-setup-v5.0.1.20220118.exe (32 bit) and
tesseract-ocr-w64-setup-v5.0.1.20220118.exe (64 bit) resp.
Step walkthrough installing OCR-Tesseract: https://github.com/slyautomation/osrs_yolov5/wiki/How-to-Install-OCR-Tesseract
### Using this Repo
Add this repo to a project in Pycharm
Step walkthrough adding project with Pycharm: https://github.com/slyautomation/osrs_yolov5/wiki/How-to-add-Project-with-Pycharm
### Ensure Project is within venv (virtual environment)
Step walkthrough activating venv: https://github.com/slyautomation/osrs_yolov5/wiki/how-to-ensure-venv-(virtual-environment)-is-active
## Install Module Requirements
in the terminal type:
```pip install -r requirements.txt```

## Check cuda version is compatiable with torch and torchvision
goto website and check version https://download.pytorch.org/whl/torch_stable.html
To take advantage of the gpu and cuda refer to the list for your cuda version search for cu e.g cu102 for cuda 10.2.
use the latest versions found, i at this point in time found: torch 1.9.0 and torchvision 0.10.0 (these 2 module versions so far i have had no issues other versions i get errors when running detect.py)

in the terminal type the torch version + your cuda version (except for torchaudio no cuda version required):
```pip install torch==1.9.0+cu102 torchvision==0.10.0+cu102 torchaudio==0.9.0 -f https://download.pytorch.org/whl/torch_stable.html```
Alternatively use this one:
```pip install --upgrade --force-reinstall torch torchvision torchaudio --index-url https://download.pytorch.org/whl/cu118```
```pip install tensorboard seaborn tqdm matplotlib pandas pyyaml opencv-python```


- `Make sure when installing torchvision it doesn't try to install another version due to incompatability, try to either find a later version of torch or use a downgraded version of torchvision. there could be issues if another torch version is installed but the cuda version doesn't align with your gpu.`
## Test pytorch and cuda work
in the project run main.py, the output should result in the device used as cuda, and the tensor calculations should run without errors:

This will also download the yolov5 weight files:

# Custom training setup with YAML
COCO128 is an example small tutorial dataset composed of the first 128 images in COCO train2017. These same 128 images are used for both training and validation to verify our training pipeline is capable of overfitting. data/coco128.yaml, shown below, is the dataset config file that defines 1) the dataset root directory path and relative paths to train / val / test image directories (or *.txt files with image paths), 2) the number of classes nc and 3) a list of class names:
```
# Train/val/test sets as 1) dir: path/to/imgs, 2) file: path/to/imgs.txt, or 3) list: [path/to/imgs1, path/to/imgs2, ..]
path: ../datasets/coco128 # dataset root dir
train: images/train2017 # train images (relative to 'path') 128 images
val: images/train2017 # val images (relative to 'path') 128 images
test: # test images (optional)
# Classes
nc: 80 # number of classes
names: [ 'person', 'bicycle', 'car', 'motorcycle', 'airplane', 'bus', 'train', 'truck', 'boat', 'traffic light',
'fire hydrant', 'stop sign', 'parking meter', 'bench', 'bird', 'cat', 'dog', 'horse', 'sheep', 'cow',
'elephant', 'bear', 'zebra', 'giraffe', 'backpack', 'umbrella', 'handbag', 'tie', 'suitcase', 'frisbee',
'skis', 'snowboard', 'sports ball', 'kite', 'baseball bat', 'baseball glove', 'skateboard', 'surfboard',
'tennis racket', 'bottle', 'wine glass', 'cup', 'fork', 'knife', 'spoon', 'bowl', 'banana', 'apple',
'sandwich', 'orange', 'broccoli', 'carrot', 'hot dog', 'pizza', 'donut', 'cake', 'chair', 'couch',
'potted plant', 'bed', 'dining table', 'toilet', 'tv', 'laptop', 'mouse', 'remote', 'keyboard', 'cell phone',
'microwave', 'oven', 'toaster', 'sink', 'refrigerator', 'book', 'clock', 'vase', 'scissors', 'teddy bear',
'hair drier', 'toothbrush' ] # class names
```
Copying the method above i have done the same with data/osrs.yaml
```
# parent
# ├── yolov5
# └── datasets
# └── osrs ← downloads here
# └── cow ← add each class
# └── xxx ← add each class
# Train/val/test sets as 1) dir: path/to/imgs, 2) file: path/to/imgs.txt, or 3) list: [path/to/imgs1, path/to/imgs2, ..]
path: ./datasets/osrs # dataset root dir
train: images/ # train images (relative to 'path') 128 images
val: images/ # val images (relative to 'path') 128 images
test: # test images (optional)
# Classes
nc: 1 # number of classes
names: ['cow'] # class names
```
To start using data/osrs.yaml run extract_osrs_zip.py, this will unzip the cow.zip.001, cow.zip.002 and cow.zip.003 files
and will create a folder in datasets osrs ready to train the osrs cow model.
# Training
Epochs. Start with 300 epochs. If this overfits early then you can reduce epochs. If overfitting does not occur after 300 epochs, train longer, i.e. 600, 1200 etc epochs.
Image size. COCO trains at native resolution of --img 640, though due to the high amount of small objects in the dataset it can benefit from training at higher resolutions such as --img 1280. If there are many small objects then custom datasets will benefit from training at native or higher resolution. Best inference results are obtained at the same --img as the training was run at, i.e. if you train at --img 1280 you should also test and detect at --img 1280.
Batch size. Use the largest --batch-size that your hardware allows for. Small batch sizes produce poor batchnorm statistics and should be avoided.
In the terminal type:
For more information and tips on datasets, model selection and training settings refer to: https://github.com/ultralytics/yolov5/wiki/Tips-for-Best-Training-Results
The setting i found useful with a GeForce GTX 1060 6GB gpu are as follows. In the terminal type:
```python train.py --data osrs.yaml --weights yolov5s.pt --img 640```

This will run train.py with the parameters mentioned above.

## Training Finished
Once finished the resulting model best.pt and last.pt will be saved in the folder runs/train/exp

# Detecting
This is where the detecting of objects take place, based on the parameters given, the code will run the default or custom weights and identify objects (inference) in
images, videos, directories, streams, etc.
## Test Dectections
Run a test to ensure all is installed correctly, in the terminal type:
```python detect.py --source data/images/bus.jpg --weights yolov5s.pt --img 640```

This will run the default yolov5s weight file on the bus image and store the results in runs/detect/exp
These are the labels (the first integer is the class index and the rest are coordinates and bounding areas of the object)
```
5 0.502469 0.466204 0.995062 0.547222 # bus
0 0.917284 0.59213 0.162963 0.450926 # person
0 0.17284 0.603241 0.222222 0.469444 # person
0 0.35 0.588889 0.146914 0.424074 # person
```
Here is the resulting image with bounding boxes identifying the bus and people:

## Test Custom Detections (osrs cows model)
Move the trained model located in runs/train/exp to the parent folder (overwrite the previous best.pt):

Let's see the results for osrs cow detection, to test in the terminal type:
``` python detect.py --source data/images/cow_osrs_test.png --weights best.pt --img 640```
The labels results are:
```
0 0.946552 0.362295 0.062069 0.0754098
0 0.398276 0.460656 0.106897 0.140984
0 0.426724 0.572131 0.105172 0.140984
0 0.352586 0.67377 0.122414 0.167213
0 0.310345 0.898361 0.117241 0.190164
0 0.151724 0.411475 0.062069 0.180328
0 0.705172 0.37541 0.0689655 0.127869
0 0.812931 0.319672 0.087931 0.127869
```
And here's the image result:

## Test Custom Detections (osrs cows model) on Monitor Display (screenshots with Pillow ImageGrab)
For a constant stream of the monitor display, in the terminal run:
```python detect.py --source screen --weights 46classes.pt --img 640```
This will run detect.py with the default parameters listed below and can be changed to suit your needs.
```
def run(
weights=ROOT / 'yolov5s.pt', # model path or triton URL
source=ROOT / 'data/images', # file/dir/URL/glob/screen/0(webcam)
data=ROOT / 'data/coco128.yaml', # dataset.yaml path
imgsz=(640, 640), # inference size (height, width)
conf_thres=0.25, # confidence threshold
iou_thres=0.45, # NMS IOU threshold
max_det=1000, # maximum detections per image
device='', # cuda device, i.e. 0 or 0,1,2,3 or cpu
view_img=False, # show results
save_txt=False, # save results to *.txt
save_conf=False, # save confidences in --save-txt labels
save_crop=False, # save cropped prediction boxes
nosave=False, # do not save images/videos
classes=None, # filter by class: --class 0, or --class 0 2 3
agnostic_nms=False, # class-agnostic NMS
augment=False, # augmented inference
visualize=False, # visualize features
update=False, # update all models
project=ROOT / 'runs/detect', # save results to project/name
name='exp', # save results to project/name
exist_ok=False, # existing project/name ok, do not increment
line_thickness=3, # bounding box thickness (pixels)
hide_labels=False, # hide labels
hide_conf=False, # hide confidences
half=False, # use FP16 half-precision inference
dnn=False, # use OpenCV DNN for ONNX inference
vid_stride=1, # video frame-rate stride
attack=False,
window=0,
click_threshold= 0.9,
):
```
To run on the captured screen and view the result add ```--view-img``` to the run script command.
```python detect.py --source screen --weights 46classes.pt --img 640 --view-img```
Adjust the size of the viewing window by adding ```--window size``` and the size (single int) and add to source in double quotes "screen left top right bottom".
```python detect.py --source "screen 0 0 800 800" --weights 46classes.pt --img 640 --view-img --window 800```
To enable mouse clicks and for the computer to click on detected object add ```--attack```
```python detect.py --source "screen 0 0 800 800" --weights 46classes.pt --img 640 --view-img --attack --window 800```
To change what confidence threshhold each mouse click will target to only get the highest confidence for detected objects add ```--click-threshold``` then a float number.
```python detect.py --source "screen 0 0 800 800" --weights 46classes.pt --img 640 --view-img --attack --window 800 --click-threshold 0.8```
## Test Custom Detections (osrs cows model) on Data Capture
To increase the fps (frames per second) and get a better detection rate, i use a hdmi data capture device. This takes a data stream of your monitor displays and sends the data like a webcam, which results in a significant increase in fps compared to taking screenshots of the screen:
In the terminal type:
```python detect.py --source 0 --weights best.pt --img 640```
See below examples on amazon/aliexpress under $20:
-Amazon - $11.07 - Audio Video Capture Cards HDMI to USB 3.0 1080P 4K Record Via DSLR Camcorder Action Cam for High Definition Acquisition, Live Broadcasting
-Aliexpress - $9.90 - 4K Video Capture Card USB 3.0 USB2.0 HDMI-compatible Grabber Recorder for PS4 Game DVD Camcorder Camera Recording Live Streaming

## Retrain using Detections
By default detect.py will not take labels and fullscreen images while the detection is running.
Either change the default settings as mentioned above on detect.py from line 69 to 98 or add to the run script command:
change in the settings save_txt=True, save_crop=True or add the following to the run script:
```--save-txt --save-crop```
These will be saved under runs/detect/exp, full screenshots and labels in labels folder and cropped images in crops folder.

To save labels and images with detect_screenshots.py set save_text and save_crop to True.

Move the txt files (labels) to datasets/osrs/labels or datasets/[name of dataset]/labels.
Move the image files (crops) to datasets/osrs/images or datasets/[name of dataset]/images.

As mentioned above follow the steps for training. This will retrain the object detection model with the detected images potentially increasing the accuracy and effectiveness.
### Troubleshooting
Runtimeerror on Train.py: make sure there is enough hard drive storage space, the models will need approx 20 gbs of space to run smoothly.
RuntimeError on Detect.py: Couldn't load custom C++ ops. This can happen if your PyTorch and torchvision versions are incompatible, or if you had errors while compiling torchvision from source. For further information on the compatible versions, check https://github.com/pytorch/vision#installation for the compatibility matrix. Please check your PyTorch version with torch.__version__ and your torchvision version with torchvision.__version__ and verify if they are compatible and if not please reinstall torchvision so that it matches your PyTorch install.
If the above error occurs install a different version of pytorch and install the compatiable torchvision module. TBA i'll add a list of compatiable versions with this project with my gpu and cuda version.
RuntimeError: The size of tensor a (80) must match the size of tensor b (56) at non-singleton dimension 3.
The weighted file is corrupted, use the following link and replace the weight file: https://github.com/ultralytics/yolov5/releases/download/v5.0/yolov5s.pt