https://github.com/socketmobile/capturesdk_flutter
Flutter CaptureSDK
https://github.com/socketmobile/capturesdk_flutter
Last synced: 5 months ago
JSON representation
Flutter CaptureSDK
- Host: GitHub
- URL: https://github.com/socketmobile/capturesdk_flutter
- Owner: SocketMobile
- License: mit
- Created: 2022-02-18T23:33:53.000Z (over 4 years ago)
- Default Branch: main
- Last Pushed: 2025-02-28T15:40:00.000Z (over 1 year ago)
- Last Synced: 2025-02-28T20:51:56.791Z (over 1 year ago)
- Language: Dart
- Homepage:
- Size: 778 KB
- Stars: 3
- Watchers: 8
- Forks: 1
- Open Issues: 6
-
Metadata Files:
- Readme: README.md
- Changelog: CHANGELOG.md
- License: LICENSE
Awesome Lists containing this project
README
# Flutter CaptureSDK - Version 1.5.60
This is the Flutter CatureSDK for Socket Mobile's Capture library.
## Devices compatibility and CaptureSDK versions
| Devices | <= 1.2 | 1.3 | 1.4 | 1.5 |
| :--------------------------------------------: | :----: | :-: | :-----: | :-----: |
| **SocketCam C860** | ❌ | ❌ | ✅ | ✅ |
| **SocketCam C820** | ❌ | ❌ | ✅ | ✅ |
| **S720/D720/S820** | ❌ | ✅ | ✅ | ✅ |
| **D600, S550, and all other barcode scanners** | ✅ | ✅ | ✅ | ✅ |
| **S370** | ❌ | ❌ | ✅ | ✅ |
| **DW930/XS930 and DW940/XS940** | ❌ | ❌ | ❌ | ✅ |
| **S320** | ❌ | ❌ | ❌ | ✅ |
## Installation
Install the flutter package by adding the following to your `pubspec.yaml` file.
```dart
dependencies:
...
capturesdk_flutter: ^1.5.60
...
```
Then, in your application's `main.dart`, you can import the Flutter CaptureSDK by adding this line to the top of your file.
```dart
import 'package:capturesdk_flutter/capturesdk.dart';
```
For the rest of the things to add in your project, go to **[iOS](#getting-started-ios)** and **[Android](#getting-started-android)**.
## Getting started iOS (first section) - Important note
You will need to change three things in your app in order for it to work with iOS. First will need to update the `Podfile` in the `ios` directory of your app in order to be compatible with the version used in our SDK and the source of our iOS CaptureSDK Cocoapods private repository.
```ruby
source 'https://github.com/CocoaPods/Specs.git'
platform :ios, '13.0' # minimum target requirement for CaptureSDK iOS
target 'MyProject' do
....
end
```
## Getting started
Create a `Capture` instance with the line `Capture capture = Capture(logger);`. `logger` is an optional argument that is passed to `Capture` and can be helpful with tracing values and requests throughout the app, particularly in `Capture` and `HttpTransport` where the bulk of the Capture logic and requests are handled.
Open the connection wth the Capture library by using the `open` method on the `Capture` instance. See below.
```dart
int? response = await capture.openClient(appInfo, _onCaptureEvent);
stat = 'handle: $response';
mess = 'capture open success';
```
`appInfo` is an instance of the `AppInfo` class and consists of the same parameters found in other CaptureSDKs. See an example of `appInfo` below.
```dart
final appInfo = AppInfo(
'android:com.example.example',
'MC4CFQDNCtjazxILEh8oyT6w/wlaVKqS1gIVAKTz2W6TB9EgmjS1buy0A+3j7nX4',
'ios:com.example.example',
'MC0CFA1nzK67TLNmSw/QKFUIiedulUUcAhUAzT6EOvRwiZT+h4qyjEZo9oc0ONM=',
'bb57d8e1-f911-47ba-b510-693be162686a');
```
To generate app info, head to the [docs](https://www.socketmobile.com/developers/portal/application-details/appkey-registration) and follow the prompts to register your app and generate your `appInfo` credentials. See the important section at the end of the README for more information specific to Flutter.
Next, `_onCaptureEvent` is the callback passed to `open` that can handle the event notifications from the CaptureSDK. Below are three important events to consider, which are accessible in the `CaptureEventIds` class.
`deviceArrival` is the event that is triggered when the scanner connects to your device.
`deviceRemoval` is the event that is triggered when the scanner is disconnected from the device.
`decodedData` is the event that is triggered when you scan something with the connected scanner.
See an example of event handling below in `_onCaptureEvent`.
```dart
_onCaptureEvent(e, handle) {
if (e == null) {
return;
} else if (e.runtimeType == CaptureException) {
_updateVals("${e.code}", e.message, e.method, e.details);
return;
}
logger.log('onCaptureEvent from: ', '$handle');
switch (e.id) {
case CaptureEventIds.deviceArrival:
Capture deviceCapture = Capture(logger);
setState(() {
_deviceCapture = deviceCapture;
});
_openDeviceHelper(deviceCapture, e);
break;
case CaptureEventIds.deviceRemoval:
_closeDeviceHelper(e, handle);
break;
case CaptureEventIds.decodedData:
setState(() {
/// storing scanned data in state for future use
_currentScan = e;
});
_updateVals('Decoded Data', "Successful scan!");
break;
}
}
```
The data the user will need to anticipate will be a `CaptureEvent` which might contain an instance of `DecodedData`, `CaptureException`, a client or device handle, etc. When you first connect to the service, the response will be a client handle (an integer) or a `CaptureException` instance will be thrown.
It's important to create another `Capture` instance when you have successfully connected the scanner to your device (see `var newCapture = Capture(logger);`). This capture instance is tied to your device and will allow the root capture instance to remain open, regardless of what happens with your device. The new instance allows you to create a capture connection to the device to handle various actions specific to the connected device, such as `getProperty` and `setProperty`.
`getProperty` enables you to retrieve specific values for the connected device, such as `friendlyNameDevice` which is the property corresponding to the scanners given name (as opposed to id/guid). Create a property instance with the provided values corresponding to the property id and type, as well an empty object. You can retrieve the friendly name of a device with the following request.
```dart
Future _handleGetNameProperty() async {
CaptureProperty property = CaptureProperty(
CapturePropertyIds.friendlyNameDevice,
CapturePropertyTypes.none,
{});
try {
CaptureProperty propertyResponse =
await _deviceCapture!.getProperty(property);
print('Successfully Retrieved "name" property for device: ${propertyResponse.value}';);
//can incorporate UI logic to update device in device list
} on CaptureException catch (e) {
print(e.code);
}
}
```
`setProperty` allows you to update the value of a specific property. The `CaptureProperty` instance you provide is similar to the one in `getProperty` but instead of an empty object for the value, you will send the value you want assigned to the property. You will also send the data type for the property as well instead of `CapturePropertyTypes().none`. In the case of `friendlyNameDevice`, you would send a string value with the type `CapturePropertyTypes().string`. See below.
```dart
Future _handleSetNameProperty() async {
CaptureProperty property = CaptureProperty(
CapturePropertyIds.friendlyNameDevice,
CapturePropertyTypes.string,
_newName);
try {
CaptureProperty propertyResponse =
await _deviceCapture!.setProperty(property);
print('Successfully set "name" property to "$_newName".');
//can incorporate UI logic to update device in device list
} on CaptureException catch (e) {
print(e.code);
}
}
```
The response in `setProperty` does not contain a `value` property. You can access the updated value by calling the `getProperty` request after a successful `setProperty` call or you can use the locally stored value that you're using for assignment.
## Getting started iOS
You will need to change three things in your app in order for it to work with iOS. First will need to update the `Podfile` in the `ios` directory of your app in order to be compatible with the version used in our SDK and the source of our iOS CaptureSDK Cocoapods private repository.
```ruby
source 'https://github.com/CocoaPods/Specs.git'
platform :ios, '13.0'
target 'MyProject' do
....
end
```
Second, go to `ios/Runner/Info.plist` and at the bottom, just above ``, include the below code.
```plist
NSBluetoothAlwaysUsageDescription
Bluetooth is needed to connect to a Socket Mobile device
UISupportedExternalAccessoryProtocols
com.socketmobile.chs
NSCameraUsageDescription
Need to enable camera access for SocketCam
LSApplicationQueriesSchemes
sktcompanion
```
For SocketCam C860 which is an enhanced version of SocketCam C820, you also need to add the following key to your `Info.plist`: **LSApplicationQueriesSchemes** (*Queried URL Schemes*) with a new item: **sktcompanion** (in lower case).
In order to use it you have to install [Socket Mobile Companion](https://apps.apple.com/app/socket-mobile-companion/id1175638950) on your device.
You can find more details about SocketCam C860 [on our website](https://www.socketmobile.com/readers-accessories/data-readers/camera-based-socketcam).
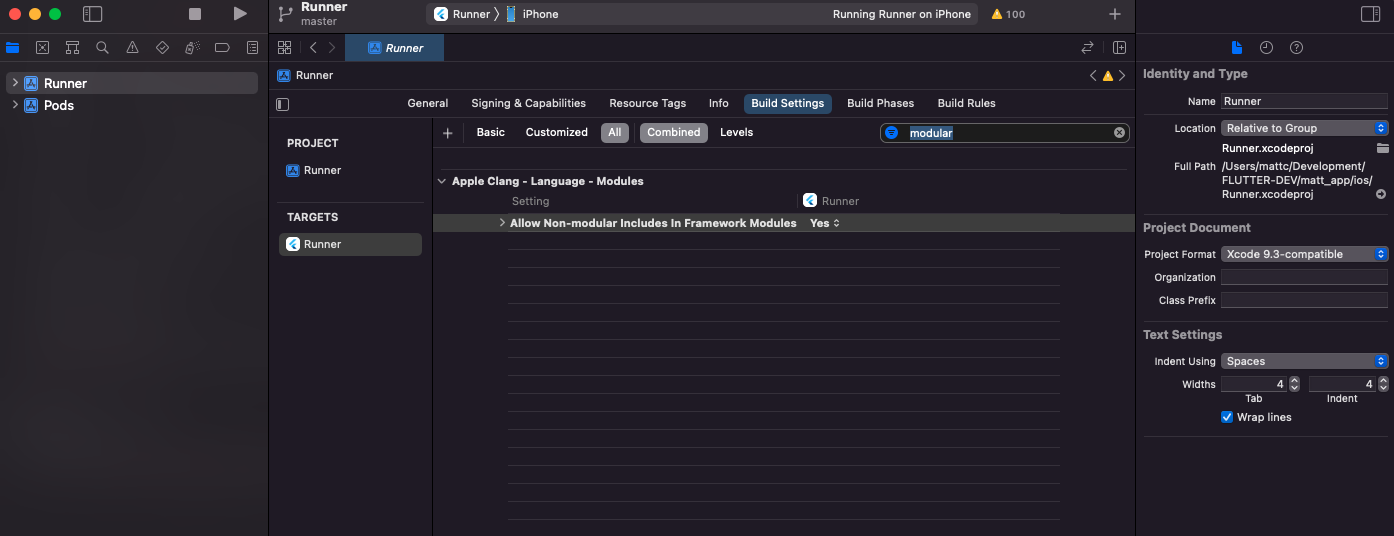
Third, open the project's iOS directory in xcode. Once you've done that, select the Runner and navigate to the build settings. In the search bar, type in 'module' and then look for the portion that says "Allow Non-modular includes in Framework Modules". Once that property is location, select "Yes". See the image below for what it should look like.
## Getting started Android
You will need to update the network configuration to enable the Android Capture client. You can find out more about network configuration [here](https://docs.socketmobile.dev/capture/java/en/latest/android/getting-started.html).
In order to pass the internet permissions, you need to have the below line in your Android manifest.
```xml
```
In order to use SocketCam C820, you will need to add the below to your Android manifest.
```xml
```
Where it says `YOUR_APP_KEY`, you need to include the android app key that you got for your app when you registered it. Where it says `YOUR_DEVELOPER_ID` is the developer ID you use for your socket mobile developer portal.
ALSO: The package name in `AndroidManifest.xml`, it needs to be both all lowercase and must match your Bundle ID that you have in your app's registration information in your dev portal.
```xml
```
In the `MainActivity.java` file, register the CaptureSDK as a plugin:
```java
package com.example.example; // Replace with your app's package name
import com.capturesdk_flutter.CaptureModule; // import CaptureModule Native Modules
import io.flutter.embedding.android.FlutterActivity;
import io.flutter.embedding.engine.FlutterEngine;
public class MainActivity extends FlutterActivity {
@Override
public void configureFlutterEngine(FlutterEngine flutterEngine) {
flutterEngine.getPlugins().add(new CaptureModule(getApplicationContext())); // register CaptureSDK as a plugin here
}
}
```
In your app's `builde.gradle` file add the 2 following options:
```java
buildTypes {
release {
minifyEnabled false <------- to add
shrinkResources false <------- to add
signingConfig = signingConfigs.debug
}
}
```
## Enable Start Capture Service on Android
You might also have to add the file `network_security_config.xml` file to `android/app/src/main/res/xml` in order to avoid a `clearText` permissions error. See the code below for the file.
```xml
localhost
127.0.0.1
```
Then, in their app's `AndroidManifest.xml` file, the developer will need to add the below property into the `` tag.
```xml
android:networkSecurityConfig="@xml/network_security_config"
```
Finally, add the below line into just before the `AndroidManifest.xml` file's closing `` tag.
```xml
```
For more on the network security configuration for Android, please check out the cleartext section in [the Android docs](https://docs.socketmobile.dev/capture/java/en/latest/android/getting-started.html#enable-cleartext-traffic).
## Important
To register your app for Flutter, you can select the Flutter language first, and then you can pick one of two platform options; Android and iOS. Below is an example of credentials generated during iOS registration.
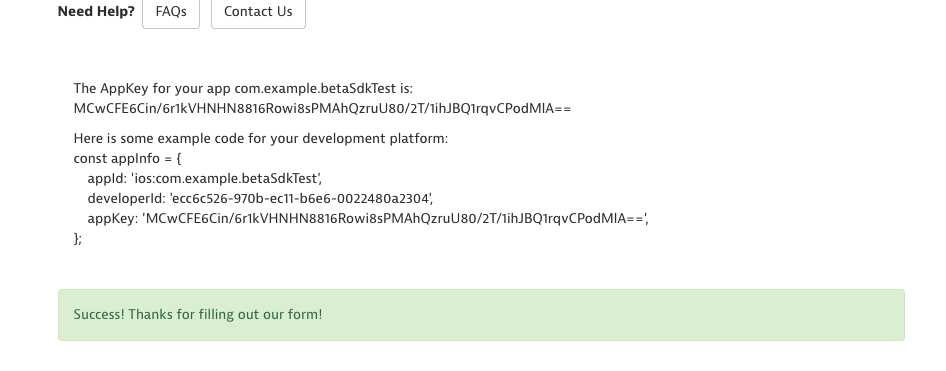
If you want to add support for both platforms you will need to generate an app key for one platform first and then the other separately. Once these two keys are generated, all you need to do is inlcude the iOS and Android appKey and appId, respectively, to the same `AppInfo` instance.
```dart
final appInfo = AppInfo(
'android:com.example.example',
'MC4CFQDNCtjazxILEh8oyT6w/wlaVKqS1gIVAKTz2W6TB9EgmjS1buy0A+3j7nX4',
'ios:com.example.example',
'MC0CFA1nzK67TLNmSw/QKFUIiedulUUcAhUAzT6EOvRwiZT+h4qyjEZo9oc0ONM=',
'bb57d8e1-f911-47ba-b510-693be162686a');
```
In order for it to work, you will need to add five argments to `AppInfo` in the following order:
1. Android appId
2. AppKey after Android registration
3. iOS appId
4. AppKey after iOS registration
5. Developer ID
For more information about the Flutter CaptureSDK, please visit the [documentation](https://docs.socketmobile.dev/captureflutter/en/latest).
For a full demonstration, check out [this video](https://vimeo.com/694611104).
## Environment Information
Run `flutter doctor -v` to see your environment tools. Here's what you need:
Visual Studio Code with Flutter extension
Flutter SDK v3.0.0 and Dart v3.0.0 minimum
DevTools v2.31.1 with Chrome as optional
Xcode 15
Android Studio
To make sure everything is installed, you can also run `flutter upgrade`. This will upgrade the Flutter SDK and the tools for Android and iOS if needed.
## Build & Run Instructions
1. `cd example`
2. Run `flutter pub get`
Then you can run the app through Android Studio and Xcode or through Visual Studio Code directly with the debugger module. See this page for more details: [https://docs.flutter.dev/tools/vs-code#running-and-debugging](https://docs.flutter.dev/tools/vs-code#running-and-debugging).
### Android
3. `cd android`
4. Run `flutter run` or open the project in Android Studio to run on connected iOS device.
### iOS
3. `cd ios`
4. Run `pod install --repo-update`
5. Run `flutter run` or open the project in Xcode to run on connected iOS device.