https://github.com/sqmax/springboot-project
这是一个用SpringBoot+JPA打造的基于微信服务号平台的点餐系统的后端,前端是一个使用Vue.js构建的运行于微信公众号的WebApp。前后端完全分离,前后端之间通过RESTful风格的接口相连。
https://github.com/sqmax/springboot-project
redis spring-boot spring-data-jpa websocket wechat wechat-pay
Last synced: 9 months ago
JSON representation
这是一个用SpringBoot+JPA打造的基于微信服务号平台的点餐系统的后端,前端是一个使用Vue.js构建的运行于微信公众号的WebApp。前后端完全分离,前后端之间通过RESTful风格的接口相连。
- Host: GitHub
- URL: https://github.com/sqmax/springboot-project
- Owner: sqmax
- Created: 2018-04-07T15:09:05.000Z (almost 8 years ago)
- Default Branch: master
- Last Pushed: 2019-05-21T08:01:31.000Z (over 6 years ago)
- Last Synced: 2025-04-08T14:11:12.409Z (10 months ago)
- Topics: redis, spring-boot, spring-data-jpa, websocket, wechat, wechat-pay
- Language: Java
- Homepage: http://www.sqmax.top/springboot-project/
- Size: 1.34 MB
- Stars: 1,471
- Watchers: 80
- Forks: 625
- Open Issues: 12
-
Metadata Files:
- Readme: README.md
Awesome Lists containing this project
- Awesome-GitHub-Repo - springboot-project - 基于微信服务号平台的点餐系统,前后端完全分离。[<img src="https://tva1.sinaimg.cn/large/008i3skNly1gxlhtmg11mj305k05k746.jpg" alt="微信" width="18px" height="18px" />](https://mp.weixin.qq.com/s?__biz=MzUxNjg4NDEzNA%3D%3D&chksm=f9a2260eced5af18b68238a82d54f1733d1d02b3f3ea2a018d880415ade8827ef8a65407af8e&idx=1&mid=2247497159&scene=21&sn=16a7d87fc81ce88672f8d0c2993c1d56#wechat_redirect) (实战项目 / 前后端分离项目)
README
基于SpringBoot的微信点餐系统
* 项目整体介绍。[http://www.sqmax.top/springboot-project/](http://www.sqmax.top/springboot-project/)
* 项目中涉及的知识细节及难点以博客的形式整理在Wiki里。[Wiki](https://github.com/sqmax/springboot-project/wiki)
## 运行环境:
1. MySQL。可以下载这个在线安装器:[https://dev.mysql.com/downloads/windows/installer/8.0.html](https://dev.mysql.com/downloads/windows/installer/8.0.html),安装MySQL社区版。
2. Redis。下载地址:[https://github.com/servicestack/redis-windows/tree/master/downloads](https://github.com/servicestack/redis-windows/tree/master/downloads),下载最新版redis-latest.zip,解压即可。可以在解压后的根目录下看到redis-server.exe文件,双击即可启动redis服务器。
3. Nginx。下载地址:[http://nginx.org/en/download.html](http://nginx.org/en/download.html)。下载的zip压缩包,解压后根目录下有nginx.exe文件,双击即可启动nginx服务器。
4. IDEA。下载地址:[https://www.jetbrains.com/idea/download/#section=windows](https://www.jetbrains.com/idea/download/#section=windows)
4. JDK1.8+、maven、IDEA。
>注:IDEA不要下载Community版,下载Ultimate版。
MySQL数据库我用的是5.7.21的版本,本项目的建表语句好像不兼容5.6的版本,建议也装5.7以上的版本。
推荐一个比较好用的MySQL客户端:[Navicat for MySQL](https://www.navicat.com/en/download/navicat-for-mysql)。
Redis客户端图形界面:[Redis Desktop Manager](https://redisdesktop.com/download)。Maven远程仓库最好改为阿里云仓库,网上有介绍修改方式,很简单。
## 运行方式:
1. 使用命令`git clone https://github.com/sqmax/springboot-project.git`将项目克隆到本地。
2. 将项目导入IDEA。在IDEA里,File->open...,然后选择项目文件夹(springboot-project)。如果是初次使用spring boot,这个过程可能会有点久,需要下载许多依赖的jar包。
4. 为IDEA安装lombok插件。在IDEA里,File->Settings...->Plugin,搜索lombok,安装。项目wiki介绍日志时有提到为什么安装这个插件。
3. 项目的配置文件在resources目录下,application.yml文件。修改MySQL数据库连接信息。我的数据库账号密码分别为root,123456,改为你的即可。
4. 在MySQL数据库终端运行建表语句的sql脚本(或者使用刚下载的Navicat for MySQL图形化工具),本项目的建表语句为项目根路径下的sqmax.sql
5. 启动redis。在刚才解压的Redis根目录下,双击redis-server.exe即可运行redis服务。
6. 最后就可以启动项目了。在IDEA里以Spring Boot的方式运行SellApplication这个主类。可以看到这和我们传统的web项目启动的方式不一样,我们没有配置tomcat等之类的服务器,因为Spring Boot已将服务器引入起步依赖中了。
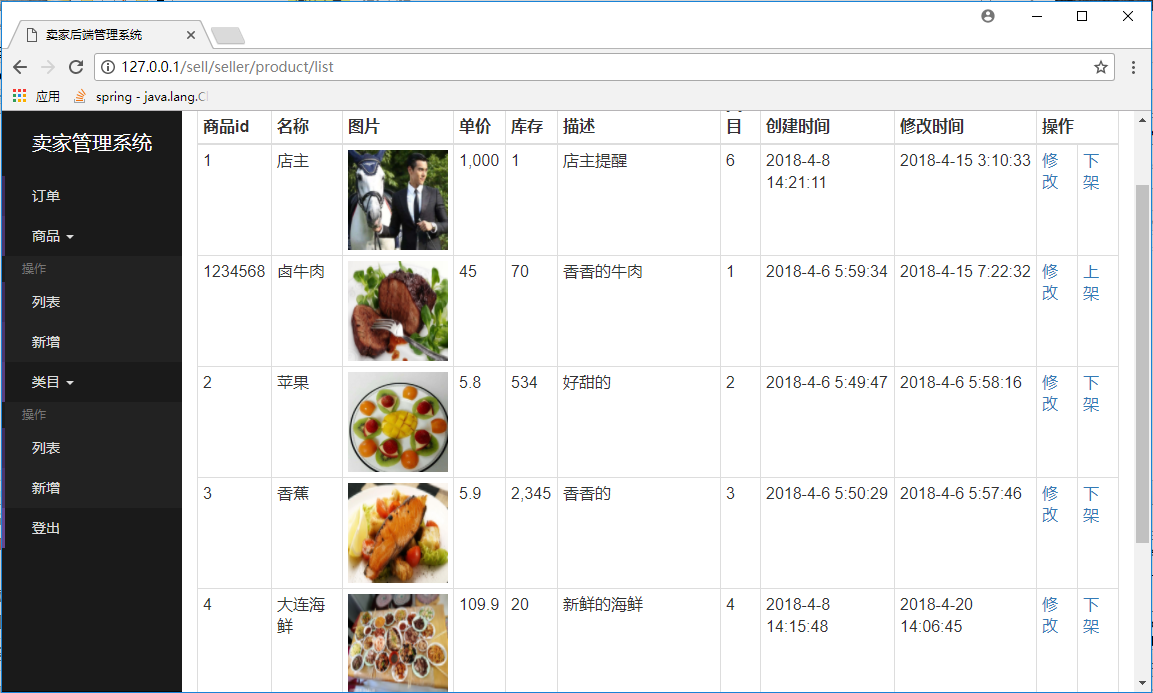
7. 经过以上步骤,我们的项目应该已经可以启动起来了。访问:`http://127.0.0.1:8080/sell/seller/product/list`,即可来到我们的卖家端的商家管理系统界面。效果如下:

## 访问买家的前端界面
1. 项目的前后端是完全分离的,买家端前端的代码在另一个仓库,使用`git clone https://github.com/sqmax/vuejs-project.git`下载前端项目,其中项目根路径(vuejs-project)下的dist目录就是前端编译后的代码。
2. 修改nginx的配置文件,让nginx可以找到前端代码。在nginx根目录下的conf目录下有一个nginx.conf文件,它就是我们要修改的配置文件,其中有下面一段:
```xml
server {
listen 80;
server_name localhost;
#charset koi8-r;
#access_log logs/host.access.log main;
location / {
root F:\vuejs-project\dist; #前端资源路径
index index.html index.htm;
}
location /sell/ {
proxy_pass http://127.0.0.1:8080/sell/;
}
```
上面的`F:\vuejs-project\dist;`该为你刚才git clone下的前端项目的dist目录。
4. 双击nginx.exe启动nginx服务器,如果已启动过,命令行进入nginx的根目录,输入`nginx -s reload`重启nginx服务器。
5. 浏览器访问:`http://127.0.0.1/#/order/`,这是会出现空白界面,按F2打开浏览器的开发者工具,在浏览器的控制台输入`document.cookie='openid=abc123'`
向该域名下添加cookie。再次访问:`http://127.0.0.1`,这时就可以访问到前端界面了。如下:

6. 对于手机端微信公众号内访问,还要使用到内网穿透工具,由于微信里不能直接访问ip地址,还要购买域名,还涉及到挺复杂的微信调试。这里就不再介绍。可以使用postman这个工具模拟微信点餐下单。访问接口参见controller包下以Buyer开头的类。
7. 如果想查看微信端的访问效果,可以在微信客户端访问这个链接:`http://sell.springboot.cn/`。(注意这是师兄上线的项目演示)
如果使用电脑访问的话,可以首先访问:[http://sell.springboot.cn/#/order/](http://sell.springboot.cn/#/order/);
然后,按`F12`打开浏览器的开发者工具,点击控制台,在控制台输入:`document.cookie='openid=abc123'`;
然后重新访问:[http://sell.springboot.cn](http://sell.springboot.cn),就可以看到前端效果了。
>关于IDEA。对于使用Eclipse的伙伴,可以尝试一下IDEA。我做这个项目也是第一次使用IDEA,感觉非常智能好用,可以参见一下这个仓库:[https://github.com/judasn/IntelliJ-IDEA-Tutorial](https://github.com/judasn/IntelliJ-IDEA-Tutorial),非常好的IDEA使用教程。
>关于前端。前端的vue.js项目,我也没有学习,我只是拿来做演示,有兴趣的可以到慕课网学习。
## 慕课网地址:
>[Spring Boot 企业微信点餐系统](https://coding.imooc.com/learn/list/117.html)
>[Vue.js 2.5 + cube-ui 重构饿了么 App](https://coding.imooc.com/class/74.html)