https://github.com/stefandeveloper/heidgaf
heiDGAF - a machine learning based DNS analyzer to detect DGAs
https://github.com/stefandeveloper/heidgaf
cybersecurity dga dns machine-learning network-analysis
Last synced: 3 months ago
JSON representation
heiDGAF - a machine learning based DNS analyzer to detect DGAs
- Host: GitHub
- URL: https://github.com/stefandeveloper/heidgaf
- Owner: stefanDeveloper
- License: eupl-1.2
- Created: 2023-07-03T13:46:26.000Z (about 3 years ago)
- Default Branch: main
- Last Pushed: 2024-04-11T12:06:31.000Z (over 2 years ago)
- Last Synced: 2024-04-11T13:31:14.015Z (over 2 years ago)
- Topics: cybersecurity, dga, dns, machine-learning, network-analysis
- Language: Jupyter Notebook
- Homepage: https://heidgaf.readthedocs.io
- Size: 1.75 MB
- Stars: 1
- Watchers: 2
- Forks: 0
- Open Issues: 0
-
Metadata Files:
- Readme: README.md
- License: LICENSE
Awesome Lists containing this project
README
[![Codecov Coverage][coverage-shield]][coverage-url]
[![Contributors][contributors-shield]][contributors-url]
[![Forks][forks-shield]][forks-url]
[![Stargazers][stars-shield]][stars-url]
[![Issues][issues-shield]][issues-url]
[![EUPL License][license-shield]][license-url]

heiDGAF - Domain Generation Algorithms Finder
Machine learning-based DNS classifier for detecting Domain Generation Algorithms (DGAs), tunneling, and data exfiltration by malicious actors.
Explore the docs »
Report Bug
·
Request Feature
> [!CAUTION]
> This project has been moved to https://github.com/Hamstring-NDR/hamstring. Future development, issues, and releases will be maintained there.
Continuous Integration


## About the Project
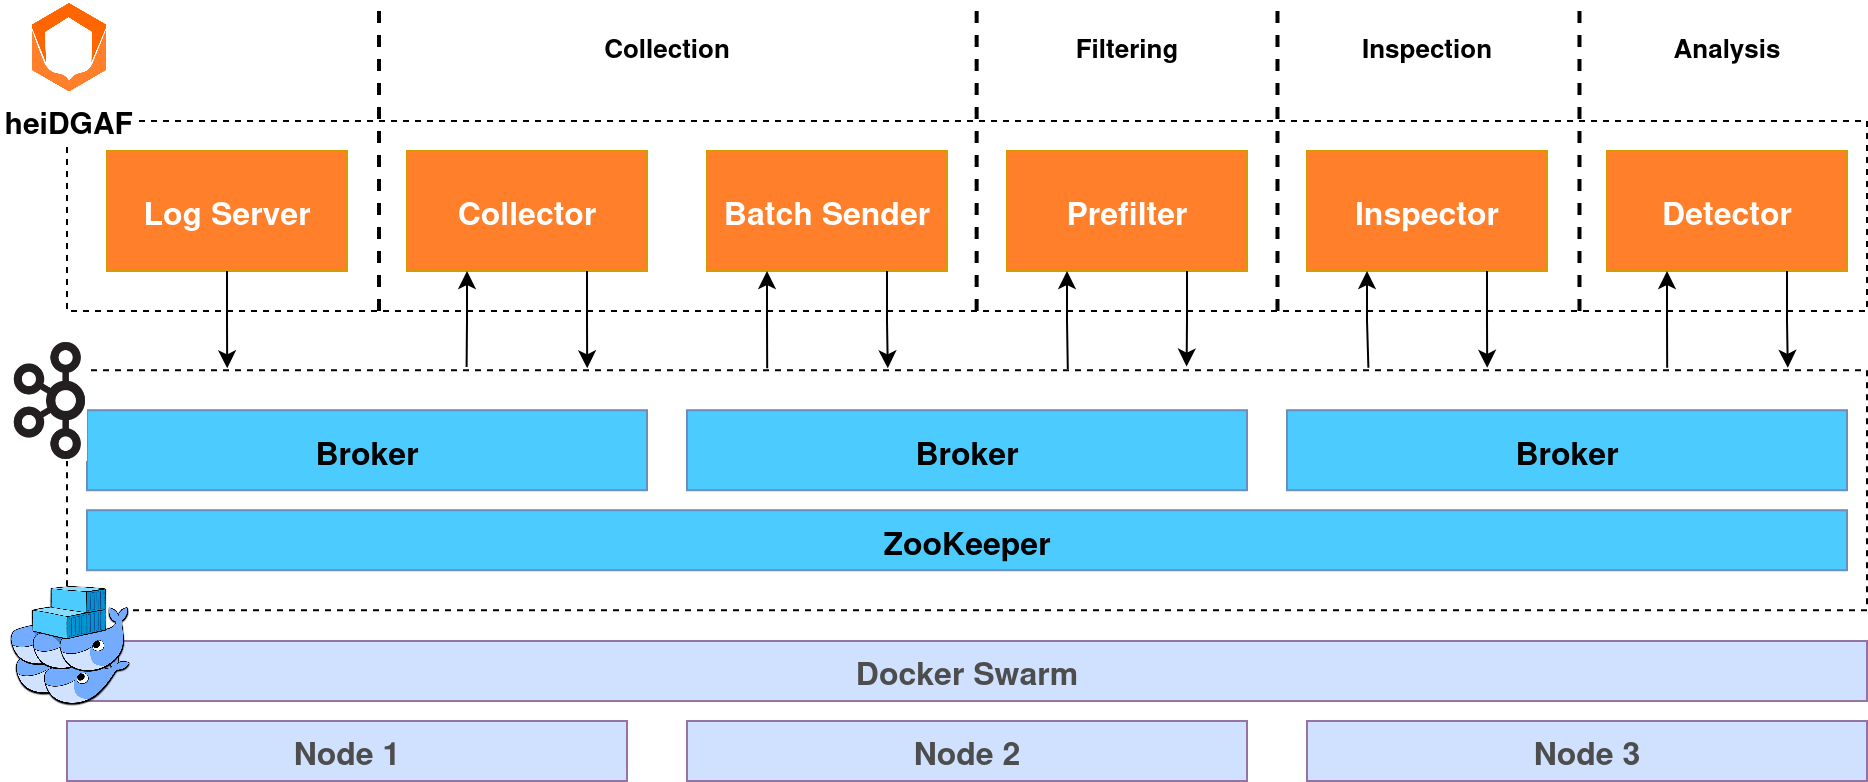
## Getting Started
#### Run **heiDGAF** using Docker Compose:
```sh
HOST_IP=127.0.0.1 docker compose -f docker/docker-compose.yml up
```
#### Or run the modules locally on your machine:
```sh
python -m venv .venv
source .venv/bin/activate
sh install_requirements.sh
```
Alternatively, you can use `pip install` and enter all needed requirements individually with `-r requirements.*.txt`.
Now, you can start each stage, e.g. the inspector:
```sh
python src/inspector/inspector.py
```
## Usage
### Configuration
To configure **heiDGAF** according to your needs, use the provided `config.yaml`.
The most relevant settings are related to your specific log line format, the model you want to use, and
possibly infrastructure.
The section `pipeline.log_collection.collector.logline_format` has to be adjusted to reflect your specific input log
line format. Using our adjustable and flexible log line configuration, you can rename, reorder and fully configure each
field of a valid log line. Freely define timestamps, RegEx patterns, lists, and IP addresses. For example, your
configuration might look as follows:
```yml
- [ "timestamp", Timestamp, "%Y-%m-%dT%H:%M:%S.%fZ" ]
- [ "status_code", ListItem, [ "NOERROR", "NXDOMAIN" ], [ "NXDOMAIN" ] ]
- [ "client_ip", IpAddress ]
- [ "dns_server_ip", IpAddress ]
- [ "domain_name", RegEx, '^(?=.{1,253}$)((?!-)[A-Za-z0-9-]{1,63}(?
Overview dashboard
Contains the most relevant information on the system's runtime behavior, its efficiency and its effectivity.

Latencies dashboard
Presents any information on latencies, including comparisons between the modules and more detailed,
stand-alone metrics.

Log Volumes dashboard
Presents any information on the fill levels of each module, i.e. the number of entries that are currently in the
module for processing. Includes comparisons between the modules, more detailed, stand-alone metrics, as well as
total numbers of logs entering the pipeline or being marked as fully processed.

Alerts dashboard
Presents details on the number of logs detected as malicious including IP addresses responsible for those alerts.

Dataset dashboard
This dashboard is only active for the **_datatest_** mode. Users who want to test their own models can use this mode
for inspecting confusion matrices on testing data.
> This feature is in a very early development stage.

## Models and Training
To train and test our and possibly your own models, we currently rely on the following datasets:
- [CICBellDNS2021](https://www.unb.ca/cic/datasets/dns-2021.html)
- [DGTA Benchmark](https://data.mendeley.com/datasets/2wzf9bz7xr/1)
- [DNS Tunneling Queries for Binary Classification](https://data.mendeley.com/datasets/mzn9hvdcxg/1)
- [UMUDGA - University of Murcia Domain Generation Algorithm Dataset](https://data.mendeley.com/datasets/y8ph45msv8/1)
- [DGArchive](https://dgarchive.caad.fkie.fraunhofer.de/)
We compute all features separately and only rely on the `domain` and `class` for binary classification.
### Inserting Data for Testing
For testing purposes, we provide multiple scripts in the `scripts` directory. Use `real_logs.dev.py` to send data from
the datasets into the pipeline. After downloading the dataset and storing it under `/data`, run
```sh
python scripts/real_logs.dev.py
```
to start continuously inserting dataset traffic.
### Training Your Own Models
> [!IMPORTANT]
> This is only a brief wrap-up of a custom training process.
> We highly encourage you to have a look at the [documentation](https://heidgaf.readthedocs.io/en/latest/training.html)
> for a full description and explanation of the configuration parameters.
We feature two trained models:
1. XGBoost (`src/train/model.py#XGBoostModel`) and
2. RandomForest (`src/train/model.py#RandomForestModel`).
After installing the requirements, use `src/train/train.py`:
```sh
> python -m venv .venv
> source .venv/bin/activate
> pip install -r requirements/requirements.train.txt
> python src/train/train.py
Usage: train.py [OPTIONS] COMMAND [ARGS]...
Options:
-h, --help Show this message and exit.
Commands:
explain
test
train
```
Setting up the [dataset directories](#insert-test-data) (and adding the code for your model class if applicable) lets you start
the training process by running the following commands:
#### Model Training
```sh
> python src/train/train.py train --dataset --dataset_path --model
```
The results will be saved per default to `./results`, if not configured otherwise.
#### Model Tests
```sh
> python src/train/train.py test --dataset --dataset_path --model --model_path
```
#### Model Explain
```sh
> python src/train/train.py explain --dataset --dataset_path --model --model_path
```
This will create a `rules.txt` file containing the innards of the model, explaining the rules it created.
## Contributing
Contributions are what make the open source community such an amazing place to learn, inspire, and create. Any
contributions you make are **greatly appreciated**.
If you have a suggestion that would make this better, please fork the repo and create a pull request. You can also
simply open an issue with the tag "enhancement".
Don't forget to give the project a star! Thanks again!
### Top contributors:

## License
Distributed under the EUPL License. See `LICENSE.txt` for more information.
[contributors-shield]: https://img.shields.io/github/contributors/stefanDeveloper/heiDGAF.svg?style=for-the-badge
[contributors-url]: https://github.com/stefanDeveloper/heiDGAF/graphs/contributors
[forks-shield]: https://img.shields.io/github/forks/stefanDeveloper/heiDGAF.svg?style=for-the-badge
[forks-url]: https://github.com/stefanDeveloper/heiDGAF/network/members
[stars-shield]: https://img.shields.io/github/stars/stefanDeveloper/heiDGAF.svg?style=for-the-badge
[stars-url]: https://github.com/stefanDeveloper/heiDGAF/stargazers
[issues-shield]: https://img.shields.io/github/issues/stefanDeveloper/heiDGAF.svg?style=for-the-badge
[issues-url]: https://github.com/stefanDeveloper/heiDGAF/issues
[license-shield]: https://img.shields.io/github/license/stefanDeveloper/heiDGAF.svg?style=for-the-badge
[license-url]: https://github.com/stefanDeveloper/heiDGAF/blob/master/LICENSE.txt
[coverage-shield]: https://img.shields.io/codecov/c/github/stefanDeveloper/heiDGAF?style=for-the-badge
[coverage-url]: https://app.codecov.io/github/stefanDeveloper/heiDGAF