https://github.com/stockbal/flp-systeminfo-plugin
Fiori LP Plugin for displaying Logon information and switching client/language
https://github.com/stockbal/flp-systeminfo-plugin
fiori launchpad plugin ui5
Last synced: 3 months ago
JSON representation
Fiori LP Plugin for displaying Logon information and switching client/language
- Host: GitHub
- URL: https://github.com/stockbal/flp-systeminfo-plugin
- Owner: stockbal
- License: mit
- Created: 2020-12-08T14:49:26.000Z (over 4 years ago)
- Default Branch: main
- Last Pushed: 2021-06-28T08:43:41.000Z (about 4 years ago)
- Last Synced: 2025-02-13T08:54:02.962Z (5 months ago)
- Topics: fiori, launchpad, plugin, ui5
- Language: JavaScript
- Homepage:
- Size: 520 KB
- Stars: 0
- Watchers: 3
- Forks: 0
- Open Issues: 0
-
Metadata Files:
- Readme: README.md
- License: LICENSE
Awesome Lists containing this project
README
# flp-systeminfo-plugin
Fiori Launchpad Plugin for
- displaying ABAP system info
- changing language
- via Dropdown of all installed languages in the system (works only if the SICF service /sap/bc/adt is active and user has authority to use it)
- from(to) German to(from) English
- changing the client
- via Dropdown of all available clients in the system (works only if the SICF service /sap/bc/adt is active and user has authority to use it)
- or via direkt input via Popup input dialog (if above service is not active)
## Development setup
### Node setup
1) Install all node dependencies
```
$ npm i
```
2) Create `.env`-file for testing/deployment
```env
# variables for Proxy
PROXY_AUTH_USER=
PROXY_AUTH_PASS=
PROXY_TARGET=
# variables for ABAP Deployment
UI5_TASK_NWABAP_DEPLOYER__USER=
UI5_TASK_NWABAP_DEPLOYER__PASSWORD=
UI5_TASK_NWABAP_DEPLOYER__SERVER=
UI5_TASK_NWABAP_DEPLOYER__CLIENT=
UI5_TASK_NWABAP_DEPLOYER__TKORRNO=
# UI5 Library paths
SAPUI5_RESOURCES=/resources
SAPUI5_TEST_RESOURCES=/test-resources
```
### Testing
```
$ npm run start
```
### Deployment to ABAP System
```
$ npm run deploy
```
## Manual deployment of Releases
1) Download the `dist.zip` file of a release and extract its contents to a folder
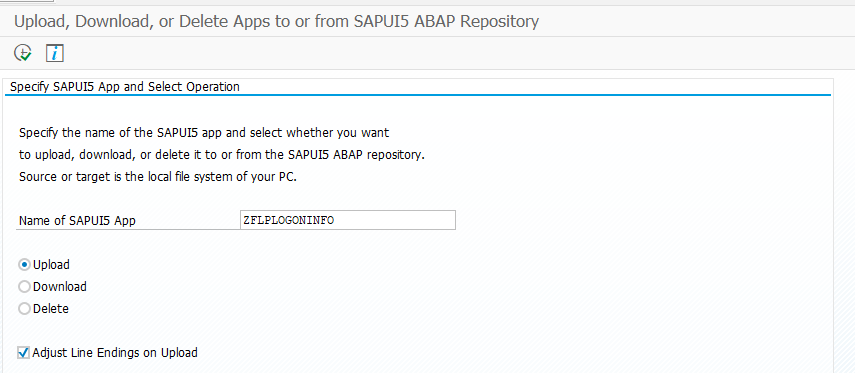
2) Start ABAP program `/UI5/UI5_REPOSITORY_LOAD` on the system where the plugin should be deployed to
3) Set a name for the final UI5 repository (max. 15 characters long) e.g. `ZFLPLOGONINFO`

4) Choose the downloaded folder from step 1
5) Enter a description for the app
6) Enter a package location (e.g. `$TMP`)
7) Enter a transport request (if needed)
8) Press `upload` to upload the app

## Activating the plugins on the ABAP system (>= S/4HANA 1809)
### Creating new plugin definition
1) Start transaction `/UI2/FLP_CONF_DEF`
2) Create new entry at node *Define FLP Plugins*

> **Note**: The URL part is normally not needed as the plugin repository can be found via the Component ID
3) Save the entry (Customizing request needed)
### Activating the plugin
1) Start transaction `/UI2/FLP_SYS_CONF`
2) Create new entry at node *FLP PLugins*

3) Save the entry (Customizing request needed)