https://github.com/superlinear-ai/graphchain
⚡️ An efficient cache for the execution of dask graphs.
https://github.com/superlinear-ai/graphchain
cache dask s3
Last synced: about 1 year ago
JSON representation
⚡️ An efficient cache for the execution of dask graphs.
- Host: GitHub
- URL: https://github.com/superlinear-ai/graphchain
- Owner: superlinear-ai
- License: mit
- Created: 2018-03-06T07:35:59.000Z (over 8 years ago)
- Default Branch: master
- Last Pushed: 2023-11-01T05:56:43.000Z (over 2 years ago)
- Last Synced: 2025-04-05T03:41:23.655Z (about 1 year ago)
- Topics: cache, dask, s3
- Language: Python
- Homepage:
- Size: 294 KB
- Stars: 71
- Watchers: 4
- Forks: 14
- Open Issues: 10
-
Metadata Files:
- Readme: README.md
- Changelog: CHANGELOG.md
- License: LICENSE
Awesome Lists containing this project
README
[](https://choosealicense.com/licenses/mit/) [](https://pypi.python.org/pypi/graphchain/)
# Graphchain
## What is graphchain?
Graphchain is like [joblib.Memory](https://joblib.readthedocs.io/en/latest/memory.html) for dask graphs. [Dask graph computations](https://docs.dask.org/en/latest/spec.html) are cached to a local or remote location of your choice, specified by a [PyFilesystem FS URL](https://docs.pyfilesystem.org/en/latest/openers.html).
When you change your dask graph (by changing a computation's implementation or its inputs), graphchain will take care to only recompute the minimum number of computations necessary to fetch the result. This allows you to iterate quickly over your graph without spending time on recomputing previously computed keys.
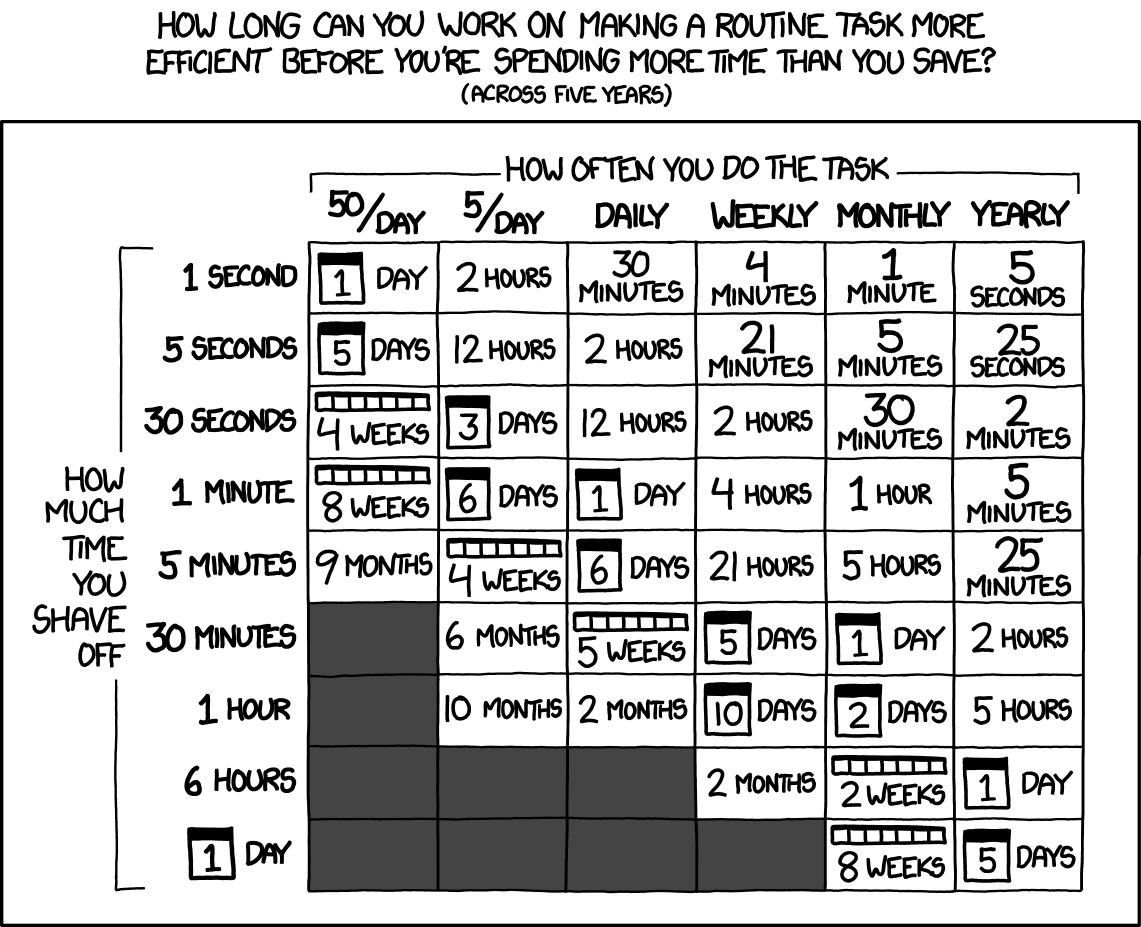
Source: xkcd.com/1205/
The main difference between graphchain and joblib.Memory is that in graphchain a computation's materialised inputs are _not_ serialised and hashed (which can be very expensive when the inputs are large objects such as pandas DataFrames). Instead, a chain of hashes (hence the name graphchain) of the computation object and its dependencies (which are also computation objects) is used to identify the cache file.
Additionally, the result of a computation is only cached if it is estimated that loading that computation from cache will save time compared to simply computing the computation. The decision on whether to cache depends on the characteristics of the cache location, which are different when caching to the local filesystem compared to caching to S3 for example.
## Usage by example
### Basic usage
Install graphchain with pip to get started:
```sh
pip install graphchain
```
To demonstrate how graphchain can save you time, let's first create a simple dask graph that (1) creates a few pandas DataFrames, (2) runs a relatively heavy operation on these DataFrames, and (3) summarises the results.
```python
import dask
import graphchain
import pandas as pd
def create_dataframe(num_rows, num_cols):
print("Creating DataFrame...")
return pd.DataFrame(data=[range(num_cols)]*num_rows)
def expensive_computation(df, num_quantiles):
print("Running expensive computation on DataFrame...")
return df.quantile(q=[i / num_quantiles for i in range(num_quantiles)])
def summarize_dataframes(*dfs):
print("Summing DataFrames...")
return sum(df.sum().sum() for df in dfs)
dsk = {
"df_a": (create_dataframe, 10_000, 1000),
"df_b": (create_dataframe, 10_000, 1000),
"df_c": (expensive_computation, "df_a", 2048),
"df_d": (expensive_computation, "df_b", 2048),
"result": (summarize_dataframes, "df_c", "df_d")
}
```
Using `dask.get` to fetch the `"result"` key takes about 6 seconds:
```python
>>> %time dask.get(dsk, "result")
Creating DataFrame...
Running expensive computation on DataFrame...
Creating DataFrame...
Running expensive computation on DataFrame...
Summing DataFrames...
CPU times: user 7.39 s, sys: 686 ms, total: 8.08 s
Wall time: 6.19 s
```
On the other hand, using `graphchain.get` for the first time to fetch `'result'` takes only 4 seconds:
```python
>>> %time graphchain.get(dsk, "result")
Creating DataFrame...
Running expensive computation on DataFrame...
Summing DataFrames...
CPU times: user 4.7 s, sys: 519 ms, total: 5.22 s
Wall time: 4.04 s
```
The reason `graphchain.get` is faster than `dask.get` is because it can load `df_b` and `df_d` from cache after `df_a` and `df_c` have been computed and cached. Note that graphchain will only cache the result of a computation if loading that computation from cache is estimated to be faster than simply running the computation.
Running `graphchain.get` a second time to fetch `"result"` will be almost instant since this time the result itself is also available from cache:
```python
>>> %time graphchain.get(dsk, "result")
CPU times: user 4.79 ms, sys: 1.79 ms, total: 6.58 ms
Wall time: 5.34 ms
```
Now let's say we want to change how the result is summarised from a sum to an average:
```python
def summarize_dataframes(*dfs):
print("Averaging DataFrames...")
return sum(df.mean().mean() for df in dfs) / len(dfs)
```
If we then ask graphchain to fetch `"result"`, it will detect that only `summarize_dataframes` has changed and therefore only recompute this function with inputs loaded from cache:
```python
>>> %time graphchain.get(dsk, "result")
Averaging DataFrames...
CPU times: user 123 ms, sys: 37.2 ms, total: 160 ms
Wall time: 86.6 ms
```
### Storing the graphchain cache remotely
Graphchain's cache is by default `./__graphchain_cache__`, but you can ask graphchain to use a cache at any [PyFilesystem FS URL](https://docs.pyfilesystem.org/en/latest/openers.html) such as `s3://mybucket/__graphchain_cache__`:
```python
graphchain.get(dsk, "result", location="s3://mybucket/__graphchain_cache__")
```
### Excluding keys from being cached
In some cases you may not want a key to be cached. To avoid writing certain keys to the graphchain cache, you can use the `skip_keys` argument:
```python
graphchain.get(dsk, "result", skip_keys=["result"])
```
### Using graphchain with dask.delayed
Alternatively, you can use graphchain together with dask.delayed for easier dask graph creation:
```python
import dask
import pandas as pd
@dask.delayed
def create_dataframe(num_rows, num_cols):
print("Creating DataFrame...")
return pd.DataFrame(data=[range(num_cols)]*num_rows)
@dask.delayed
def expensive_computation(df, num_quantiles):
print("Running expensive computation on DataFrame...")
return df.quantile(q=[i / num_quantiles for i in range(num_quantiles)])
@dask.delayed
def summarize_dataframes(*dfs):
print("Summing DataFrames...")
return sum(df.sum().sum() for df in dfs)
df_a = create_dataframe(num_rows=10_000, num_cols=1000)
df_b = create_dataframe(num_rows=10_000, num_cols=1000)
df_c = expensive_computation(df_a, num_quantiles=2048)
df_d = expensive_computation(df_b, num_quantiles=2048)
result = summarize_dataframes(df_c, df_d)
```
After which you can compute `result` by setting the `delayed_optimize` method to `graphchain.optimize`:
```python
import graphchain
from functools import partial
optimize_s3 = partial(graphchain.optimize, location="s3://mybucket/__graphchain_cache__/")
with dask.config.set(scheduler="sync", delayed_optimize=optimize_s3):
print(result.compute())
```
### Using a custom a serializer/deserializer
By default graphchain will cache dask computations with [joblib.dump](https://joblib.readthedocs.io/en/latest/generated/joblib.dump.html) and LZ4 compression. However, you may also supply a custom `serialize` and `deserialize` function that writes and reads computations to and from a [PyFilesystem filesystem](https://docs.pyfilesystem.org/en/latest/introduction.html), respectively. For example, the following snippet shows how to serialize dask DataFrames with [dask.dataframe.to_parquet](https://docs.dask.org/en/stable/generated/dask.dataframe.to_parquet.html), while other objects are serialized with joblib:
```python
import dask.dataframe
import graphchain
import fs.osfs
import joblib
import os
from functools import partial
from typing import Any
def custom_serialize(obj: Any, fs: fs.osfs.OSFS, key: str) -> None:
"""Serialize dask DataFrames with to_parquet, and other objects with joblib.dump."""
if isinstance(obj, dask.dataframe.DataFrame):
obj.to_parquet(os.path.join(fs.root_path, "parquet", key))
else:
with fs.open(f"{key}.joblib", "wb") as fid:
joblib.dump(obj, fid)
def custom_deserialize(fs: fs.osfs.OSFS, key: str) -> Any:
"""Deserialize dask DataFrames with read_parquet, and other objects with joblib.load."""
if fs.exists(f"{key}.joblib"):
with fs.open(f"{key}.joblib", "rb") as fid:
return joblib.load(fid)
else:
return dask.dataframe.read_parquet(os.path.join(fs.root_path, "parquet", key))
optimize_parquet = partial(
graphchain.optimize,
location="./__graphchain_cache__/custom/",
serialize=custom_serialize,
deserialize=custom_deserialize
)
with dask.config.set(scheduler="sync", delayed_optimize=optimize_parquet):
print(result.compute())
```
## Contributing
Setup: once per device
1. [Generate an SSH key](https://docs.github.com/en/authentication/connecting-to-github-with-ssh/generating-a-new-ssh-key-and-adding-it-to-the-ssh-agent#generating-a-new-ssh-key) and [add the SSH key to your GitHub account](https://docs.github.com/en/authentication/connecting-to-github-with-ssh/adding-a-new-ssh-key-to-your-github-account).
1. Configure SSH to automatically load your SSH keys:
```sh
cat << EOF >> ~/.ssh/config
Host *
AddKeysToAgent yes
IgnoreUnknown UseKeychain
UseKeychain yes
EOF
```
1. [Install Docker Desktop](https://www.docker.com/get-started).
- Enable _Use Docker Compose V2_ in Docker Desktop's preferences window.
- _Linux only_:
- [Configure Docker and Docker Compose to use the BuildKit build system](https://docs.docker.com/develop/develop-images/build_enhancements/#to-enable-buildkit-builds). On macOS and Windows, BuildKit is enabled by default in Docker Desktop.
- Export your user's user id and group id so that [files created in the Dev Container are owned by your user](https://github.com/moby/moby/issues/3206):
```sh
cat << EOF >> ~/.bashrc
export UID=$(id --user)
export GID=$(id --group)
EOF
```
1. [Install VS Code](https://code.visualstudio.com/) and [VS Code's Remote-Containers extension](https://marketplace.visualstudio.com/items?itemName=ms-vscode-remote.remote-containers). Alternatively, install [PyCharm](https://www.jetbrains.com/pycharm/download/).
- _Optional:_ Install a [Nerd Font](https://www.nerdfonts.com/font-downloads) such as [FiraCode Nerd Font](https://github.com/ryanoasis/nerd-fonts/tree/master/patched-fonts/FiraCode) with `brew tap homebrew/cask-fonts && brew install --cask font-fira-code-nerd-font` and [configure VS Code](https://github.com/tonsky/FiraCode/wiki/VS-Code-Instructions) or [configure PyCharm](https://github.com/tonsky/FiraCode/wiki/Intellij-products-instructions) to use `'FiraCode Nerd Font'`.
Setup: once per project
1. Clone this repository.
2. Start a [Dev Container](https://code.visualstudio.com/docs/remote/containers) in your preferred development environment:
- _VS Code_: open the cloned repository and run Ctrl/⌘ + ⇧ + P → _Remote-Containers: Reopen in Container_.
- _PyCharm_: open the cloned repository and [configure Docker Compose as a remote interpreter](https://www.jetbrains.com/help/pycharm/using-docker-compose-as-a-remote-interpreter.html#docker-compose-remote).
- _Terminal_: open the cloned repository and run `docker compose run --rm dev` to start an interactive Dev Container.
Developing
- This project follows the [Conventional Commits](https://www.conventionalcommits.org/) standard to automate [Semantic Versioning](https://semver.org/) and [Keep A Changelog](https://keepachangelog.com/) with [Commitizen](https://github.com/commitizen-tools/commitizen).
- Run `poe` from within the development environment to print a list of [Poe the Poet](https://github.com/nat-n/poethepoet) tasks available to run on this project.
- Run `poetry add {package}` from within the development environment to install a run time dependency and add it to `pyproject.toml` and `poetry.lock`.
- Run `poetry remove {package}` from within the development environment to uninstall a run time dependency and remove it from `pyproject.toml` and `poetry.lock`.
- Run `poetry update` from within the development environment to upgrade all dependencies to the latest versions allowed by `pyproject.toml`.
- Run `cz bump` to bump the package's version, update the `CHANGELOG.md`, and create a git tag.
## Developed by Radix
[Radix](https://radix.ai) is a Belgium-based Machine Learning company.
Our vision is to make technology work for and with us. We believe that if technology is used in a creative way, jobs become more fulfilling, people become the best version of themselves, and companies grow.