https://github.com/supratimrk/web-bulk-email-sender
✉️ Bulk Email Sender Web UI A clean, modern Flask app to send beautiful bulk or manual emails using CSV or custom inputs. Upload templates or draft your own, preview live, attach files, and blast away — no code changes needed. Fast, flexible, and actually fun to use!
https://github.com/supratimrk/web-bulk-email-sender
automailer begginer-friendly bulk-email bulk-email-sender custom-templates dynamic-email-send email-automation email-ui flask-app html-email python send-email-with-attachment smtp-client web-utility
Last synced: 23 days ago
JSON representation
✉️ Bulk Email Sender Web UI A clean, modern Flask app to send beautiful bulk or manual emails using CSV or custom inputs. Upload templates or draft your own, preview live, attach files, and blast away — no code changes needed. Fast, flexible, and actually fun to use!
- Host: GitHub
- URL: https://github.com/supratimrk/web-bulk-email-sender
- Owner: SupratimRK
- License: mit
- Created: 2025-04-10T15:58:18.000Z (over 1 year ago)
- Default Branch: main
- Last Pushed: 2025-04-10T16:49:23.000Z (over 1 year ago)
- Last Synced: 2025-04-10T18:09:12.038Z (over 1 year ago)
- Topics: automailer, begginer-friendly, bulk-email, bulk-email-sender, custom-templates, dynamic-email-send, email-automation, email-ui, flask-app, html-email, python, send-email-with-attachment, smtp-client, web-utility
- Language: HTML
- Homepage:
- Size: 60.5 KB
- Stars: 0
- Watchers: 1
- Forks: 0
- Open Issues: 0
-
Metadata Files:
- Readme: readme.md
- License: LICENSE
Awesome Lists containing this project
README
# 📬 Bulk Email Sender Web UI
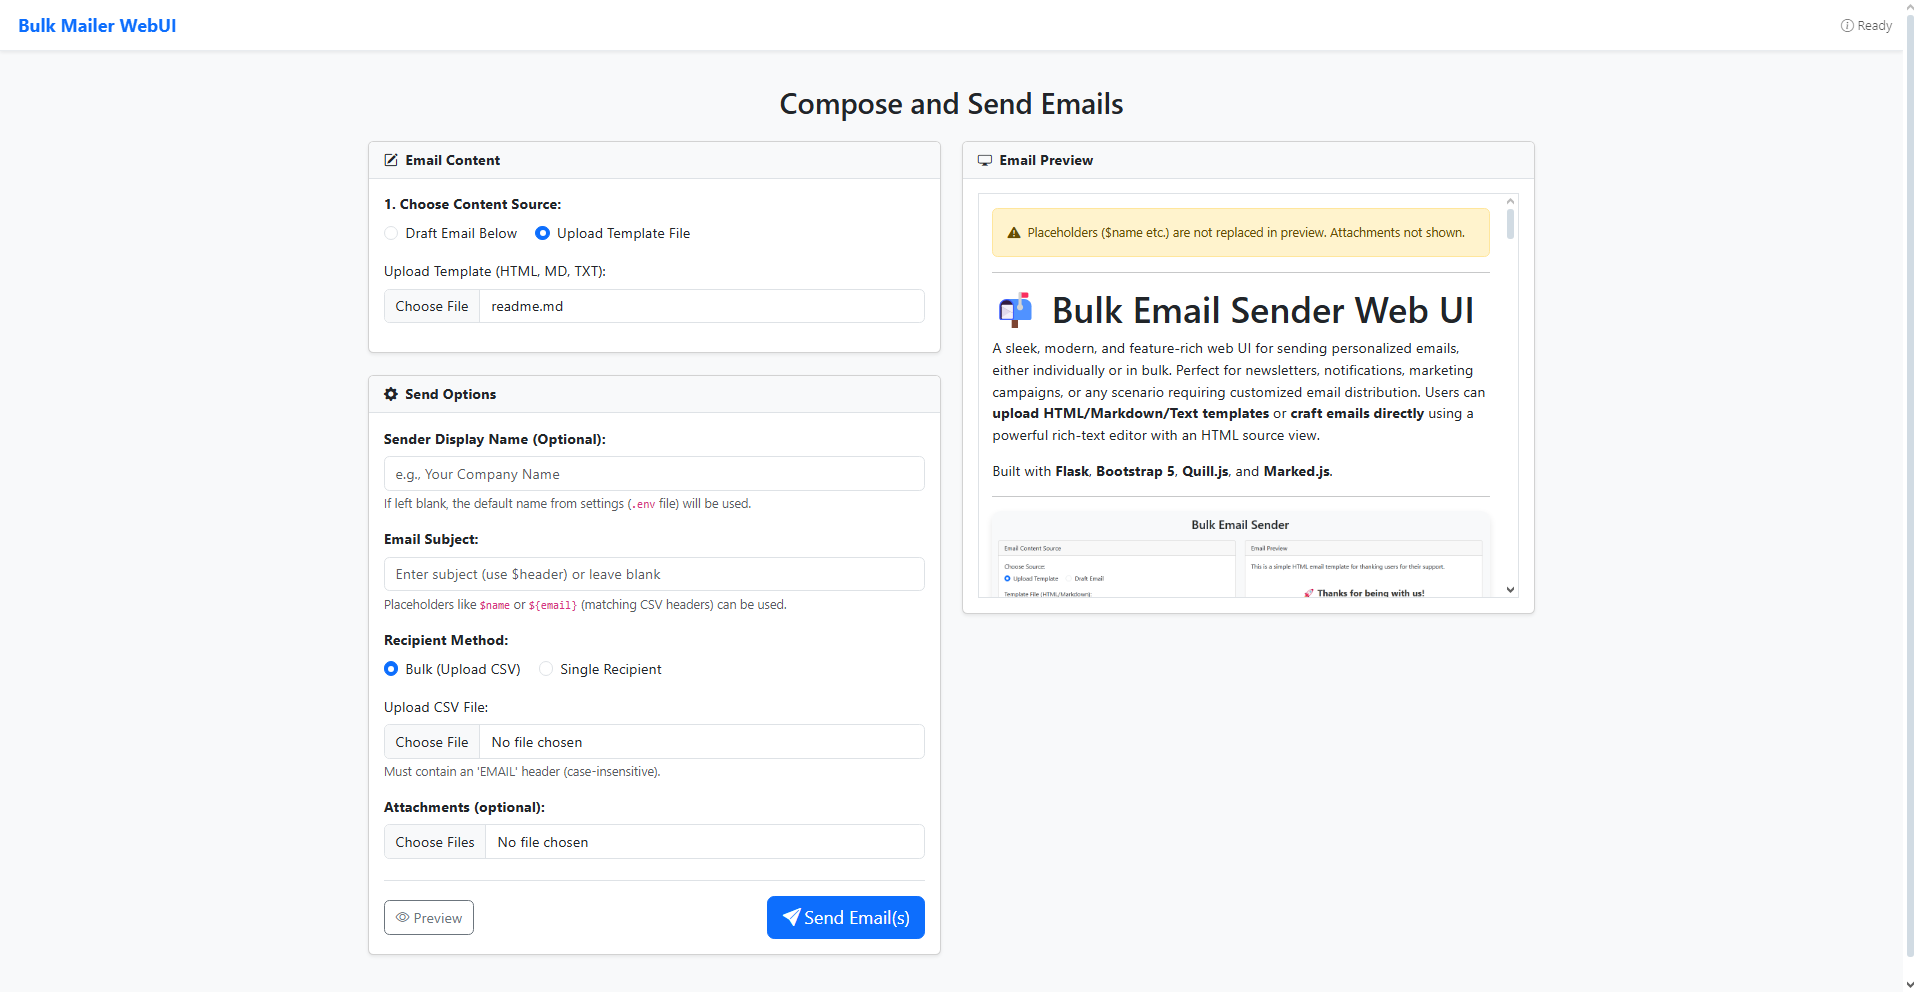
A sleek, modern, and feature-rich web UI for sending personalized emails, either individually or in bulk. Perfect for newsletters, notifications, marketing campaigns, or any scenario requiring customized email distribution. Users can **upload HTML/Markdown/Text templates** or **craft emails directly** using a powerful rich-text editor with an HTML source view.
Built with **Flask**, **Bootstrap 5**, **Quill.js**, and **Marked.js**.
---
---
## ✨ Key Features
* **⚙️ Flexible Email Content Creation**:
* **Upload Templates**: Use existing `.html`, `.htm`, `.md`, or `.txt` files. Markdown is automatically converted to HTML. Plain text is wrapped nicely.
* **Draft In-App**: Utilize the **Quill Rich Text Editor** for easy formatting or switch to the **HTML Source** tab for precise control.
* **📧 Multiple Recipient Modes**:
* **Bulk Sending**: Upload a `.csv` file. Requires an email column (looks for `email`, `email address`, etc., case-insensitive).
* **Single Recipient**: Quickly send a test or one-off email by typing the address directly.
* **🎨 Dynamic Personalization**:
* Use placeholders like `$name` or `${header}` in your subject and email body (matching your CSV column headers) for personalized messages. **(See 'Using Variables' section below)**
* **🖼️ Live Email Preview**:
* Instantly see how your drafted or uploaded content will render before sending. (Note: Placeholders are not substituted in the preview).
* **📎 Attachment Support**:
* Easily attach one or more files to your emails.
* **👤 Custom Sender Name**:
* Optionally override the default sender display name (set in `.env`) for specific campaigns.
* **✉️ HTML & Plain Text**:
* Automatically generates both HTML and plain text versions of your email for compatibility across different email clients using `html2text`.
* **🔐 Secure Configuration**:
* Keep your SMTP credentials safe using a `.env` file. No hardcoding needed.
* Supports standard SMTP servers and ports, including TLS.
* **📊 Detailed Results & Logging**:
* Redirects to a results page after sending, showing a summary (Sent, Failed, Skipped) and a detailed log for each attempted email.
* Clear success/failure/info icons for quick status assessment.
* **💡 Smart & Responsive UI**:
* Built with Bootstrap 5 for a clean look on all devices.
* Form sections dynamically show/hide based on selected options.
* Navbar status indicator provides real-time feedback during processing and shows the final result.
* Loading indicator prevents accidental double-sends.
* **✅ Robust Error Handling**:
* Validates file types, checks for required inputs, handles CSV parsing errors, and provides informative SMTP error messages.
## 💻 Tech Stack
* **Backend**: Flask (Python)
* **Frontend**: HTML, CSS, JavaScript
* **Styling**: Bootstrap 5, Bootstrap Icons
* **Rich Text Editor**: Quill.js
* **Markdown Parsing**: Marked.js (Frontend Preview), Python-Markdown (Backend Processing)
* **Email Generation**: Standard Python `email` library, `smtplib`
* **HTML to Text**: `html2text`
* **Environment Variables**: `python-dotenv`
## 🛠️ Setup & Installation
Follow these steps to get the application running on your local machine.
### ✅ Prerequisites
* **Python**: Version 3.7 or newer recommended (due to Flask 2.x+ dependencies).
* **pip**: Python package installer (usually comes with Python).
* **Git**: For cloning the repository.
* **(Optional but Recommended)** A Python virtual environment manager (`venv`).
### 🚀 Installation Steps
1. **Clone the Repository**:
```bash
git clone https://github.com/SupratimRK/web-bulk-email-sender.git
cd web-bulk-email-sender
```
2. **Create and Activate a Virtual Environment**:
* **macOS / Linux**:
```bash
python3 -m venv venv
source venv/bin/activate
```
* **Windows (Command Prompt/PowerShell)**:
```bash
python -m venv venv
.\venv\Scripts\activate
```
*(Your terminal prompt should now indicate you're in the `(venv)`)*
3. **Install Dependencies**:
```bash
pip install -r requirements.txt
```
4. **Configure Environment Variables**:
* **Copy the example file**:
```bash
cp .env.example .env
```
*(On Windows, you might use `copy .env.example .env`)*
* **Edit the `.env` file** with your actual SMTP credentials and desired default display name. See the section below for details.
### 🔒 Environment Variables (`.env` File)
Create a file named `.env` in the project root directory (where `app.py` is located) and add the following variables:
```dotenv
# .env - DO NOT COMMIT THIS FILE TO GIT!
# Display Name shown in the 'From' field by default (can be overridden in UI)
display_name="Your Default Sender Name"
# Your sending email address (must match SMTP login)
sender_email="your_email@example.com"
# Your email account password or an App Password (Recommended!)
password="your_password_or_app_password"
# SMTP Server Configuration (Examples below)
MAILER_HOST="smtp.yourprovider.com" # e.g., smtp.gmail.com, smtp.mailersend.net
MAILER_PORT="587" # Common ports: 587 (TLS), 465 (SSL), 25 (Insecure)
# Flask Secret Key (for session management, flash messages)
# Change this to a random string for better security
FLASK_SECRET_KEY="a_default_but_less_secure_key_please_change_me"
```
**Important Notes**:
* **Security**: **NEVER** commit your `.env` file to version control (Git). The `.gitignore` file should ideally prevent this, but always be cautious.
* **App Passwords**: If using Gmail or some other providers, it's highly recommended (or required) to enable 2-Factor Authentication (2FA) and generate an **App Password** specifically for this application instead of using your main account password.
* [Gmail App Passwords Guide](https://support.google.com/accounts/answer/185833?hl=en)
* **SMTP Settings**: Ensure `MAILER_HOST` and `MAILER_PORT` are correct for your email provider. The code currently uses STARTTLS for port 587. If using port 465 (implicit SSL), the `smtplib.SMTP_SSL` class might be needed instead (requires code adjustment).
## 🚀 How to Use
1. **Start the Flask Application**:
```bash
python app.py
```
The application will start, usually on `http://127.0.0.1:5000/` or `http://0.0.0.0:5000/` (accessible on your local network). Open the URL in your web browser.
2. **Choose Content Source**:
* Select "Draft Email Below" to use the editor.
* Select "Upload Template File" to browse for an `.html`, `.md`, or `.txt` file.
3. **Create/Upload Email Content**:
* **If Drafting**: Use the Rich Text Editor or switch to the "HTML Source" tab.
* **If Uploading**: Select your template file.
4. **Set Subject & Sender Name**:
* Enter the **Email Subject**. You can use placeholders here (e.g., `Welcome, $name!`). See **"How the Subject is Determined"** below.
* Optionally, enter a **Sender Display Name** to override the default from `.env`.
5. **Choose Recipient Method**:
* Select "Bulk (Upload CSV)".
* Select "Single Recipient".
6. **Provide Recipients**:
* **If Bulk**: Upload your `.csv` file. See **"Example CSV File"** below.
* **If Single**: Enter the recipient's email address in the input field.
7. **Add Attachments (Optional)**:
* Click "Choose Files" and select one or more files to attach.
8. **Preview (Recommended)**:
* Click the "Preview" button to see how the email body will look. Check formatting, especially if using Markdown or complex HTML. (Placeholders are not replaced in the preview).
9. **Send**:
* Click the "Send Email(s)" button. A loading indicator will appear.
10. **Review Results**:
* You'll be redirected to the results page.
* Check the summary status in the flash message and the navbar.
* Review the detailed log for the status of each individual email (Success, Failed, Skipped). Error messages will be shown for failures.
11. **Go Back**: Click "Go Back & Send More" to return to the main form.
## 📄 Example CSV File for Bulk Sending
When using the "Bulk (Upload CSV)" option, your CSV file structure is crucial.
* **Required Header**: It **MUST** contain a column header for email addresses. The application looks for common names like `email`, `email address`, `email_address`, `e-mail`, or `recipient` (case-insensitive). It will also try to find any header containing `mail` if the common ones aren't present.
* **Optional Headers**: Any other column headers can be used as variables for personalization in your subject and email body.
* **Encoding**: UTF-8 encoding (with or without BOM) is recommended. Latin-1 is supported as a fallback.
* **Delimiter**: Standard comma (`,`) delimiter is expected. The app attempts to sniff the dialect but defaults to comma-separated.
**Example `recipients.csv` file:**
```csv
Email,FirstName,LastName,Product,DiscountCode
alice@example.com,Alice,Smith,SuperWidget,SUMMER20
bob@domain.org,Bob,Jones,MegaGadget,WELCOME10
charlie@email.net,Charlie,Brown,TurboTool,
diana@sample.co,Diana,Prince,SuperWidget,SAVEBIG5
,"","",,"" # Example of a potentially empty row (will be skipped)
frank@test.io,Frank,,,SAVE15 # Example with missing data
```
**Key points from the example:**
* The `Email` column is present and contains the recipient addresses.
* `FirstName`, `LastName`, `Product`, `DiscountCode` are optional headers used for personalization.
* Some rows might have missing data (like Charlie's DiscountCode or Frank's LastName/Product). The corresponding placeholder will be replaced with an empty string.
* Empty rows are skipped automatically.
## 🔑 Understanding Variables & Personalization
You can personalize both the **Subject** and the **Email Body** using data from your CSV file (when in Bulk mode).
* **Syntax**: Use `$` followed by the header name (e.g., `$firstname`) OR `${header_name}` (e.g., `${product}`). The curly brace syntax `${...}` is useful if the placeholder is immediately followed by other characters that could be mistaken as part of the name (e.g., `${product}s`).
* **Matching**: The placeholder name **MUST** exactly match a column header in your CSV file, but the match is **case-insensitive**. So, `$firstname`, `$FirstName`, and `${FIRSTNAME}` will all correctly pull data from the `FirstName` column in the example CSV above.
* **Replacement**: Before sending each email, the application replaces every placeholder it finds with the corresponding value from that recipient's row in the CSV.
* **Missing Data**: If a placeholder exists in your template but the corresponding column is missing in the CSV or the cell is empty for a specific recipient, the placeholder will be replaced with an empty string (nothing).
**Example Usage (based on the CSV above):**
* **Subject Input**: `Special Offer for $FirstName on ${Product}!`
* For Alice: `Special Offer for Alice on SuperWidget!`
* For Bob: `Special Offer for Bob on MegaGadget!`
* **Email Body Content (HTML example)**:
```html
Hi $FirstName $LastName,
Thanks for your interest in the ${Product}. As a valued customer, use code $DiscountCode for a special discount!
Best regards,
The Team
```
* For Alice: Renders with "Hi Alice Smith," ... "code SUMMER20..."
* For Charlie: Renders with "Hi Charlie Brown," ... "code ..." (empty string for DiscountCode)
**Important**: Variables are **NOT** replaced in the live Preview. The preview shows the raw template with placeholders intact.
## 🤔 How the Email Subject is Determined
The application follows this logic to set the subject line for each email:
1. **User Input Field**: If you type anything into the "Email Subject" field on the form, that text is used as the template. Placeholders (like `$FirstName`) within this input *will* be processed using the CSV data for each recipient.
2. **`` Tag (HTML Upload/Draft)**: If the "Email Subject" field is **left empty** AND the email content is determined to be HTML (either uploaded `.html`/`.htm` or drafted HTML), the application looks for a `Your Subject Here` tag within the HTML content. If found, the text inside the title tag is used as the subject. Placeholders are *not* processed if the subject is extracted this way.
3. **First Non-Empty Line (Markdown/Text Upload or Fallback)**: If the subject field is empty AND no `` tag is found (or the content is Markdown/Text), the application attempts to use the first non-empty, non-HTML-tag-like line from the email content as the subject. Placeholders are *not* processed if the subject is extracted this way.
4. **Default Subject**: If none of the above methods yield a subject (e.g., the content starts immediately with HTML tags and has no title, and the subject field was empty), a generic default subject like `"Your Default Sender Name Information"` (using the `display_name` from `.env` or the custom one) will be used.
**Recommendation**: For maximum control and personalization, **always specify your desired subject in the "Email Subject" form field**, using placeholders as needed.
## 📁 Project Structure
```
web-bulk-email-sender/
├── .env # Your SMTP config & secrets (!!! NOT COMMITTED !!!)
├── .env.example # Example environment file structure
├── app.py # Main Flask application logic (routing, email sending)
├── requirements.txt # Python package dependencies
├── readme.md # This file
└── templates/
├── index.html # Main form UI (editor, options, preview)
└── result.html # Status/result log page
```
## 🏃 Running the App
```bash
# Ensure you are in the project directory and your virtualenv is active
python app.py
```
By default, it runs on `http://127.0.0.1:5000`. The `host='0.0.0.0'` setting in `app.py` makes it accessible from other devices on your local network using your computer's local IP address (e.g., `http://192.168.1.100:5000`).
## 🤝 Contributing & Future Development
We welcome contributions from the community! Whether it's fixing a bug, improving documentation, adding a new feature, or suggesting an idea, your help is appreciated.
### How to Contribute
1. **Find an Issue or Feature**: Look through the existing [GitHub Issues](https://github.com/SupratimRK/web-bulk-email-sender/issues) or propose a new idea. Discussing your plan in an issue first is often a good idea.
2. **Fork the Repository**: Create your own copy of the project on GitHub ([https://github.com/SupratimRK/web-bulk-email-sender](https://github.com/SupratimRK/web-bulk-email-sender)).
3. **Create a Branch**: Make a new branch in your fork for your changes:
```bash
git checkout -b feature/your-awesome-feature # Or fix/address-specific-bug
```
4. **Develop & Test**: Make your code changes. Add tests if applicable. Ensure the application runs correctly and your changes integrate well. Follow existing code style.
5. **Commit Your Changes**: Use clear and descriptive commit messages:
```bash
git commit -m "feat: Add template saving functionality" -m "Implemented feature X, allowing users to save drafts..."
```
6. **Push to Your Fork**:
```bash
git push origin feature/your-awesome-feature
```
7. **Open a Pull Request (PR)**: Go to the original repository ([https://github.com/SupratimRK/web-bulk-email-sender](https://github.com/SupratimRK/web-bulk-email-sender)) and open a PR from your branch to the `main` branch.
8. **Describe Your PR**: Clearly explain the purpose of your changes, what issue it fixes (e.g., `Closes #123`), and any specific testing instructions.
### 💡 Potential Future Ideas & Roadmap
This project has room to grow! Here are some ideas that contributors could tackle:
* **📨 Template Management**: Allow users to save, load, and manage email templates directly within the UI.
* **🚦 Rate Limiting Control**: Add UI options to configure delays between sending emails to respect SMTP server limits.
* **✅ Enhanced CSV Validation/Preview**: Show a preview of parsed CSV data before sending, highlighting potential issues or the identified 'email' column.
* **🐳 Dockerization**: Create `Dockerfile` and `docker-compose.yml` for easier setup and deployment.
* **🎨 UI Themes/Customization**: Add options for different visual themes or allow minor UI tweaks.
* **👥 Simple Contact List Management**: Beyond single CSV uploads, potentially add basic list storage/management.
If you're interested in working on any of these, please open an issue on the [GitHub repository](https://github.com/SupratimRK/web-bulk-email-sender/issues) to discuss the approach first!
## 🙏 Credits & Acknowledgements
* **Original Concept Inspiration**: [aahnik/bulk-email-sender](https://github.com/aahnik/bulk-email-sender)
* **Framework**: [Flask](https://flask.palletsprojects.com/)
* **Frontend Styling**: [Bootstrap](https://getbootstrap.com/), [Bootstrap Icons](https://icons.getbootstrap.com/)
* **Rich Text Editor**: [Quill.js](https://quilljs.com/)
* **Markdown Rendering**: [Marked.js](https://marked.js.org/), [Python-Markdown](https://python-markdown.github.io/)
* **HTML to Text**: [html2text](https://github.com/Alir3z4/html2text)
## 📄 License
This project is licensed under the **MIT License**. See the LICENSE file (if included) or the standard MIT License text for details. Feel free to use, modify, and distribute it as you see fit, but please provide attribution.
---
### Happy Emailing! 🚀