https://github.com/susumuota/nostr-keyx
A NIP-07 browser extension that uses the OS's keychain or YubiKey to protect your private keys.
https://github.com/susumuota/nostr-keyx
browser-extension chrome-extension encryption keychain nip-07 nodejs nostr typescript yubico yubikey
Last synced: 6 months ago
JSON representation
A NIP-07 browser extension that uses the OS's keychain or YubiKey to protect your private keys.
- Host: GitHub
- URL: https://github.com/susumuota/nostr-keyx
- Owner: susumuota
- License: mit
- Created: 2023-02-11T16:30:01.000Z (over 2 years ago)
- Default Branch: main
- Last Pushed: 2023-04-23T12:10:49.000Z (over 2 years ago)
- Last Synced: 2025-04-22T15:08:51.722Z (6 months ago)
- Topics: browser-extension, chrome-extension, encryption, keychain, nip-07, nodejs, nostr, typescript, yubico, yubikey
- Language: TypeScript
- Homepage:
- Size: 297 KB
- Stars: 77
- Watchers: 3
- Forks: 3
- Open Issues: 1
-
Metadata Files:
- Readme: README.md
- License: LICENSE
Awesome Lists containing this project
- awesome-nostr-japan - nostr-keyx - OSキーチェーンやYubikeyを用いて秘密鍵を保護するNIP-07ブラウザ拡張 by [susumuota](https://github.com/susumuota) (Tools)
- awesome-nostr - nostr-keyx - keyx.svg?style=social) - A NIP-07 browser extension that uses the OS's keychain or YubiKey to protect your private keys. (NIP-07 Browser extensions / Client reviews and/or comparisons)
README
# nostr-keyx: Nostr Key Management Extension
[](https://github.com/susumuota/nostr-keyx/releases)
[](https://github.com/susumuota/nostr-keyx/blob/main/LICENSE)
[](https://github.com/susumuota/nostr-keyx/actions/workflows/build.yaml)
[](https://github.com/susumuota/nostr-keyx/commits)
EN |
[JA](https://github-com.translate.goog/susumuota/nostr-keyx/blob/main/README.md?_x_tr_sl=en&_x_tr_tl=ja&_x_tr_hl=ja&_x_tr_pto=wapp) |
[ES](https://github-com.translate.goog/susumuota/nostr-keyx/blob/main/README.md?_x_tr_sl=en&_x_tr_tl=es&_x_tr_hl=es&_x_tr_pto=wapp) |
[ZH](https://github-com.translate.goog/susumuota/nostr-keyx/blob/main/README.md?_x_tr_sl=en&_x_tr_tl=zh-CN&_x_tr_hl=zh-CN&_x_tr_pto=wapp)
A [NIP-07](https://github.com/nostr-protocol/nips/blob/master/07.md) browser extension that uses the OS's keychain or YubiKey to protect your private keys.
- **OS's native keychain application** support ([macOS](https://support.apple.com/guide/keychain-access/what-is-keychain-access-kyca1083/mac), [Windows](https://support.microsoft.com/en-us/windows/accessing-credential-manager-1b5c916a-6a16-889f-8581-fc16e8165ac0), [Linux](https://www.passwordstore.org/))
- **YubiKey OpenPGP** support ([YubiKey 5 Series](https://www.yubico.com/products/yubikey-5-overview/))
- Minimal dependencies ([`@noble/secp256k1`](https://github.com/paulmillr/noble-secp256k1) and [`@scure/base`](https://github.com/paulmillr/scure-base))
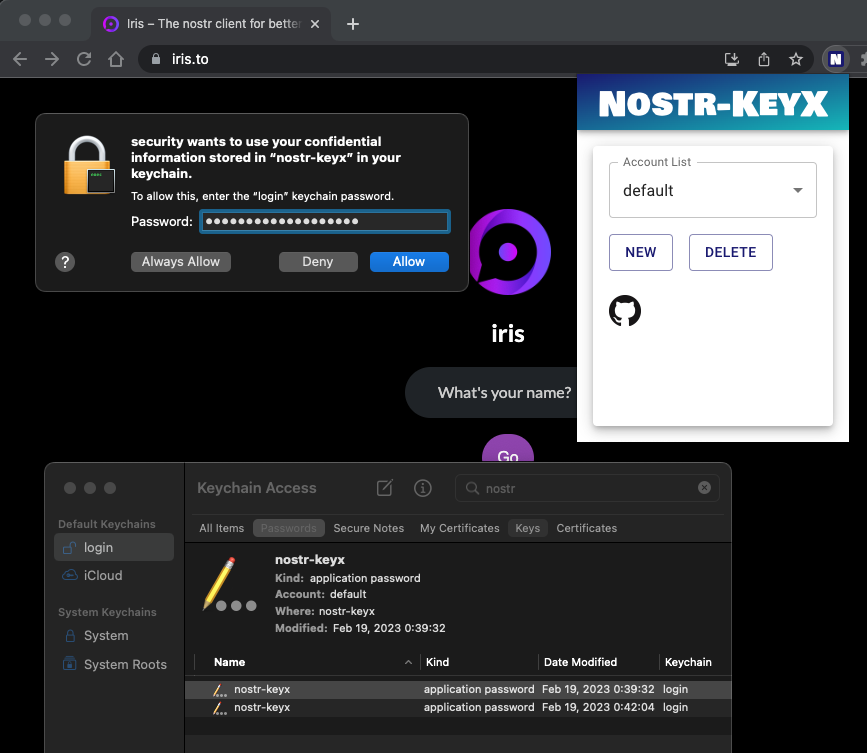
There are already great extensions like [nos2x](https://github.com/fiatjaf/nos2x) or [Alby](https://getalby.com/) for [NIP-07](https://github.com/nostr-protocol/nips/blob/master/07.md). Unlike these existing extensions, `nostr-keyx` uses the **OS's native keychain application** or **YubiKey** to store your private key instead of the web browser's local storage. Your private keys are encrypted by the operating system or by YubiKey. In addition, all of the [NIP-07](https://github.com/nostr-protocol/nips/blob/master/07.md) functions (`signEvent`, `encrypt`, `decrypt`, etc.) are executed outside of the web browser's memory. So it might be less risky than other extensions. I hope this extension helps you too.
## Download
- There are 2 options to download `nostr-keyx`.
### Option 1: Download zip file
- Download the latest zip file from [Releases](https://github.com/susumuota/nostr-keyx/releases).
- Unzip it. `nostr-keyx-{version}.zip` will be extracted to `nostr-keyx-{version}` folder.
### Option 2: Download with `git` and build from source
> **Note**: For Windows, install [Git for Windows](https://gitforwindows.org/), start `git-bash` and run `npm config set script-shell /usr/bin/bash`. Otherwise, you will get error at `npm run build`.
```sh
# install latest stable version of Node.js
node -v # I have tested on v18.16.0
git clone https://github.com/susumuota/nostr-keyx.git
cd nostr-keyx
npm ci
npm run build
```
## Install
- You need to install a Chrome extension, Node.js and a Chrome native messaging host to run `nostr-keyx`.
### Install Chrome extension
- Open Chrome's extensions setting page `chrome://extensions`.
- Turn `Developer mode` on.
- Click `Load unpacked`.
- Specify the extension folder `/path/to/dist/extension`.
- You will see error messages but it's OK for now.
- Copy the `id` of the extension. e.g. `jhpjgkhjimkbjiigognoefgnclgngklh`. We will use it later.
### Install Node.js
- `nostr-keyx` uses [Node.js](https://nodejs.org/) to provide NIP-07 functions and access the OS's native keychain application.
- Install [Node.js](https://nodejs.org/) and make sure `node` command is available in your terminal (type `which node` to confirm).
### Install Chrome native messaging host
- This Chrome extension uses [Chrome Native Messaging](https://developer.chrome.com/docs/apps/nativeMessaging/) to communicate with a native Node.js script.
- You need to install a native messaging host file which is a JSON file that specifies the absolute path of the Node.js script.
#### For macOS and Linux
> **Note**: I recommend that you should check the content of `install.sh` before you run it. I have tested it in my environment, but I cannot guarantee anything. Basically, `install.sh` performs the steps on [this page](https://developer.chrome.com/docs/apps/nativeMessaging/#native-messaging-host) in `bash` script.
- Run [`install.sh`](https://github.com/susumuota/nostr-keyx/blob/main/public/macos/install.sh) to install the native messaging host.
```sh
cd /path/to/dist/macos # or linux
cat ./install.sh # confirm before you run it
bash ./install.sh # or bash ./install.sh
```
- Paste the `id` of the extension. e.g. `jhpjgkhjimkbjiigognoefgnclgngklh`. You can find the `id` of the extension in Chrome's extensions setting page `chrome://extensions`.
- If you want to uninstall the native messaging host, run [`uninstall.sh`](https://github.com/susumuota/nostr-keyx/blob/main/public/macos/uninstall.sh).
```sh
cat ./uninstall.sh # confirm before you run it
bash ./uninstall.sh
```
#### For Windows
- First, you need to allow PowerShell to run scripts.
- Open PowerShell as an **Administrator**.
- Run the following command to allow executing script. See details [here](https://learn.microsoft.com/en-us/powershell/module/microsoft.powershell.core/about/about_execution_policies?view=powershell-7.3#remotesigned).
```powershell
Set-ExecutionPolicy -ExecutionPolicy RemoteSigned
```
- Exit PowerShell of **Administrator**.
- Open PowerShell as a **normal user**.
- Run `Unblock-File` to unblock PowerShell script files that were downloaded from the internet so you can run them. See details [here](https://learn.microsoft.com/en-us/powershell/module/microsoft.powershell.utility/unblock-file?view=powershell-7.3).
```powershell
cd C:\path\to\dist\windows
Unblock-File .\install.ps1
Unblock-File .\uninstall.ps1
Unblock-File .\add_privatekey.ps1
Unblock-File .\get_privatekey.ps1
```
> **Note**: I recommend that you should check the contents of PowerShell script files before you run them. I have tested them in my environment, but I cannot guarantee anything. Basically, `install.ps1` performs the steps on [this page](https://developer.chrome.com/docs/apps/nativeMessaging/#native-messaging-host) in PowerShell.
- Run [`install.ps1`](https://github.com/susumuota/nostr-keyx/blob/main/public/windows/install.ps1) to install the native messaging host.
```powershell
cat .\install.ps1 # confirm before you run it
.\install.ps1
```
- Paste the `id` of the extension. e.g. `jhpjgkhjimkbjiigognoefgnclgngklh`. You can find the `id` of the extension in Chrome's extensions setting page `chrome://extensions`.
- If you want to uninstall the native messaging host, run [`uninstall.ps1`](https://github.com/susumuota/nostr-keyx/blob/main/public/windows/uninstall.ps1).
```powershell
cat .\uninstall.ps1 # confirm before you run it
.\uninstall.ps1
```
## Setup
- Save your private key to the OS's native keychain application.
- You need to specify the private key with account name and service name to switch between multiple private keys.
- The default account name must be `default`. You can add other account names, but they must consist of alphanumeric characters, underscores, periods or hyphens.
- At the moment, the service name must be `nostr-keyx`.
> **Note**: If you need private keys for test, you can generate them with `npm run genkey` (needs source, see option 2 above).
### For macOS: Option 1: Using command `security`
- Here, I show you how to save your private key on Terminal. You can also use [Keychain Access](https://support.apple.com/guide/keychain-access/what-is-keychain-access-kyca1083/mac). I will show you later.
- Copy private key (e.g. `nsec1...`) to clipboard.
- Open Terminal.
- Run `security add-generic-password` command to create a new entry for your private key. Here, `-a` specifies the account name e.g `default`, `-s` specifies the service name (service **MUST** be `nostr-keyx`), and `-w` means the password will be asked.
```sh
security add-generic-password -a default -s nostr-keyx -w
# paste your private key (e.g. nsec1....)
# paste it again
```
- Confirm that the entry is created. `find-generic-password` sub command will show the password.
```sh
security find-generic-password -a default -s nostr-keyx -w
```
- If you want to delete the entry, run `delete-generic-password` sub command.
```sh
security delete-generic-password -a default -s nostr-keyx
```
- You can create multiple accounts for multiple private keys. e.g. `default`, `bot`, `test`, etc. But service name **MUST** be `nostr-keyx`.
> **Note**: Right now, `security` command can access the private key without password. But you can revoke that by Keychain Access application. See the next section.
### For macOS: Option 2: Using [Keychain Access](https://support.apple.com/guide/keychain-access/what-is-keychain-access-kyca1083/mac)
- Open spotlight search and type `Keychain Access` and open it.
- `File` menu > `New Password Item...`
- Type `nostr-keyx` to `Keychain Item Name` (the first text field).
- Type `default` to `Account Name` (the second text field).
- Copy private key (e.g. `nsec1...`) to clipboard.
- Paste it to `Password` (the third text field).
- Click `Add`.
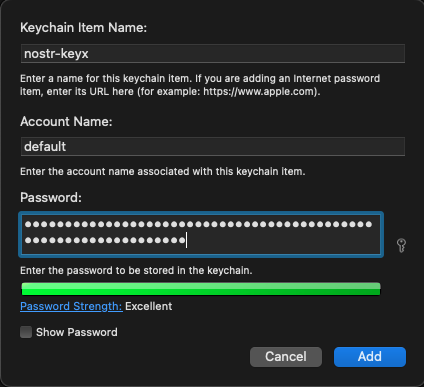
- You can create multiple accounts for multiple private keys. But make sure that the service name is `nostr-keyx`.
- Open Terminal and run `security` command to confirm that the private key can be accessed via `security` command.
```sh
security find-generic-password -a default -s nostr-keyx -w
```
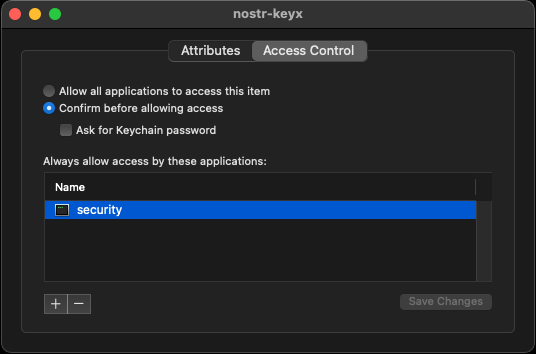
> **Note**: When you try to access private key, you will be asked to enter your password. You can click `Always Allow` to allow the access without password. When you want to revoke that, you can change the access control of the entry. Right click the entry and select `Get Info`. Then, click `Access Control` tab and click `security` on `Always allow access by these applications:` area then click `-` button to remove it. Now you will be asked to enter your password when you try to access the private key via `security` command.
### For Windows: Using command `add_privatekey.ps1`
- Confirm content of [`add_privatekey.ps1`](https://github.com/susumuota/nostr-keyx/blob/main/public/windows/add_privatekey.ps1) whether it is safe to run. See details [here](https://learn.microsoft.com/en-us/uwp/api/windows.security.credentials.passwordvault?view=winrt-22621) and [here](https://learn.microsoft.com/en-us/uwp/api/windows.security.credentials.passwordcredential?view=winrt-22621).
- Copy private key (e.g. `nsec1...`) to clipboard.
- Run `add_privatekey.ps1` to create a new entry for your private key. You **MUST** pass `nostr-keyx` as an argument.
```powershell
cat .\add_privatekey.ps1 # confirm before you run it
.\add_privatekey.ps1 "nostr-keyx"
```
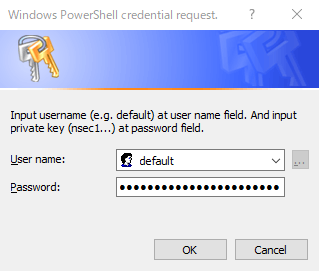
- Dialog will be shown. Type `default` to `User name` field, paste your private key to `Password` field, then click `OK`.
- Confirm content of [`get_privatekey.ps1`](https://github.com/susumuota/nostr-keyx/blob/main/public/windows/get_privatekey.ps1) whether it is safe to run. See details [here](https://learn.microsoft.com/en-us/uwp/api/windows.security.credentials.passwordvault?view=winrt-22621) and [here](https://learn.microsoft.com/en-us/uwp/api/windows.security.credentials.passwordcredential?view=winrt-22621).
- Run `get_privatekey.ps1` to get your private key.
```powershell
cat .\get_privatekey.ps1 # confirm before you run it
.\get_privatekey.ps1 "default" "nostr-keyx"
```
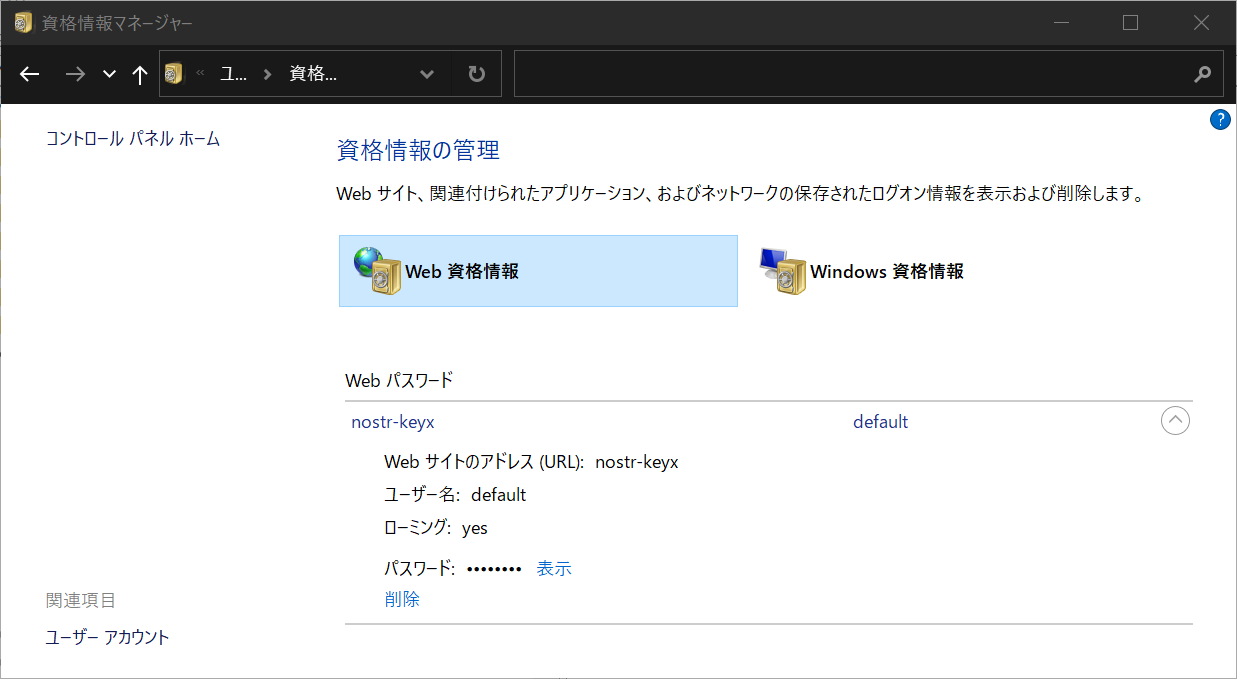
- Type `credential manager` in the search box on the taskbar and select [Credential Manager](https://support.microsoft.com/en-us/windows/accessing-credential-manager-1b5c916a-6a16-889f-8581-fc16e8165ac0) Control panel.
- Click `Web Credentials` and you will see the entry for your private key.
### For Linux: Using command `pass`
- Setup `pass`. See [this page](https://www.passwordstore.org/).
- Copy private key (e.g. `nsec1...`) to clipboard.
- Run `pass insert` command to create a new entry for your private key.
```sh
pass insert nostr-keyx/default
# paste your private key (e.g. nsec1....)
# paste it again
```
### For YubiKey: Using command `gpg`
- Setup OpenPGP with YubiKey. Follow [my setup memo](https://github.com/susumuota/yubikey-setup#generate-gpg-keys) or [this article](https://support.yubico.com/hc/en-us/articles/360013790259-Using-Your-YubiKey-with-OpenPGP).
- Install `pinentry-mac` (for macOS) or GUI-based `pinentry` (for Linux).
```sh
brew install pinentry-mac
```
- Encrypt (and sign) the Nostr private key with gpg and YubiKey.
```sh
cd /path/to/dist/macos # or linux
gpg -sea --default-recipient-self > nostr_privatekey.asc
# paste the private key, enter, and Ctrl+D
```
- Try to decrypt it.
```sh
gpg -d nostr_privatekey.asc
```
- Unplug YubiKey and try again, it should fail
```sh
gpg -d nostr_privatekey.asc
```
- Plug YubiKey again.
- Run `yubikey.sh` script.
```sh
/bin/sh -c ./yubikey.sh 2> /dev/null
```
- It should decrypt the private key successfully.
- Don't forget to add an account `yubikey` on extension popup settings. See `Usage` section below.
### Test it on Iris or Snort
- Open Chrome and go to `chrome://extensions/`.
- Disable similar NIP-07 extensions, e.g. nos2x, Alby, etc. On Alby, you only need to disable `NIP-07` section on the settings.
- Clear errors of the extension.
- Reload the extension.
- Click `Service Worker` to open dev console of the extension.
- If you have used previous versions of this extension, you should clear the extension's cache. Type the following commands in the extension's dev console.
```javascript
await chrome.storage.local.clear();
await chrome.storage.sync.clear();
await chrome.storage.session.clear();
```
- Enable log level `Verbose` to show debug logs.
- Go to [Iris](https://iris.to/) or [Snort](https://snort.social/).
- Logout if you already logged in.
- Click `Nostr extension login` for Iris or `Login with Extension (NIP-07)` for Snort. It should use `window.nostr.getPublicKey` to get public key.
- Post some notes. It should use `window.nostr.signEvent` to sign events with private key.
- Send/receive direct messages. It should use `window.nostr.nip04.encrypt/decrypt` to encrypt/decrypt messages.
## Usage
- You can change account (private key) by popup UI of the extension.
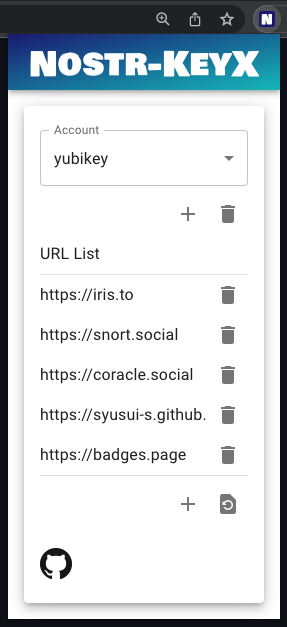
- You can add an account. This account name must match the account name in the OS Keychain application. e.g. `default`, `yubikey`, `bot`, etc.
- To use YubiKey, you need to add an account `yubikey`.
- Press `+` button and enter your account name, then press `ADD`.
- You can switch accounts by selecting list items on the popup UI.
- You can also add a URL to allow the web page to use the extension.
- Press `+` button and enter a new URL, then press `ADD`.
## Experimental features
- The popup icon shows the number of API calls accessing the private key (`signEvent`, `encrypt` and `decrypt`). You should keep your eyes on the **growth of this number** in order to monitor the behavior of web-based Nostr clients. The number is reset to zero when it reaches 10 due to space limitations in the popup icon.

## Potential risks
- This extension passes your private key to [secp256k1.schnorr.sign](https://github.com/paulmillr/noble-secp256k1#schnorrsignmessage-privatekey) and [secp256k1.getSharedSecret](https://github.com/paulmillr/noble-secp256k1#getsharedsecretprivatekeya-publickeyb). The security of this extension depends heavily on these functions.
- Let me know if you find any other potential risks.
## TODO
- [x] Prepare a zip file for easy installation.
- [x] Find a way to store the private key securely.
- [x] Find a way to store the AES key securely.
- [x] Find a way to access OS's Keychain app or Chrome's password manager from the Chrome extension.
- [x] Minimal UI.
- [x] Add profiles to switch multiple accounts.
- [x] Add Windows keychain applications support.
- [x] GitHub Actions to build and publish the zip file.
- [x] Add installer script.
- [x] UI to guide users to install the native messaging host.
- [x] Add preliminary YubiKey support.
- [ ] Add biometric authentication support. e.g. fingerprint sensor for MacBook Pro.
- [ ] Add a stats page to show the number of API calls accessing the private key.
- [ ] Support [NIP-46](https://github.com/nostr-protocol/nips/blob/master/46.md).
- [ ] Better error handling.
- [ ] Test `relays`.
- [ ] Chrome Web Store?
- [ ] Add YubiKey native support. At the moment, it looks hard. Related information: [here](https://support.yubico.com/hc/en-us/articles/360016649139-YubiKey-5-2-Enhancements-to-OpenPGP-3-4-Support), [here](https://bitcoindev.network/using-gpg-as-a-bitcoin-address/) and [here](https://github.com/Yubico/yubico-piv-tool/issues/405#issuecomment-1289079879).
## Source code
- https://github.com/susumuota/nostr-keyx
## Related Links
- [NIP-07](https://github.com/nostr-protocol/nips/blob/master/07.md): `window.nostr` capability for web browsers.
- [nos2x](https://github.com/fiatjaf/nos2x): Chrome Extension for NIP-07.
- [nostr-tools](https://github.com/nbd-wtf/nostr-tools): Tools for developing Nostr clients.
- [noble-secp256k1](https://github.com/paulmillr/noble-secp256k1): JavaScript implementation of [secp256k1](https://www.secg.org/sec2-v2.pdf).
- [scure-base](https://github.com/paulmillr/scure-base): Secure implementation of base64, etc.
- [Iris](https://iris.to/): Web-based Nostr client.
- [Snort](https://snort.social/): Web-based Nostr client.
## License
MIT License, see [LICENSE](LICENSE) file.
## Author
S. Ota
- nostr: [`npub1susumuq8u7v0sp2f5jl3wjuh8hpc3cqe2tc2j5h4gu7ze7z20asq2w0yu8`](https://iris.to/s_ota)
- GitHub: [susumuota](https://github.com/susumuota)
- Twitter: [@susumuota](https://twitter.com/susumuota)