https://github.com/tcarters/integrate_springapp_jenkins_sonarqube_nexus_docker
https://github.com/tcarters/integrate_springapp_jenkins_sonarqube_nexus_docker
Last synced: 4 months ago
JSON representation
- Host: GitHub
- URL: https://github.com/tcarters/integrate_springapp_jenkins_sonarqube_nexus_docker
- Owner: Tcarters
- Created: 2023-03-03T02:12:13.000Z (over 3 years ago)
- Default Branch: master
- Last Pushed: 2023-03-05T00:48:07.000Z (over 3 years ago)
- Last Synced: 2025-03-16T15:55:36.796Z (over 1 year ago)
- Language: Dockerfile
- Size: 2 MB
- Stars: 1
- Watchers: 2
- Forks: 0
- Open Issues: 0
-
Metadata Files:
- Readme: README.md
Awesome Lists containing this project
README
# Build a complete Jenkins pipeline by integrating a SpringApp with a Code Auditor, Nexus Repository Manager and Docker
We build a Jenkins job which takes a code directly from gitHub, then proceed with maven life cycle policy and after integrate SonarQube for Code Analysis. At the end of code Analysis by SonarQube, the artifact generated is uploaded to a Repository Manager (Nexus) to keep each version of our App. Then a Docker image of the App is build and publish to DockerHub to finally launch a sample container running the application.

### Prerequisites :
- Nexus Server Installed ( Mine is available at **192.168.1.19:5000** )
- Sonarqube Server Installed ( Accessible at : **192.168.1.17:9000** )
- Maven Installed on the Jenkins Machine
- Jenkins server Installed ( Mine is available at **192.168.1.68:8082** )
- A sample SpringBoot Application ( https://github.com/Tcarters/SpringBootApp_and_DevOps ) with two branch:
- **nexus-integration** for release package config at Nexus repo
- **nexus-snapshot** for snapshot package repository in Nexus repo
### Pipeline Steps Overview
- 1. Application Overview
- 2. Git use cases
- 3. Jenkins Job Creation
- 4. Maven UNIT TEST
- 5. Maven Integration TEST
- 6. Maven Building jar/War files
- 7. SonarQube Configuration
- 8. Sonarqube-webhook Configuration
- 9. Static code Analysis
- 10. QualityGate Status
- 11. Nexus Repo Overview
- 12. Release Repo creation & Configuration
- 13. Snapshot repo creation & Configuration
- 14. Error Debugging
- 15. Multistage DockerFile Creation
- 16. Docker Image Build
- 17. Docker Image Push
- 18. Launch Docker container through Jenkins
- 19. To be continued...
- - -
## Step 1: Basic configuration on the SonarQube server:
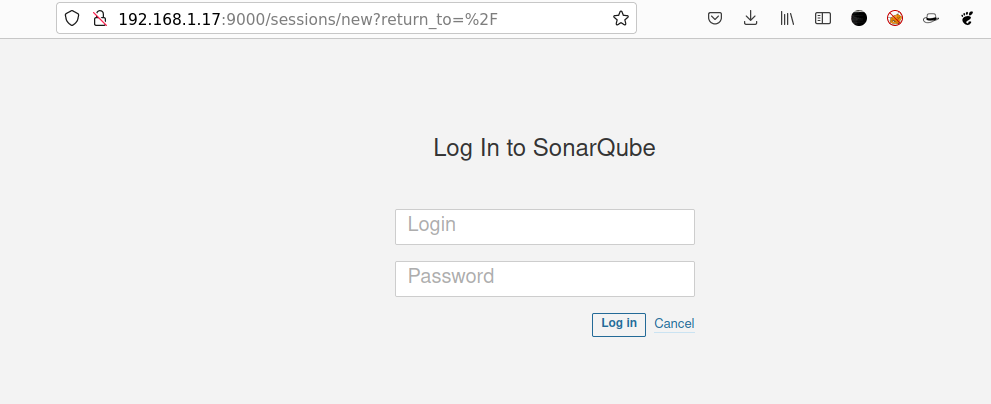
### 1.1. Launch the SonarQube server
### 1.2. Create a new Token which will be used later for jenkins integration

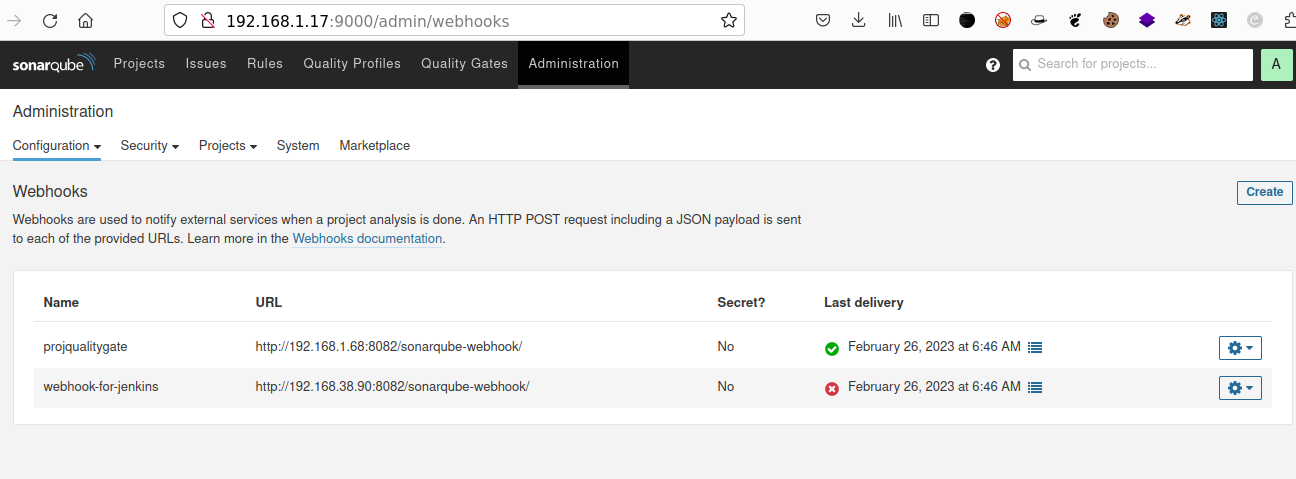
### 1.3 Create a webhook by which Sonarqube will send notification to Jenkins after the Analysis ...
- Going to ``sonarQube Dashboard > Adminisration > Webhooks`` and provide url of jenkins server like http://jenkins-ip-server/sonarqube-webhook/
- ❗ Be sure to add the path `/sonarqube-webhook` otherwise, it won't work ...
## Step 2: Configuration and plugins installation on Jenkins Server:
### 2.1 Start the jenkins server
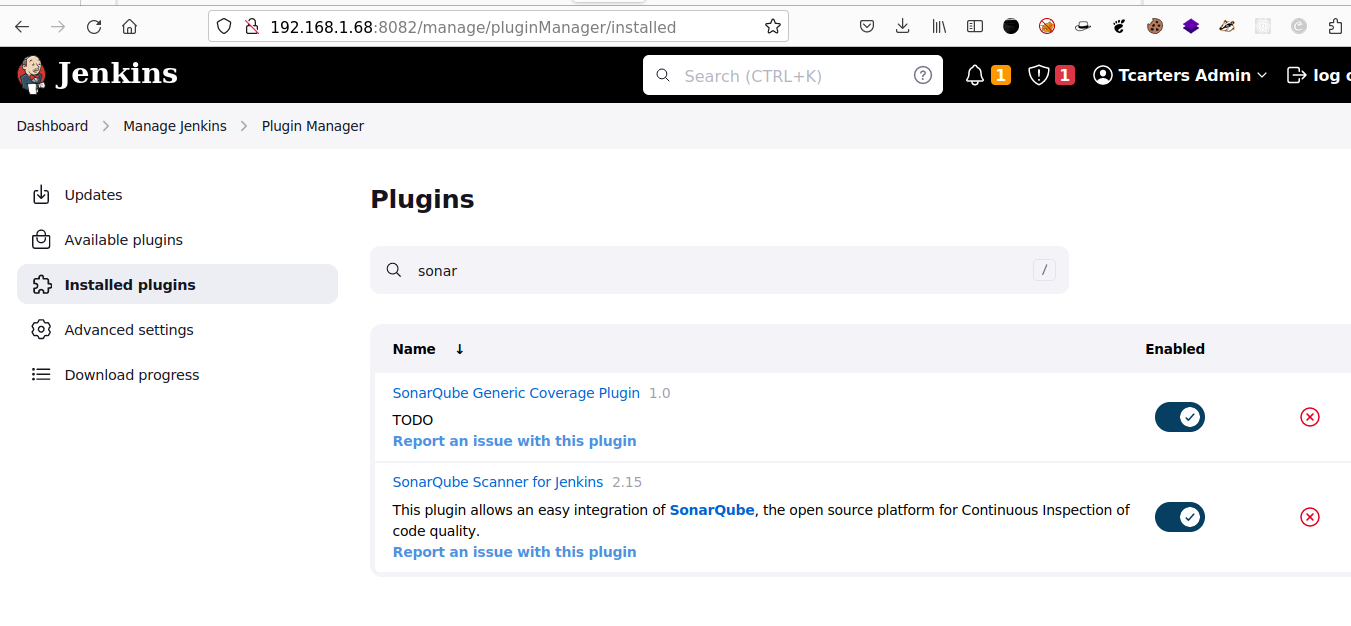
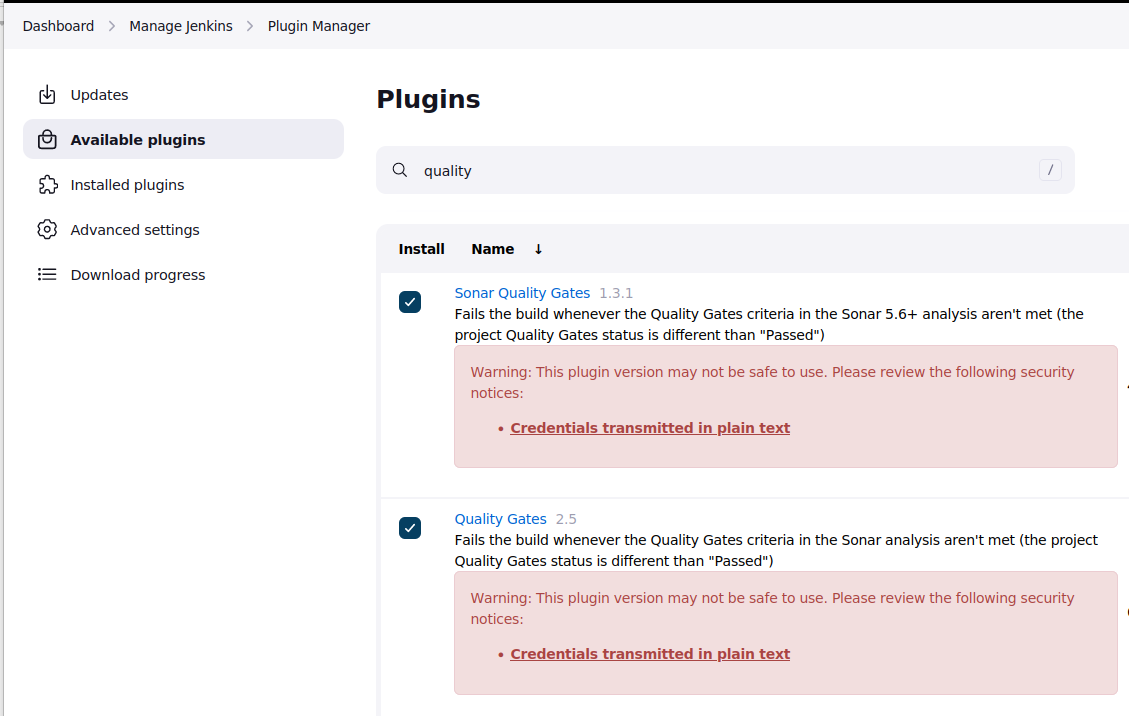
### 2.2 Install Sonarqube plugins required in the Jenkins Server
- A demo of this installation is available in this mini project: https://github.com/Tcarters/Sonarqube_projects/tree/master/jenkins_pipeline_sonarQube. Where we showed how to integrate SonarQube with Jenkins, so feel free to go there and fork this project 😃..
- Looking at the **jenkins Manager Plugin** and search for :
- `Sonarqube` scanner plugin
- and `Quality Gate` plugin
-----
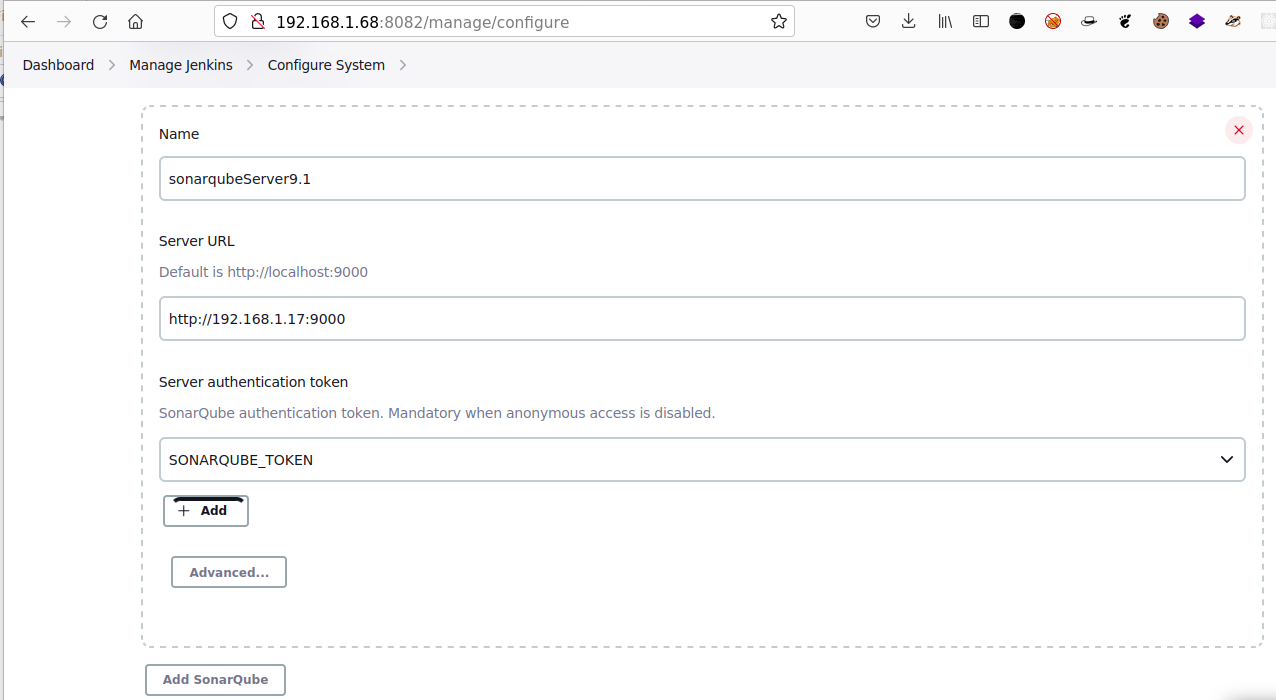
### 2.3 Configure the SonarQube plugin in the Jenkins server:
- First, we go to ``Jenkins Dashboard > Manage Jenkins > Configure System ``
* After, Jump to the Section **SonarQube servers** and provide:
- A Name ( Here we give the same name as the one parameter available at ``Global Tool Configuration > Sonarqube ``
- Your SonarQube server URL like **http://ip_server:port-no**
❗❗ **Don't add slash (/) at the end of URL** ❗❗.
- And finally the Token of User managing your SonarQube Server , which can be found at :

* Final configuration review :
🔥 🔥 If you failed to install & configure the plugins look at the following repo where we explained in detail how to do it : https://github.com/Tcarters/Sonarqube_projects
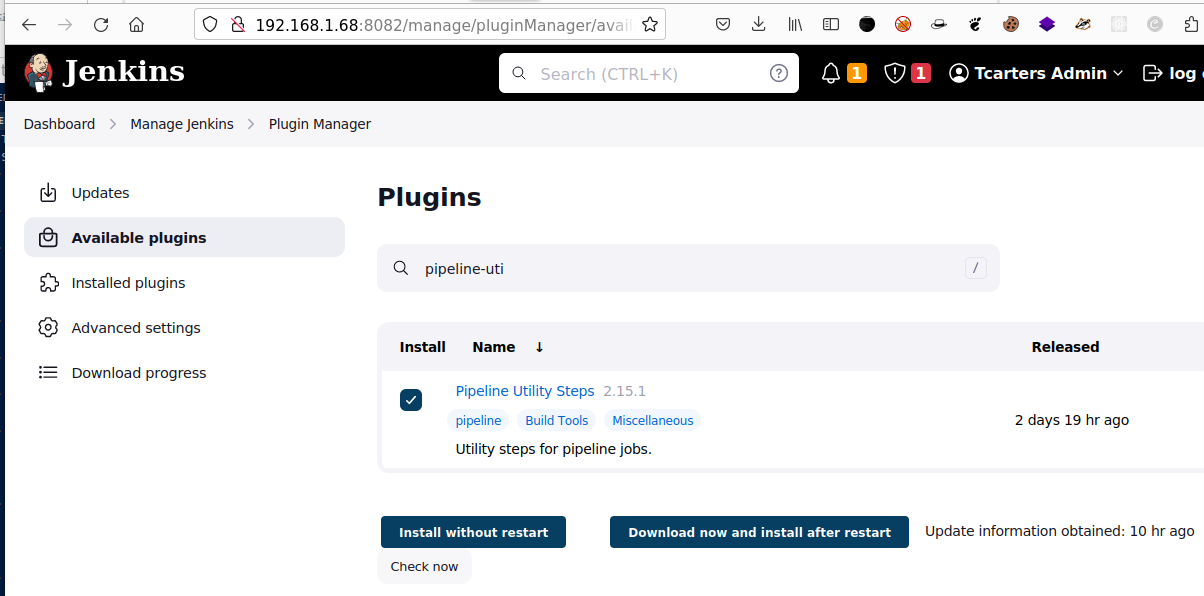
### 2.3 Install the plugin ``pipeline-utility-steps`` :
- This plugin will help us to write a dynamic configuration of a release package to be integrated in the Jenkins pipeline. To install it, same place like others by looking at ``Plugin Managers`` :
## Step 3: Launch a new Jenkins pipeline
### 3.1 Create a new pipeline Job named `javaapp-pipeline`:

- Next, jump to the section ``Pipeline`` and define the pipeline script to be executed by Jenkins.
- At this step, we used the branch **nexus-integration** or you can use `master` and GitHub repo: https://github.com/Tcarters/SpringBootApp_and_DevOps
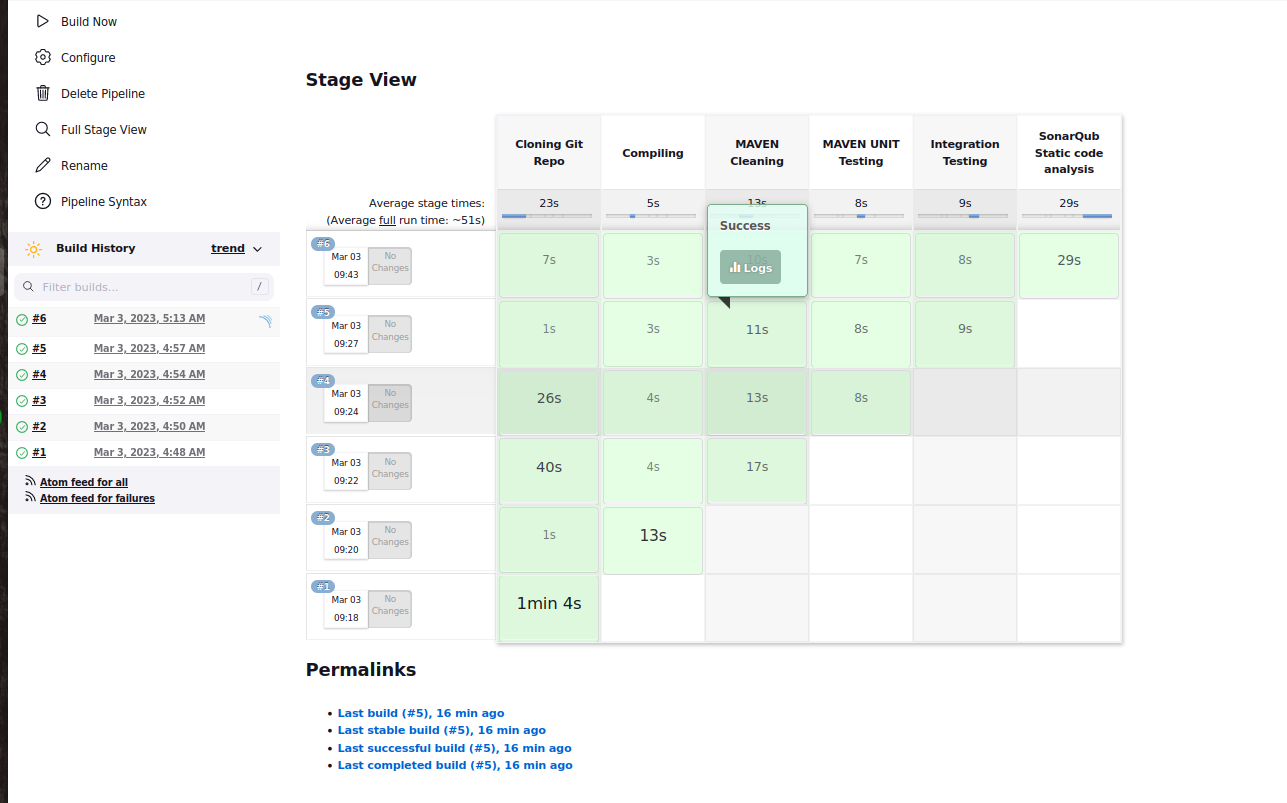
- In our Jenkinsfile , we define four stages which go like this
- Stage 1 ==> Clone the GitHub repo
- Stage 2 ==> Code compiling
- Stage 3 ==> MAVEN Cleaning
- Stage 4 ==> UNIT TESTING OF MAVEN BUILD
- Stage 5 ==> VERIFICATION OF UNIT TEST
- The jenkinsfile code used is defined as :
```bash
pipeline{
agent any
stages {
stage('Cloning Git Repo'){
steps{
script{
git branch: 'nexus-integration', url: 'https://github.com/Tcarters/SpringBootApp_and_DevOps.git'
}
}
} //stage1
stage('Compiling'){
steps{
script{
sh 'mvn compile'
}
}
} // stage2
stage ('MAVEN Cleaning') {
steps{
script {
sh 'mvn clean install'
}
}
}//stage3
stage('MAVEN UNIT Testing'){
steps{
script{
sh 'mvn test'
}
}
}//stage4
stage('Integration Testing'){
steps{
script{
sh 'mvn verify -DskipUnitTests'
}
}
}//stage5
} //end stages
}
```
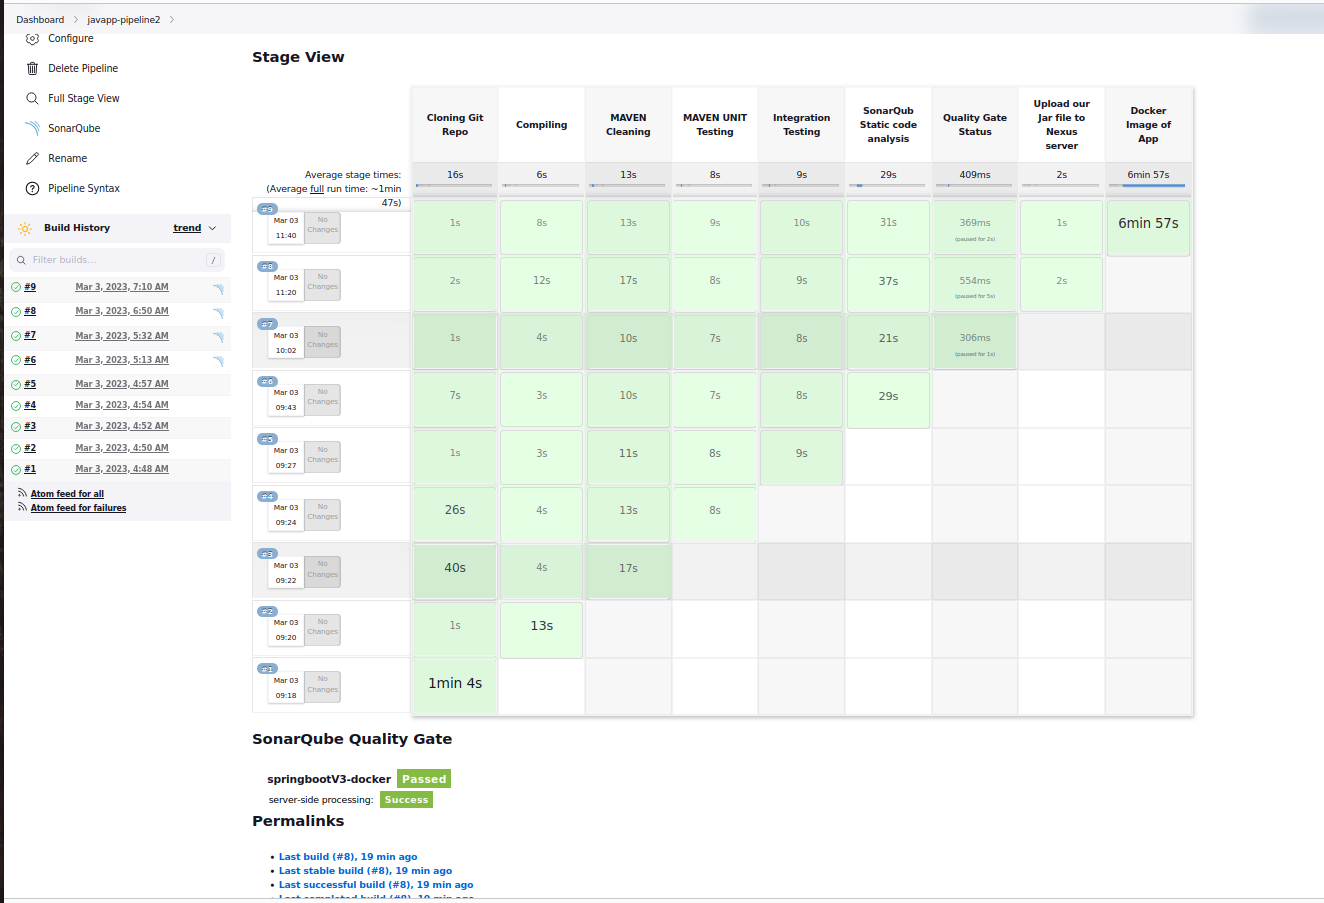
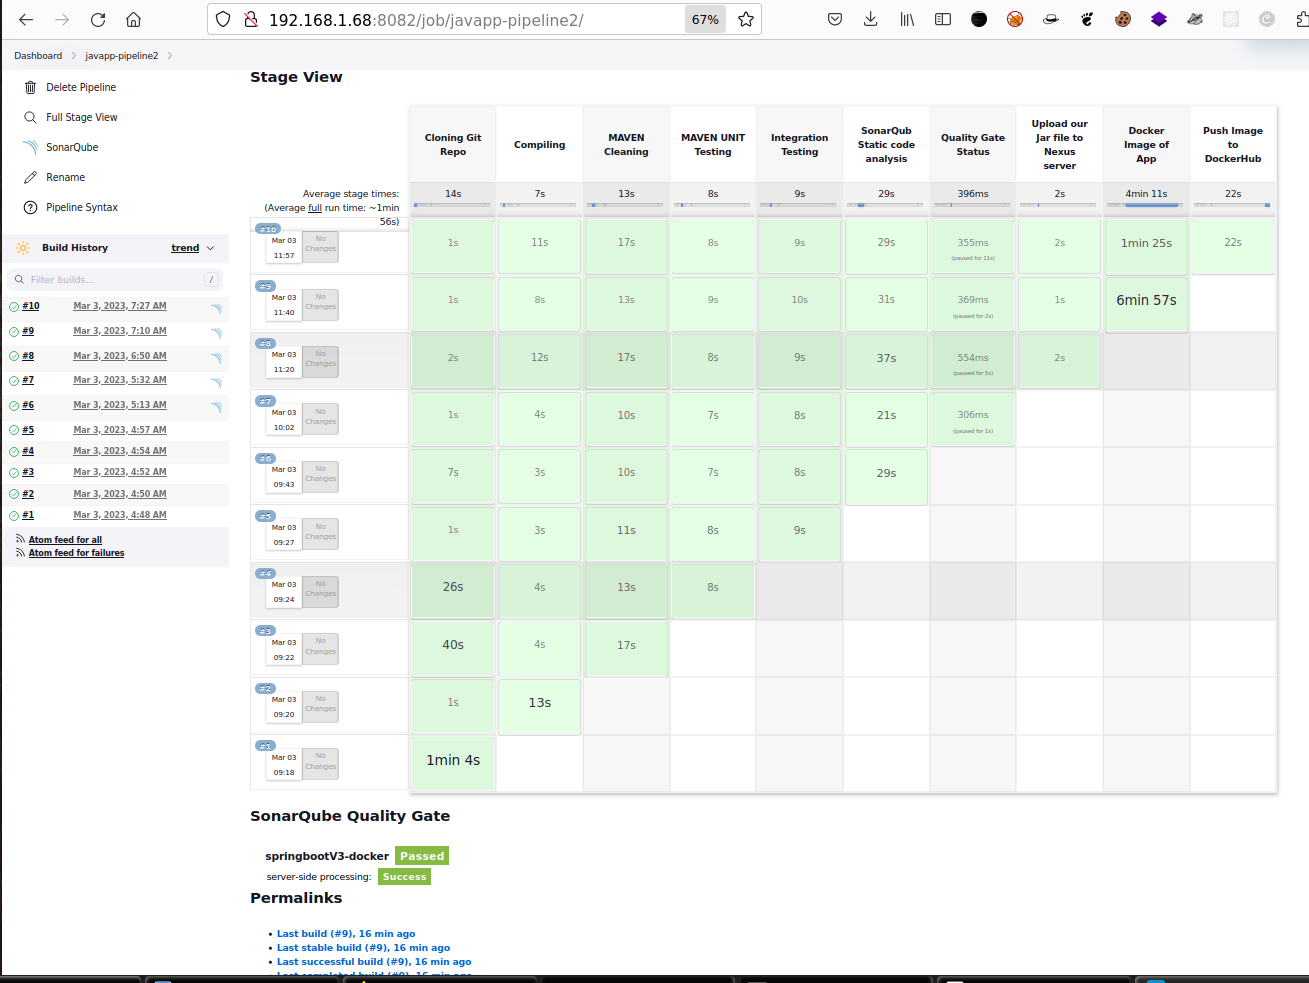
### 3.2 Build the 4 stages in our pipeline and get Results:
- Dashboard View of current build

## Step 4: SonarQube Integration in Jenkins pipeline
- Step 1.1 till 1.3 should be done before continuing here...
### 4.1 Update the Jenkinsfile with new stage:
- The stage 6 for a **Static Code Analysis** by SonarQube Tool:
```bash
stage('SonarQub Static code analysis'){
steps{
script{
withSonarQubeEnv(credentialsId: 'SONARQUBE_TOKEN') { // Here we refer tname of token configured in our Jenkins sonarQube Server plugin
sh 'mvn clean package sonar:sonar'
}
} // end script
} // end steps
} //stage6
```
- Run the updated Jenkinsfile, we can see SonarQube Analysis performed successfully

- On Jenkins dashboard View :
### 4.2 Adding Quality Gate Analysis in the pipeline Integration:
- To do that , we have to add a new stage7 in which SonarQube will perform a Quality Gate Condition checking of our code and if passsed, It will inform Jenkins to proceed to next build otherwise the pipeline will false and will enter in a rebuild process until the dev Team make a correction to the code.
- The stage 7 code in jenkinsfile will be:
```bash
stage('Quality Gate Status'){
steps{
script {
echo '<---------------Quality Gates Analysis Started-------------->'
timeout (time: 5) {
// Just in case something goes wrong, pipeline will be killed after a timeout
// Parameter indicates whether to set pipeline to UNSTABLE if Quality Gate fails
// true = set pipeline to UNSTABLE, false = don't
def myqualitygate = waitForQualityGate abortPipeline: true , credentialsId: 'SONARQUBE_TOKEN' // Reuse taskId previously collected by withSonarQubeEnv
if ( myqualitygate.status != 'OK' ) {
echo "Pipeline aborted due to Quality Gate failure 🎃: ${myqualitygate.status}"
}
else {
echo "Pipeline succeeded with Quality Gate 🤗 : ${myqualitygate.status}"
}
} // end timeout
} // end script
} // end steps
} //stage7
```
- Viewing the Console Output in Jenkins platform :

- On the Dashboard after refresh , we can see a Notification below showing the Quality Gate Checking passed

## Step 5: Nexus Server Integration to Jenkins server :
At this step we have to configure a Nexus Repo for Jenkins integration.
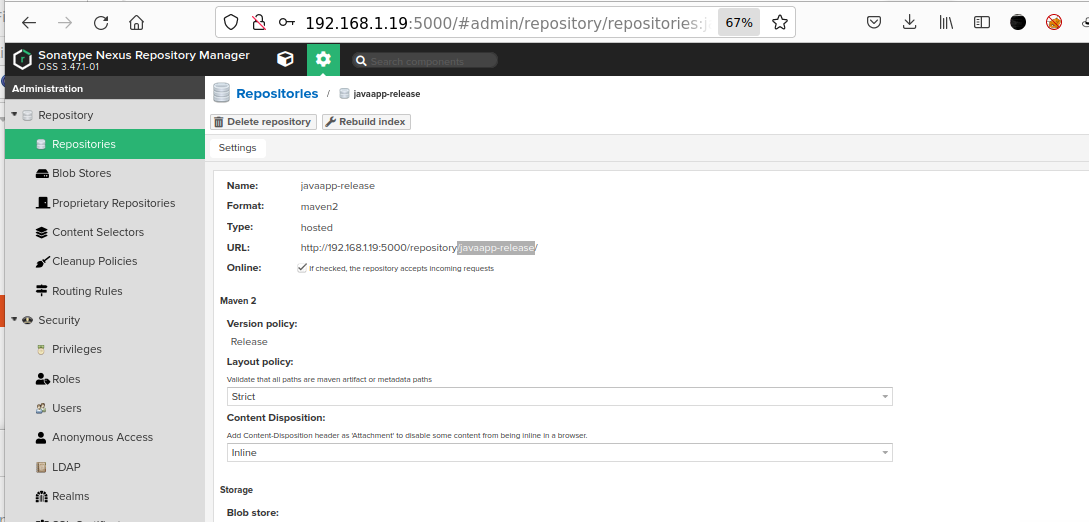
### 5.1 Create a Nexus repo
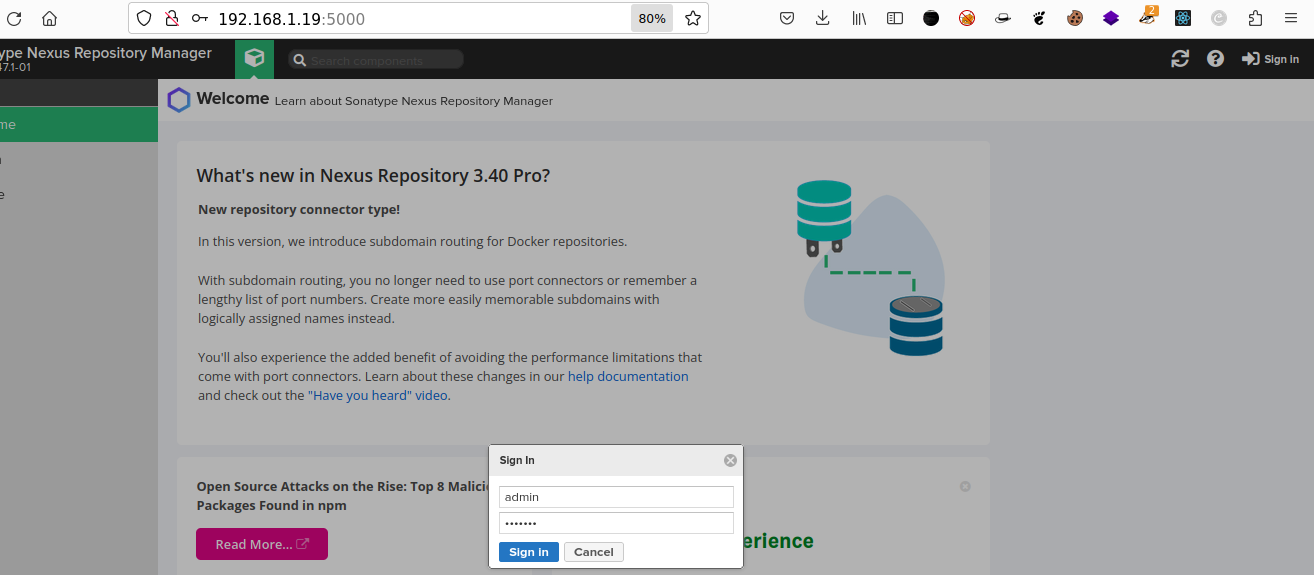
- First, Launch your Nexus Server Machine:
- Create a new Nexus repository
- We have to go : ``Settings > Repository `` , and click *Create repository*
- After select the type of repository as **Maven 2 hosted**
- Ok, now Put a name `javaapp-release`
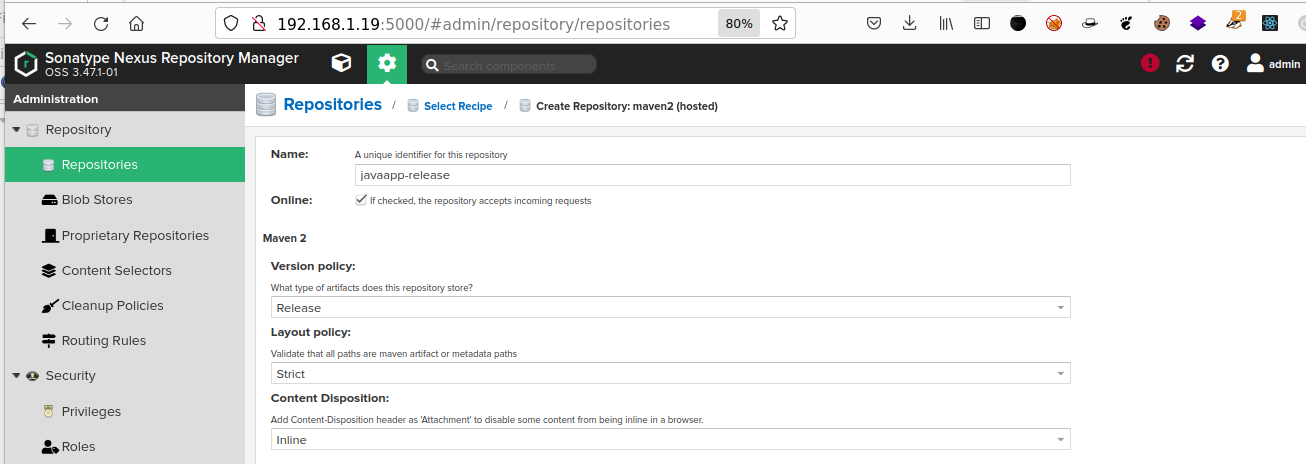
- As we are creating a Nexus release repository so , we keep the ``Version policy`` as : **Release**
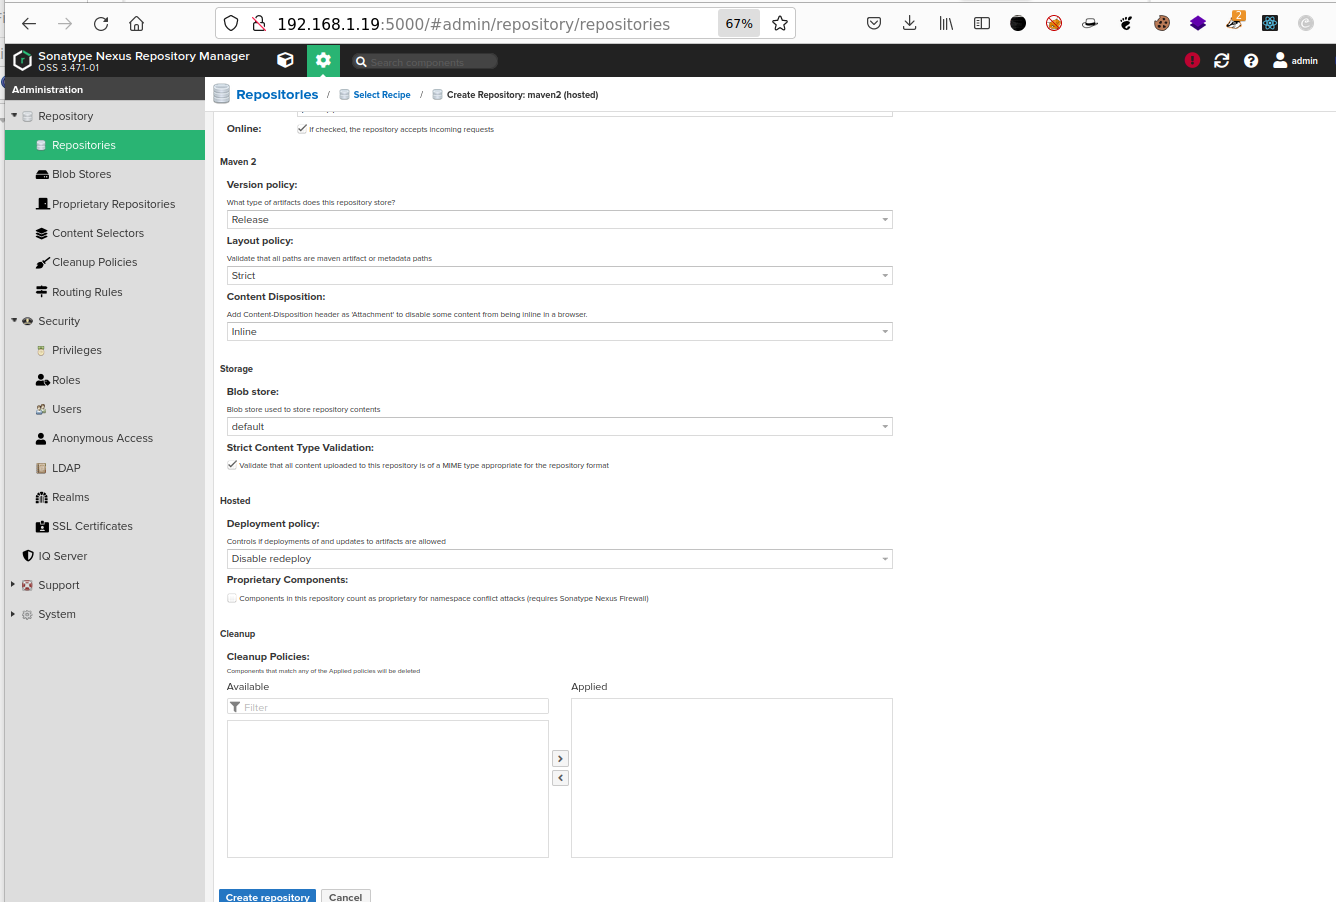
- And finally, click ``Create repository`` to create it :
### 5.2 Configure a connection between Nexus server and Jenkins Server
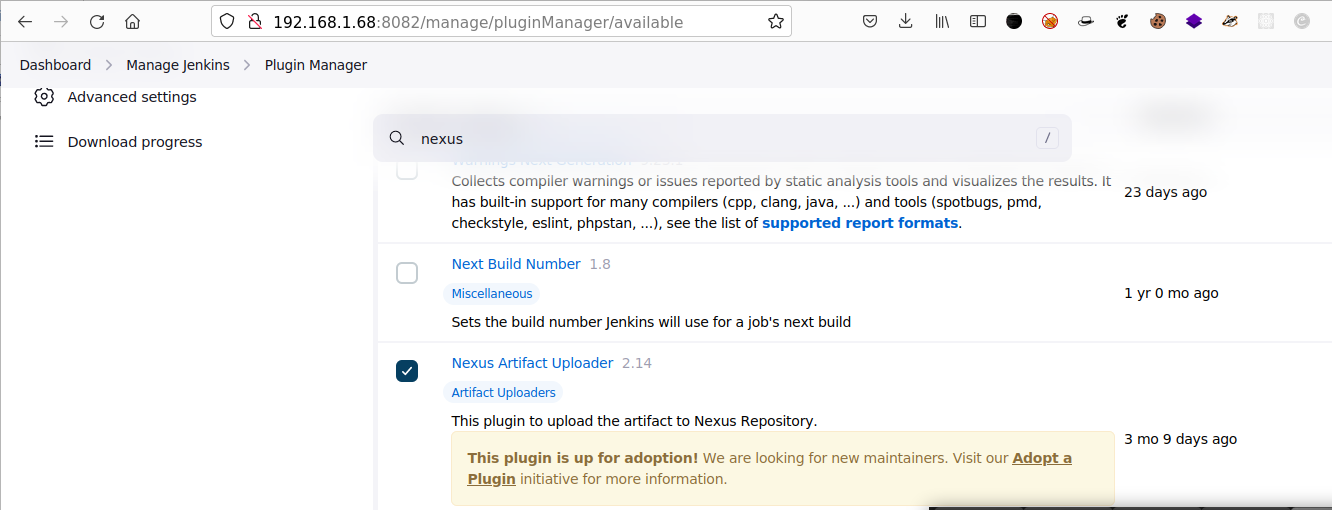
- For that we have to install a Jenkins plugin called **Nexus Artifact Uploader**
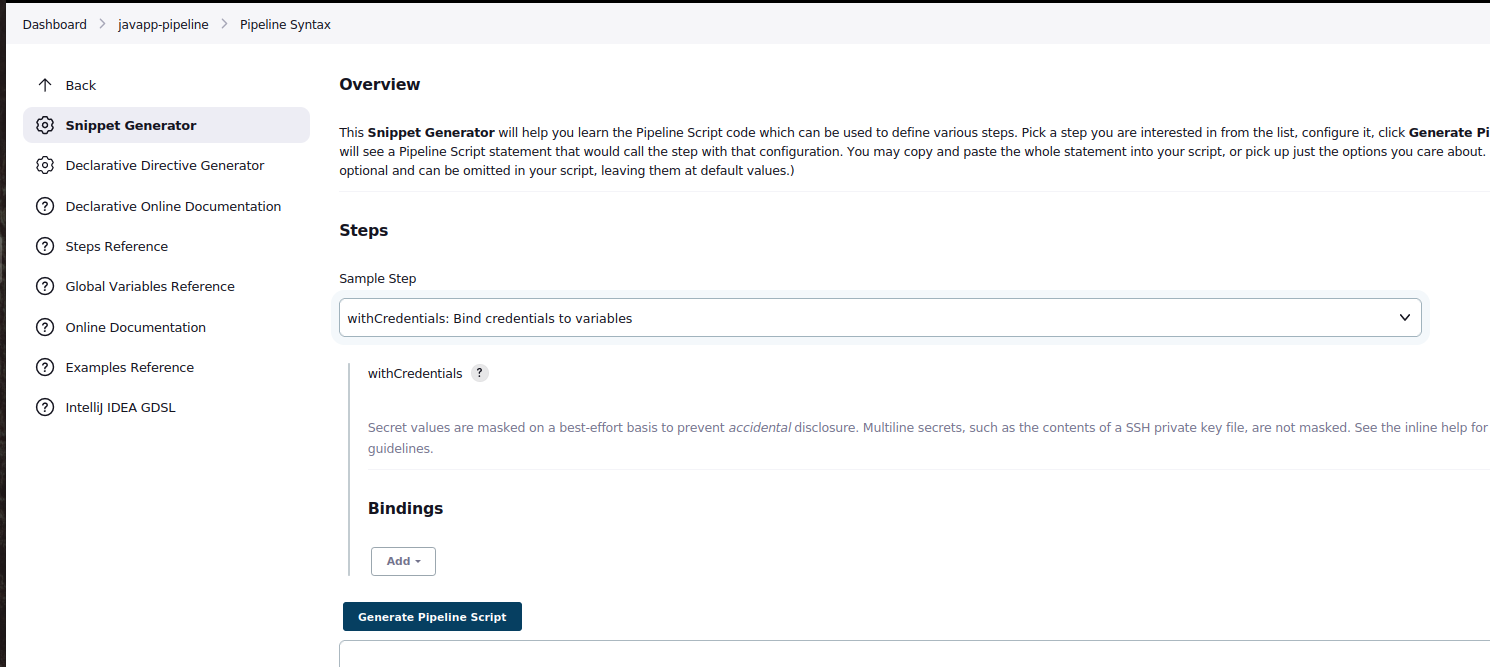
- Get the nexus integration script
* To do it just go to the current job **Pipeline Syntax** at ``Dashboard >javaapp>Pipeline Syntax``
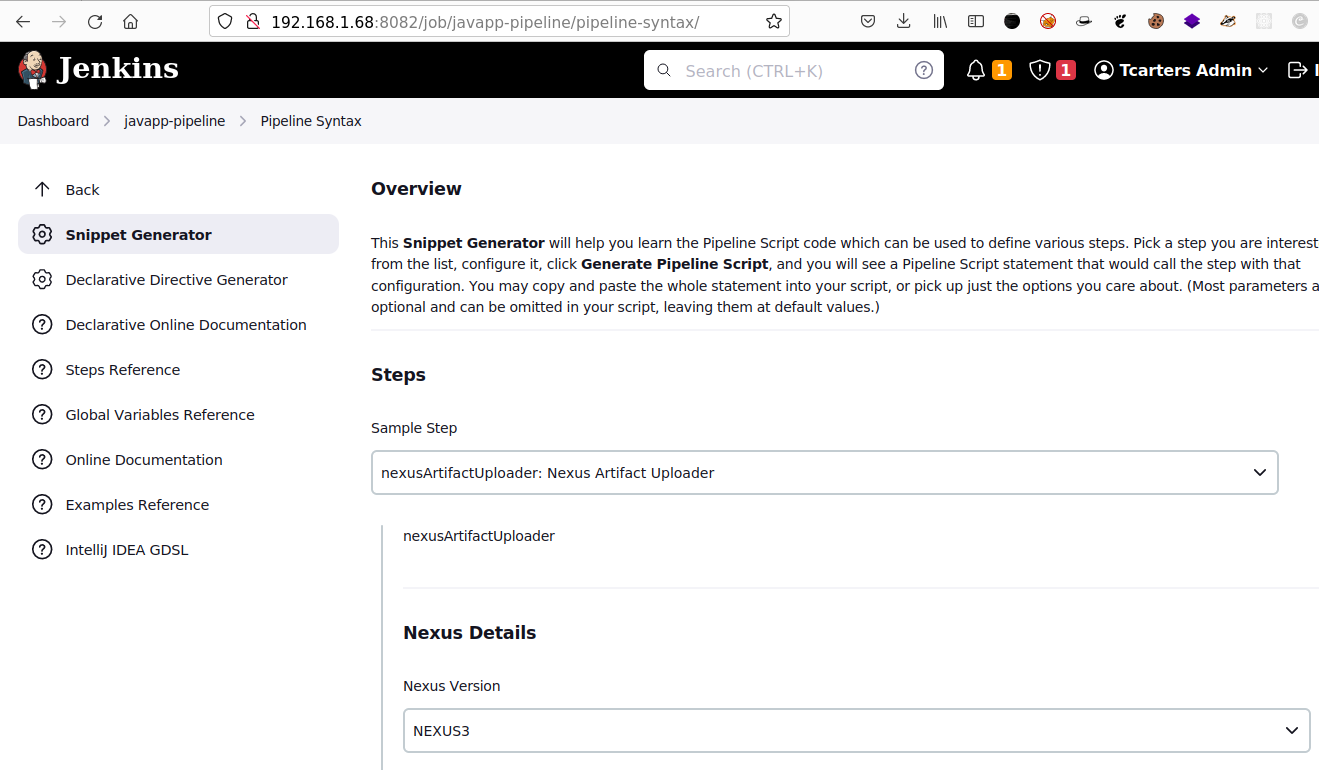
* Set up the credentials to be used by jenkins for connection to nexus server
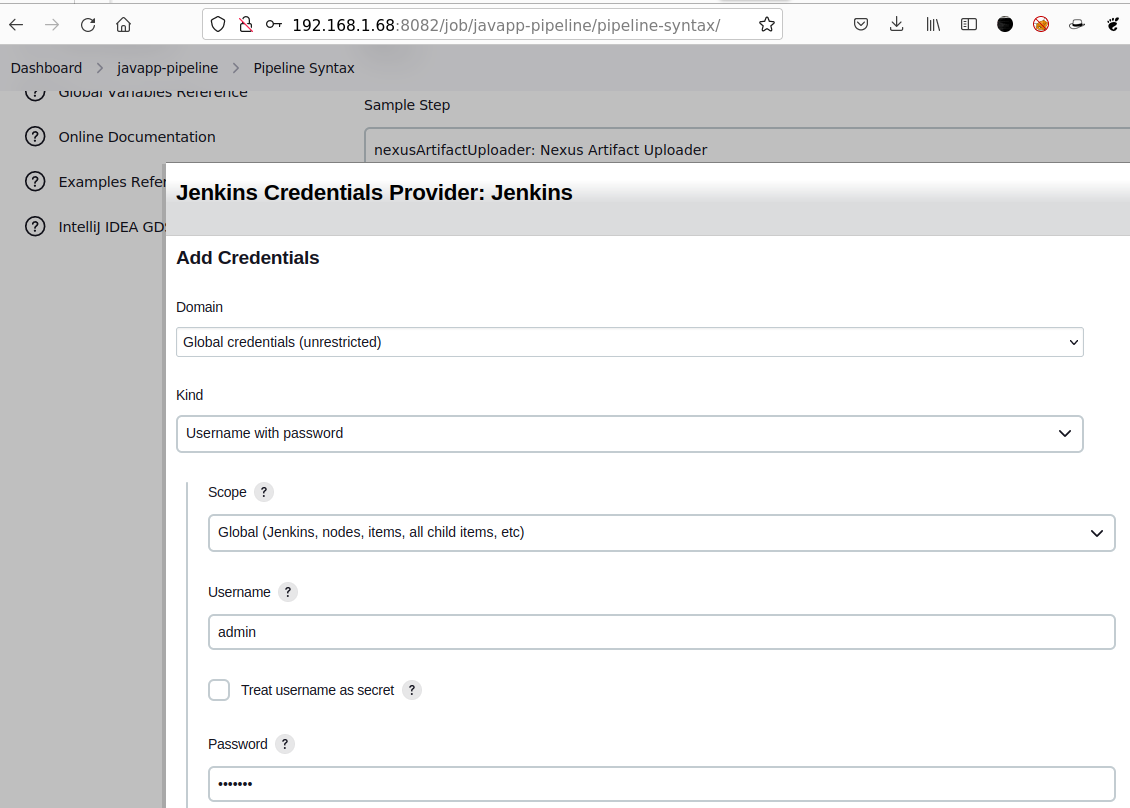
* Provide a `username` and `Password`, it should be the one configured on the nexus server ...
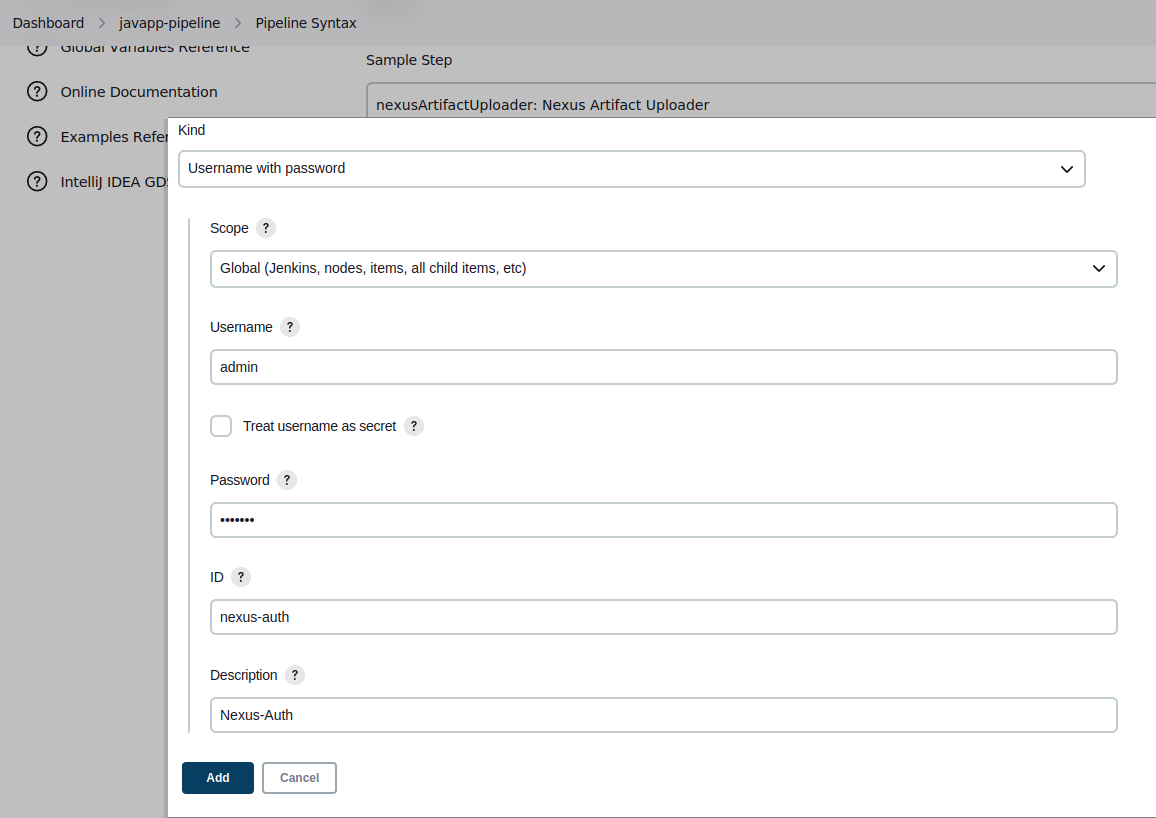
* And save it.
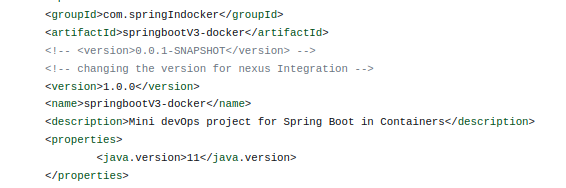
* Now add a `GroupId`, which can be retrieve by looking at the **pom.xml** of the Application code.
- In our example, It's **com.springIndocker**. Just by looking at the line ***11*** of the pom file of: https://github.com/Tcarters/SpringBootApp_and_DevOps/blob/nexus-integration/pom.xml on branch **nexus-integration**

- Same process for the **Version**, here It's ``1.0.0`` for **master** barnch
- :exclamation: And ``1.0.1`` for the branch **nexus-integration**
- For the Nexus ``Repository``configuration, looking at the nexus server repo created earlier
### 5.3 Create a new stage for Artifact release creation and uploading to Nexus Server
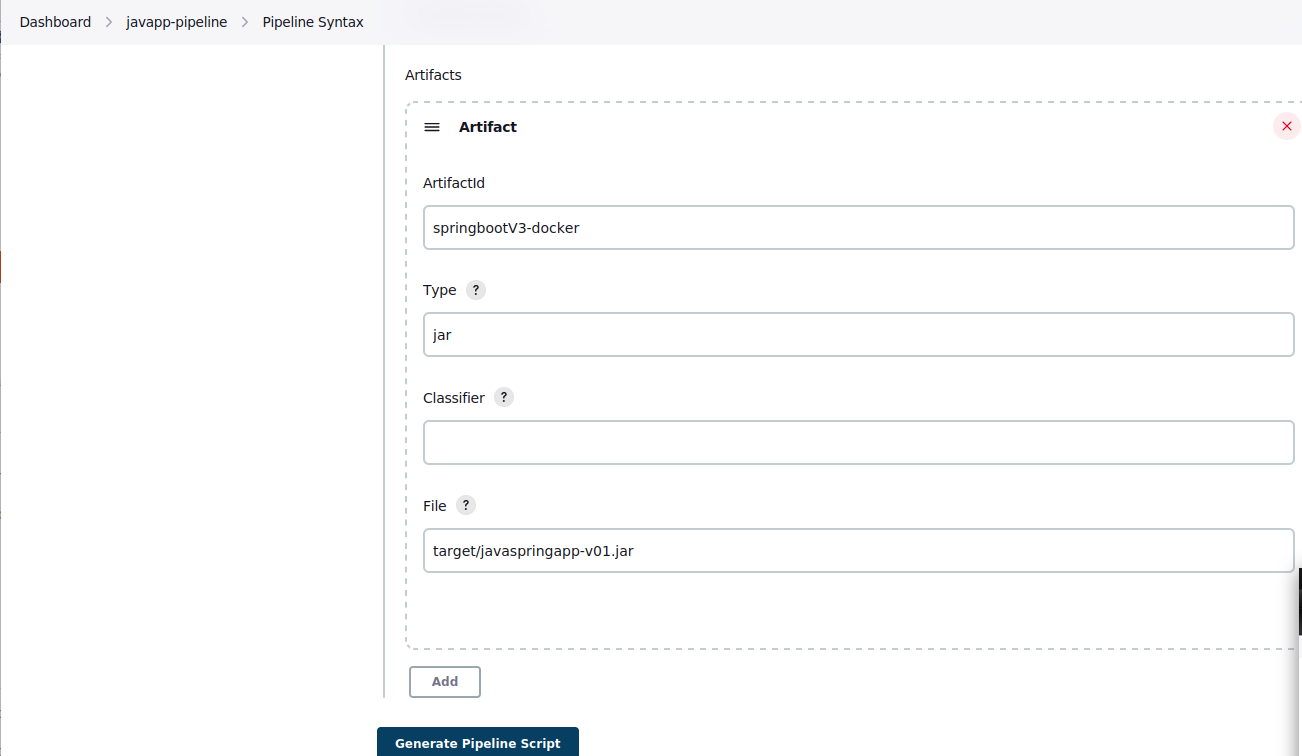
- Now back to the Jenkins Pipeline Syntax page, provide **Artifacts** configuration by clicking on `Add` button like:
- Provide an **ArtifactId** which can be get by looking again in the pom.xml file https://github.com/Tcarters/SpringBootApp_and_DevOps/blob/master/pom.xml

- For the `Type` , we choose a **Jar** file type
- And finally the `File` name as `target/javaspringapp-v01.jar`, which should normally be available in the pom.xml file build code section line ...
- Final Artifact review :
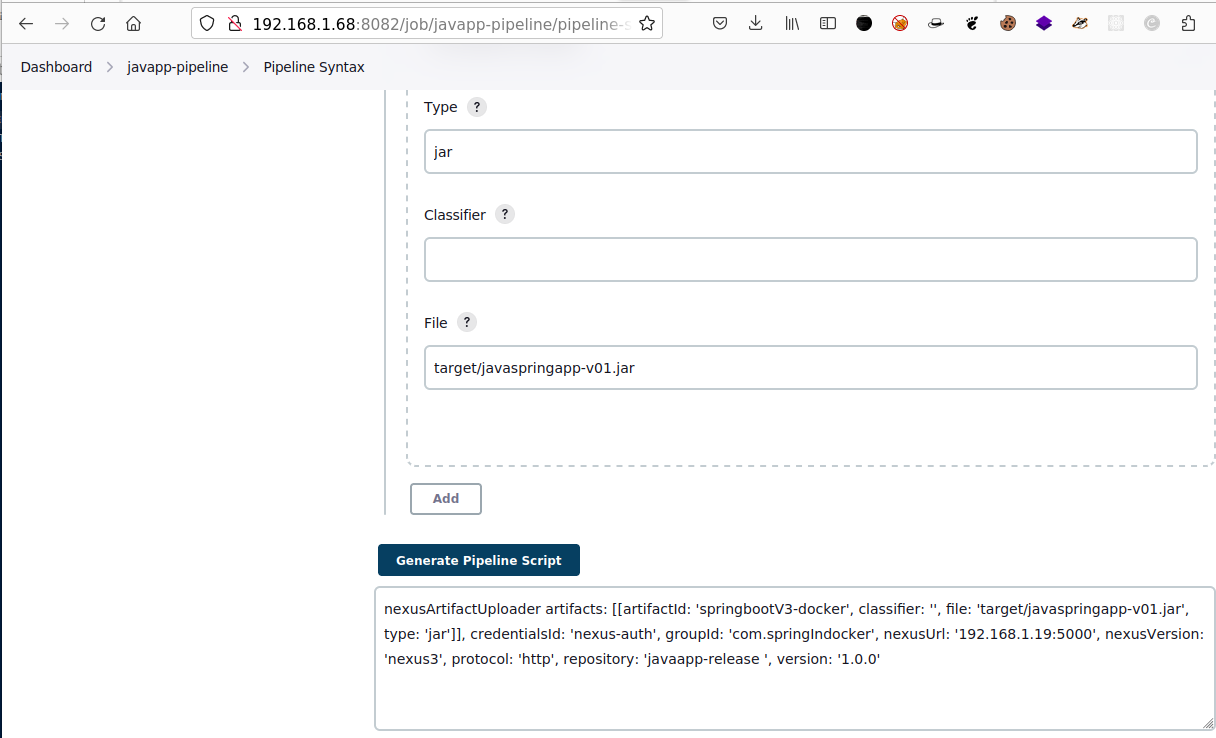
- Still on current Job, Click Pipeline script to generate it
- The Artifact script generated:
```bash
nexusArtifactUploader artifacts: [[artifactId: 'springbootV3-docker', classifier: '', file: 'target/javaspringapp-v01.jar', type: 'jar']], credentialsId: '', groupId: 'com.springIndocker', nexusUrl: '192.168.1.19:5000', nexusVersion: 'nexus3', protocol: 'http', repository: 'javaapp-release ', version: '1.0.0'
```
### 5.4 Update the Jenkinsfile script with a new stage for nexus Integration :
- First us tested with Master branch using the version ``1.0.0``
```bash
stage('Upload our Jar file to Nexus server '){
steps{
script {
nexusArtifactUploader artifacts: [
[
artifactId: 'springbootV3-docker',
classifier: '',
file: 'target/javaspringapp-v01.jar',
type: 'jar'
]
],
credentialsId: 'nexus-auth',
groupId: 'com.springIndocker',
nexusUrl: '192.168.1.19:5000',
nexusVersion: 'nexus3',
protocol: 'http',
repository: 'javaapp-release ',
version: '1.0.0'
}
} //end steps
} //stage8
```
- Result of The build process with the Master branch on version ``1.0.0 ``
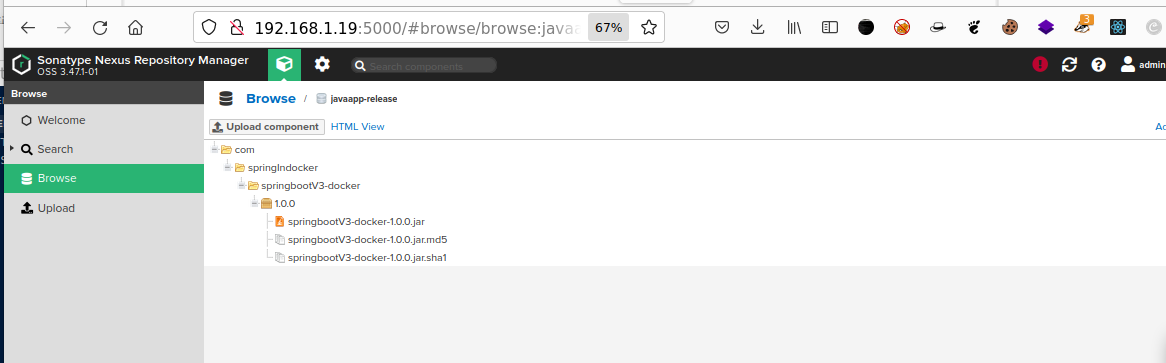
- Consultation of package uploaded on the ``Nexus server ``
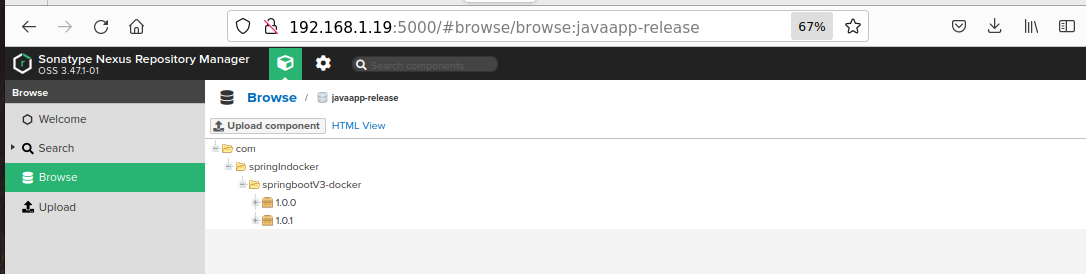
### 5.5 Test again with version 1.0.1 of ``pom.xml`` on branch nexus-integration :
- The pom.xml file of the package looks like :

- Build again the pipeline , we see a second package 1.0.1 in our nexus Repository
- - -
### Possible Errors to get while building the pipeline for Nexus Integration
#### Case of using ``pipeline utility steps``
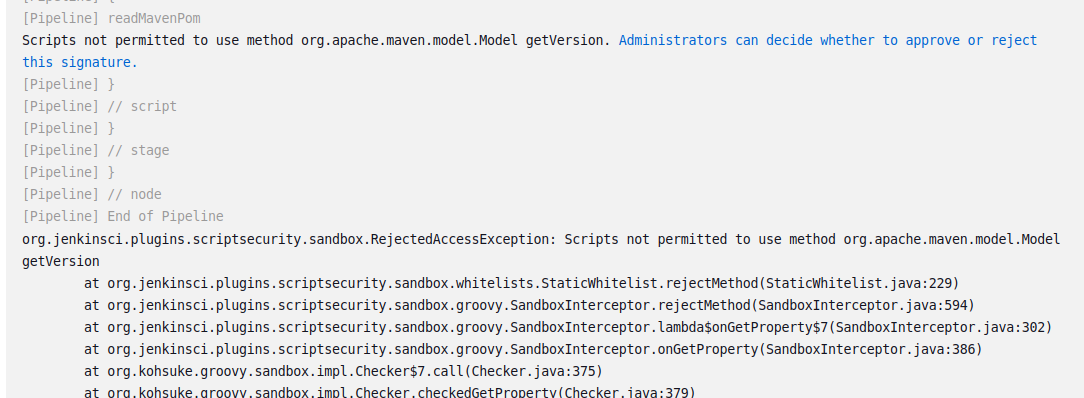
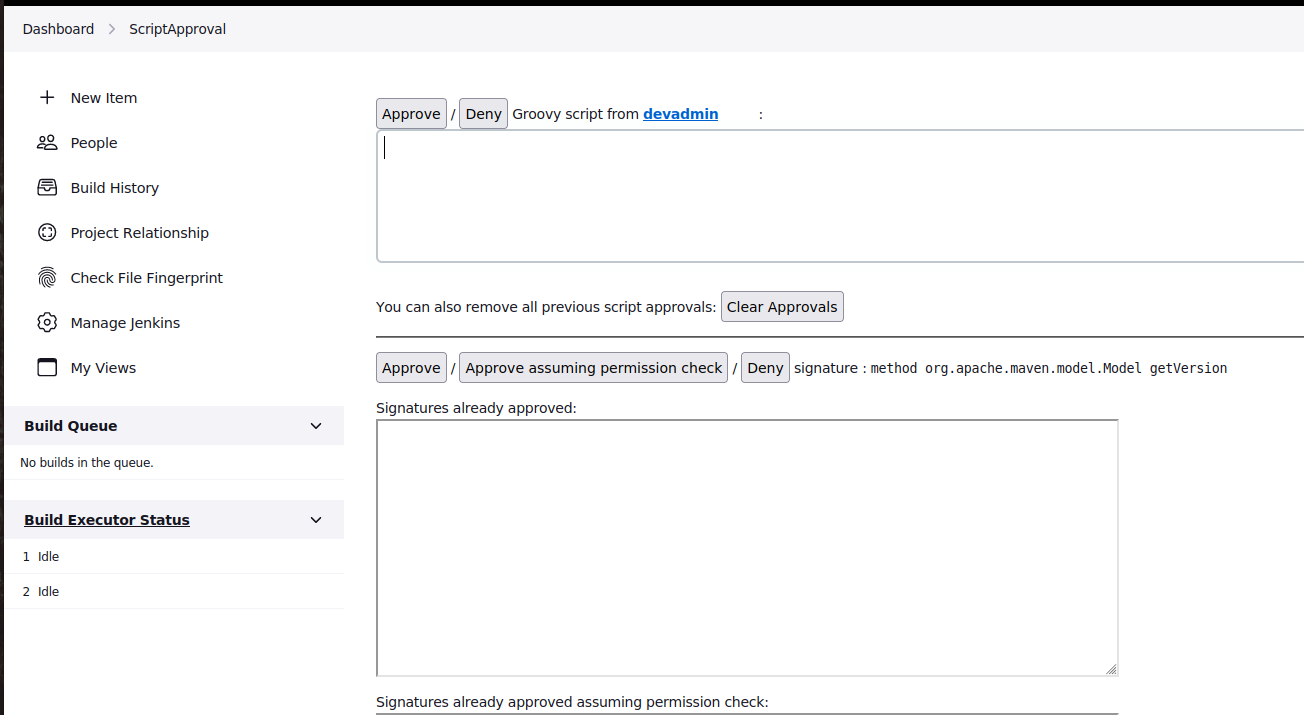
- In case , we got error for script Approval , click on the `blue` link link on below to get access to the script
- Click *Approve* to give it access
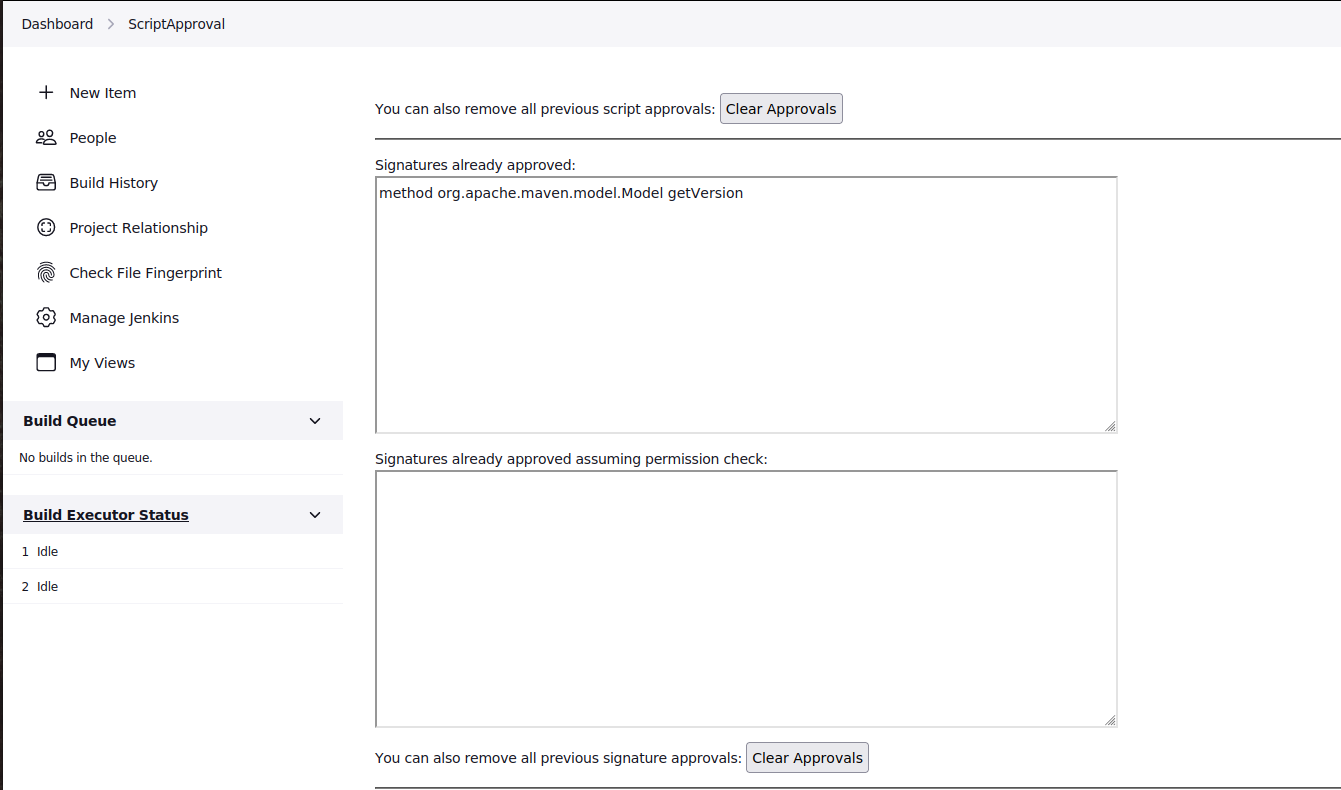
- At the end of access given , we got :
- - -
- :exclamation: Step 5.4 & 5.5 for 5.6 are the same but we prefer the 5.6 because of the Dynamic support in the script :exclamation:
### 5.6 Updating our Pipeline script with SNAPSHOT creation and Dynamic support :
- For this step, we used the branch **nexus-snapshotrepo**
- The stage 8 will be written like this :
```bash
stage('Upload our Jar file to Nexus server '){
steps{
script {
def readPomVersion = readMavenPom file: 'pom.xml'
def nexusRepo = readPomVersion.version.endsWith("SNAPSHOT") ? "javaapp-snapshot" : "javaapp-release"
nexusArtifactUploader artifacts: [
[
artifactId: 'springbootV3-docker',
classifier: '',
file: 'target/javaspringapp-v01.jar',
type: 'jar'
]
],
credentialsId: 'nexus-auth',
groupId: 'com.springIndocker',
nexusUrl: '192.168.1.19:5000',
nexusVersion: 'nexus3',
protocol: 'http',
repository: nexusRepo, //'javaapp-release',
version: "${readPomVersion.version}" //using dynamic reading version '1.0.0'
} // end script
} //end steps
}//stage8
```
- And Finally, run the pipeline with the new branch **nexus-snapshotrepo** for snapshot creation of the repository https://github.com/Tcarters/SpringBootApp_and_DevOps
### 5.7 Build Result
- On the Nexus platform, we can see our Artifact snaphost uploaded successfully by jenkins.
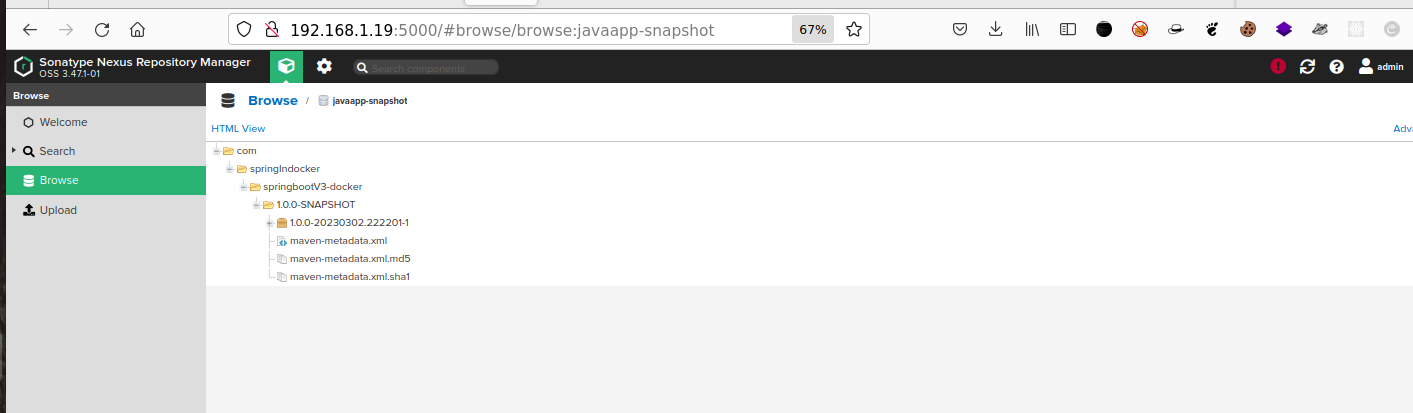
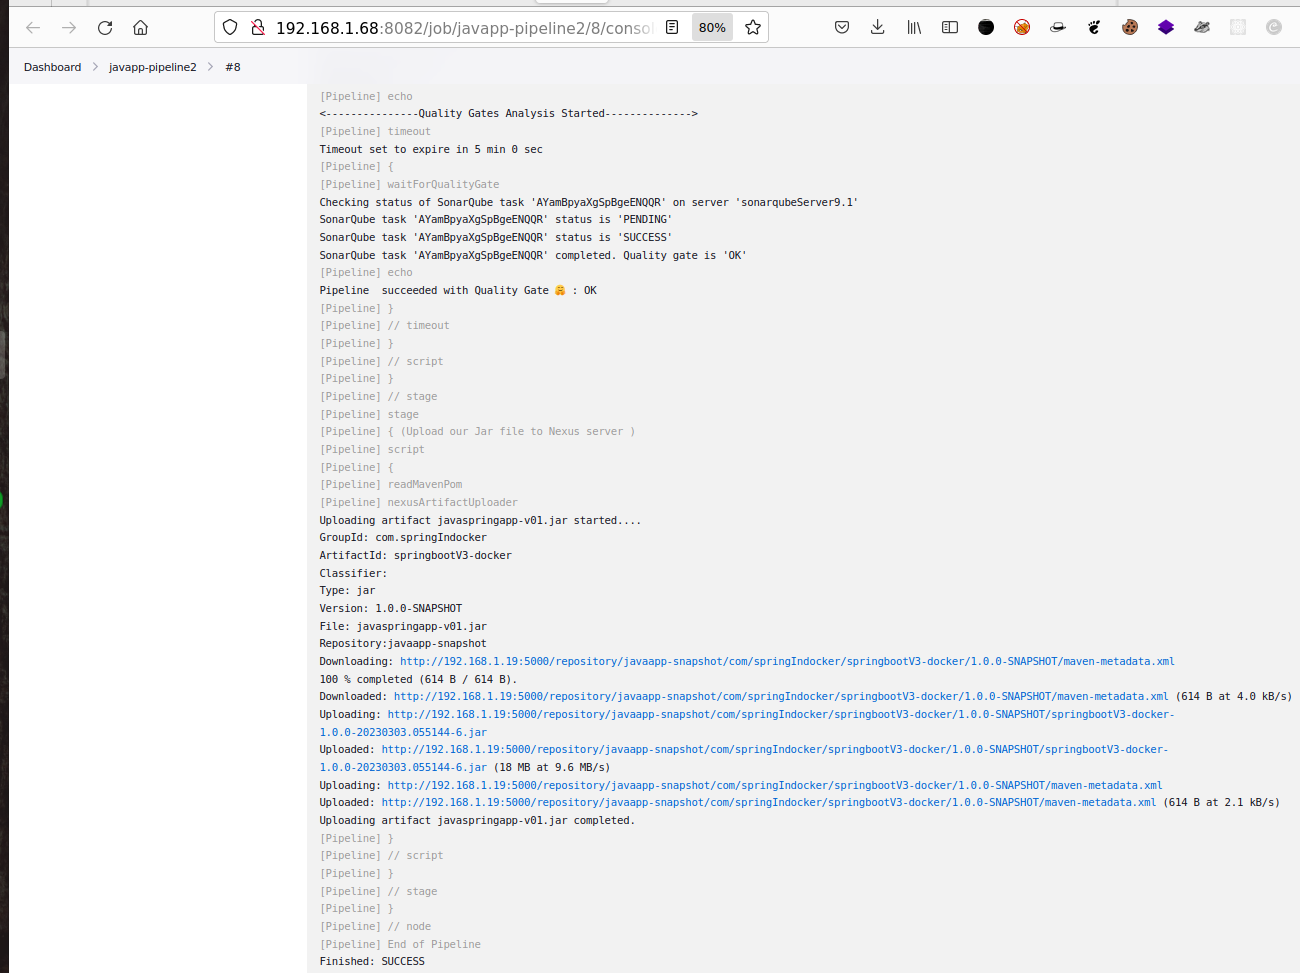
- Console Output in Jenkins platform :
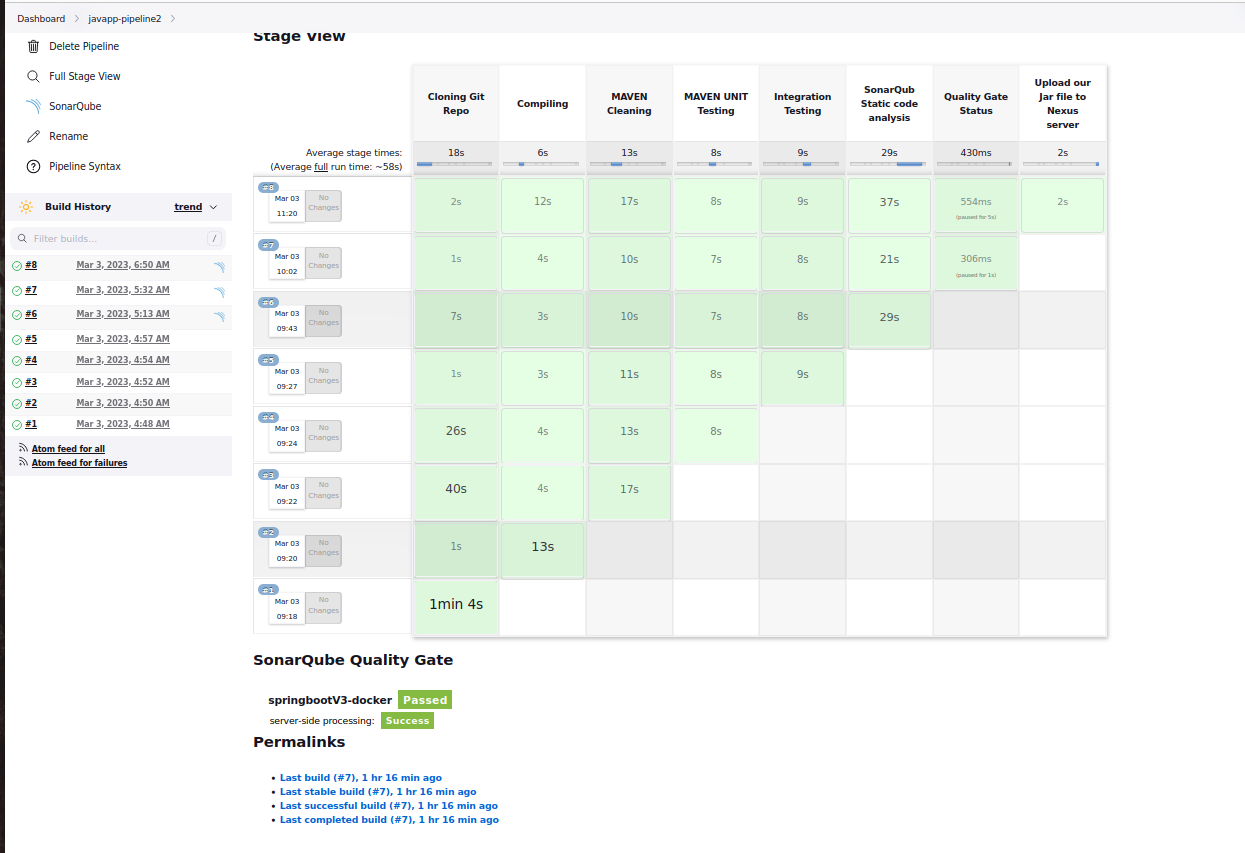
- Jenkins Dashboard View Result :
## Step 6: Build the Docker Image of our Application after Nexus stage
### 6.1 Define a Dockerfile
- For this step, we'll work with the branch **nexus-snapshotrepo** of our current Repository: https://github.com/Tcarters/SpringBootApp_and_DevOps
- And the Dockerfile is already defined in the gitHub repo for the above mentioned branch.
- For that , we have to create a ``Dockerfile``
- Content of ``Dockerfile`` :
```bash
FROM maven as build
LABEL maintainer=" Tcarters a.k.a @Tdmund_"
WORKDIR /app
COPY . .
RUN mvn install
FROM openjdk:11.0
WORKDIR /app
COPY --from=build /app/target/javaspringapp-v01.jar /app/
EXPOSE 8080
CMD [ "java", "-jar", "javaspringapp-v01.jar" ]
```
### 6.2 Update the Jenkinsfile with a new stage:
- ❗Before continue, if docker isn't installed on local machine running jenkins; go and install it.
- For Docker configuration and Integration to Jenkins , check this Repo: https://github.com/Tcarters/mini-DevOps-Project_jenkins-springBoot-Docker
- New stage script :
```bash
stage('Build Docker Image of App'){
steps{
script {
echo 'Starting Docker Image building'
echo 'Build Image from current Jenkins job-name & build-id'
sh 'docker image build -t $JOB_NAME:v1.$BUILD_ID .' // Don't forget at cmd end ``point``
echo 'Tag the Image with our DockerHub name'
sh 'docker image tag $JOB_NAME:v1.$BUILD_ID tcdocker2021/springbt-in-docker:from_Nexus_Snapshot '
echo 'Listing current Images '
sh 'docker image ls'
}
}
} //end stage9
```
#### 6.2.1 Result of the pipeline build
- Console Output view :
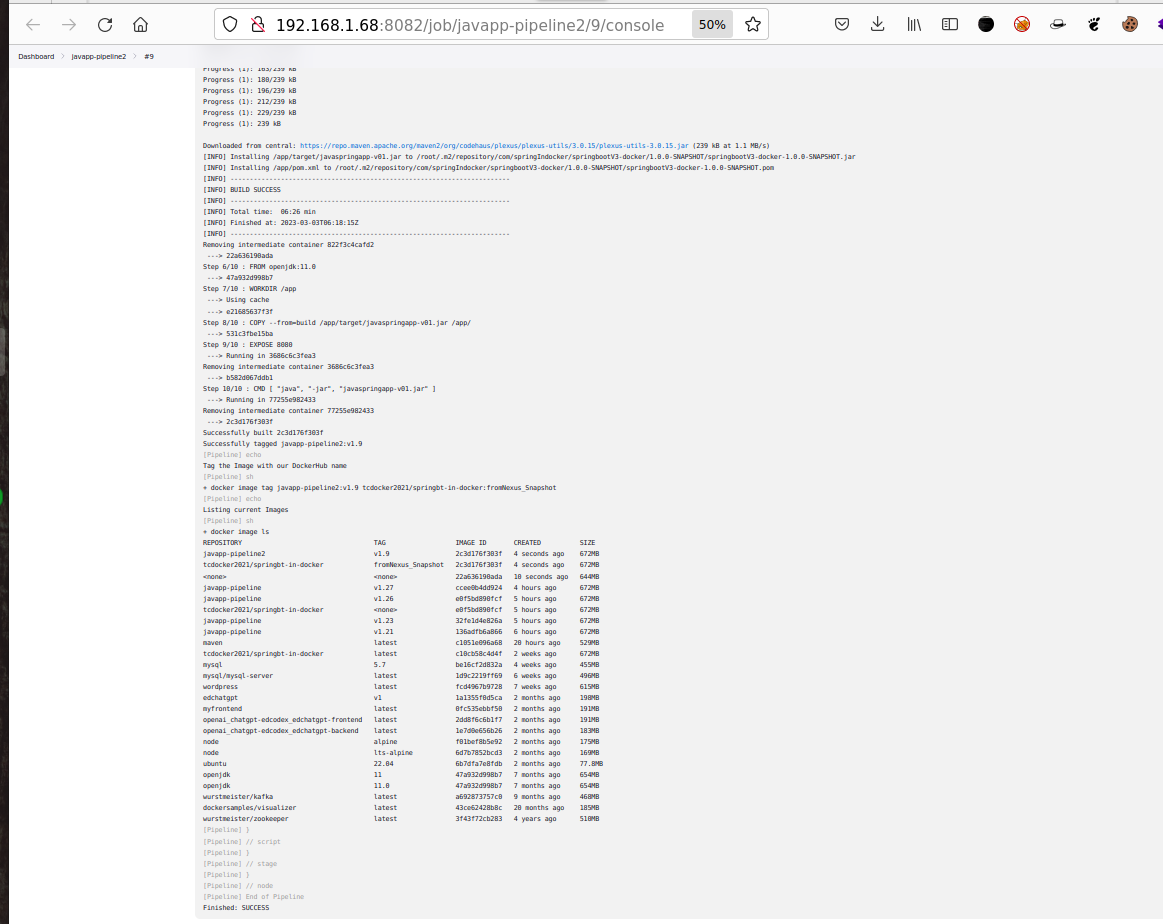
- Dashboard View :
## Step 7: Push the App Image to DockerHub
### 7.1 Get script from Pipeline Syntax
- Looking at ``Dashboard > current Job > Pipeline Syntax`` and select ``withCredentials`` by which we can bind our DockerHub credentials to Jenkins variable
- Under **Bindings**, choose **Secret text**
- After Provide your ``DockerHub Account password`` and then click ``Generate Pipeline Script``
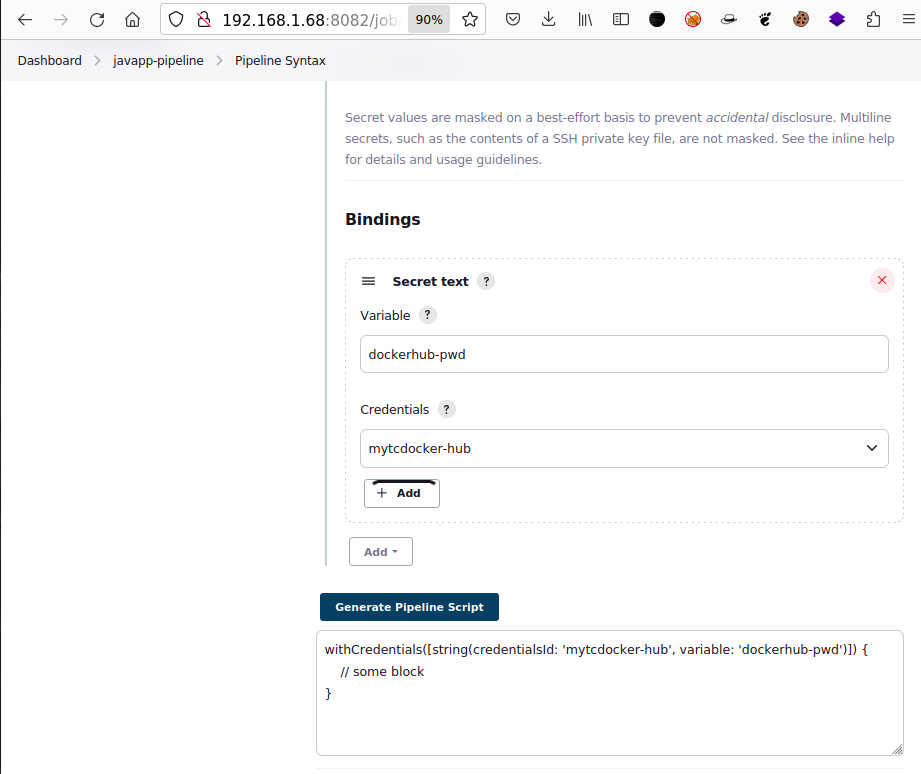
- Copy above script to update our new stage in jenkinsfile
### 7.2 Update the Jenkinsfile with a new stage for Image push
- Our new stage to be added will be:
```bash
stage('Push Image to DockerHub'){
steps{
script{
echo 'Logging to Docker registry.....'
withCredentials([string(credentialsId: 'mytcdocker-hub', variable: 'dockerhub-pwd')]) {
sh 'docker login -u tcdocker2021 -p ${dockerhub-pwd}' //logging to my DockerHub account
}
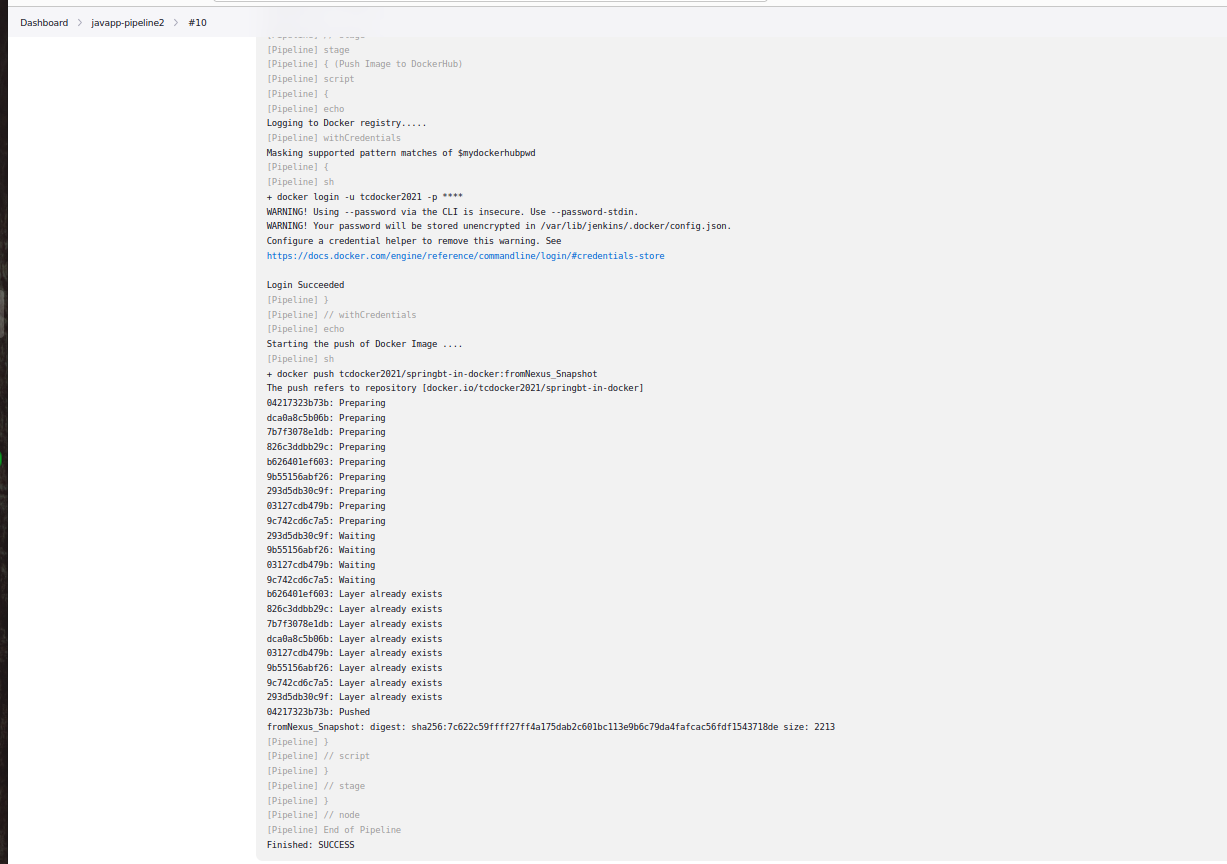
echo 'Starting the push of Docker Image ....'
sh ' docker push tcdocker2021/springbt-in-docker:fromNexus_Snapshot'
}
}
} // end stage10
```
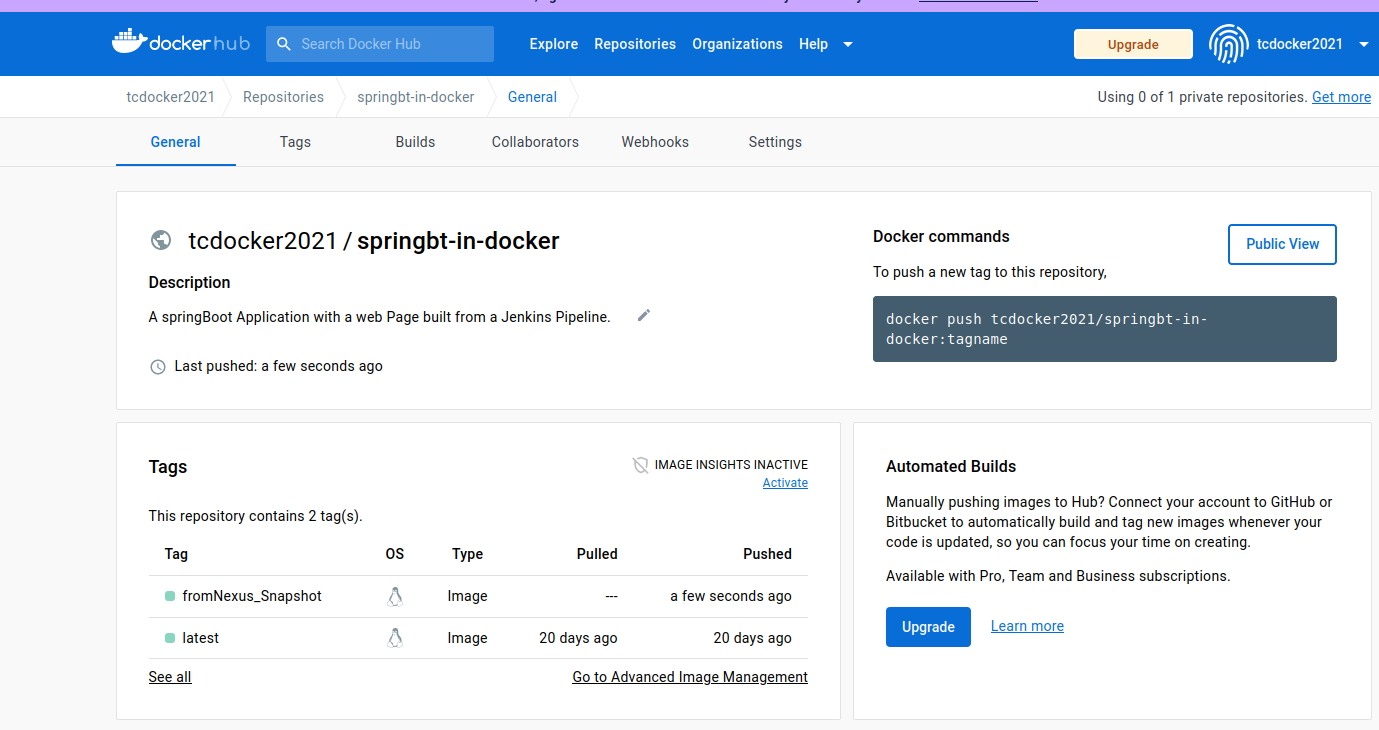
### 7.3 Visualizing Results of Image deployed on DockerHub
- On the DockerHub Dashboard, we can see our App Image successfully deployed with tag **fromNexus_Snapshot**
- Console Output View on Jenkins platform

- Dashboard view
## Step 8: Launch a local Container of the App.
- With Jenkinsfile , we have to add a new stage to launch a Docker container of the App.
- Content of new stage :
```bash
stage ('Launch a container of App') {
steps {
script {
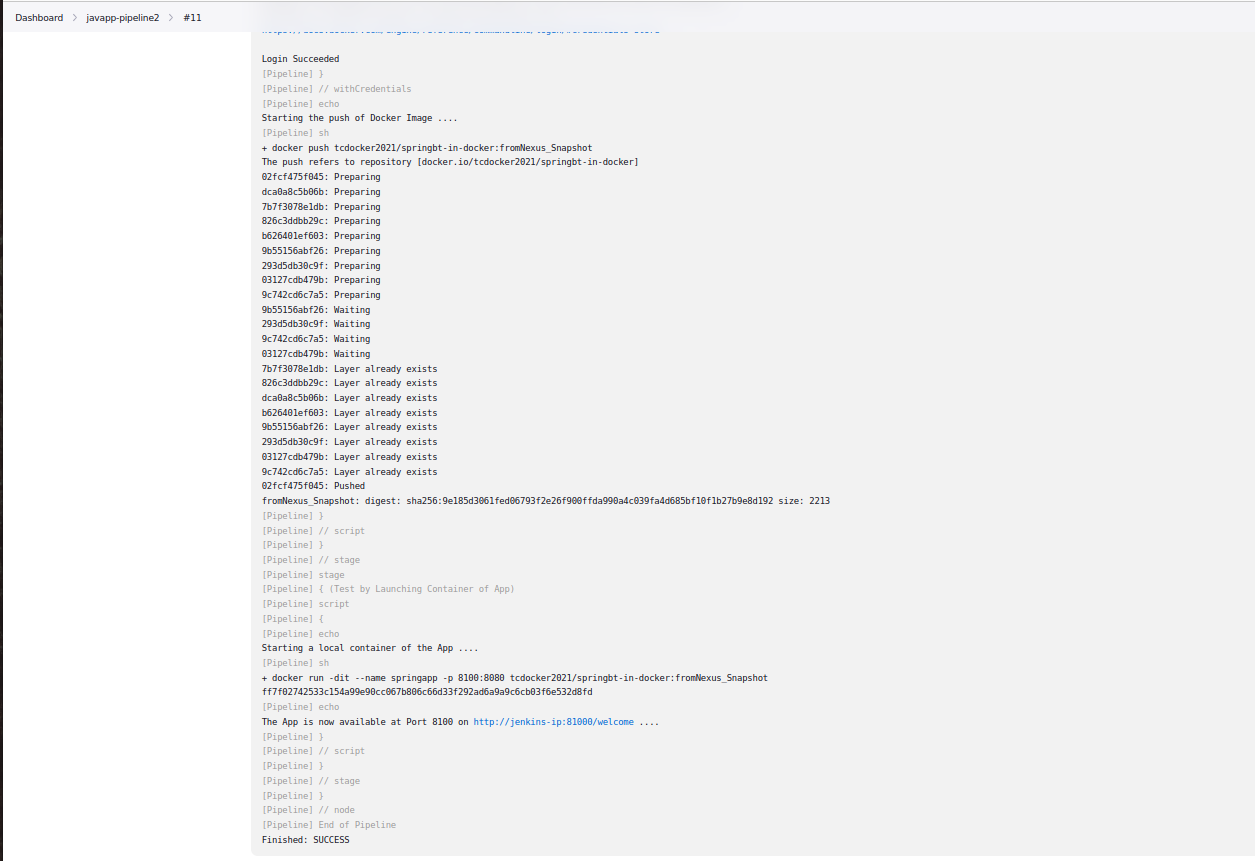
echo 'Starting a local container of the App ....'
sh 'docker run -dit --name springapp -p 8100:8080 tcdocker2021/springbt-in-docker:fromNexus_Snapshot '
echo 'The App is now available at Port 8100 on http://jenkins-ip://81000/welcome ....'
}
}
} // end stage11
```
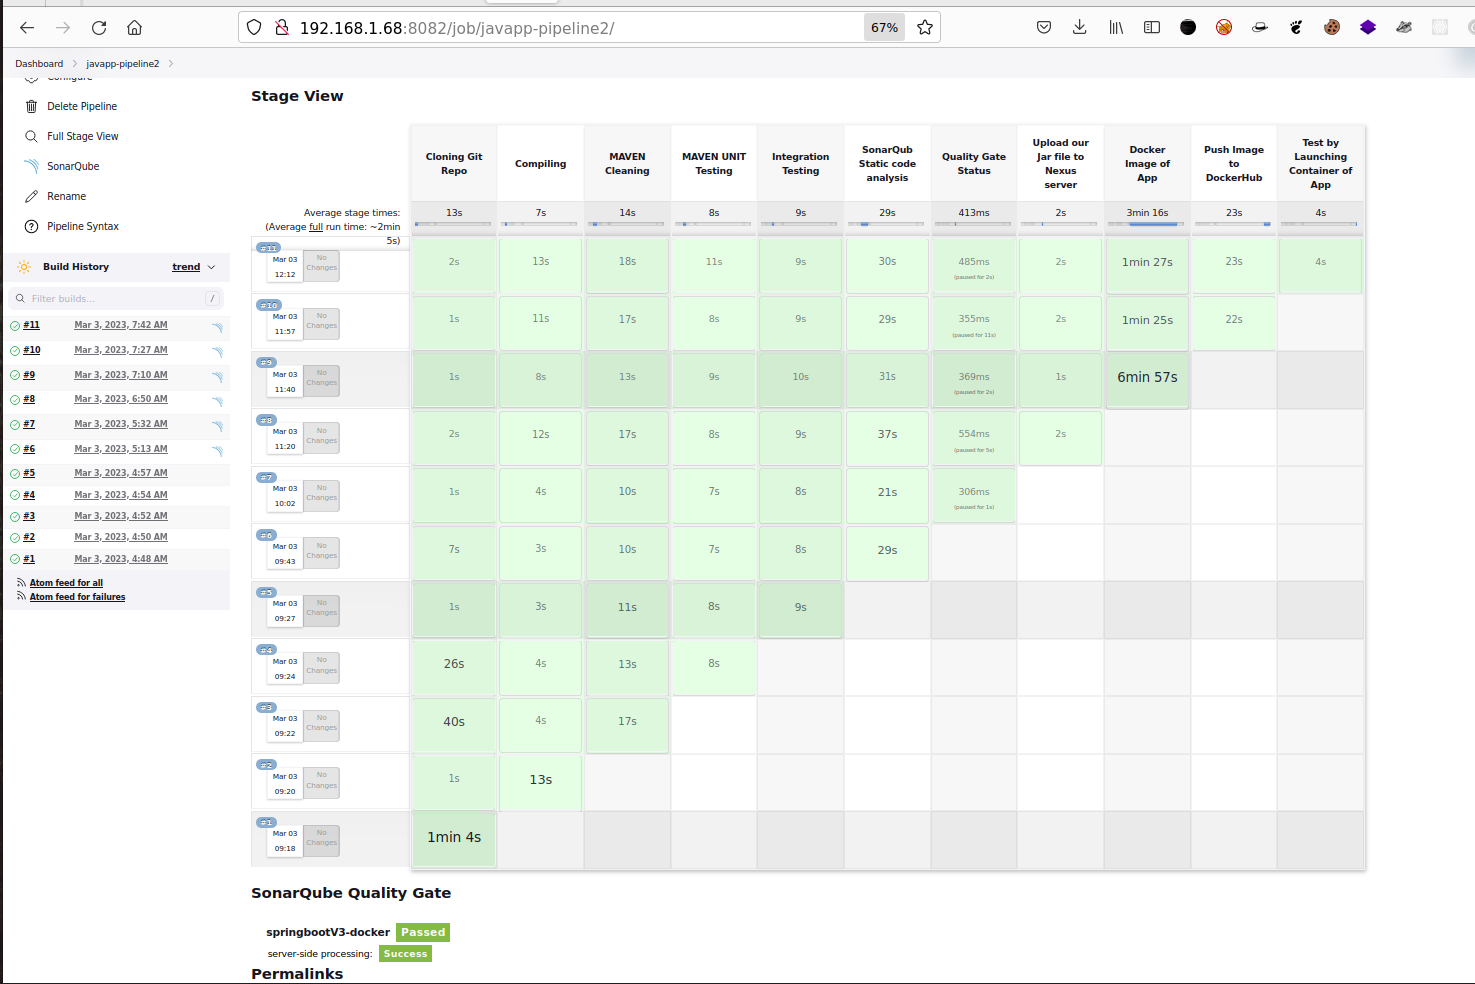
## 9. Final Results
- On local Jenkins machine, we can see our Container launched successfully through Jenkins
- Console Output View :
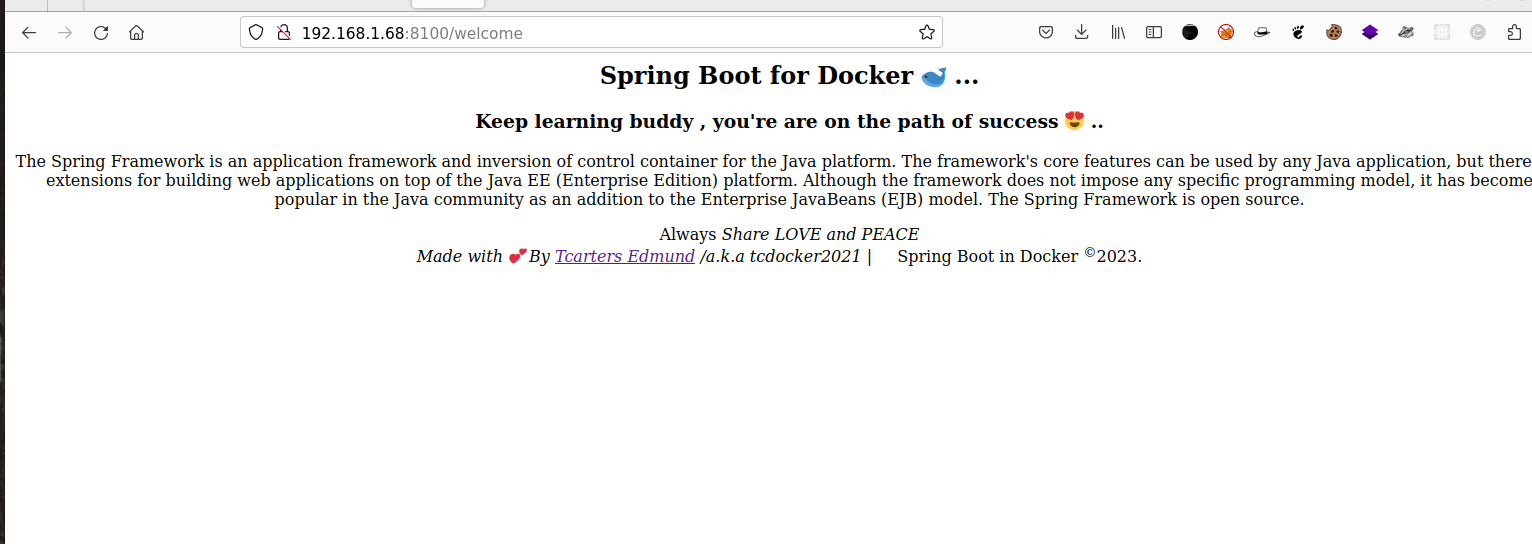
- Accessing the App on our local browser:
- Dashboard View:
### Waooooh , we did 🤟 ...... TIME TO GET A COFFE 😵....
- **Idea for Next Project 🤔** And if we don't launch the Docker Container in local Jenkins Server but instead, we give this task to a cluster orchestrator like K8s... ? 🤔