https://github.com/techwithtim/Langflow-RAG-Tutorial
https://github.com/techwithtim/Langflow-RAG-Tutorial
Last synced: 5 months ago
JSON representation
- Host: GitHub
- URL: https://github.com/techwithtim/Langflow-RAG-Tutorial
- Owner: techwithtim
- Created: 2024-04-17T10:56:19.000Z (over 1 year ago)
- Default Branch: main
- Last Pushed: 2024-07-18T10:50:24.000Z (over 1 year ago)
- Last Synced: 2024-11-06T09:07:03.745Z (about 1 year ago)
- Size: 1.04 MB
- Stars: 30
- Watchers: 2
- Forks: 12
- Open Issues: 1
-
Metadata Files:
- Readme: README.md
Awesome Lists containing this project
- jimsghstars - techwithtim/Langflow-RAG-Tutorial - (Others)
README
# Langflow-RAG-Tutorial
[](https://github.com/yourusername/Langflow-RAG-Tutorial/stargazers)
[](https://github.com/yourusername/Langflow-RAG-Tutorial/network/members)
[](https://github.com/yourusername/Langflow-RAG-Tutorial/blob/main/LICENSE)
[](https://www.python.org/downloads/)
[](https://github.com/langflow-ai/langflow)
[](https://www.youtube.com/watch?v=rz40ukZ3krQ)
[](https://www.youtube.com/@TechWithTim)
This tutorial guides you through creating an AI application that utilizes [Retrieval-Augmented Generation (RAG)](https://www.pinecone.io/learn/retrieval-augmented-generation/) without writing any code.
We'll use [LangFlow](https://docs.langflow.org/), a visual platform that makes building AI applications intuitive and straightforward.
## About Me
**Dive into the world of programming, software engineering, machine learning, and all things tech through my channel! I place a strong focus on Python and JavaScript, offering you an array of free resources to kickstart your coding journey and make your mark in the software engineering and programming fields. My mission is to deliver the finest quality tech and programming tutorials online, ensuring you receive top-notch education right at your fingertips.**
Links
 **Become a Developer**[techwithtim.net/dev](https://www.youtube.com/redirect?event=channel_description&redir_token=QUFFLUhqa29ENVE4UnVlRVlzdHZQSFllZ3lzN1U5OXNTZ3xBQ3Jtc0tudXlsLUh1S00xVG50ckhpTVpFM09JTVhvREZ5WlVWcnhvYjBCYUFRZ3ZxX080M0VUM2VjZmNGMDJWdlpkQk1SVmFBT2NxWnk5YUZWV2hWUFczVVQxMnFvTVdSR3VhN3VnVE9taTBLQ1dSSVRJQVRJVQ&q=https%3A%2F%2Ftechwithtim.net%2Fdev)
 **Instagram**[instagram.com/tech_with_tim](https://www.youtube.com/redirect?event=channel_description&redir_token=QUFFLUhqa1EyMThsR3cyQVhFRWpCb3FlMkk4UGxLUGxpUXxBQ3Jtc0tsaTJaT0g3OGR3NHBScS05dU5aODRYeUZ2QkttZjFrQVhRRzloTzlKejhtTDgyb3lPSC02TTQyTTZUSzhfQ3RKbzlPNmhqMWpvRDZqcmFfRmtOdG5zYXhxX0hyT1YtTDZCVkpZbDBGNnQxUC1ndlVERQ&q=https%3A%2F%2Fwww.instagram.com%2Ftech_with_tim%2F)
 **Website**[techwithtim.net](https://www.youtube.com/redirect?event=channel_description&redir_token=QUFFLUhqa21ZZVdCOXZRSmlDeHZlSk9xUTRCSzhFOWdCQXxBQ3Jtc0tuUjRBekp2ZlM1MzFTOEVQRVp4enhoSDEyQk1Wc3ZyaVlxWlhzWHBuZTFKVVZPenF4VVA3ZEk0U3RYUlB4MEFLU1NlVlowa25PTGNWaXQtTTh6Y3RUMHZLOGZTSGVydmU0RnM0Zy1OTlhIdFc1YVAtWQ&q=https%3A%2F%2Ftechwithtim.net)
 **Discord**[discord.gg/pr2k55t](https://www.youtube.com/redirect?event=channel_description&redir_token=QUFFLUhqa3pfWDY5c1d2aFdYS3dIM1M0dlIxa1ZPUFBNd3xBQ3Jtc0trRk82cXBaZnU2VHEzb3dWNVBZRzdhXzh6T3gzT0lJZEQ3VHZTVVo2c0prbGYwVi1Obldqak9vT2x6bm9lVGtOTTZaTUFmaXQzbVMwUlcwMjNuTVV3dmZnTkRTaHB3ZXdERDRCcllESmIwdnhaaUQ1SQ&q=https%3A%2F%2Fdiscord.gg%2Fpr2k55t)
 **GitHub**[github.com/techwithtim](https://www.youtube.com/redirect?event=channel_description&redir_token=QUFFLUhqbkZGNlpjZ01jaFhYQmw4WFFBT0tHTXRyRjVVUXxBQ3Jtc0tuS1hnWEJwZlRBQTdFczhPNlFlTkJxTkpvNjZHaWJlak55SDFyUXpONnZQSTRpSTZSdV9iSG5sd29oU2w1OUtUNktMdWFERTZjMGMxbDJGcUp1SW9SMndKT2pTSGZLaElKdUFMWDNkMlREQmxhWGNxVQ&q=https%3A%2F%2Fgithub.com%2Ftechwithtim)
Table of Contents
1. [Introduction](#introduction)
2. [Quick Start](#quick-start)
3. [Overview](#overview)
4. [Project Demo](#project-demo)
5. [Setup/Installation](#setupinstallation)
6. [Building a Basic Chatbot](#building-a-basic-chatbot)
7. [OpenAI Integration](#openai-integration)
8. [VectorStore Databases](#vectorstore-databases)
9. [Adding RAG](#adding-rag)
10. [Testing The App](#testing-the-app)
11. [Additional Features](#additional-features)
12. [Troubleshooting](#troubleshooting)
13. [Best Practices and Optimization](#best-practices-and-optimization)
14. [FAQ](#faq)
15. [Contributing](#contributing)
16. [Changelog](#changelog)
17. [Related Projects](#related-projects)
18. [Helpful Tips](#helpful-tips)
19. [Resources](#resources)
---
## Introduction
In this guide, we'll walk you through creating an AI application that utilizes Retrieval-Augmented Generation (RAG) without writing any code. We'll use LangFlow, a visual platform that makes building AI applications intuitive and straightforward.
[IMAGE PLACEHOLDER: Overview of LangFlow interface]
---
## Quick Start
For experienced users who want to jump right in:
1. Install LangFlow: `pip install langflow --pre --force-reinstall`
2. Run LangFlow: `langflow run`
3. Open `http://localhost:7860` in your browser
4. Create a new flow and follow the steps in the [Building a Basic Chatbot](#building-a-basic-chatbot) section
---
## Overview
- **Video:** [Build a RAG Based LLM App in 20 Minutes! | Full Langflow Tutorial](https://www.youtube.com/watch?v=rz40ukZ3krQ)
- **Channel:** [Tech With Tim](https://www.youtube.com/c/TechWithTim)
- **Date:** 22 Apr 2024
Timestamps
- [00:00 | Overview](https://www.youtube.com/watch?v=rz40ukZ3krQ&t=0s)
- [00:33 | Project Demo](https://www.youtube.com/watch?v=rz40ukZ3krQ&t=33s)
- [02:14 | Setup/Installation](https://www.youtube.com/watch?v=rz40ukZ3krQ&t=134s)
- [04:07 | Building a Basic Chatbot](https://www.youtube.com/watch?v=rz40ukZ3krQ&t=247s)
- [09:27 | OpenAI Integration](https://www.youtube.com/watch?v=rz40ukZ3krQ&t=567s)
- [12:33 | VectorStore Databases](https://www.youtube.com/watch?v=rz40ukZ3krQ&t=753s)
- [15:00 | Adding RAG](https://www.youtube.com/watch?v=rz40ukZ3krQ&t=900s)
- [21:35 | Testing The App](https://www.youtube.com/watch?v=rz40ukZ3krQ&t=1295s)
- [23:02 | Additional Features](https://www.youtube.com/watch?v=rz40ukZ3krQ&t=1382s)
---
## Project Demo
In this section, you'll see a demo of the final AI application you'll be building. The application will be able to answer questions based on a provided PDF document using a chatbot interface.
[IMAGE PLACEHOLDER: Screenshot of the final chatbot interface]
### Watch the Demo
- **Timestamp:** [00:33](https://www.youtube.com/watch?v=rz40ukZ3krQ&t=33s)
---
## Setup/Installation
### Install LangFlow using pip.
### Ensure you have [Python 3.10](https://www.python.org/downloads/) or above installed.
- **Command to check Python version:**
```bash
python --version
```
or
```bash
python3 --version
```
- **If Python is not installed:**
- **Download and install it from** [python.org](https://www.python.org/).
- **Open your terminal and run the following command:**
```bash
pip install langflow --pre --force-reinstall
```
**Explanation:**
- `pip install` is the command to install Python packages.
- `langflow` is the name of the package.
- `--pre` allows the installation of pre-release versions.
- `--force-reinstall` forces the reinstallation of the package even if it's already installed.
### Run LangFlow locally.
- **Command to run LangFlow:**
```bash
langflow run
```
- **Open LangFlow in your browser:**
- Navigate to `http://localhost:7860` if it doesn't open automatically.
[IMAGE PLACEHOLDER: Screenshot of LangFlow running in the browser]
### Watch the Setup
- **Timestamp:** [02:14](https://www.youtube.com/watch?v=rz40ukZ3krQ&t=134s)
---
## Building a Basic Chatbot
### Create a new flow.
- **Steps:**
1. Click "New Project."
2. Select "Blank Flow."
[IMAGE PLACEHOLDER: Screenshot of creating a new flow]
### Add text and chat inputs:
1. **From the sidebar, drag and drop the "Text Input" and "Chat Input" components.**
2. **Rename "Text Input" to "Name":**
* Set it to capture the user's name.
3. **Connect the output of "Name" to the sender name input of "Chat Input."**
[IMAGE PLACEHOLDER: Screenshot of adding inputs and connecting components]
### Create a prompt template:
1. **Add a "Prompt" component.**
2. **Edit the template to include placeholders for context, question, and history:**
```markdown
Hey, answer the user's question based on the following context:
The context is this: {context}
And this is the message History: {history}
The users question is this: {question}
```
### Add chat memory:
1. **Drag and drop the "Chat Memory" component.**
2. **Connect the name input to the session ID of the chat memory.**
### Add a chat output:
1. **Drag and drop the "Chat Output" component.**
2. **Connect the output of the OpenAI component to the chat output.**
3. **Set the sender name to "AI."**
[Screenshot of the complete basic chatbot flow]

### Watch the Basic Chatbot Build
- **Timestamp:** [04:07](https://www.youtube.com/watch?v=rz40ukZ3krQ&t=247s)
---
## OpenAI Integration
### Create an OpenAI account.
- **Sign up at** [OpenAI](https://platform.openai.com/).
### Generate an OpenAI API key.
- **Steps:**
1. Go to API keys in your OpenAI dashboard.
2. Click "Create new secret key."
3. Name the key to LangFlow-API (Makes things easier if you use more than one OpenAI API key)
4. Give it access to everything.
5. Copy the generated key.
[Screenshot of OpenAI API URL and Wherer the API Key is found.]

### Connect to OpenAI:
1. **Add an "OpenAI" component.**
2. **Name it OpenAI_Key_New.**
3. **Paste your OpenAI API key in the Value field (Box).**
4. **Make the 'Type' Credential.**
5. **Click Save Variable.**
6. **Drag the Chat Output from the menu and drage it to the left of OpenAI and place it beside.**
7. **Drag and link the connection from OpenAI 'text' to the Chat Output 'Message'.**
8. **Connect the prompt to the OpenAI component.**
[IMAGE PLACEHOLDER: Screenshot of OpenAI integration in LangFlow]

### Watch the OpenAI Integration
- **Timestamp:** [09:27](https://www.youtube.com/watch?v=rz40ukZ3krQ&t=567s)
---
## VectorStore Databases
### Create a free account on DataStax Astra.
- **Go to** [DataStax Astra](https://dtsx.io/3vZk6n2) **and sign up.**
### Create a new database.
- **Steps:**
1. Click on "Create Database."
2. Select "Serverless Vector Database."
3. Name your database (e.g., "LangFlowTutorial").
4. Choose your cloud provider and region.
5. Click "Create Database."
### Configure Astra DB:
1. **Add an "Astra DB" component.**
2. **Enter your Astra DB endpoint, token, and collection name.**
3. **Connect the embeddings to the Astra DB component.**
[IMAGE PLACEHOLDER: Screenshot of Astra DB configuration in LangFlow]
### Watch the VectorStore Databases Setup
- **Timestamp:** [12:33](https://www.youtube.com/watch?v=rz40ukZ3krQ&t=753s)
---
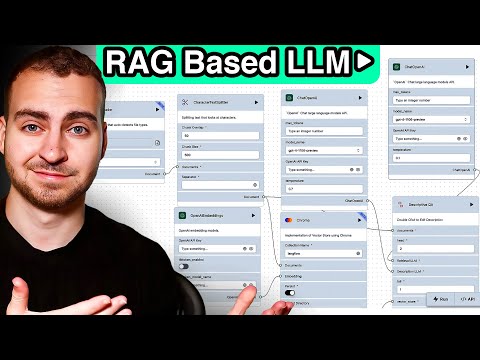
## Adding RAG
### Load the PDF file:
1. **Add a "File Loader" component.**
2. **Upload your PDF file (e.g., restaurant Q&A).**
### Split the text:
1. **Add a "Split Text" component.**
2. **Connect the file loader to the split text component.**
### Set up OpenAI embeddings:
1. **Add an "OpenAI Embeddings" component.**
2. **Connect the split text output to the embeddings input.**
### Add a Vector Search component:
1. **Connect the chat input to the Vector Search component.**
2. **Connect the embeddings to the Vector Search component.**
3. **Connect the output of the Vector Search component to the prompt context input.**
[IMAGE PLACEHOLDER: Screenshot of the complete RAG flow]
### Watch Adding RAG
- **Timestamp:** [15:00](https://www.youtube.com/watch?v=rz40ukZ3krQ&t=900s)
---
## Testing The App
### Test the flow:
1. **Click "Run" at the top of the LangFlow interface.**
2. **Enter your name and ask a question (e.g., "What time are you open?").**
### Check for responses:
- **Ensure the chatbot responds correctly by utilizing the information from the PDF.**
[IMAGE PLACEHOLDER: Screenshot of testing the chatbot]
### Watch Testing The App
- **Timestamp:** [21:35](https://www.youtube.com/watch?v=rz40ukZ3krQ&t=1295s)
---
## Additional Features
### Export your flow as JSON:
1. **Click "Export" and download the JSON file.**
### Import a flow:
1. **Click "Import" and upload the JSON file to load a pre-configured flow.**
[IMAGE PLACEHOLDER: Screenshot of exporting and importing flows]
### Watch Additional Features
- **Timestamp:** [23:02](https://www.youtube.com/watch?v=rz40ukZ3krQ&t=1382s)
---
## Troubleshooting
Common Issues and Solutions
### Issue: LangFlow not starting on macOS
**Error:**
```
Error: objc[31704]: +[__NSCFConstantString initialize] may have been in progress in another thread when fork() was called. We cannot safely call it or ignore it in the fork() child process. Crashing instead. Set a breakpoint on objc_initializeAfterForkError to debug.
```
**Solution:**
1. Open your `.zshrc` file:
```bash
nano ~/.zshrc
```
2. Add the following line at the end of the file:
```bash
export OBJC_DISABLE_INITIALIZE_FORK_SAFETY=YES
```
3. Save the file and exit the editor.
4. Reload your `.zshrc` file:
```bash
source ~/.zshrc
```
5. Try running LangFlow again:
```bash
langflow run
```
For more details, see [this GitHub issue](https://github.com/langflow-ai/langflow/issues/2721).
---
## Best Practices and Optimization
1. **Use descriptive names** for your components to keep your flow organized.
2. **Optimize your prompts** for better results from the language model.
3. **Regularly update your knowledge base** to keep your chatbot informed with the latest information.
4. **Monitor and analyze chatbot performance** to identify areas for improvement.
5. **Implement error handling** to gracefully manage unexpected inputs or system issues.
---
## FAQ
Frequently Asked Questions
1. **Q: Can I use LangFlow with other language models besides OpenAI?**
A: Yes, LangFlow supports integration with various language models. Check the documentation for a full list of supported models.
2. **Q: How can I customize the appearance of my chatbot?**
A: LangFlow provides options to customize the chat interface. Explore the UI components in the sidebar for customization options.
3. **Q: Is it possible to deploy my LangFlow chatbot to a website?**
A: Yes, you can export your LangFlow as an API and integrate it into a web application. Refer to the LangFlow documentation for deployment guides.
---
## Contributing
We welcome contributions to improve this tutorial! Here's how you can contribute:
1. Fork the repository
2. Create a new branch (`git checkout -b feature/AmazingFeature`)
3. Make your changes
4. Commit your changes (`git commit -m 'Add some AmazingFeature'`)
5. Push to the branch (`git push origin feature/AmazingFeature`)
6. Open a Pull Request
Please read [CONTRIBUTING.md](CONTRIBUTING.md) for details on our code of conduct and the process for submitting pull requests.
---
## Changelog
Version History
- **v1.0.0** (2024-07-17): Initial release
- Basic chatbot setup.
- OpenAI integration.
- RAG implementation.
- Added TimeStamps.
- Added DropDown Meun in OverView.
- **v1.1.0** (2024-07-18):
- Added troubleshooting section.
- Improved documentation.
- Added Introduction.
- Added Quick Start
- Added YouTube Video to Click on.
- Added Related Projects.
- Added Change Log.
- Added Contributing.
- Added FAQ.
- Added Overview with TimeStamps.
- Added Best Practices and Optimization
- Added Troubleshooting
---
## Related Projects
- [LangChain](https://github.com/hwchase17/langchain): A framework for developing applications powered by language models.
- [Haystack](https://github.com/deepset-ai/haystack): An open-source framework for building search systems.
- [Rasa](https://github.com/RasaHQ/rasa): An open-source machine learning framework for automated text and voice-based conversations.
---
## Helpful Tips
- **Stay Organized:** Use descriptive names for your components to keep track of their functions easily.
- **Test Frequently**