https://github.com/tencentcloud/trtc-education-electron
教育场景化解决方案App,包含基础的实时音视频通信和即时通信功能,支持丰富的课堂互动(举手、点名/签到等)和教育白板。 技术栈:Electron、React、Material-ui react、Webpack、sass等。
https://github.com/tencentcloud/trtc-education-electron
electron react tencent-cloud trtc
Last synced: 9 months ago
JSON representation
教育场景化解决方案App,包含基础的实时音视频通信和即时通信功能,支持丰富的课堂互动(举手、点名/签到等)和教育白板。 技术栈:Electron、React、Material-ui react、Webpack、sass等。
- Host: GitHub
- URL: https://github.com/tencentcloud/trtc-education-electron
- Owner: TencentCloud
- License: mit
- Created: 2022-01-19T07:23:12.000Z (over 4 years ago)
- Default Branch: main
- Last Pushed: 2024-09-20T03:41:58.000Z (almost 2 years ago)
- Last Synced: 2025-01-01T10:03:40.232Z (over 1 year ago)
- Topics: electron, react, tencent-cloud, trtc
- Language: TypeScript
- Homepage:
- Size: 4.47 MB
- Stars: 69
- Watchers: 1
- Forks: 14
- Open Issues: 0
-
Metadata Files:
- Readme: README.en.md
- Changelog: CHANGELOG.md
- License: LICENSE
Awesome Lists containing this project
README
# TRTC Education for Electron: Quick start
_English | [简体中文](README.md)_
This document focuses on how to run the source code of this project. To learn more about TRTC and `TRTC Education for Electron`, please ture to [Tencent Cloud Site](https://intl.cloud.tencent.com/document/product/647/37278).
# Code Description
```
./
├── assets -- Built resource files such as installer icon
├── build -- Build directory
│ ├── app
│ └── release -- Built installer directory
├── src
│ ├── constants -- Definitions of constants shared by Electron main and renderer processes
│ ├── main -- Electron main process code
│ │ └── windows
│ ├── renderer -- Electron renderer process code
│ │ ├── ViewManager.jsx -- View management component, which loads different pages based on the URL accessed in different windows
│ │ ├── components -- UI component
│ │ ├── core -- Core business logic layer, which implements non-UI logic such as room and whiteboard logic
│ │ ├── hooks -- Use hooks shared by multiple pages
│ │ ├── initA18n.js
│ │ ├── locales
│ │ │ ├── en-US.json
│ │ │ └── zh-CN.json
│ │ ├── pages -- UI pages
│ │ ├── store
│ │ └── utils
│ └── util
├── package.json
├── babel.config.js
├── tsconfig.json
├── yarn.lock
```
# Prepare the runtime environment
> ! Note:
- Only Microsoft Windows OS and Mac OS supported.
- **The computer must have physical cameras, microphones, and speaker devices to run the project normally.**
Node.js and Yarn are required for the source code to run.
1. Install node.js.
Install [Node.js](https://nodejs.org/en/download/) (preferably a version higher than 14.16.0). Run the terminal command below to check the version.
```
node --version
```
2. Install Yarn.
- If the Node.js version is lower than 16.10, run the terminal command below to install [Yarn](https://yarnpkg.com/getting-started/install).
```
npm i -g corepack
```
- If the Node.js version is higher than 16.0, run the terminal command below to install Yarn.
> ! Note: On Windows 10 or 11, if an error occurs because of insufficient permissions, try running the commands as administrator in the Command Prompt.
```
corepack enable
```
# Run the souce code
## Step 1. Create an TRTC application
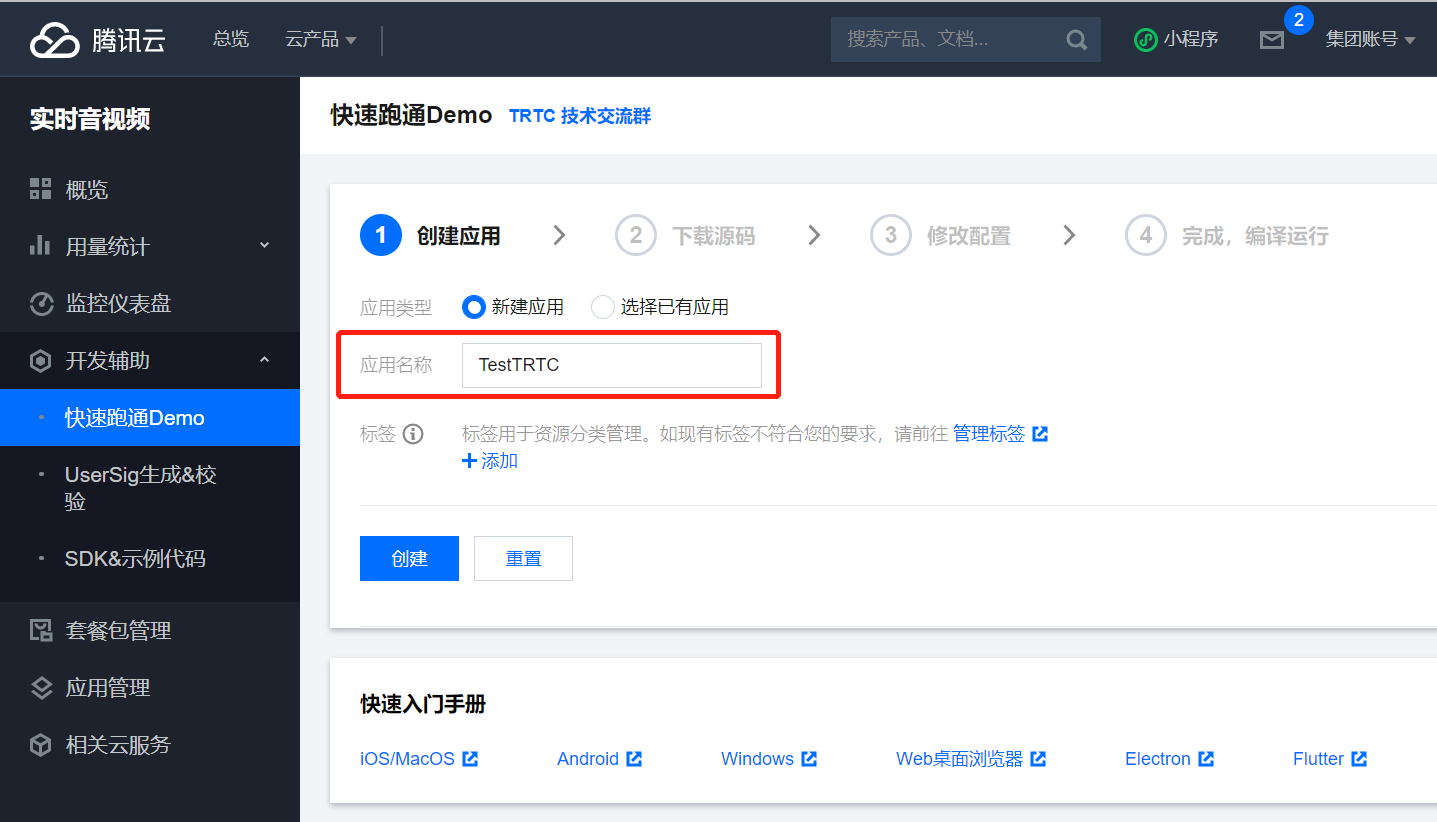
1. Log in to the TRTC console, click **Development Assistance** > **[Demo Quick Run](https://console.cloud.tencent.com/trtc/quickstart)**, enter your application name such as `TestTRTC`, and click **Create**.
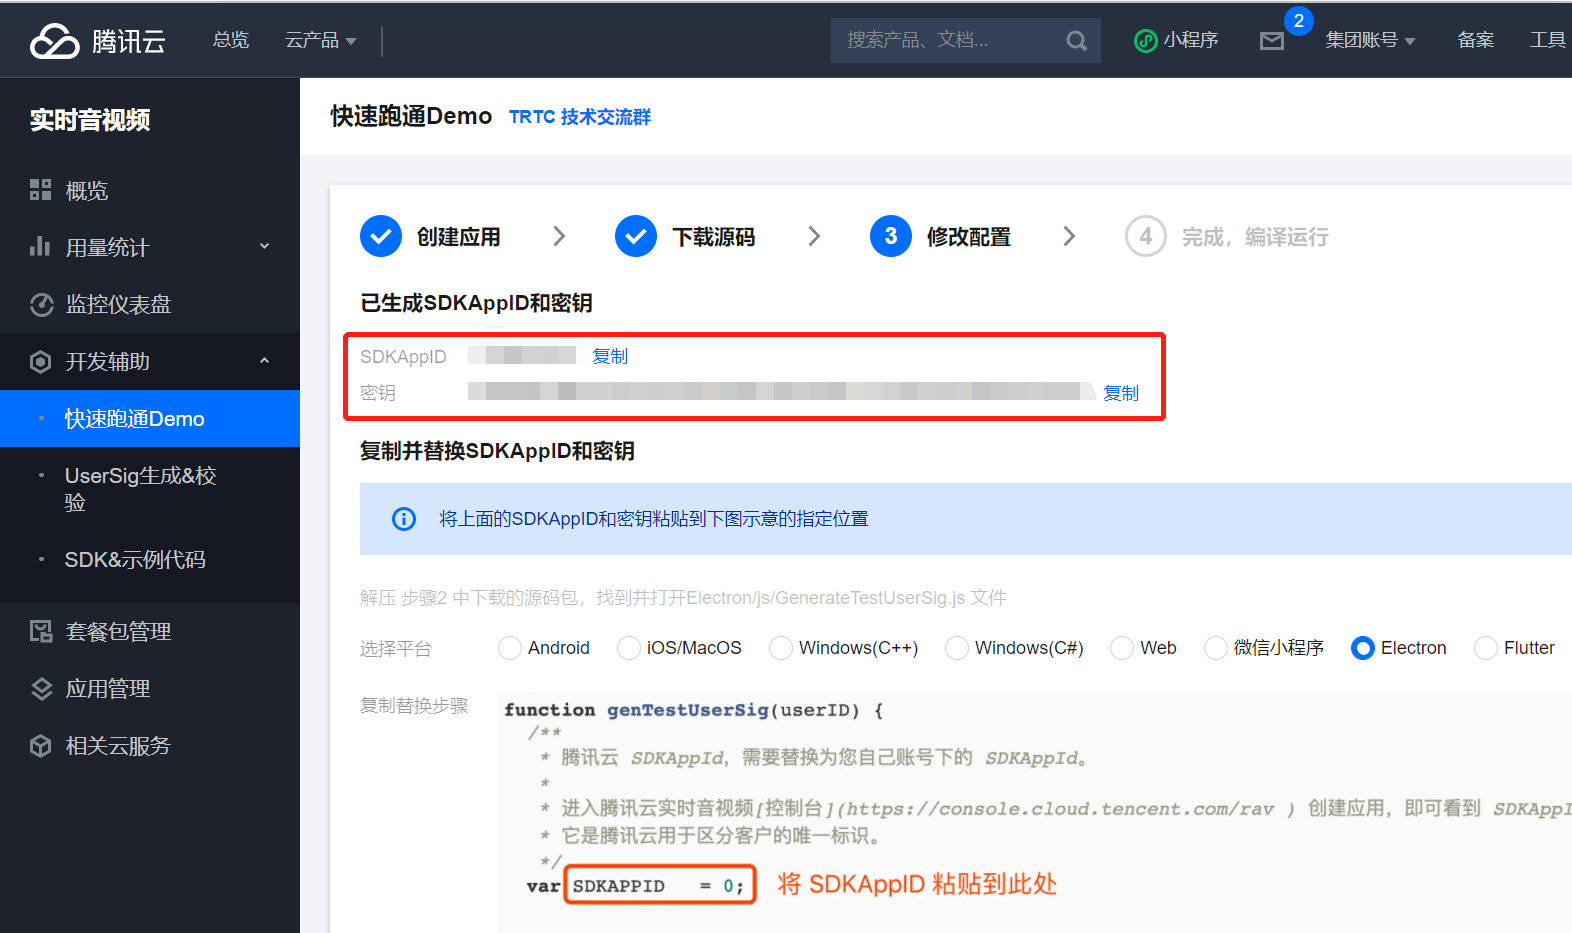
2. Click **Next**. In the **Modify Configuration** step, note down the `SDKAppID` and key.
3. Click **Relevant Cloud Services** in the left sidebar and then click **IM console > Application List**.
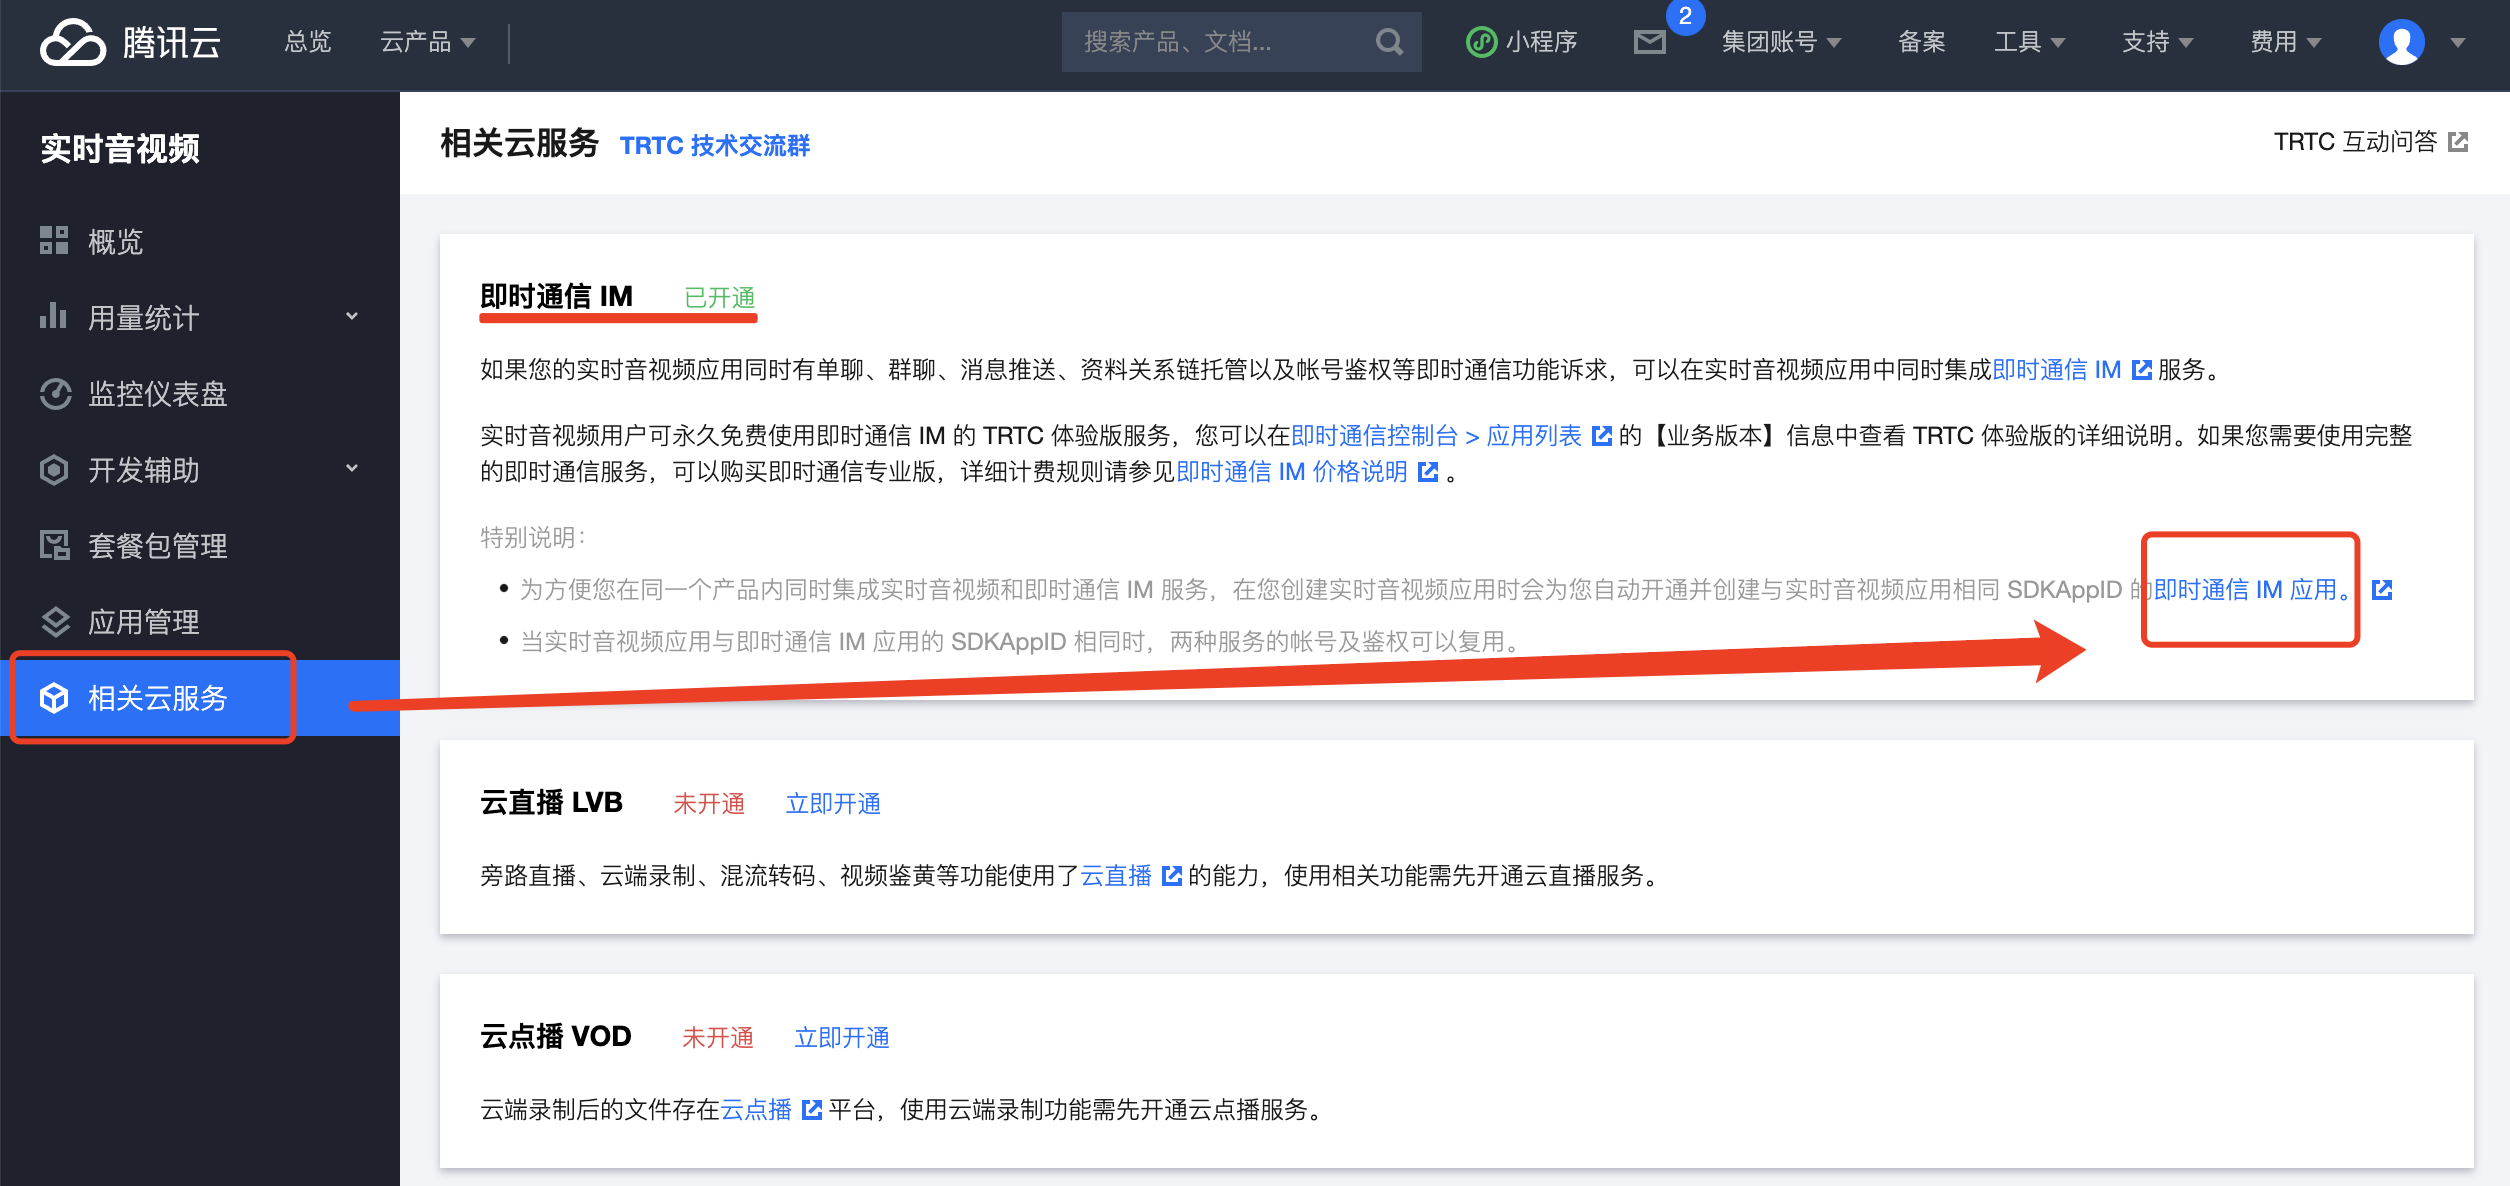
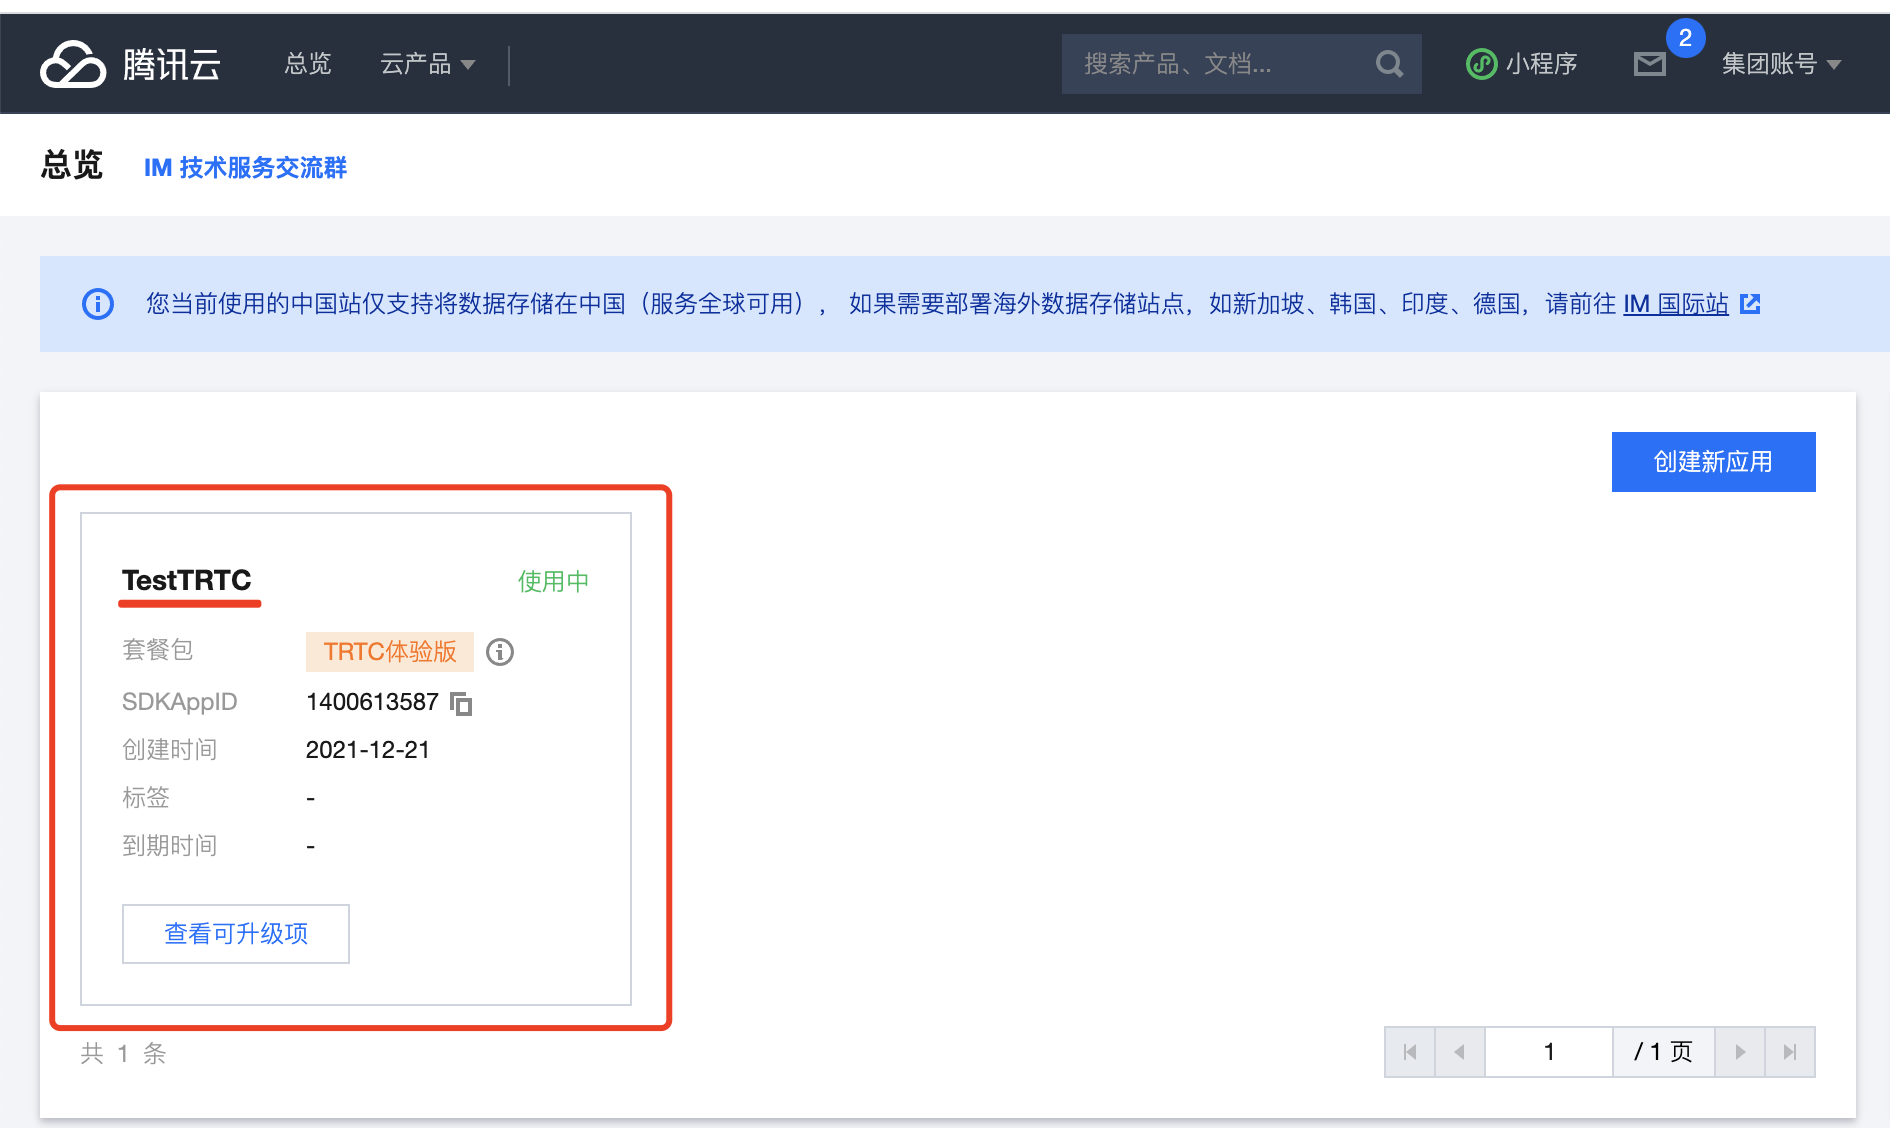
4. Click the application you created as shown below:
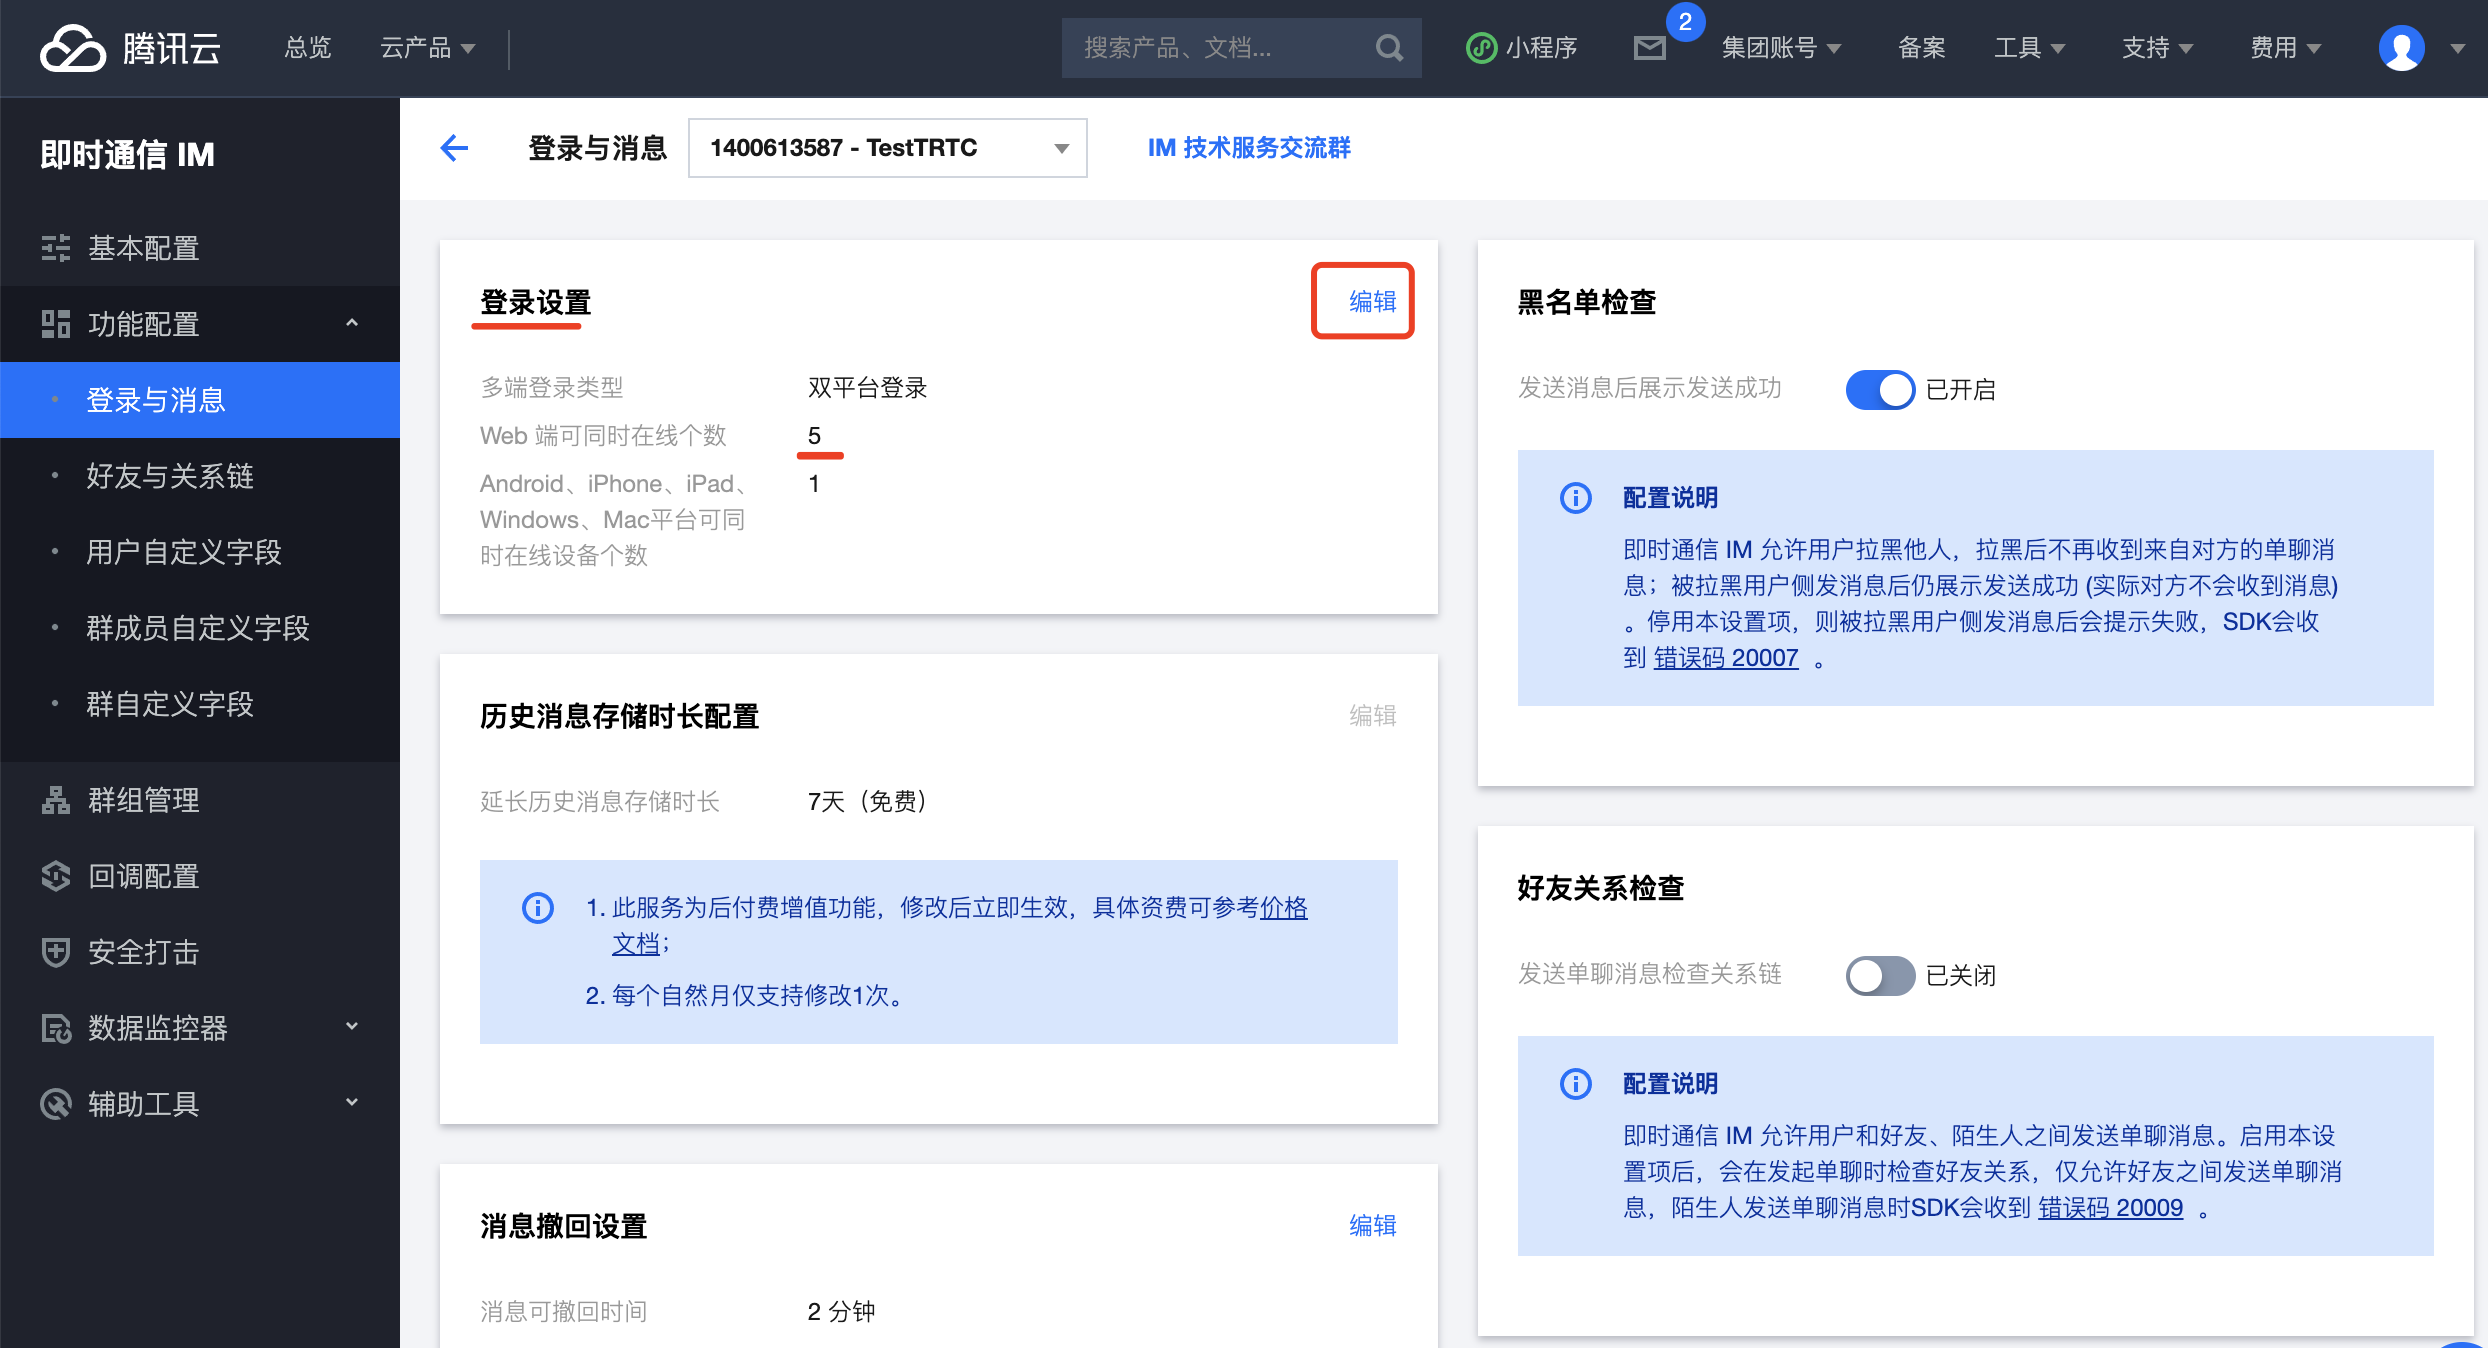
5. Click **Feature Configuration** > **Login and Message**. Under **Login Settings**, click **Edit**, and set the **Max Login Instances per User per Platform** for web to 2 or larger (the demo application requires login to only two IM instances, but you can set this value higher in case you need more in the future).
## Step 2. Clone and configure the code project
1. You can use [git](https://git-scm.com/downloads) to clone the source code. Or you can [download a ZIP file of the code](https://github.com/TencentCloud/trtc-education-electron). Git clone command is showing below:
```
git clone https://github.com/TencentCloud/trtc-education-electron.git
cd trtc-education-electron
```
2. Find and open `src/main/config/generateUserSig.js`.
3. Set the parameters required to generate `UserSig`:
- SDKAPPID: 0 by default. Set it to the `SDKAppID` obtained in step 1.
- SECRETKEY: An empty string by default. Set it to the key obtained in step 1.
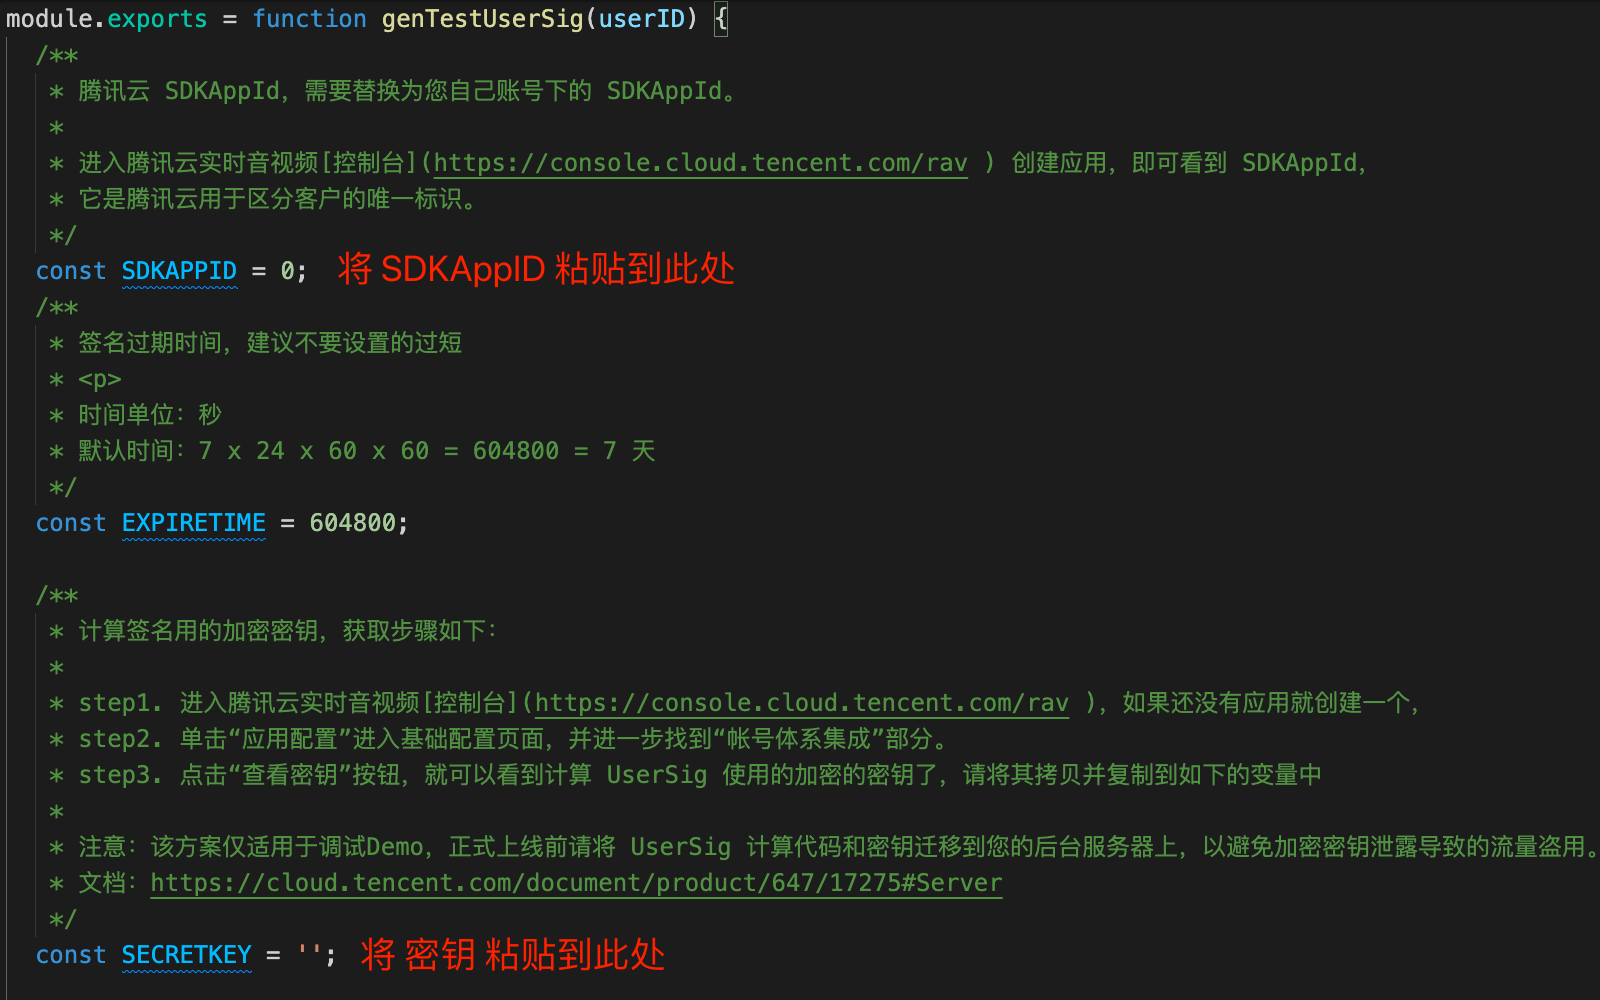
> Notes:
> The above two parameters are used to generate a user signature (UserSig) for user authentication during TRTC operations.
>
> This method to obtain UserSig is to configure a SECRETKEY in the client code. In this method, the SECRETKEY is vulnerable to decompilation and reverse engineering. Once your SECRETKEY is leaked, attackers can steal your Tencent Cloud traffic. Therefore, **this method is only suitable for locally running a demo project and feature debugging**.
>
> The correct `UserSig` distribution method is to integrate the calculation code of `UserSig` into your server and provide an application-oriented API. When `UserSig` is needed, your application can send a request to the business server for a dynamic `UserSig`. For more information, see [How do I calculate `UserSig` during production?](https://intl.cloud.tencent.com/document/product/647/35166).
## Step 3. Run the code
1. Run in development mode
Open `trtc-education-electron` in a terminal and run the following command:
```
yarn
yarn start
```
> Note:
>
> On Windows 10 or 11, when you run the Yarn command for the first time to install dependencies, if an error occurs because of insufficient permissions, run the command as administrator in the Command Prompt first. After that, you can run the command as an ordinary user in the Command Prompt or a terminal of your code editor such as Visual Studio Code or WebStorm.
>
> During installation of dependencies, if you encounter problems such as slow Electron download or failure, you can troubleshoot them as instructed in [FAQs About Electron](https://cloud.tencent.com/developer/article/1616668).
2. Create an installer and run it
Open `trtc-education-electron` in a terminal and run the command below to create an installer. After it is created, find the installer in `trtc-education-electron/build/release`, and then install and run it.
- Create single CPU architecture(X64) installer for Windows or Mac OS
```
yarn package
```
- Creat dual CPU architecture(X64 and ARM64) installer for Mac OS. Only Electron version 11 and later supported.
```
yarn package:mac-universal
```
> Note: You need Mac PC to create a macOS installer and Windows PC to create a Windows installer.
## Step 4. Run and trial
> Tips: You'd better use two PCs to try and explore this application. Create a classroom as a teacher on one PC and enter the same classroom ID as a student on the other.
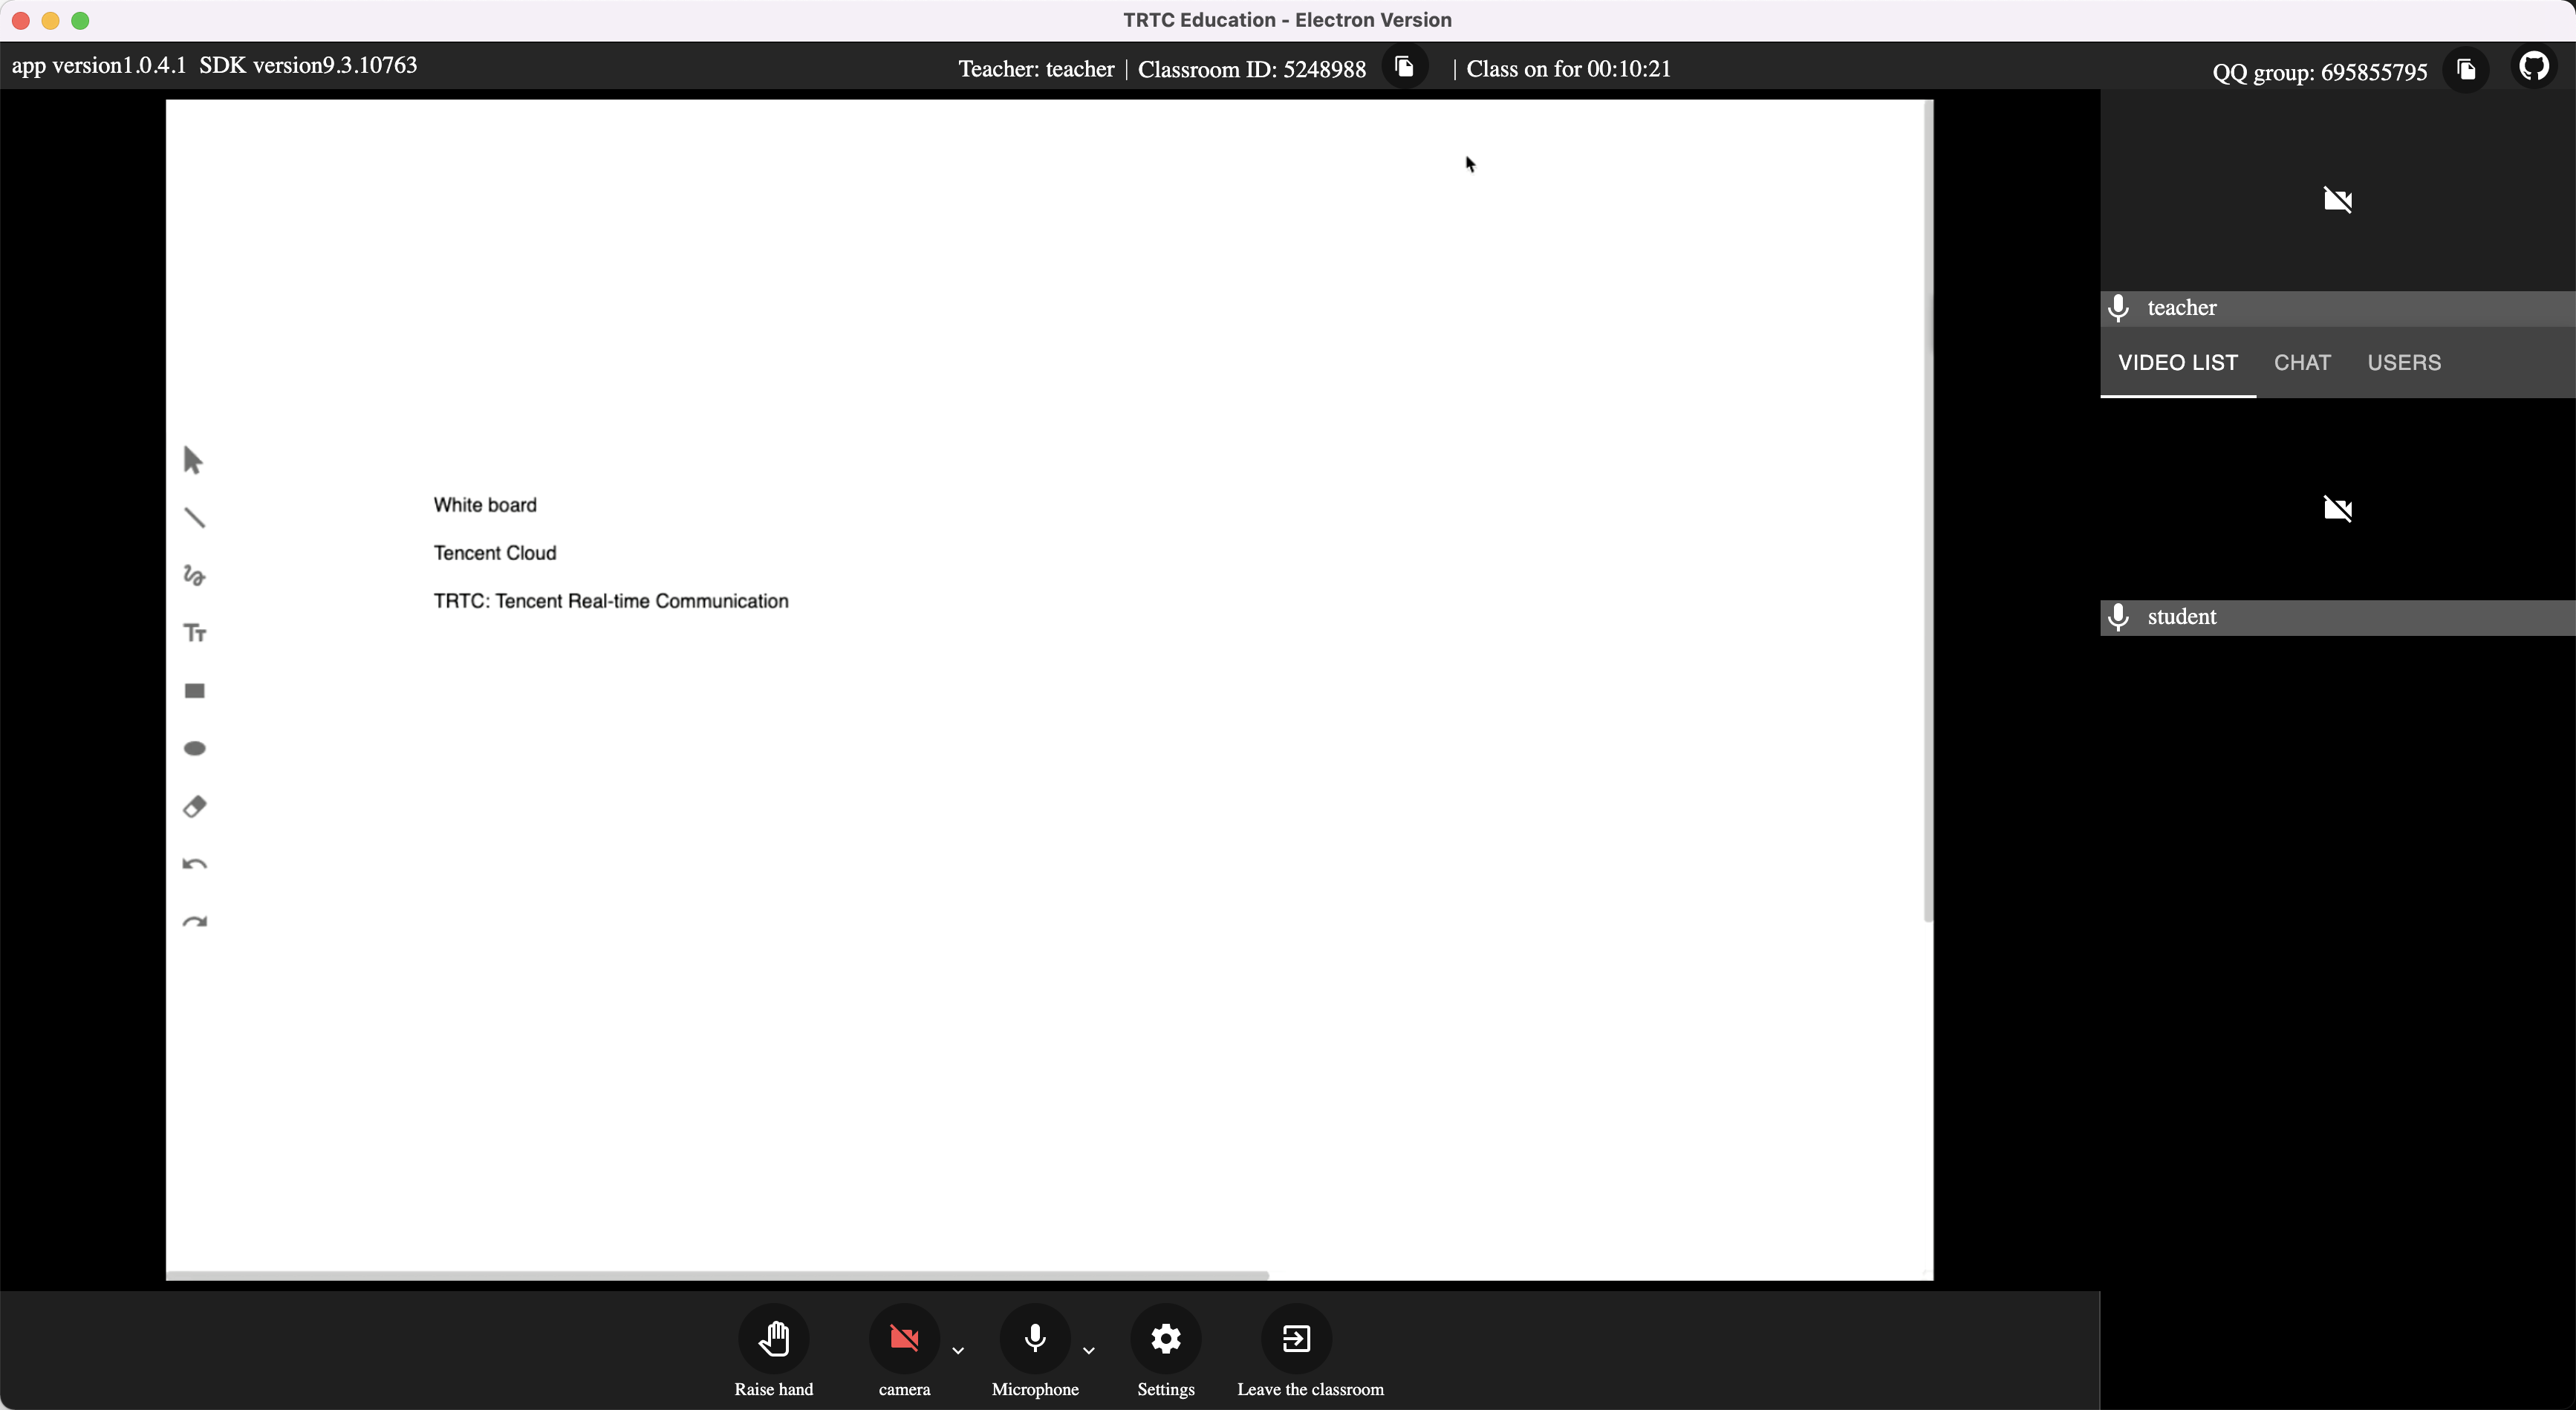
### Create a classroom as a teacher
1. Start the applicaiton, set "Name" as "**teacher**" and let "Classroom ID" as random generated or input a number you like. Then click "Create".
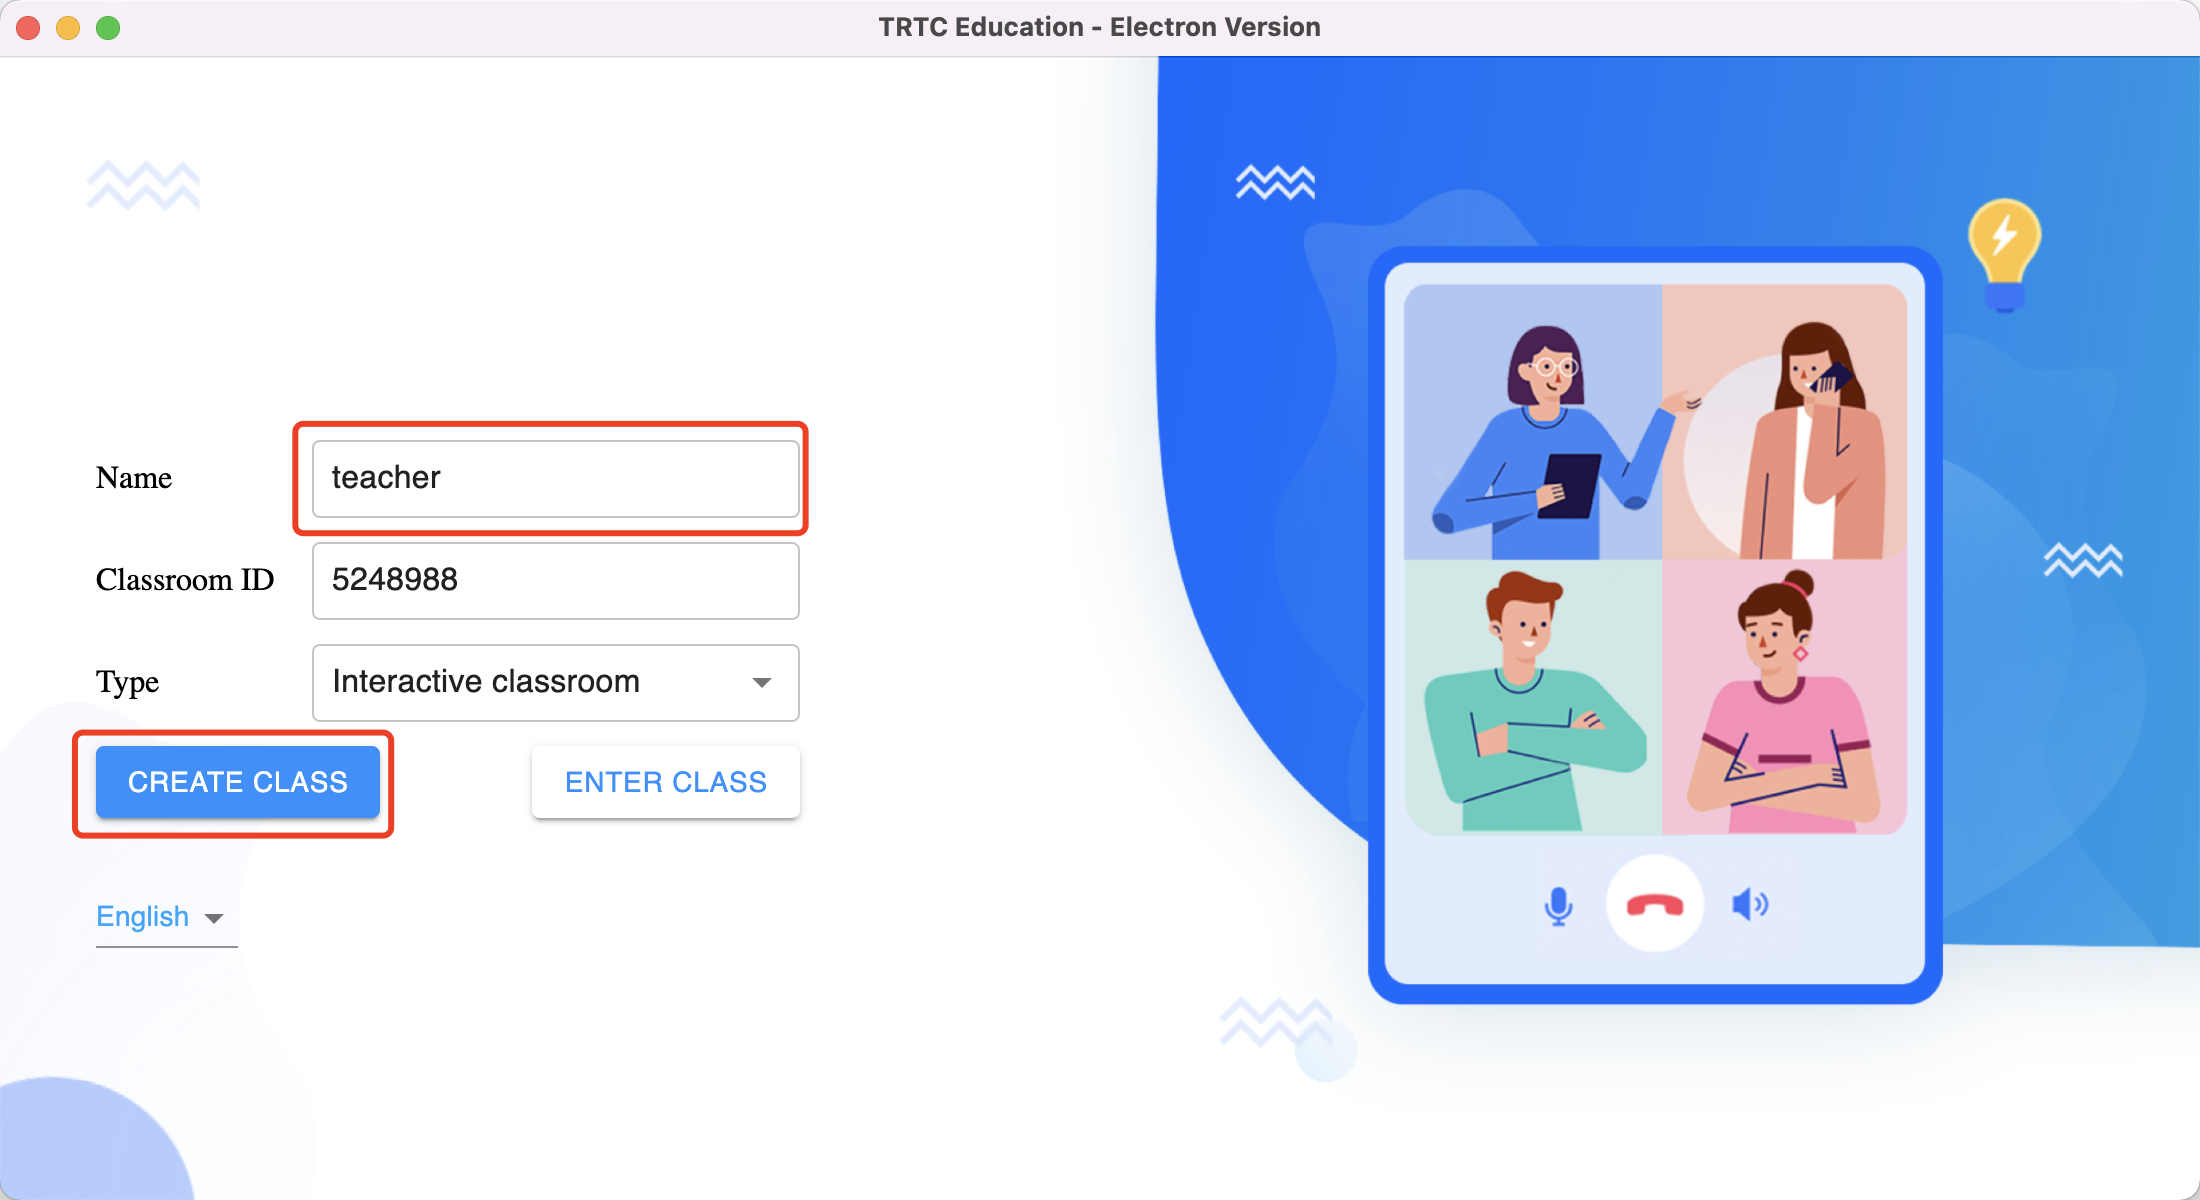
2. Then you will enter the classroom window of teacher view.

### Enter a classroom as a student
1. Start the applicaiton, set "Name" as "**student**" and set "Classroom ID" the same as teacher above. Then click "Enter".
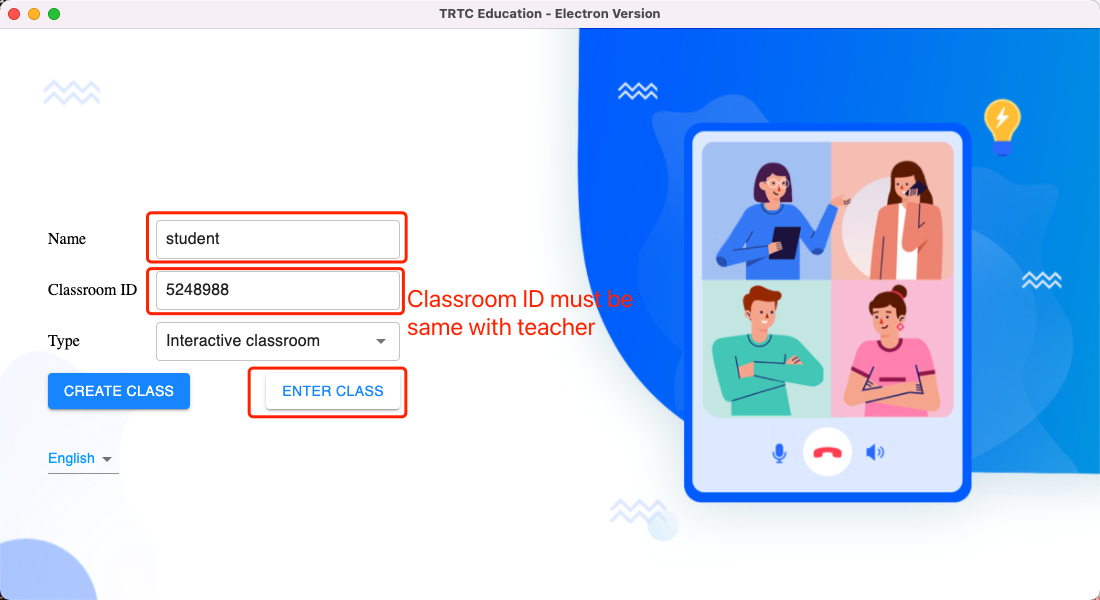
2. Then you will enter the classroom window of student view.
# FAQ
1. Download very slowly when execute 'yarn' command
You'd better choose a npm/yarn registry of your local provider to get better network performace. For user in china mainland, you can execute following command in Terminal:
```
yarn config set registry https://npmmirror.com/mirrors/
yarn config set ELECTRON_MIRROR https://npmmirror.com/mirrors/electron/
```
2. Install 3rd library failure for first time execute 'yarn'
On windows, you can open `cmd` in `Administrator Role` and execute for the first time. Later, you can use common cmd or IDE terminal to run 'yarn' command.
On Mac, you can open a 'Termnal' and execute the following command for the first time. You will be prompted to input the administrator password to start the command.
```
sudo yarn
```
3. Crashing when you 'create' or 'enter' the classroom on MacOS
Open `System Prerefenences`. Add `Camera`, `Microphone` and `Screen recording` device permissions to the IDE when you run the code in development mode. If you open the installed applicaiton, make sure add the above 3 device permissions to the installed application.
4. [FAQs at Tencent Cloud official website](https://intl.cloud.tencent.com/document/product/647/43093).
5. [FAQs in the Tencent Cloud developer forum](https://cloud.tencent.com/developer/article/1616668).
# Documentation
For documentation, see: https://intl.cloud.tencent.com/document/product/647/37278
# License
MIT